My Little World

learn and share


  • 首页

  • 分类

  • 标签

  • 归档

  • 关于
My Little World

高性能索引的创建及使用策略

发表于 2026-09-08

创建策略

索引在查询中的作用

一个索引就是一颗B+Tree,索引可以让我们的查询快速定位和扫描到我们需要的数据记录上,加快查询速度。

索引列的类型尽量小

1)定义表结构时一定会指定列类型,举例说:针对整数类型,就有很多选项:tinyint、smallint、int、bigint.。占用的存储空间是逐渐增加的。
2) 选择较小数据类型创建列的好处
•使用较小的数据类型,可以在查询时带来性能上的一些提升。
•较小的数据类型占用的索引存储空间比较少的,一个数据页就可以容纳更多的数据记录,从而減少磁盘/0性能的消耗。同时也意味着内存中,是可以有更多的数据页缓存,从而提高数据库的读写效率。
3)主键类型选择小类型非常重要
•主键值,不仅是在聚簇索引中存储,其他的二级索引的节点上也会存储主键值。选择较小的主键数据类型,可以节省存储空间,并且提高查询效率。

—>索引列类型尽量小好处

  1. 有利于提高查询效率
  2. 减少存储空间,一个是自身的存储空间,一个是作为主键在二级索引中的存储空间。

索引列的选择性尽量高

索引列的选择性是指在一个数据库表中,某个特定列的值的唯一性和多样性程度。
索引列的选择性衡量方式:选择性=不同值的数据量/总行数,选择性通常是介于0~1之间的值。

选择性高低的区别:
•选择性越高,表示该列中的值越多样化,就更加接近唯一。
•选择性越低,表示该列中重复值比较多。
选择性高的索引,可以让MySQL在查询时过滤掉更多的行。唯一性索引的选择性1,这是最好的索引选择性,性能也是最好的

1
2
-- 索引选择性计算方式
SELECT COUNT(DISTINCT ename) / COUNT(*) FROM emp;

前缀索引

对于不能直接使用全量值作为索引列的数据类型,比如字符串类型
通过选取不同的前n个数据作为索引内容,计算索引列的选择性后,选择索引列的选择性最高的n 值,作为最后进行索引的数据计算

针对于blob、text、很长的varchar类型,MySQL是不支持索引它们全部的长度,需要建立前缀索引.

1
2
-- 前缀索引的创建
alter table tablename add key index(column(n))

前缀索引的缺点:前缀索引是一种能使索引更小,更快的有效办法,但是它的缺点也很明显,MySQL中无法使用前缀索引做
order by、group by,也无法使用前缀索引进行索引覆盖。
前缀索引使用的注意事项:使用的是较短的前缀,可能会降低索引的选择性,影响查询效率。所以在使用前缀索引之前,需要仔
细考虑分析数据分布,确保前缀长度的选择是合适
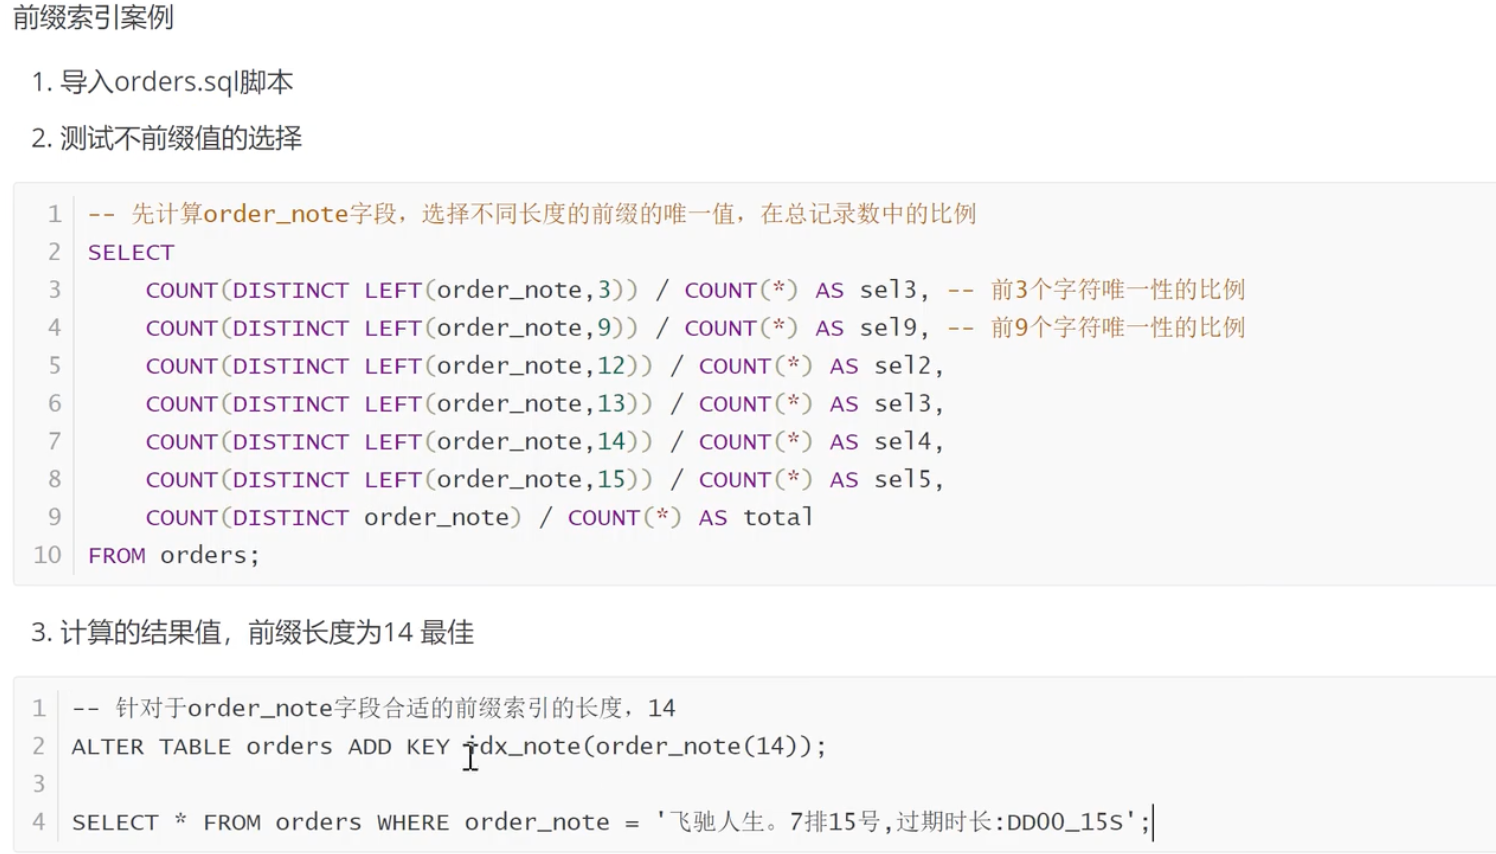
不同前缀长度的索引选择性:

sel3 sel9 sel12 sel13 sel14 sel15 total
0.0008 0.1717 0.7573 0.8673 0.9197 0.9592 0.9676

多列索引的创建原则

  1. 选择性最高的列放在最前面,因为选择性高的列通常可以更好的筛选数据,减少检索的数据量。
  2. 根据运行频率最高的查询,来调整索引的顺序。
  3. 覆盖查询需要的列,创建联合索引的时候,要注意这个联合索引是否是一个覆盖索引。可以避免在索引中和表中来回的跳转(回表)。
  4. 避免冗余索引:如果已经有了一个联合索引,再创建一个包含该索引一部分的索引是没有必要的。冗余索引会增加索引的维护成本。
  5. 权衡索引的长度:太长索引会占用更多的存储空间,同时也会降低索引检索效率。
  6. 避免使用过多列:只去选择那些在查询中被经常使用到的列。
  7. 只在查询条件中被经常使用,或者排序分组中经常使用的字段,去创建索引。

三星索引

针对查询而言,一个三星索引,可能是其最好的索引。

三星索引需要满足的条件

  1. 一星:索引将相关的记录放到了一起。
  2. 二星(排序星):索引中的数据顺序和查找中的排序顺序一致。
  3. 三星(宽索引星):索引中包含了所要查询的全部列的数据。

具体含义

  • 一星:如果一个查询相关的索引行是相邻的,或者相距比较近,那么需要扫描的索引片的宽度就会缩短。一星要求让索引片尽量变窄,也就是索引的扫描范围越小越好。
  • 二星(排序星):当查询需要排序时,使用的索引本身是有序的,就可以不用再去额外排序了。
  • 三星(宽索引星):如果索引中包含了所要查询的全部列的数据,就是一个覆盖索引,查询不需要回表,减少了 I/O 的次数。

案例一:完全满足三星要求

1
2
3
4
5
6
7
8
9
10
11
12
13
14
15
16
17
18

--- 建表语句
CREATE TABLE customer(
number INT,
username VARCHAR(10),
nicename VARCHAR(10),
sex INT,
city VARCHAR(10)
);

CREATE INDEX idx_cun ON customer(city, username, nicename);

---- 查询语句

SELECT username, city
FROM customer
WHERE city = '北京' AND username = 'lisi'
ORDER BY city;

—- 评估该索引满足几颗星

  • 第一颗星:✅ 满足。city、username 作为索引前列,能有效减少索引片大小,减少需要扫描的行数。
  • 第二颗星:✅ 满足。ORDER BY city,而 city 字段在组合索引的最左侧,本身已经排好序。
  • 第三颗星:✅ 满足。SELECT 查询的 username 和 city 字段都在联合索引中,无需回表。

案例二:评估现有索引(满足二颗星)

1
2
3
4
5
6
7
8
9
10
11
12
13
14
15
16
17
18
19
--- 建表语句
CREATE TABLE customer2(
id INT(11) NOT NULL AUTO_INCREMENT,
user_name VARCHAR(100) DEFAULT NULL,
sex INT(11) DEFAULT NULL,
age INT(11) DEFAULT NULL,
c_date DATETIME DEFAULT NULL,
PRIMARY KEY (id)
);

SELECT
user_name,
sex,
age
FROM customer2
WHERE user_name LIKE '大%' AND sex = 1
ORDER BY age;

CREATE INDEX idx_usa ON customer2(user_name, sex, age);

评估结果

  • 第一颗星:✅ 满足
  • 第二颗星:❌ 不满足。因为查询语句中使用 age 进行排序,而 user_name 采用了范围匹配,导致 age 无法保证有序。
  • 第三颗星:✅ 满足

结论:修改后满足 1、3 星。

为满足第二颗星重新设计索引, 优化后的索引

1
CREATE INDEX idx_sau ON customer2(sex, age, user_name);

重新评估

  • 第一颗星:❌ 不满足。sex 字段的选择性低,字段值重复率高,无法有效缩小索引片。
  • 第二颗星:✅ 满足。在 sex 等值条件下,age 是有序的。
  • 第三颗星:✅ 满足。

结论:修改后满足 2、3 星。

总结

同时满足三星的情况是比较少的。所以在设计索引的时候,尽可能满足两颗星就已经是不错的选择了。

使用策略

最佳左前缀法则

使用索引时,where后面的条件需要从索引的最左前列开始,并且不能够跳过索引中的列使用。创建的是联合索引,在使用时要遵守该法则
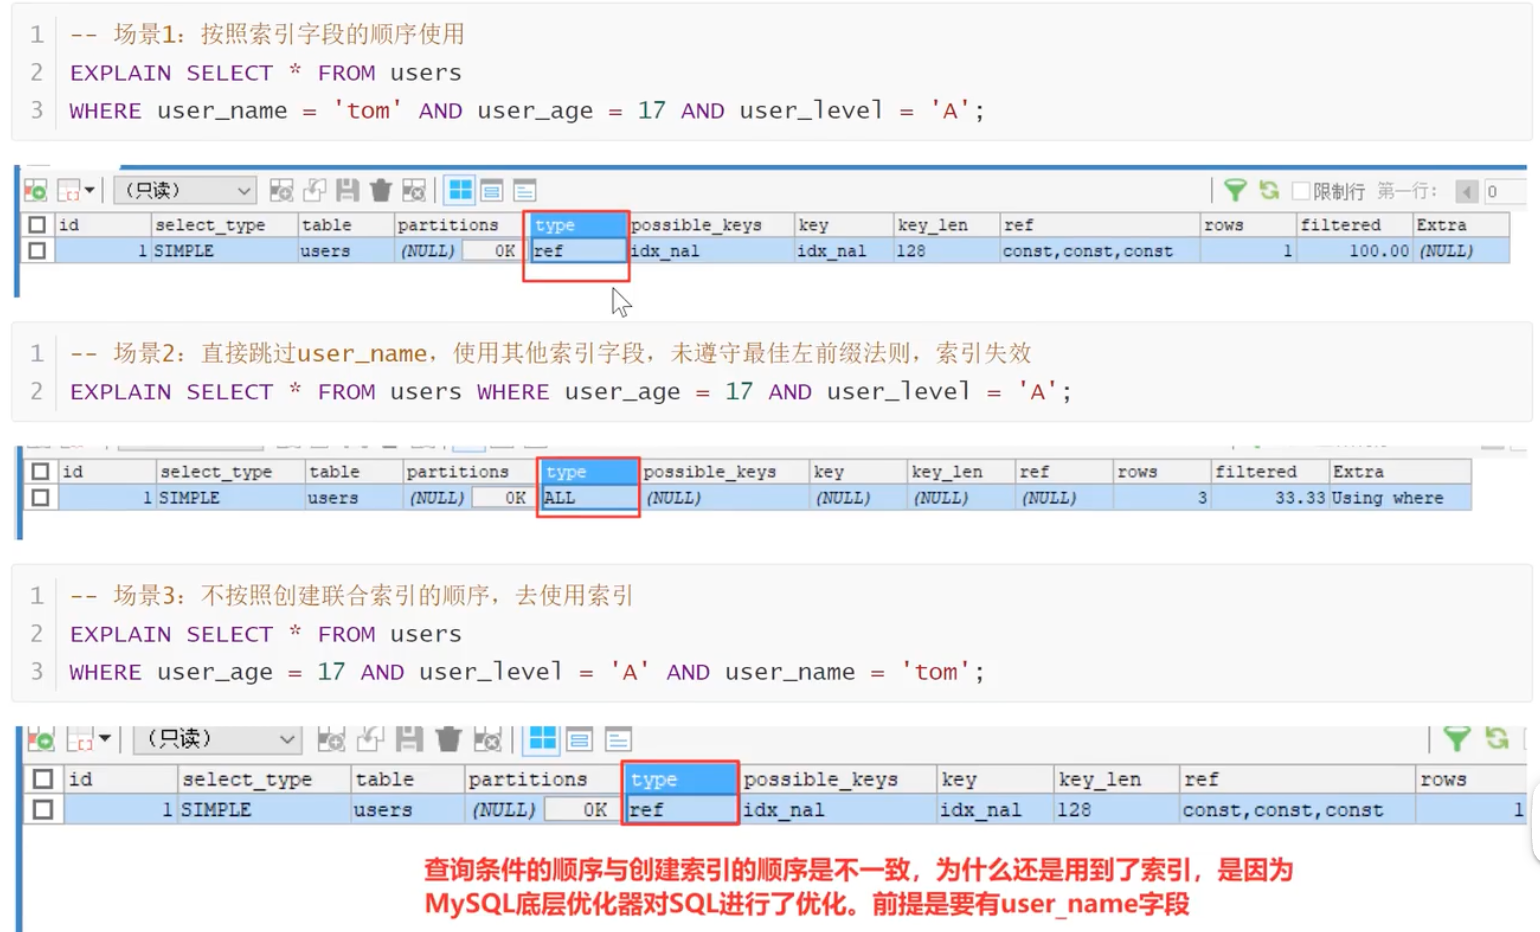
原理
MYSQL在创建联合索引时的规则是:首先会对联合索引最左边的字段进行排序(例子中user_name),在第一个字段的基础之上,再对第二个字段进行排序
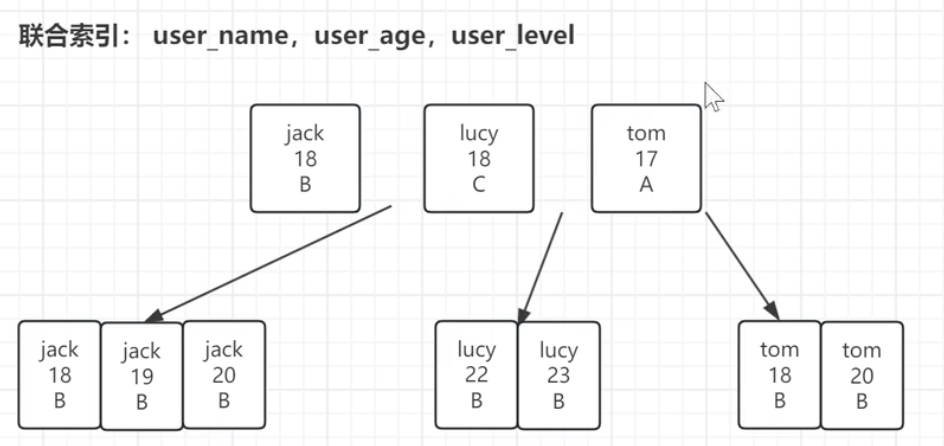
最佳左前缀原则其实是和B+树的结构有关系,最左字段肯定是有序的,第二个字段则是无序的
联合索引的排序方式是:先按照第一个字段进行排序,如果第一个字段相等再根据第二个字段排序
所以如果直接使用第二个字段 user_age 通常是使用不到索引的

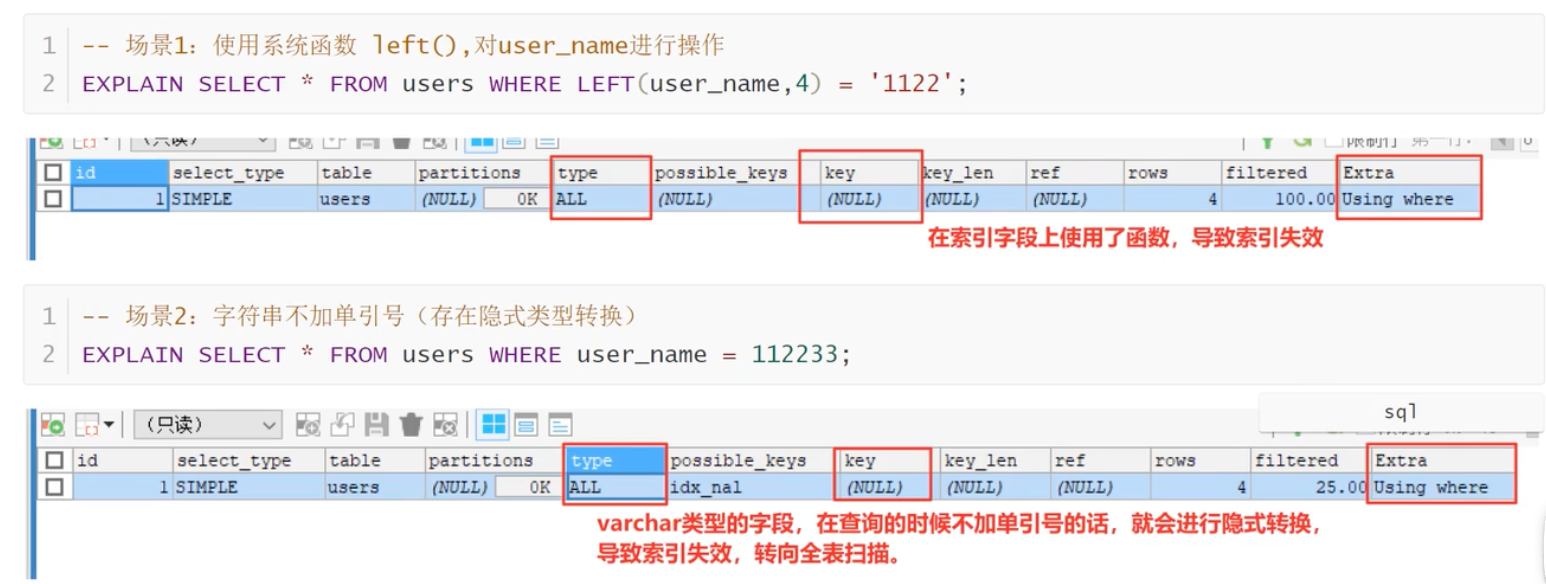
不要在索引列上做任何操作

不要在索引列上做任何操作,包括了比如计算、使用函数、自动的或者手动进行数据类型转换,都会导致索引的失效,从而使查询转向全表扫描。
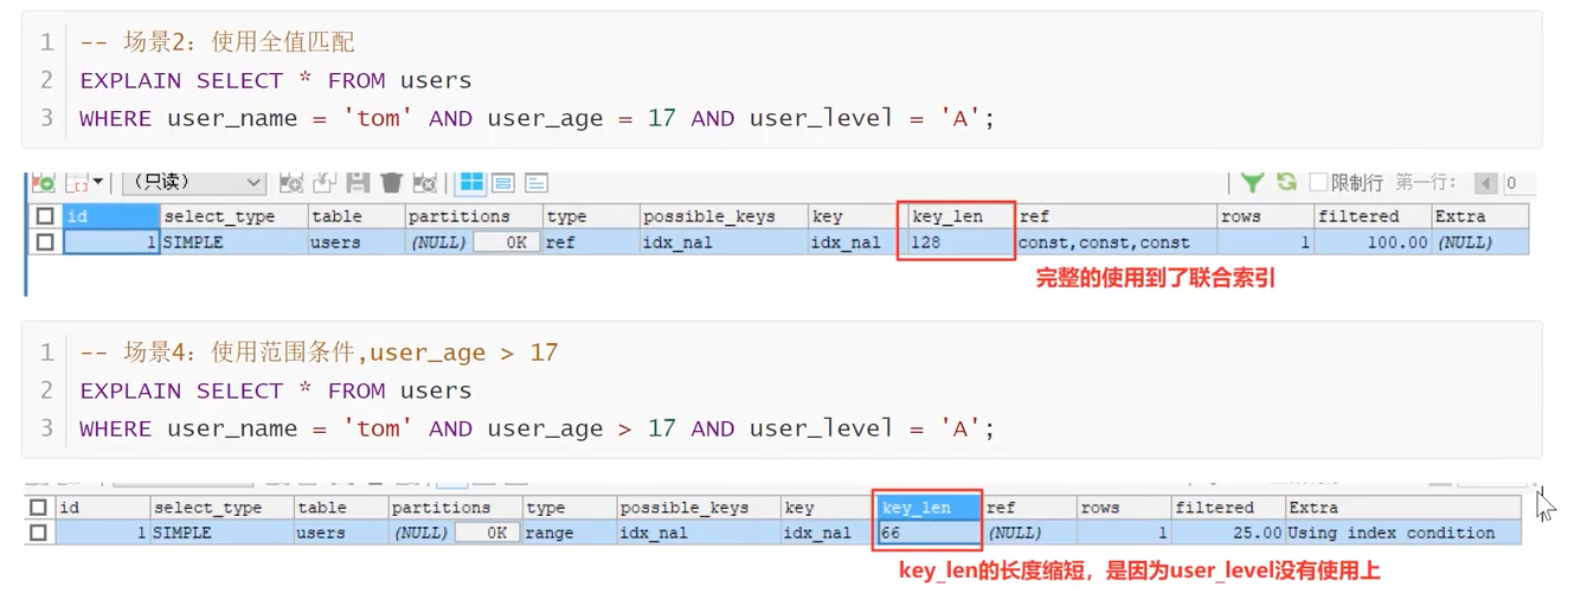
范围条件放最后

在编写查询语句的时候,where条件中如果有范围条件,并且范围条件之后还有其他过滤条件的话,那么范围条件之后的列就都将会索引失效
like 查询注意事项

like查询以%开头的话,就会使索引失效,%出现在左边索引失效,%出现在右边索引正常使用。
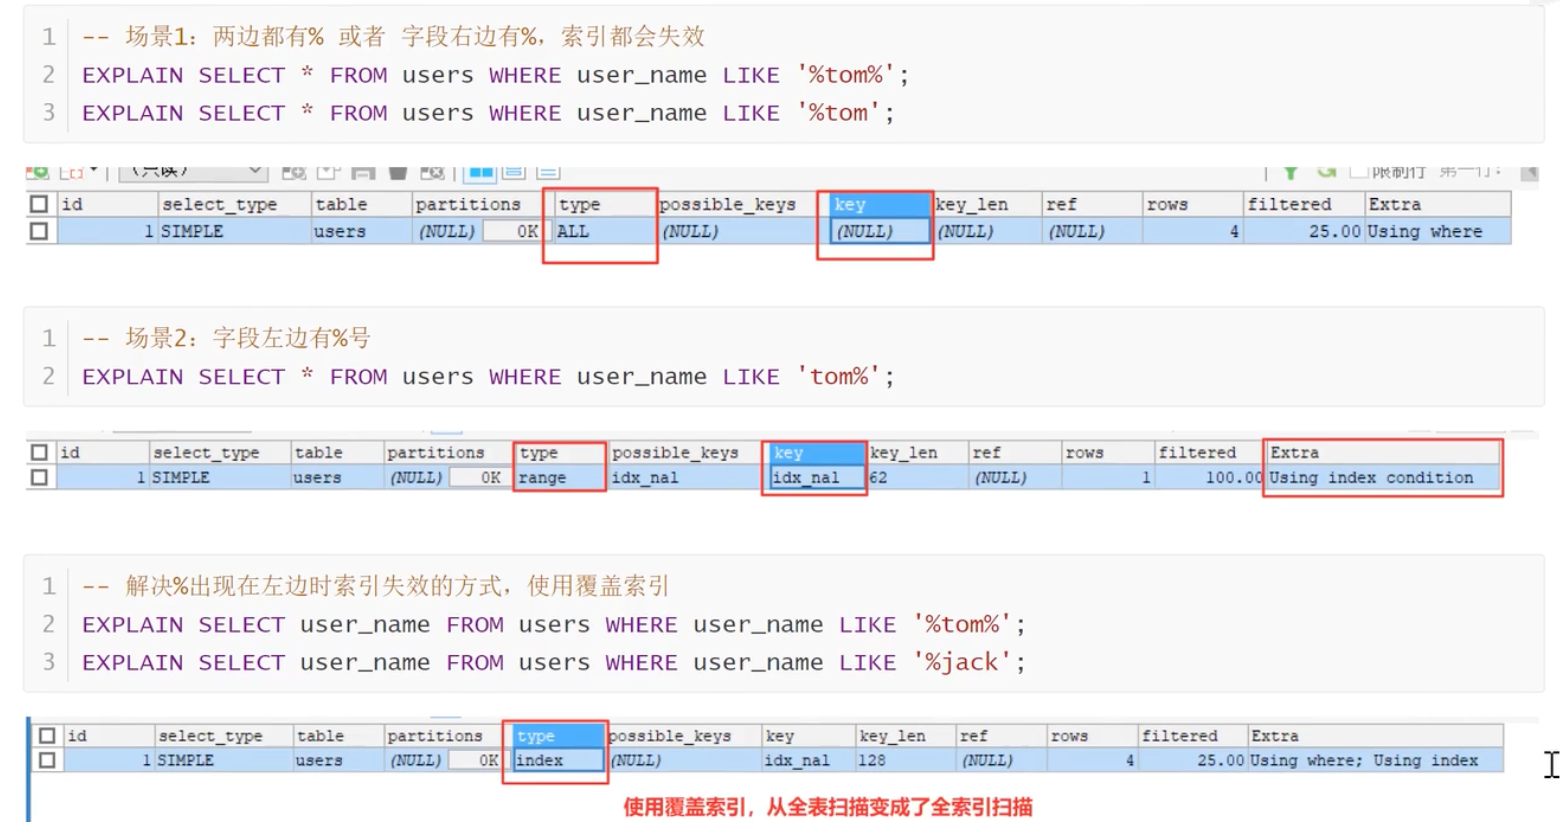
like % 在关键字左边导致索引失效原因

  1. %在右边:有B+树的索引顺序,按照首字母的大小进行排序,%如果是在右,匹配的是首字母。所以可以在B+树上进行有序查找,查找首字母符合要去的数据。
  2. %在左边:匹配的是字符串尾部的数据,尾部的字母是没有顺序的,所以无法按照索引顺序查询,索引失效。
  3. 两个%:查询任意位置的字母满足条件就可以。与%在左的问题一样只有首字母有序,其他位置的字母是无序的,所以索引失效。

null值注意事项

避免使用 is null、is not null、!= 、or
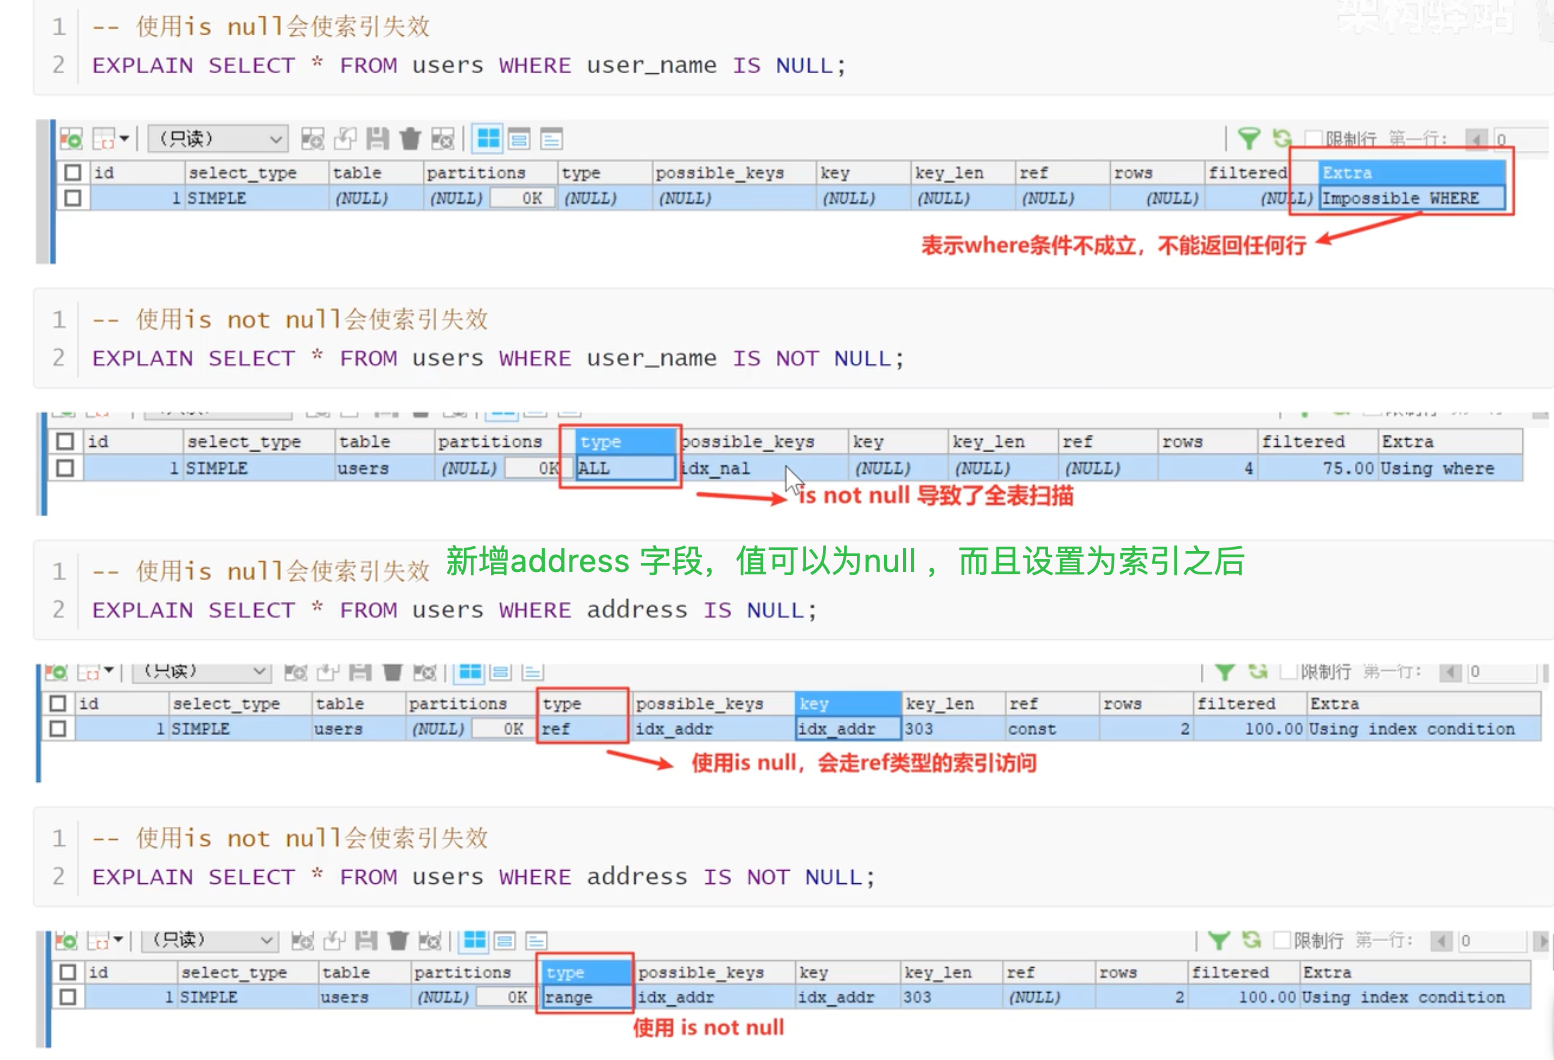

关于null值的说明可能有以下三种情况
1)定义1:null值代表着一个未确定的值,MySQL认为任何和nul值进行比较的表达式的结果都为null。所以认为每一个null值都
是独一无二。(nulls_unequal)
2)定义2:null值在业务上就是代表没有,所有的null 就被算作是一份。(null_equal)
3)定义3:null值完全没有意义,在统计的时候就不要算进来了 (nulls_ignored)

假设:一个表中的某个列c1列,记录分别为(2,1000,null,null),第一种情况表中根据c1统计的记录数为4.
第二种表中的c1的记录数为3,第三种表中c1的记录数为2

在MySQL5.7.2版本之后,MySQL将这个值写死为nulls_equal。总的来说对于列的声明,尽可能的不要允许为null!
My Little World

MySql explain 性能分析

发表于 2026-09-08

explain 可以模拟优化器执行sql 语句,从而分析sql语句处理过程,得到sql语句或者表结构性能瓶颈

MySQL架构体系

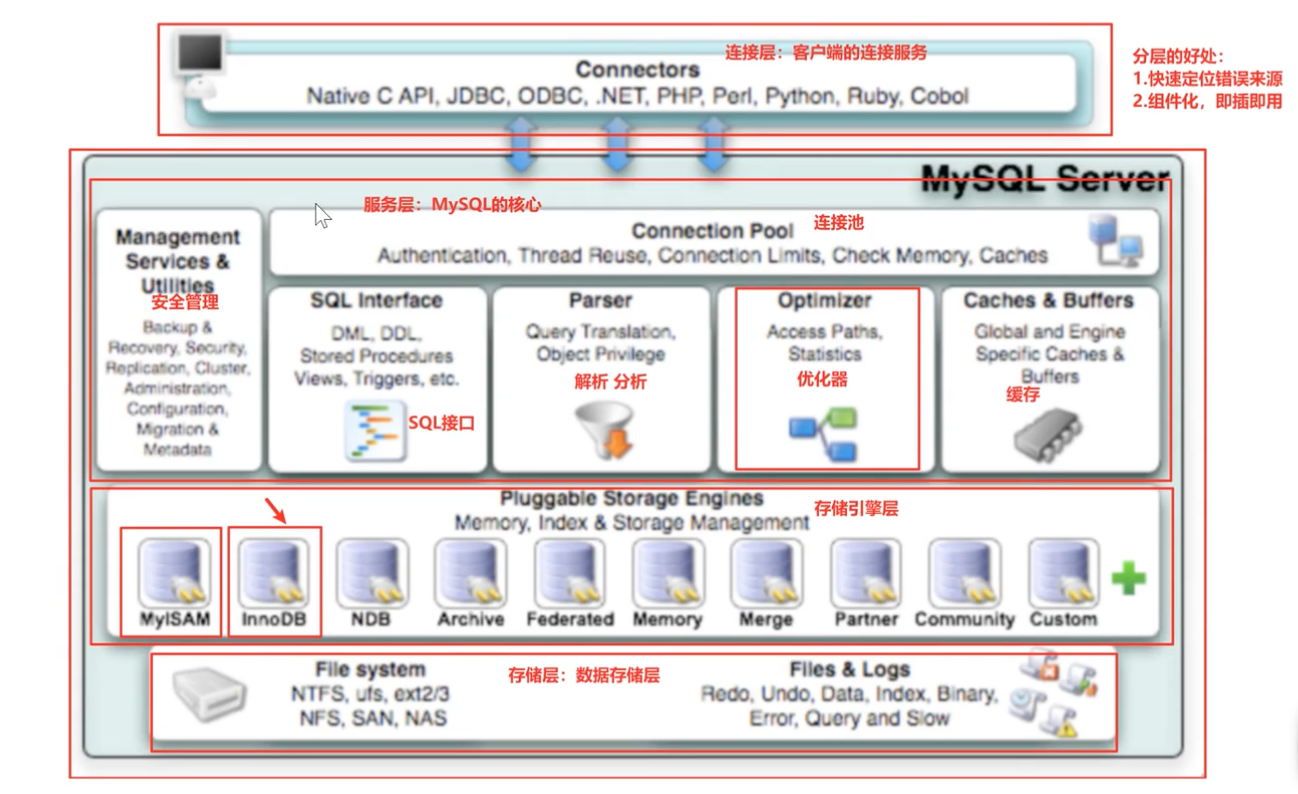
MySQL是由连接池、SQL接口、解析器、优化器、缓存、存储引擎、文件系统组成的,可以分为四层:
• 连接层
• 服务层
• 引擎层
• 文件系统层

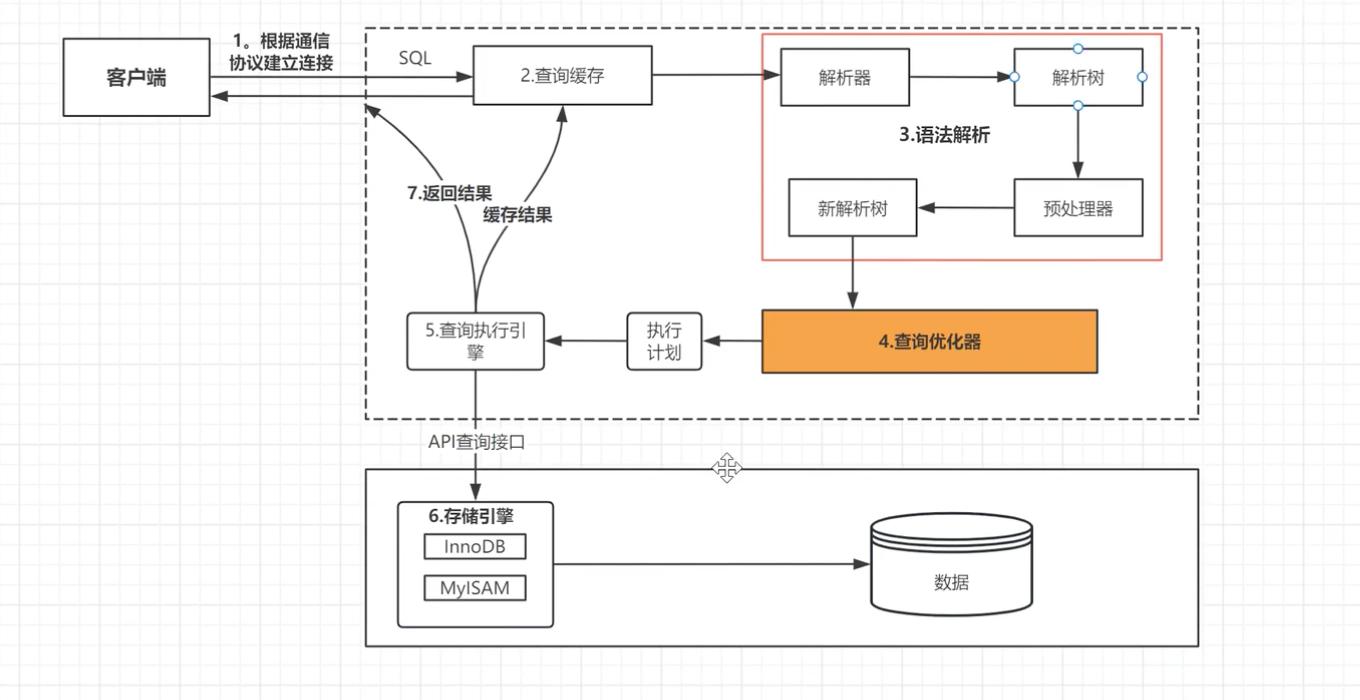
MYSQL 查询过程

主要字段

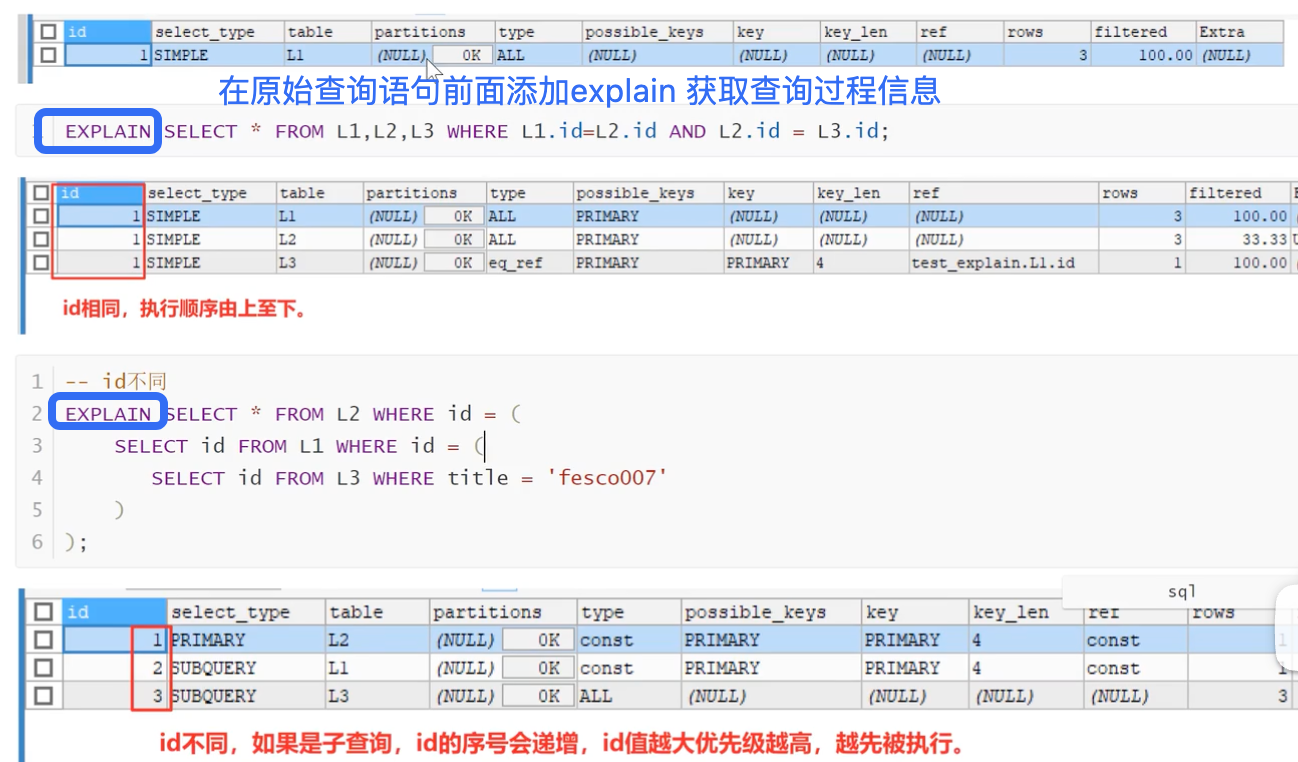
id字段

1
2
3
4
5
6
7
8
9
10
11
12
13
14
--创建数据库
CREATE DATABASE test_explain CHARACTER SET 'utf8';

--创建表
CREATE TABLE LICTd INT PRIMARY KEY AUTO_INCREMENT, title VARCHAR(100));
CREATE TABLE L2C1d INT PRIMARY KEY AUTO_INCREMENT, title VARCHAR(100));
CREATE TABLE L3(id INT PRIMARY KEY AUTO_INCREMENT, title VARCHAR(100));
CREATE TABLE L4Cid INT PRIMARY KEY AUTO_INCREMENT, title VARCHAR(100));

-- 每张表插入3条数据
INSERT INTO LI(title) VALUES('fesco001'), ('fesco002'), ('fesco003');
INSERT INTO L2(title) VALUES ('fesco004'), ('fesco005'), ('fesco006');
INSERT INTO L3(title) VALUES('fesco007'),('fesco008'), ('fesco009');
INSERT INTO L4(title) VALUES('fesco010'), ('fesco011'),C'fesco012');

id字段表示的是查询的序列号,包含一组数字,表示查询中执行子句或者操作表的顺序

select_type字段

  • table:表名
  • select_type:表示【查询类型】,主要用于区别普通查询、联合查询、子查询等等复杂查询。

1. simple

1
2
-- simple
EXPLAIN SELECT * FROM L1 WHERE id = 1;

simple 表示简单的 select 查询,查询中不包含子查询和 UNION。

2. primary / subquery(复杂查询)

1
2
3
4
5
6
-- 复杂查询
EXPLAIN SELECT * FROM L2 WHERE id = (
SELECT id FROM L1 WHERE id = (
SELECT id FROM L3 WHERE title = 'fesco008'
)
);

  • primary:查询中如果包含任何复杂的子部分,最外层查询将会被标记为 primary
  • subquery:在 select 或者 where 列表中包含的子查询

3. union / derived / union result(合并查询)

1
2
-- 合并查询 注意UNION连接L3和L4,L3被标记为derived,L4被标记为union
EXPLAIN SELECT * FROM (SELECT * FROM L3 UNION SELECT * FROM L4) a;

  • union:union 连接的两个 select 查询,除了第一个查询被标记为 derived,第二个及以后的表的 select_type 都是 union
  • derived:在 from 列表中包含的子查询被标记为 derived(派生表)
  • union result:union 的结果

type字段

type字段显示的是连接类型,type描述了找到所需要的数据,所使用的【扫描方式】,是一个非常重要的指标。

– 完整的连接类型比较多
system > const > eq_ref > ref > fulltext > ref_or_null > index_merge > unique_subquery >
index_subquery > range > index > ALL
– 简化之后,我们可以只关注一下几种
system > const > eq_ref > ref > range > index > ALL

一般来说,需要保证查询至少到 range 级别,最好是能到 ref,否则就证明我们的 SQL 需要进行优化调整。

type 字段值的含义:

  1. system:表中就仅仅只有一行数据的时候,比较少见。
  2. const:const 表示命中的是主键索引或者是唯一索引,表示通过索引一次就获取到对应的数据记录。
1
EXPLAIN SELECT * FROM L1 WHERE id = 3;

主键索引等值查询,type 为 const。

1
2
3
-- 为L1表添加唯一索引
ALTER TABLE L1 ADD UNIQUE(title);
EXPLAIN SELECT * FROM L1 WHERE title = 'fesco003';

唯一索引等值查询,type 同样为 const,Extra 为 Using index。

  1. eq_ref:对于前一个表中的每一行,后表只有一行被扫描。只有当连表使用索引的部分都是主键或者唯一非空索引时,才会出现。
1
2
3
4
5
6
7
8
9
10
11
12
13
14
15
16
17
18
19
20
21
22
23
24
-- 准备测试数据
create table user (
id int primary key,
name varchar(20)
)engine=innodb;

insert into user values(1,'ar414');
insert into user values(2,'zhangsan');
insert into user values(3,'lisi');
insert into user values(4,'wangwu');

create table user_balance (
uid int primary key,
balance int
)engine=innodb;

insert into user_balance values(1,100);
insert into user_balance values(2,200);
insert into user_balance values(3,300);
insert into user_balance values(4,400);
insert into user_balance values(5,500);

-- eq_ref:两表通过主键关联查询
EXPLAIN SELECT * FROM user u LEFT JOIN user_balance ub ON u.id = ub.uid;

user 表(u)type 为 ALL,全表扫描 4 行;user_balance 表(ub)通过主键关联,type 为 eq_ref,key 为 PRIMARY,ref 为 test_explain.u.id,对 user 表的每一行只在 user_balance 中扫描一行。

  1. ref:使用了普通索引(非唯一性索引),对于前表的每一行,后表有可能有多于一行的数据被扫描,会返回所有匹配某个单独值的行。

  1. range:索引上的范围查询,检索给定范围的行。between、in函数、>、<都是范围查询
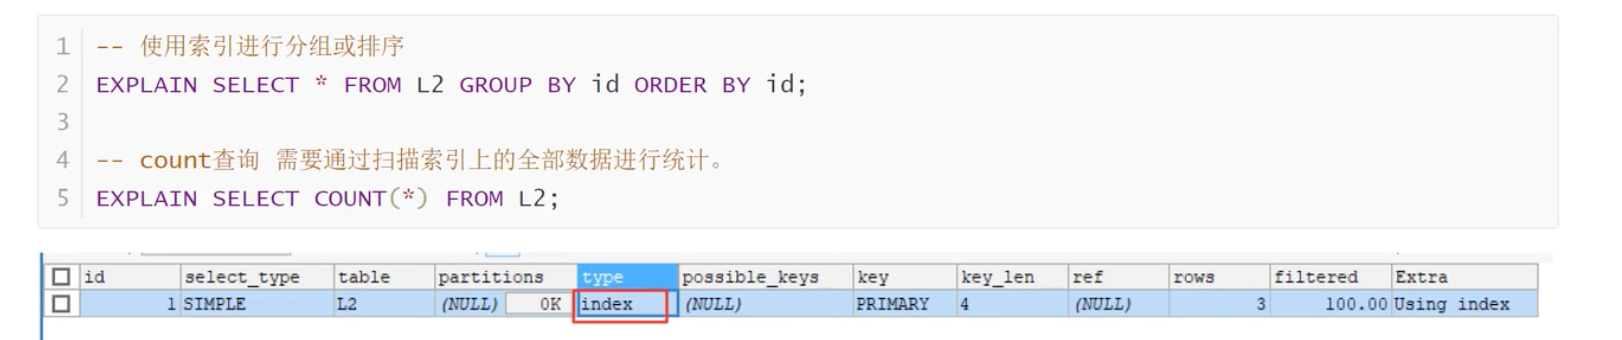
  2. index:出现index 表示SQL使用了索引,但是没有通过索引进行过滤。需要扫描索引上的全部数据。
  3. ALL:全表扫描,没有使用索引。

type类型总结:
• system:不进行磁盘I0,查询系统表,仅仅返回一条数据
• const:查找主键索引,最多返回1或者0条数据。属于精确查找
• eq_ref:查找唯一索引,返回数据最多1条,属于精确查找
• ref:查找非唯一性索引,返回匹配某一条数据的多行记录,属于精确查找。
• range: 查找某个索引的部分索引,只检索给定范围的行级,属于范围查找。
• index:查找所有的索引树,比ALL快一些。
• ALL:不使用任何索引,直接全表扫描

possible_keys 与 key说明

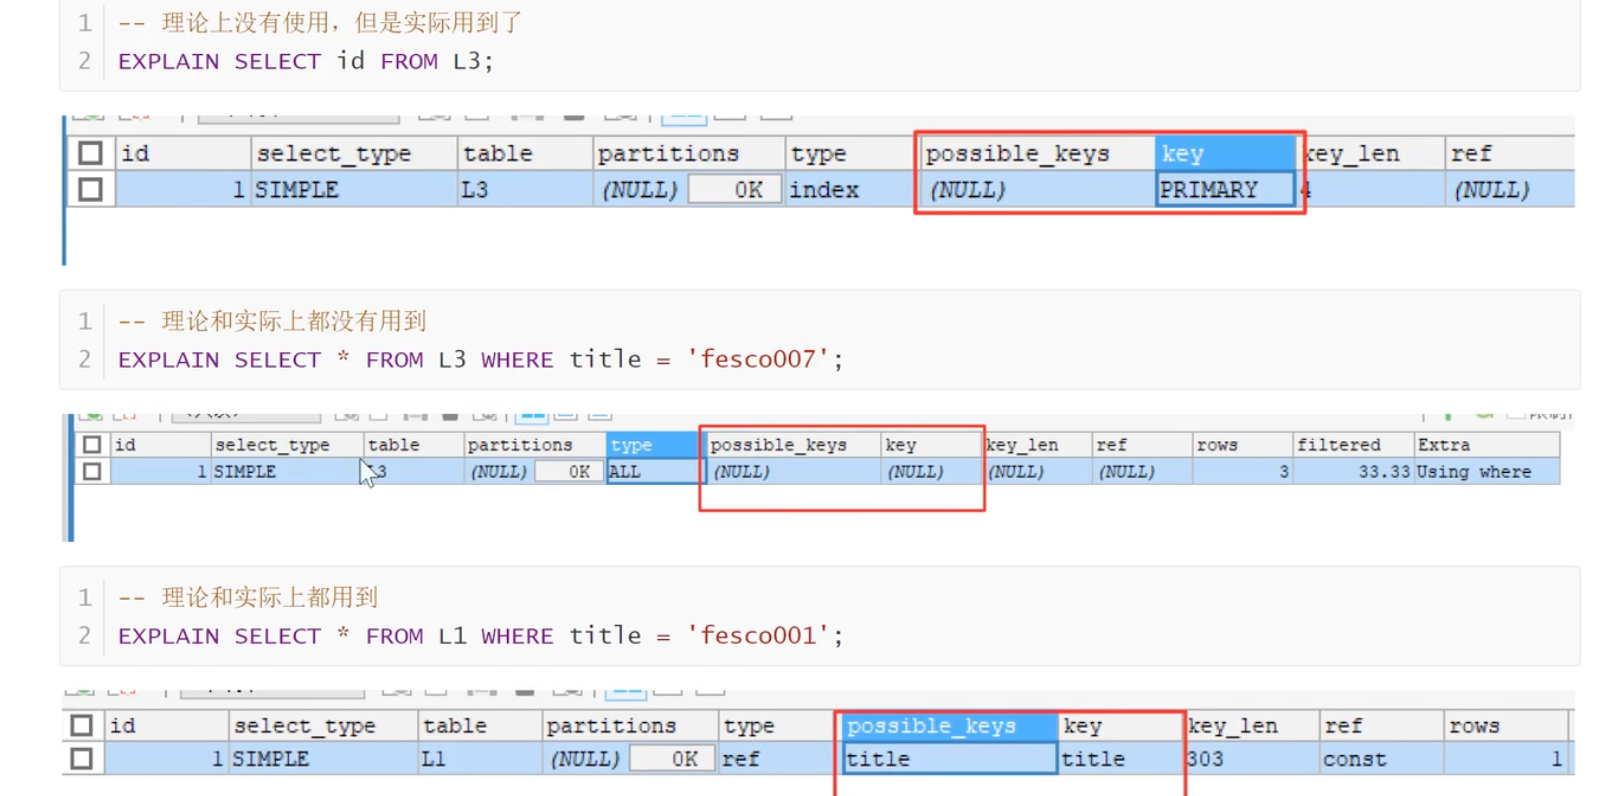
  • possible_keys:显示可能应用到这张表上的索引,一个或者多个,查询涉及到的字段上如果存在索引,该索引将会被列出,但是实际查询不一定用到。
  • key:实际使用的索引,若为null,则表示没有用到索引。两种可能
  1. 没有建立索引
  2. 建立索引,但是索引失效
    查询中使用了覆盖索引,该索引只会出现在key列表中

    key_len字段

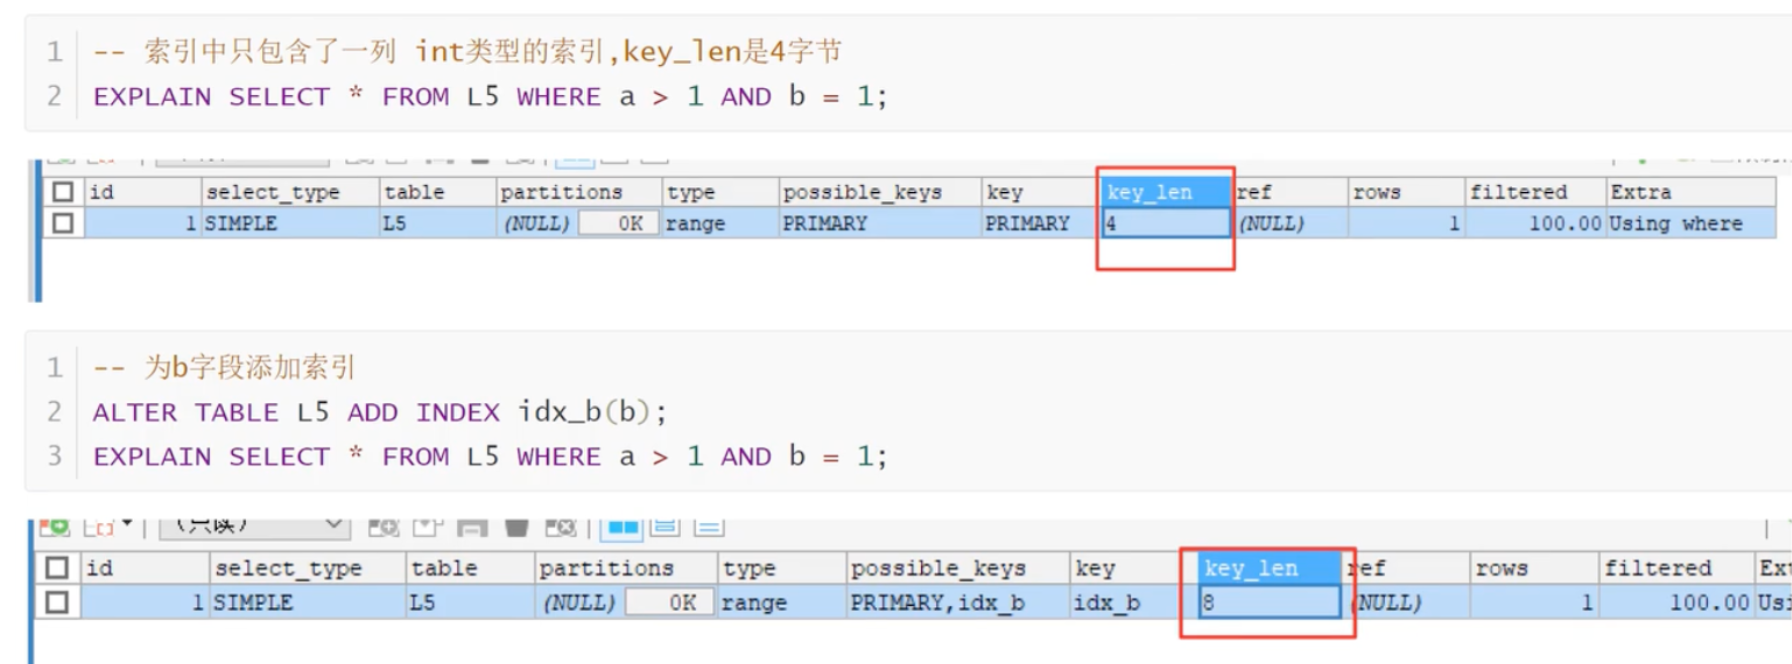
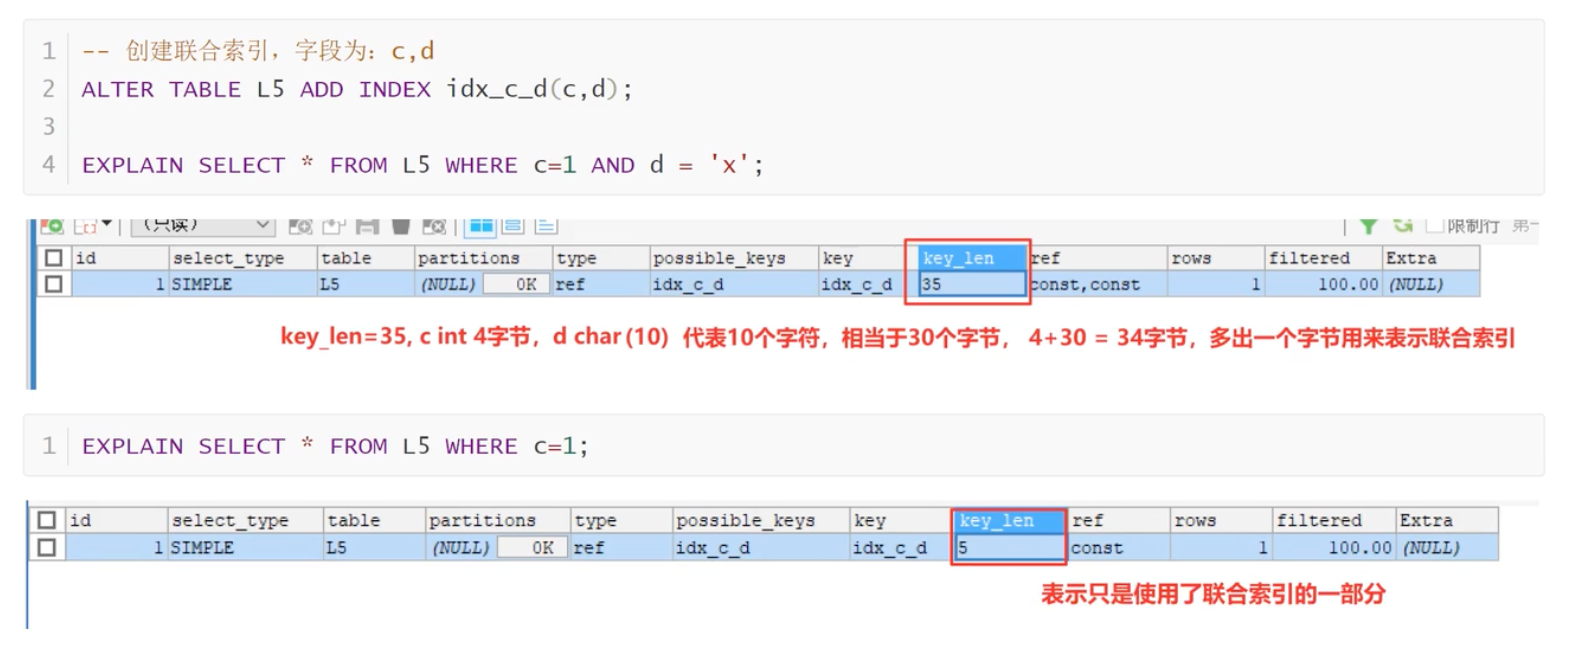
key_len:表示索引中使用的字节数,可以通过该列计算查询中使用的索引的长度。
key_len字段能够帮助你检查是否充分的利用了索引,ken_len越长,说明索引利用的越充分

1
2
3
4
5
6
CREATE TABLE L5(
a INT PRIMARY KEY,
b INT NOT NULL,
C INT DEFAULT NULL,
d CHAR (10) NOT NULL
);


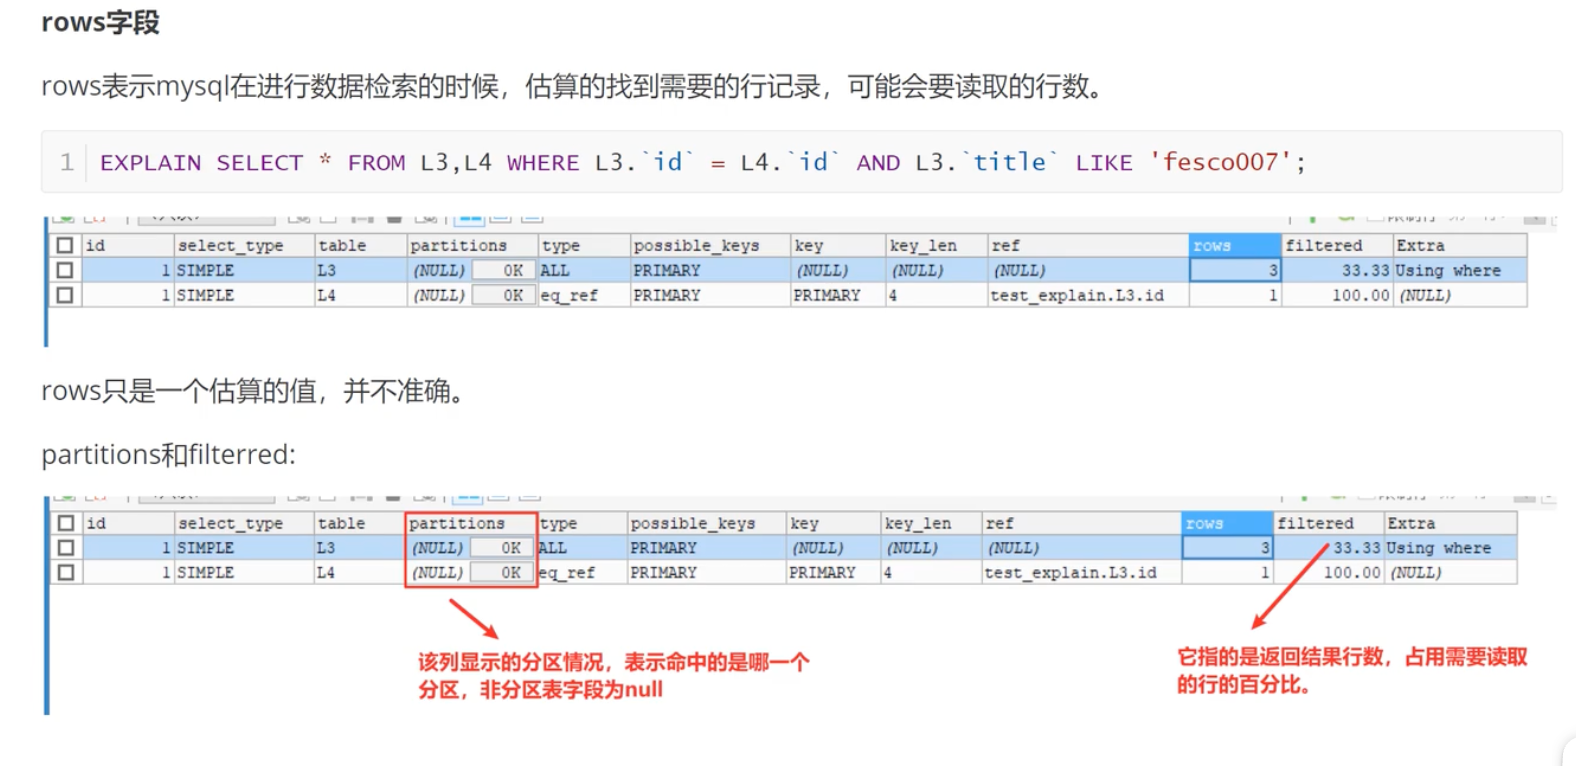
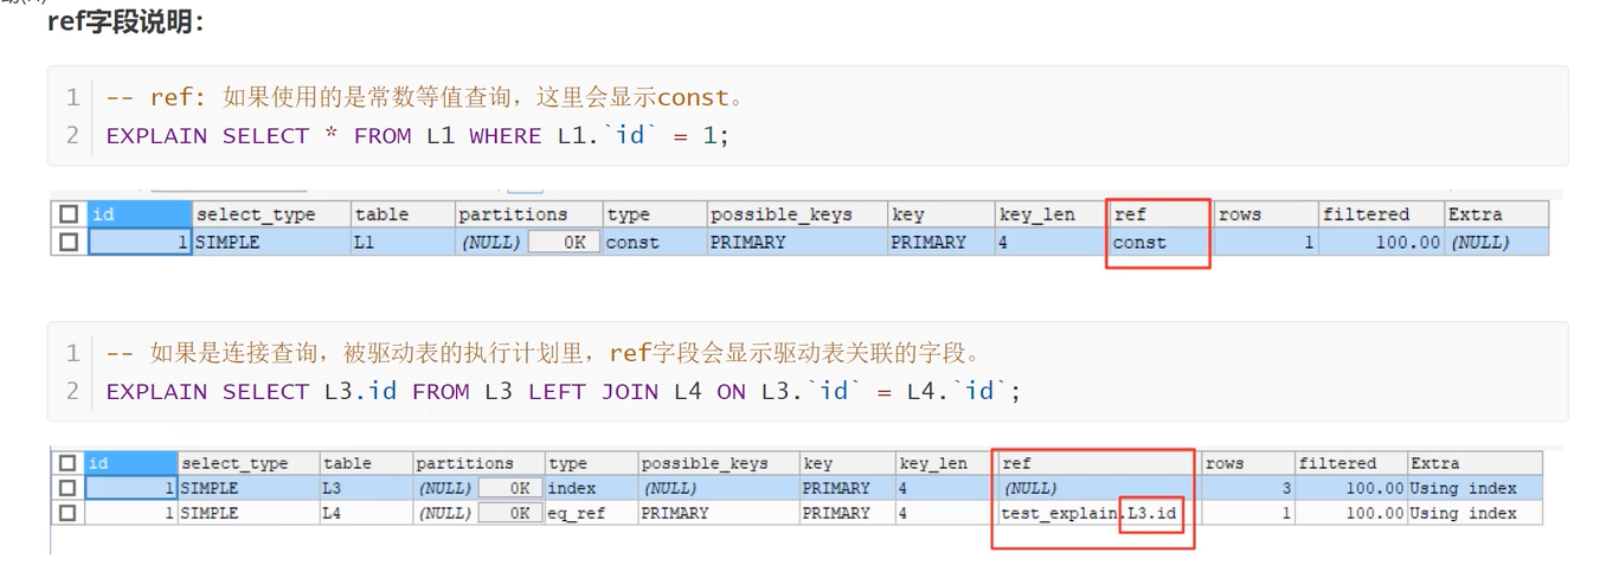
ref/rows/patition/filtered字段说明


分区/分表/分库

解决的层次不同、拆分粒度不同。可以按”从单机到分布式”的顺序来理解:分区 → 分表 → 分库,拆分力度依次增大。


一、分区(Partition)

层次:单库单表内部,逻辑上还是一张表。

做法:把一张表的数据,按某种规则(如范围、哈希、列表)拆成多个物理文件存放,但对应用来说仍然是一张表,SQL 不用改。

常见分区类型

类型 说明 举例
RANGE 分区 按范围 按年份分区:2023、2024、2025
LIST 分区 按枚举值 按地区:华北、华东、华南
HASH 分区 按哈希取模 HASH(id) % 4
KEY 分区 类似 HASH,用 MySQL 内部函数 —

特点

  • ✅ 应用无感知:SQL 不变,还是查同一张表。
  • ✅ 单库内解决:不涉及多库、多实例。
  • ❌ 仍受单机限制:数据量、连接数、磁盘 I/O 还是同一台机器。
  • ❌ 跨分区查询可能变慢:如果 WHERE 条件没带分区键,要扫描所有分区。

适用场景

单表数据量过大(如几千万到上亿),但还没到需要拆库的程度。


二、分表(Sharding / 分表)

层次:同一个库内,把一张表拆成多张独立的表。

做法:按规则把数据分散到 orders_0、orders_1、orders_2…… 多张表里。应用需要知道数据在哪张表,或者通过中间件路由。

常见拆分方式

方式 说明
水平分表 按行拆分,每张表结构相同,数据不同
垂直分表 按列拆分,把不常用或大字段拆到另一张表

特点

  • ✅ 突破单表数据量瓶颈:每张表数据变少,查询更快。
  • ✅ 仍在同一个库:事务、连接还在一起,相对简单。
  • ❌ 应用需要改:SQL 要改表名,或引入中间件。
  • ❌ 跨表查询麻烦:JOIN、ORDER BY、COUNT 等要合并结果。
  • ❌ 仍受单库限制:磁盘、连接数、CPU 还是同一台机器。

适用场景

单表数据量极大,但单库的整体压力还能承受。


三、分库(分库)

层次:把数据拆分到多个数据库实例(可能在不同机器上)。

做法:按规则把不同的表,或同一张表的不同部分,放到不同的数据库实例中。通常和分表结合,形成 “分库分表”。

常见拆分方式

方式 说明
垂直分库 按业务拆,如订单库、用户库、商品库
水平分库 同一张表的数据分散到多个库

特点

  • ✅ 突破单机瓶颈:CPU、内存、磁盘、连接数都能横向扩展。
  • ✅ 提升可用性:一个库挂了,其他库还能用。
  • ❌ 架构复杂度高:需要处理分布式事务、跨库 JOIN、全局 ID、数据一致性。
  • ❌ 运维成本高:多实例部署、监控、备份、扩容。

适用场景

单库已经扛不住,数据量、并发量都到了单机上限。


四、三者对比

维度 分区 分表 分库
拆分层次 单库单表内 单库内多表 多库多实例
应用是否感知 无感知 需改 SQL / 中间件 需改 SQL / 中间件
突破的瓶颈 单表数据量 单表数据量 单机整体性能
事务 本地事务 本地事务 分布式事务
跨节点 JOIN 分区内可 需合并 很难
复杂度 低 中 高
典型工具 MySQL 原生分区 ShardingSphere、MyCat ShardingSphere、Vitess

五、演进顺序(推荐路径)

实际架构演进通常是:

1
2
3
4
5
6
7
单库单表
↓ 数据量变大
分区(单库内拆分,应用无感知)
↓ 还不够
分表(单库内多表)
↓ 单库扛不住
分库分表(多库多表,分布式)

核心原则:能分区就不分表,能分表就不分库。因为每往上一层,复杂度、运维成本、开发成本都大幅上升。分库分表是最后的手段,不是首选。


六、一句话总结

  • 分区:一张表在单库内拆成多个物理文件,应用无感知。
  • 分表:一张表拆成多张表,还在同一个库,应用要改。
  • 分库:数据拆到多个数据库实例,突破单机瓶颈,但复杂度最高。

三者是递进关系,拆分力度和复杂度依次增大,应按需选择,避免过度设计。

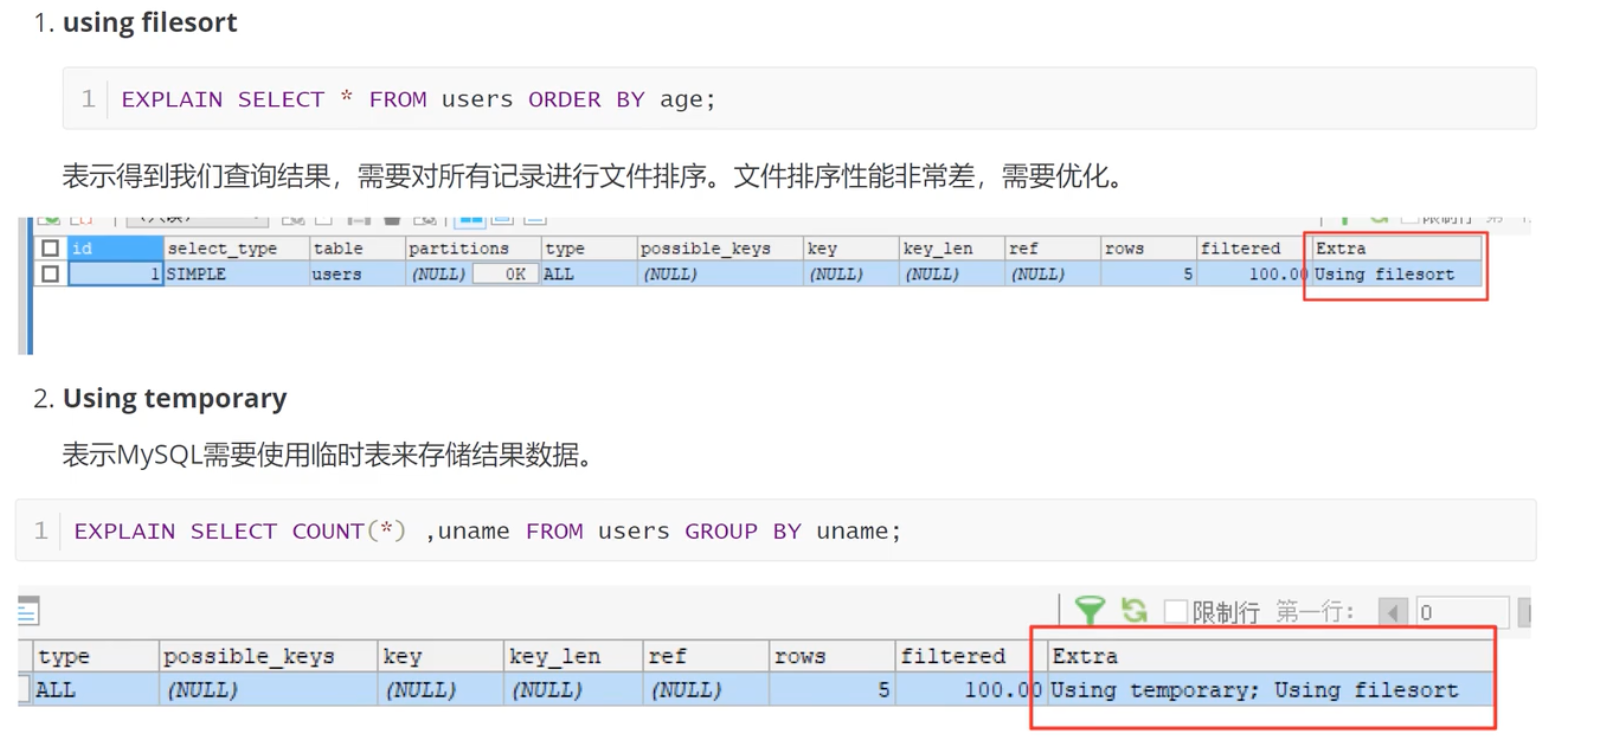
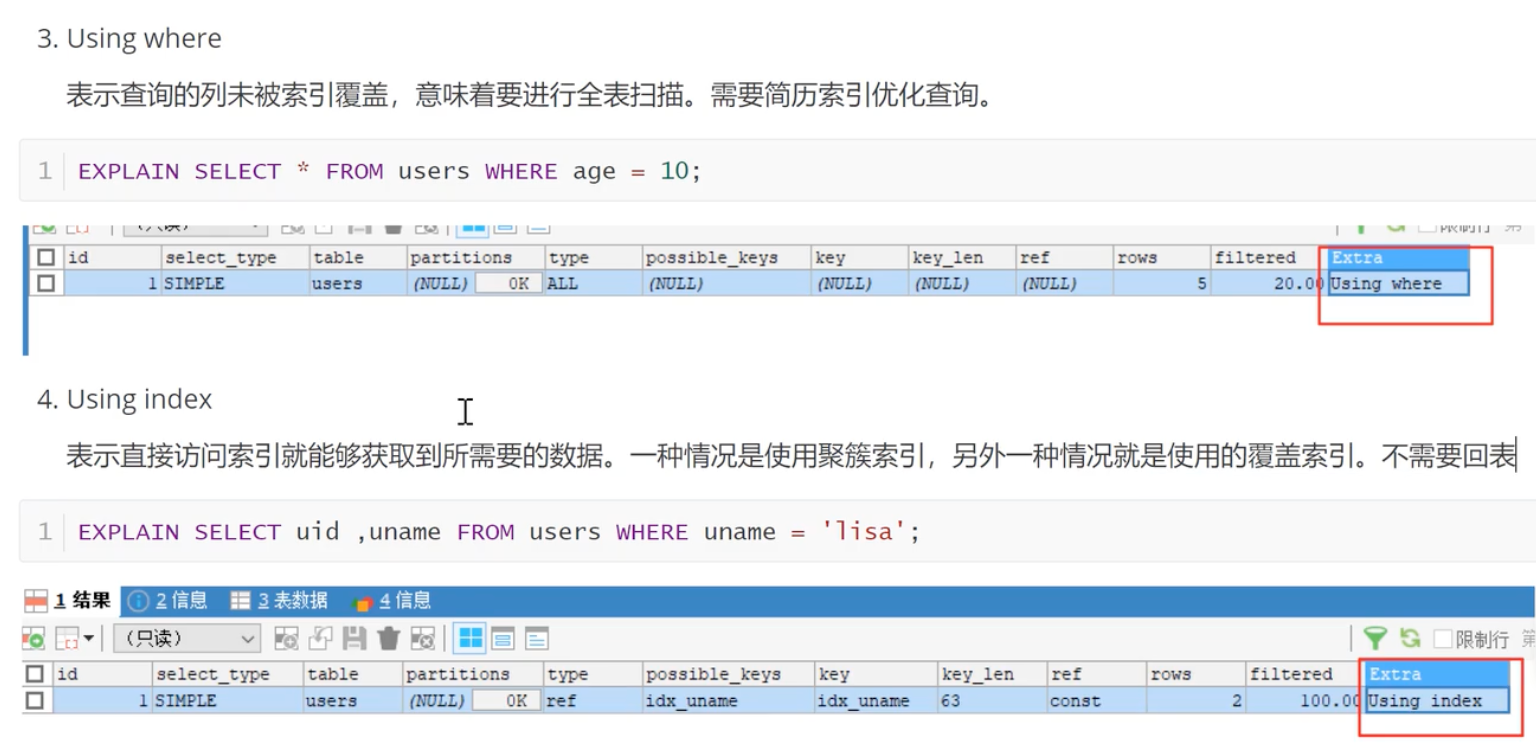
Extra字段说明

1
2
3
4
5
6
7
8
9
10
11
12
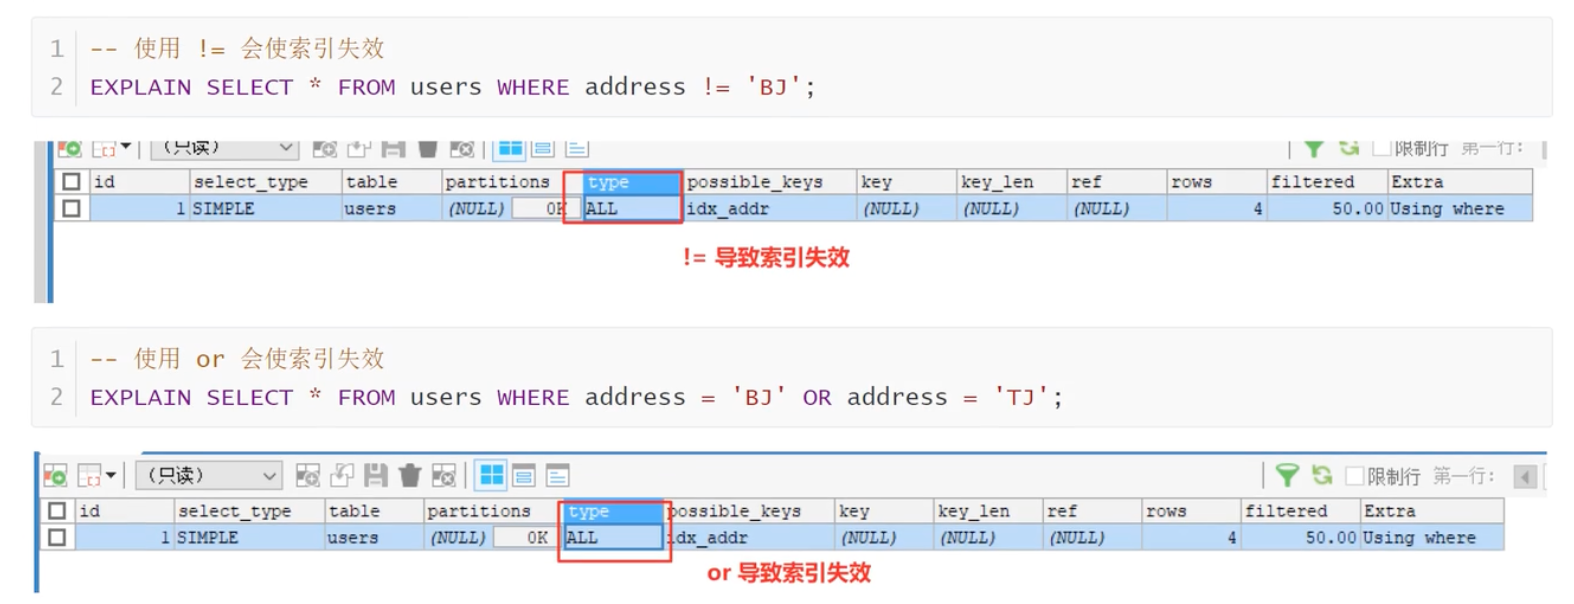
CREATE TABLE users(
uid INT PRIMARY KEY AUTO_INCREMENT,
uname VARCHAR(20),
age INT (11)
);
INSERT INTO users VALUES(NULL,'lisa',10);
INSERT INTO users VALUES(NULL,'Tisa',10);
INSERT INTO users VALUES (NULL,'rose', 11);
INSERT INTO users VALUES (NULL,'jack',12);
INSERT INTO users VALUES (NULL,'sam',13);

EXPLAIN SELECT * FROM users ORDER BY age


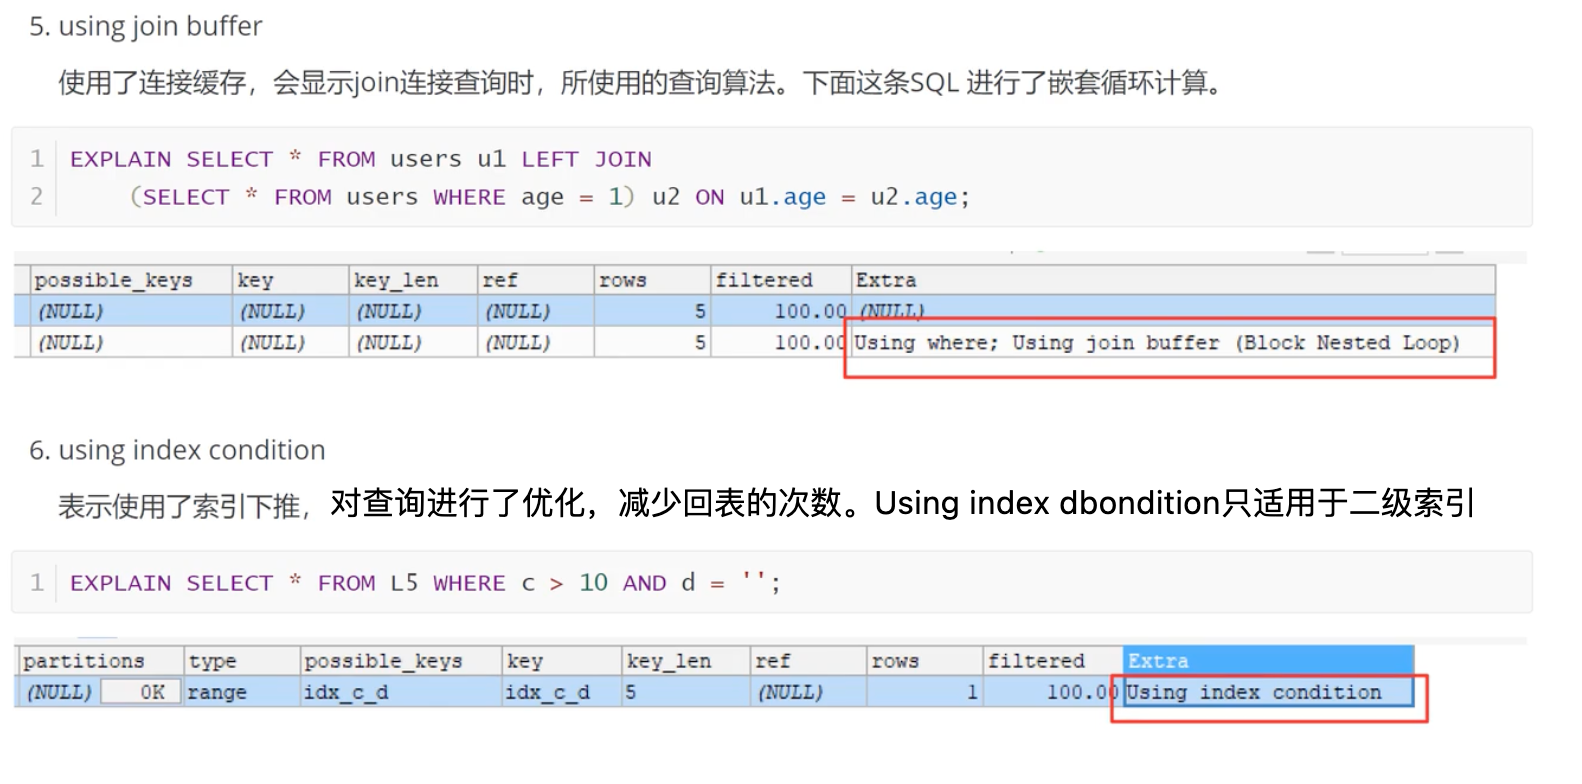
对查询进行了优化,减少回表的次数。Using index dbondition只适用于二级索引

My Little World

数据库事务

发表于 2026-09-08

数据库事务

什么是数据库事务

事务是一个不可分割的数据库操作序列,也是数据库并发控制的基本单位,其执行的结果将使数据库从一种一致性状态变迁到另一种一致性状态。事务是逻辑上的一组操作,要么全部执行,要么全部不执行。

事务的四大特性(ACID)

  1. 原子性(Atomicity):事务是最小的执行单位,不允许分割。事务的原子性确保动作要么全部完成,要么完全不起作用。
  2. 一致性(Consistency):执行事务前后,数据保持一致,多个事务对同一个数据读取的结果是相同的。
  3. 隔离性(Isolation):并发访问数据库时,一个用户的事务不被其他事务所干扰,各并发事务之间数据库是独立的。
  4. 持久性(Durability):一个事务被提交之后,它对数据库中数据的改变是持久的,即使数据库发生故障也不应该对其有任何影响。

SQL 标准定义的四个隔离级别

  1. Read Uncommitted(读取未提交):最低的隔离级别,允许读取尚未提交的数据变更,可能会导致脏读、幻读或不可重复读。
  2. Read Committed(读取已提交):允许读取并发事务已经提交的数据,可以阻止脏读,但是幻读或不可重复读仍有可能发生。
  3. Repeatable Read(可重复读):对同一字段的多次读取结果都是一致的,除非数据是被本身事务自己所修改,可以阻止脏读和不可重复读,但幻读仍有可能发生。
  4. Serializable(可串行化):最高的隔离级别,完全服从 ACID 的隔离级别。所有的事务依次逐个执行,这样事务之间就完全不可能产生干扰,也就是说,该级别可以防止脏读、不可重复读以及幻读。

什么是脏读?幻读?不可重复读?

  1. 脏读(Dirty Read):某个事务已更新一份数据,另一个事务在此时读取了同一份数据,由于某些原因,前一个事务 RollBack 了操作,则后一个事务所读取的数据就会是不正确的。
  2. 不可重复读(Non-repeatable read):在一个事务的两次查询之中数据不一致,这可能是两次查询过程中间插入了一个事务更新原有的数据。
  3. 幻读(Phantom Read):在一个事务的两次查询中数据笔数不一致,例如有一个事务查询了几行(Row)数据,而另一个事务却在此时插入了新的几行数据,先前的事务在接下来的查询中,就会发现有几行数据是它先前所没有的。

各个事务隔离级别对脏读、不可重复读、幻读的支持情况

隔离级别 脏读 不可重复读 幻读
READ-UNCOMMITTED √ √ √
READ-COMMITTED × √ √
REPEATABLE-READ × × √
SERIALIZABLE × × ×

事务冲突与解决

数据竞争冲突场景与解决

ACID DB

一种写入数据库的方式
ACID DB Transactions:

  • Atomicity:
    All writes succeed or none of them do
    Jondan - $10, Loriaa Keef +$10
    数据一致性,有¥10 支付,肯定要有¥10 收入

  • Consistency:
    All fails occur gracefully, no invariants are broke
    eg.
    Need at least one officer on shift
    Delek“Lomy’and write “Osscur”
    Failuer in the mildle? Now no security guard
    数据发生故障时,能够优雅方式处理故障

  • Isolation:
    Appears if all transations are executed independently of each other,
    No race conditions
    所有交易操作都独立进行,不存在并发竞争关系
    并发竞争关系
    eg. 两个线程同时对数据库同一数据原值0 进行+1操作,由于两次读取时,都是读到的是数据0,+1 操作完落库的结果是1,虽然应该加两次

  • Durability:
    comitted writes, don’t get lost data on disk

Atomicity, Consistency, Durability 都能通过预写日志(write ahead log)实现,
Isolation is hard and slow

read committed Isolation

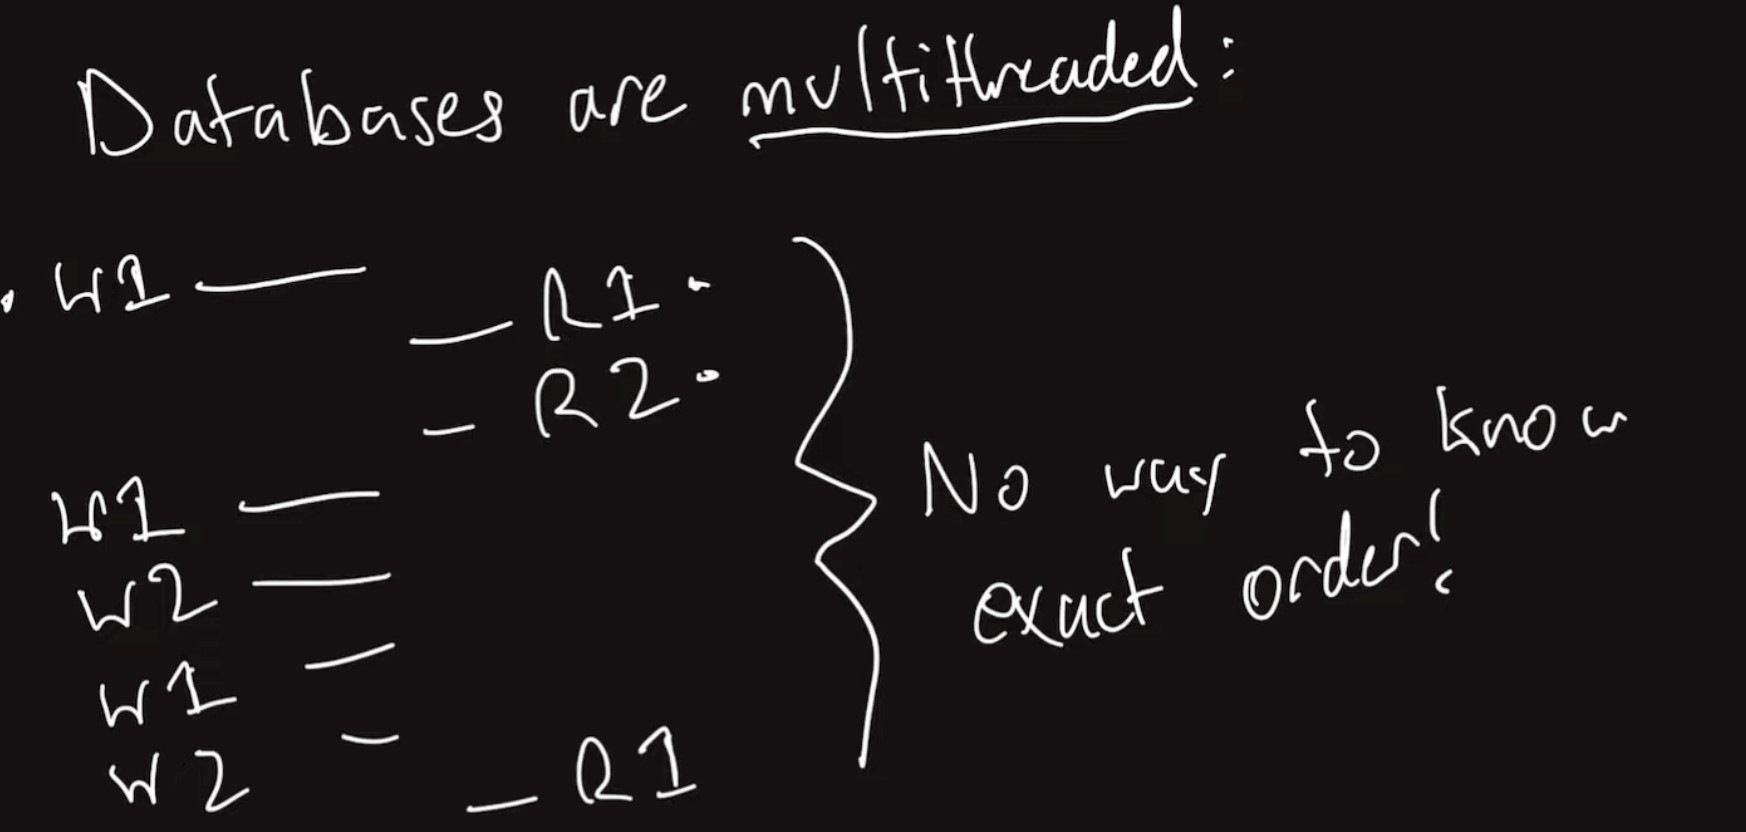
当multi读写任务几乎同时发送到数据库,时间上差不多处于同一时期,no way to know exact order, 无法保证操作结果合法性

commit : a write state, only happens when all are finished
在数据库中所有操作都是完成态

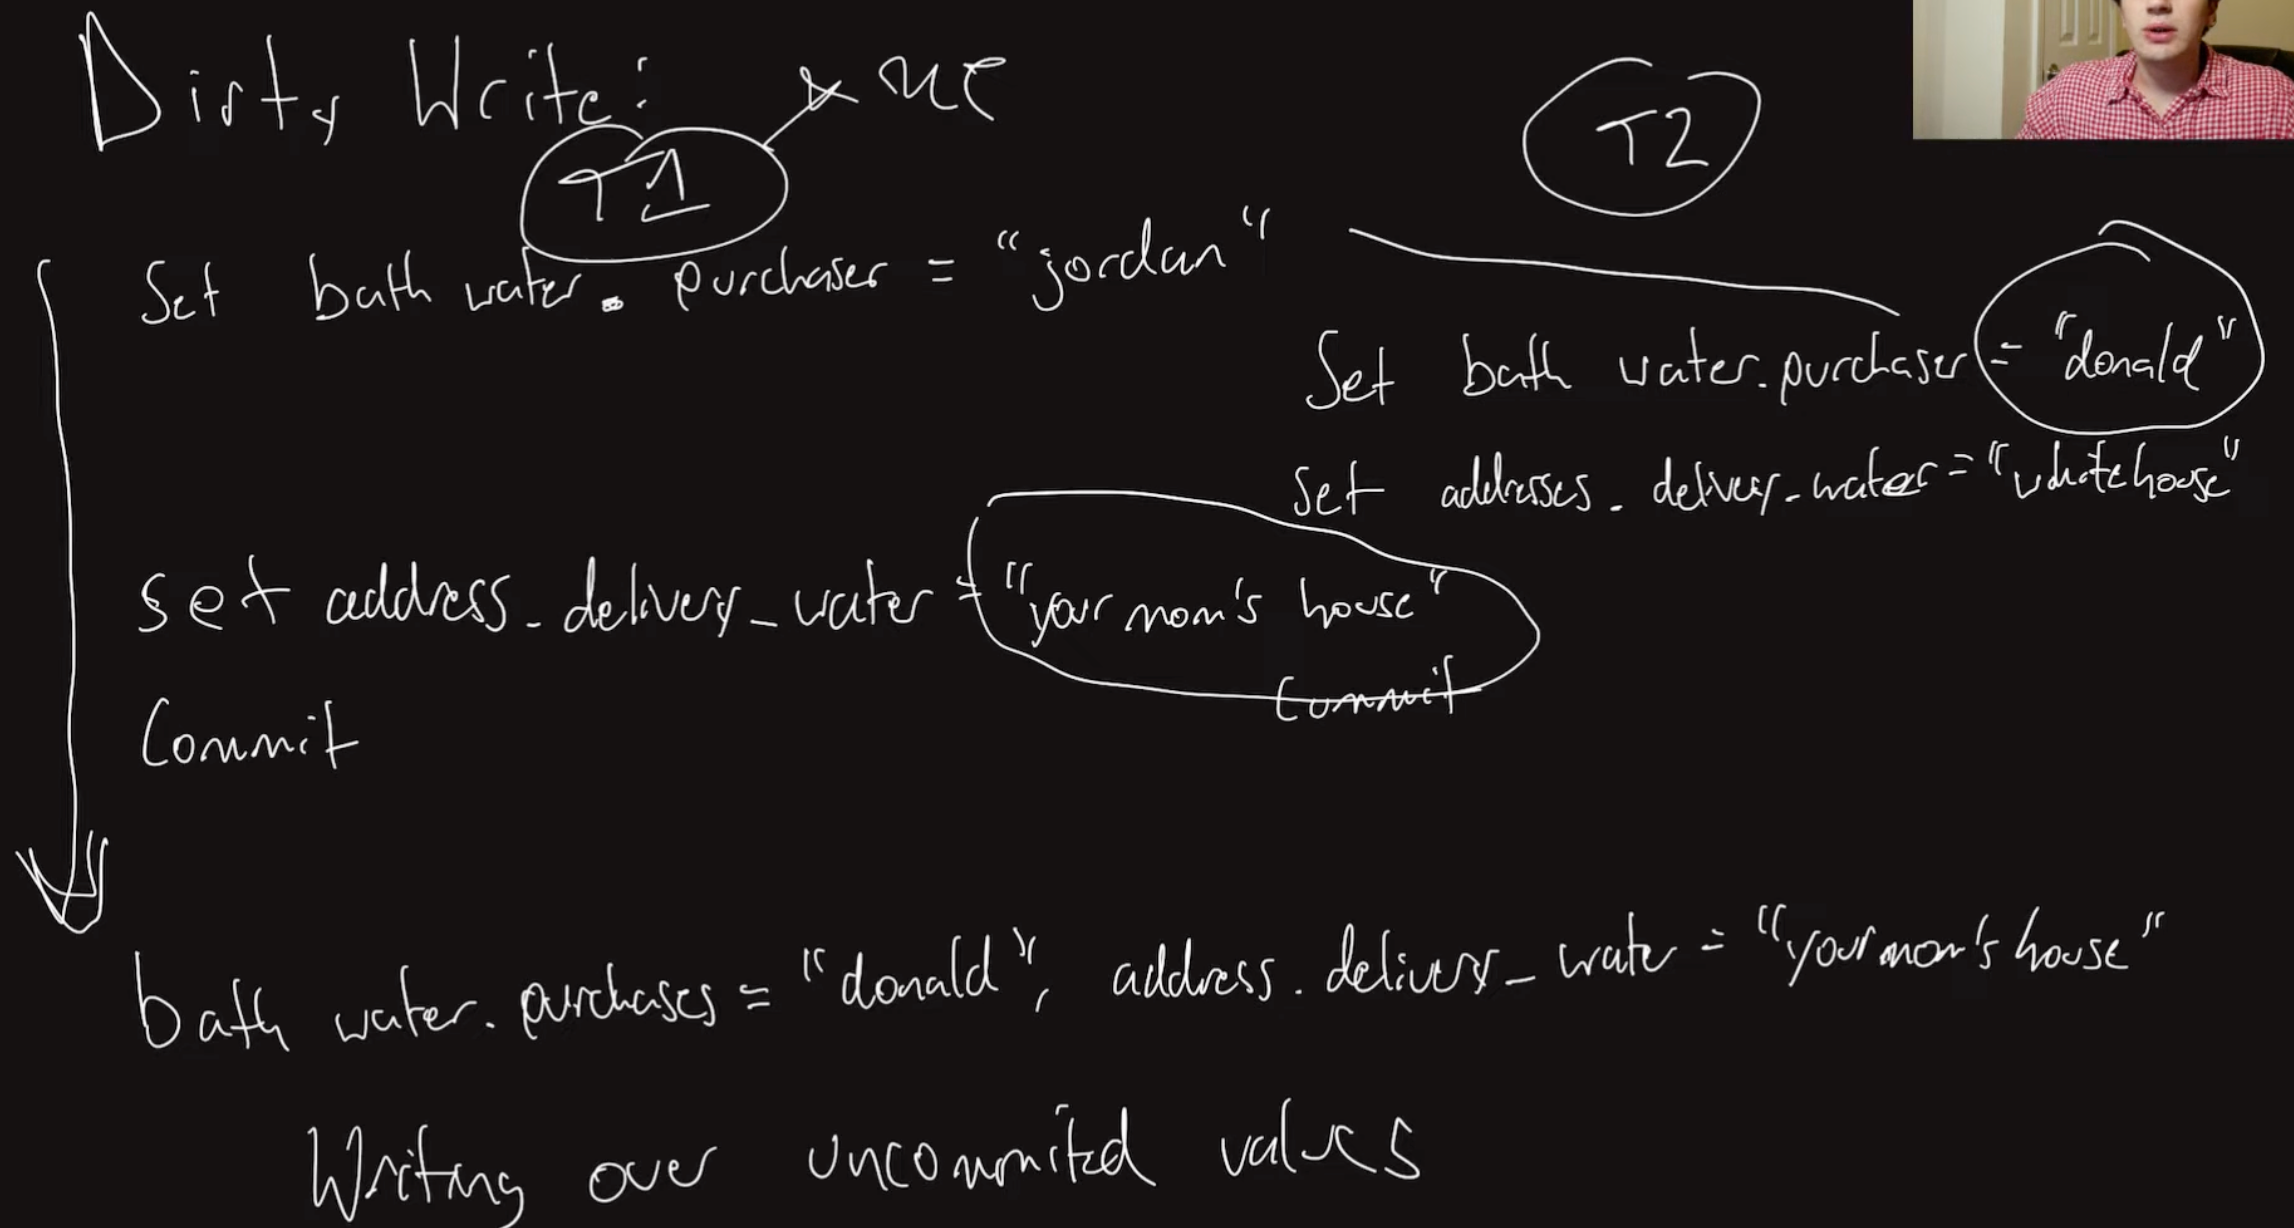
dirty writes


对于相同数据的写操作同时由不同的用户发起,二者写的内容不同,任务顺序不可控,可能会导致最后结果不符合双方预期

解决办法: row level locks(grab rows in same order)
通过加锁机制,处于写入执行过程中的数据被保护起来,不再穿插执行其他用户任务,执行完一整套操作,再执行下一套操作,保证数据准确性

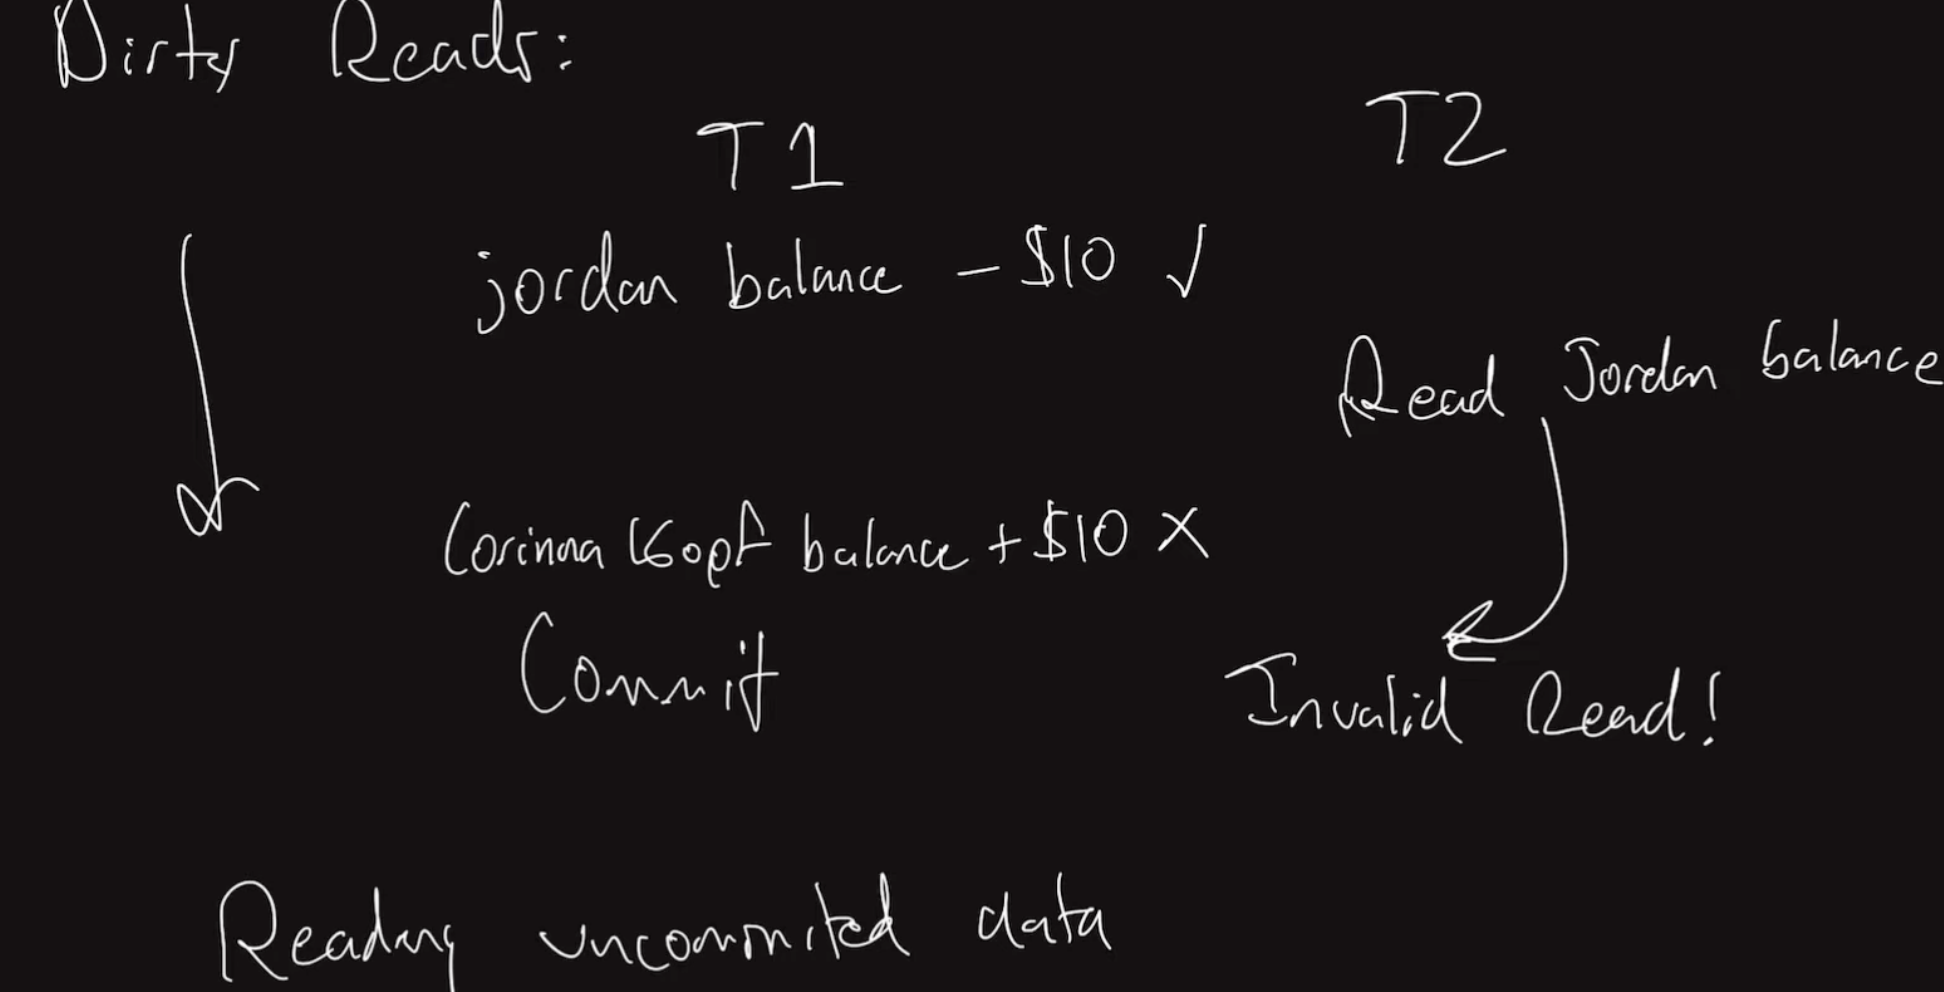
dirty reads


对于上图中操作,当t1 corina 收入+10 的操作没有commit 的时候,T2 打算读取corina 收入+10 之后的余额时,可能由于账户消除等原因导致读取异常

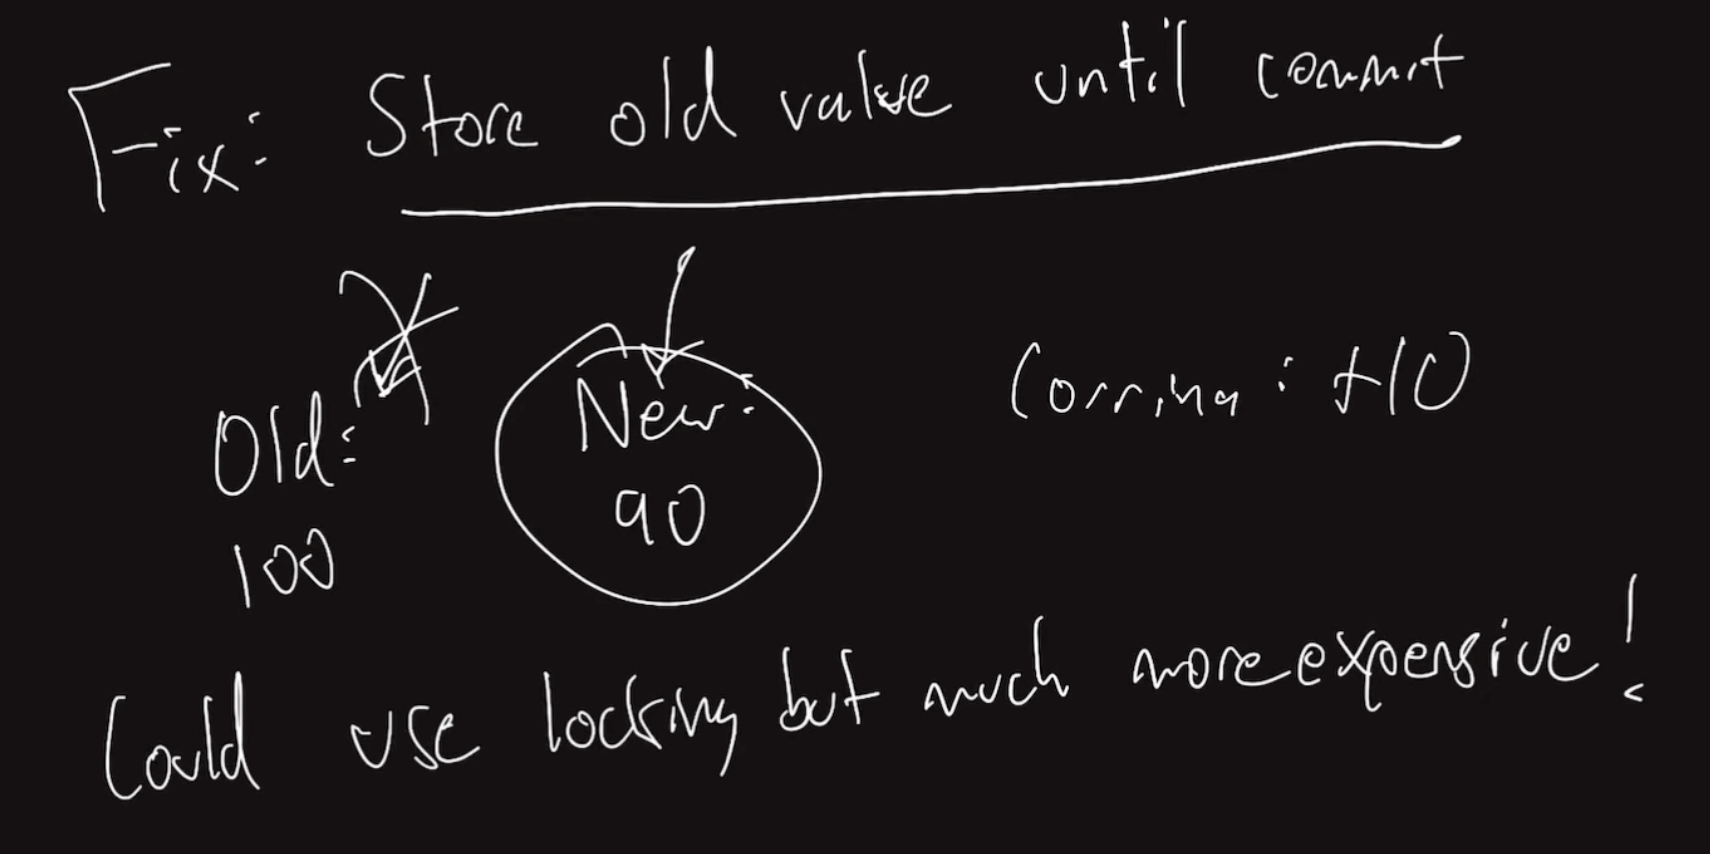
解决办法:也可以用锁,但是锁的成本太高
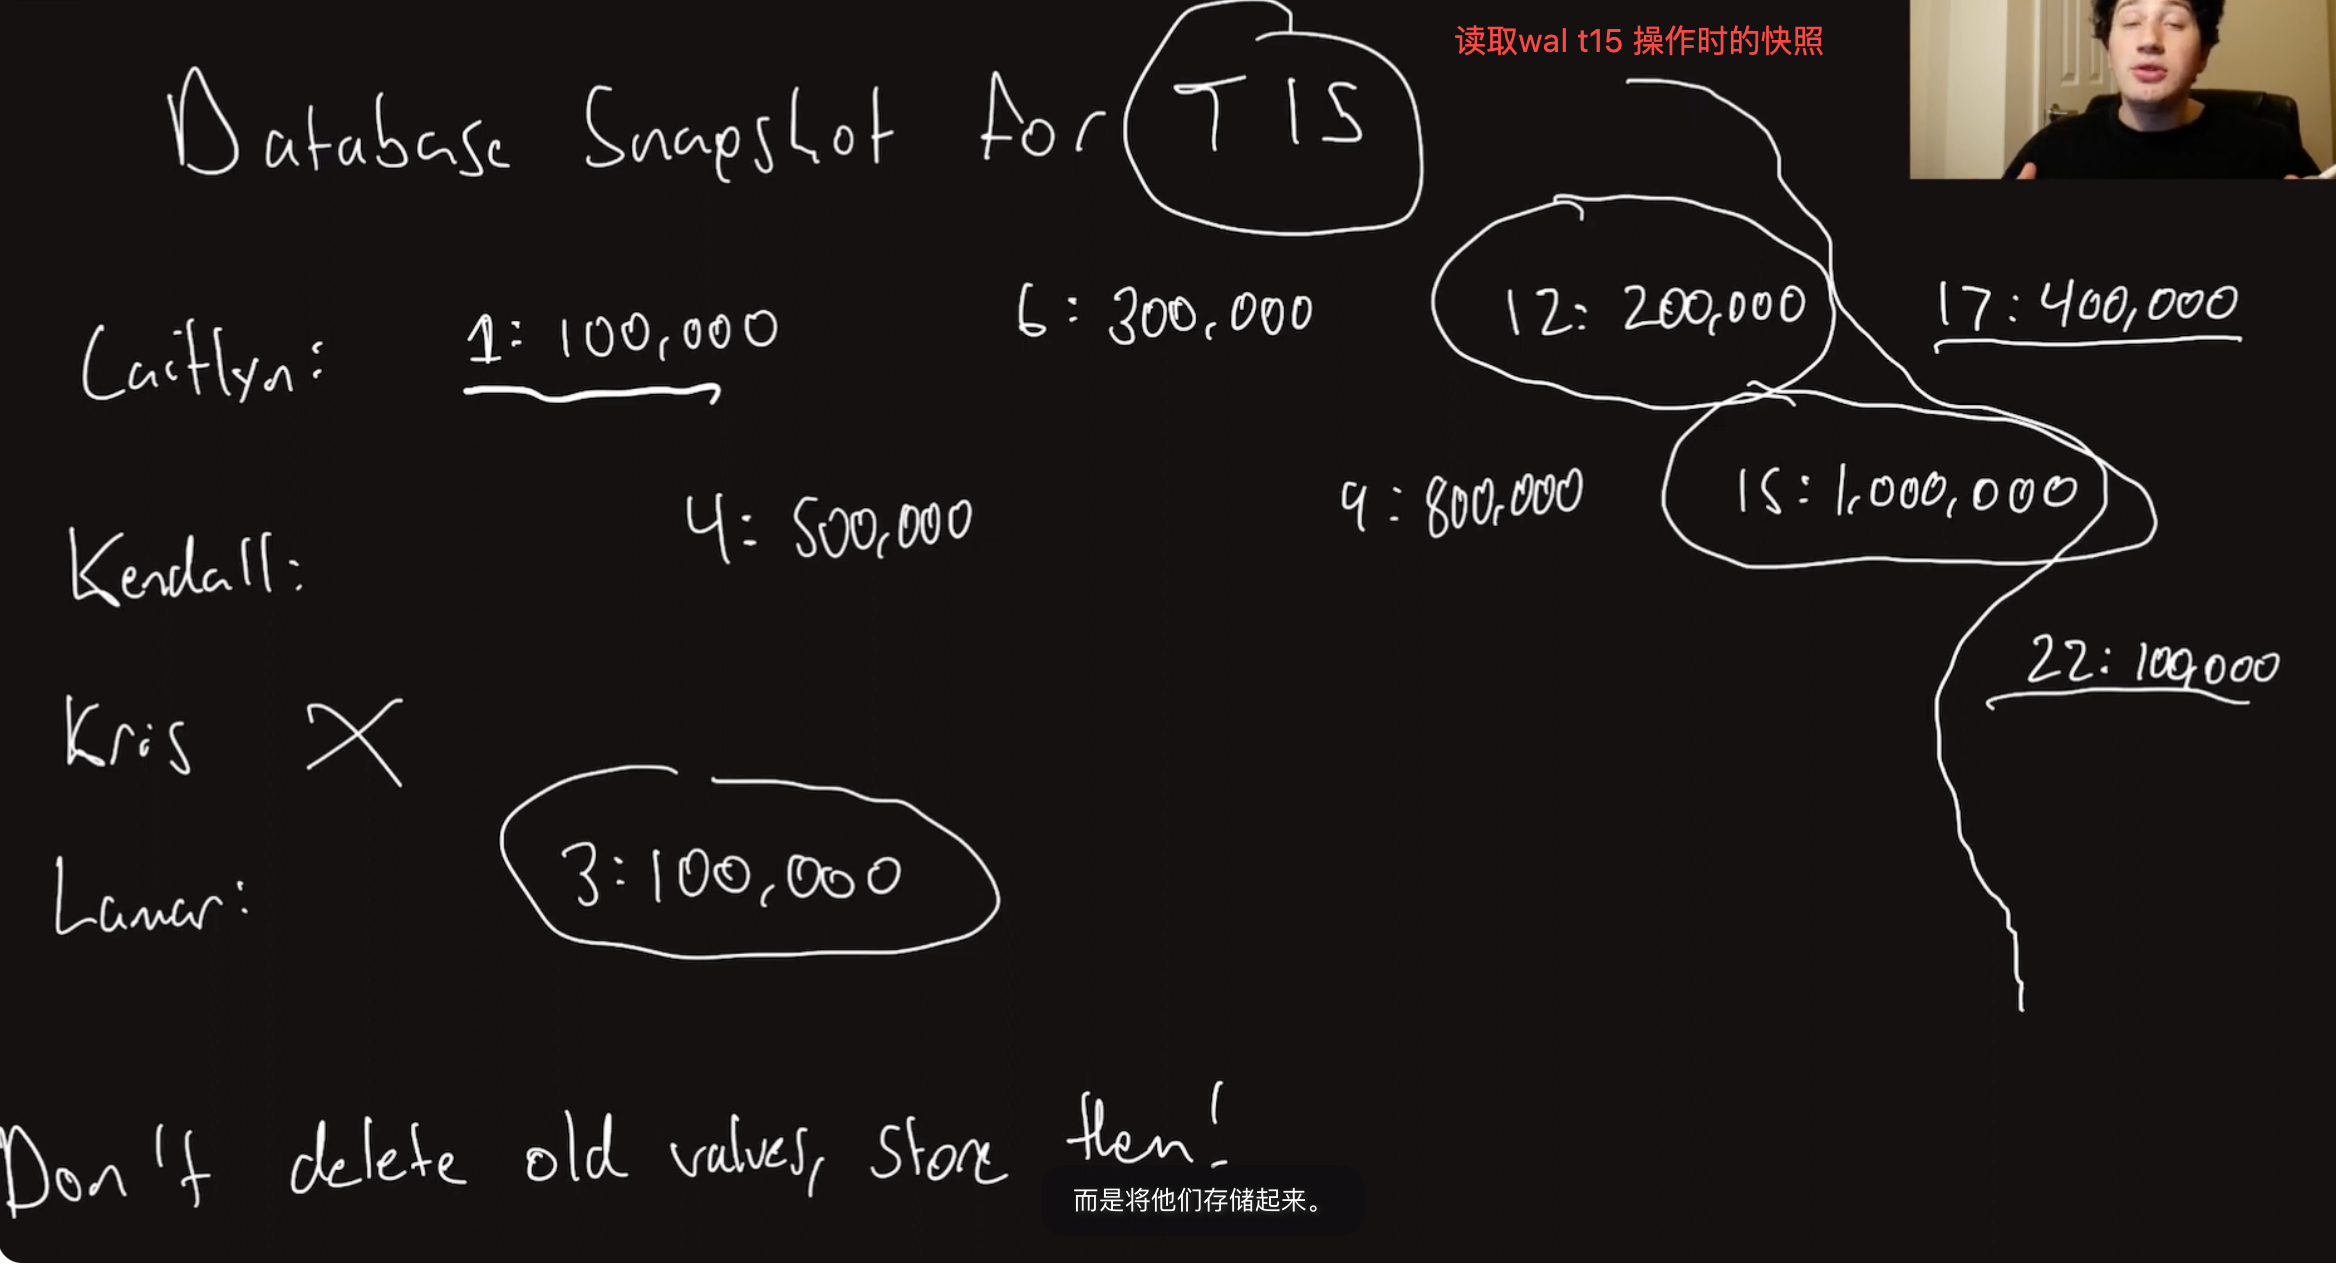
这里可以采用存储老数据直到commit 的时候

现在余额是100,old 指针指向100, 花10元后新值是90,new 指针指向90
现在收入+10
将old指针从100 改到90 ,再计算, 这样即使commit 没有完成,也能将old data 给出去

snapshot isolation

用来解决并发事务之间的读写冲突(一个事务正在读某条数据,同时另一个并发事务正在修改这条数据。)
读事务不要去读“当前正在被修改的数据”,而是读事务开始时的一个快照。
实现写不会阻塞读,读也不会读到未提交的写。
如果用锁,写过程在commit 之后读才能去读,造成阻塞

repeatable read

  • Non-repeatable Read 不可重复读/ Read Committed : 同一个事务里,前后两次读取同一条数据,结果不一样。
    eg.
  1. t1 读a = 30; t1 还没commit 时,t2 修改 a = 40 ;t1 再读 a= 40
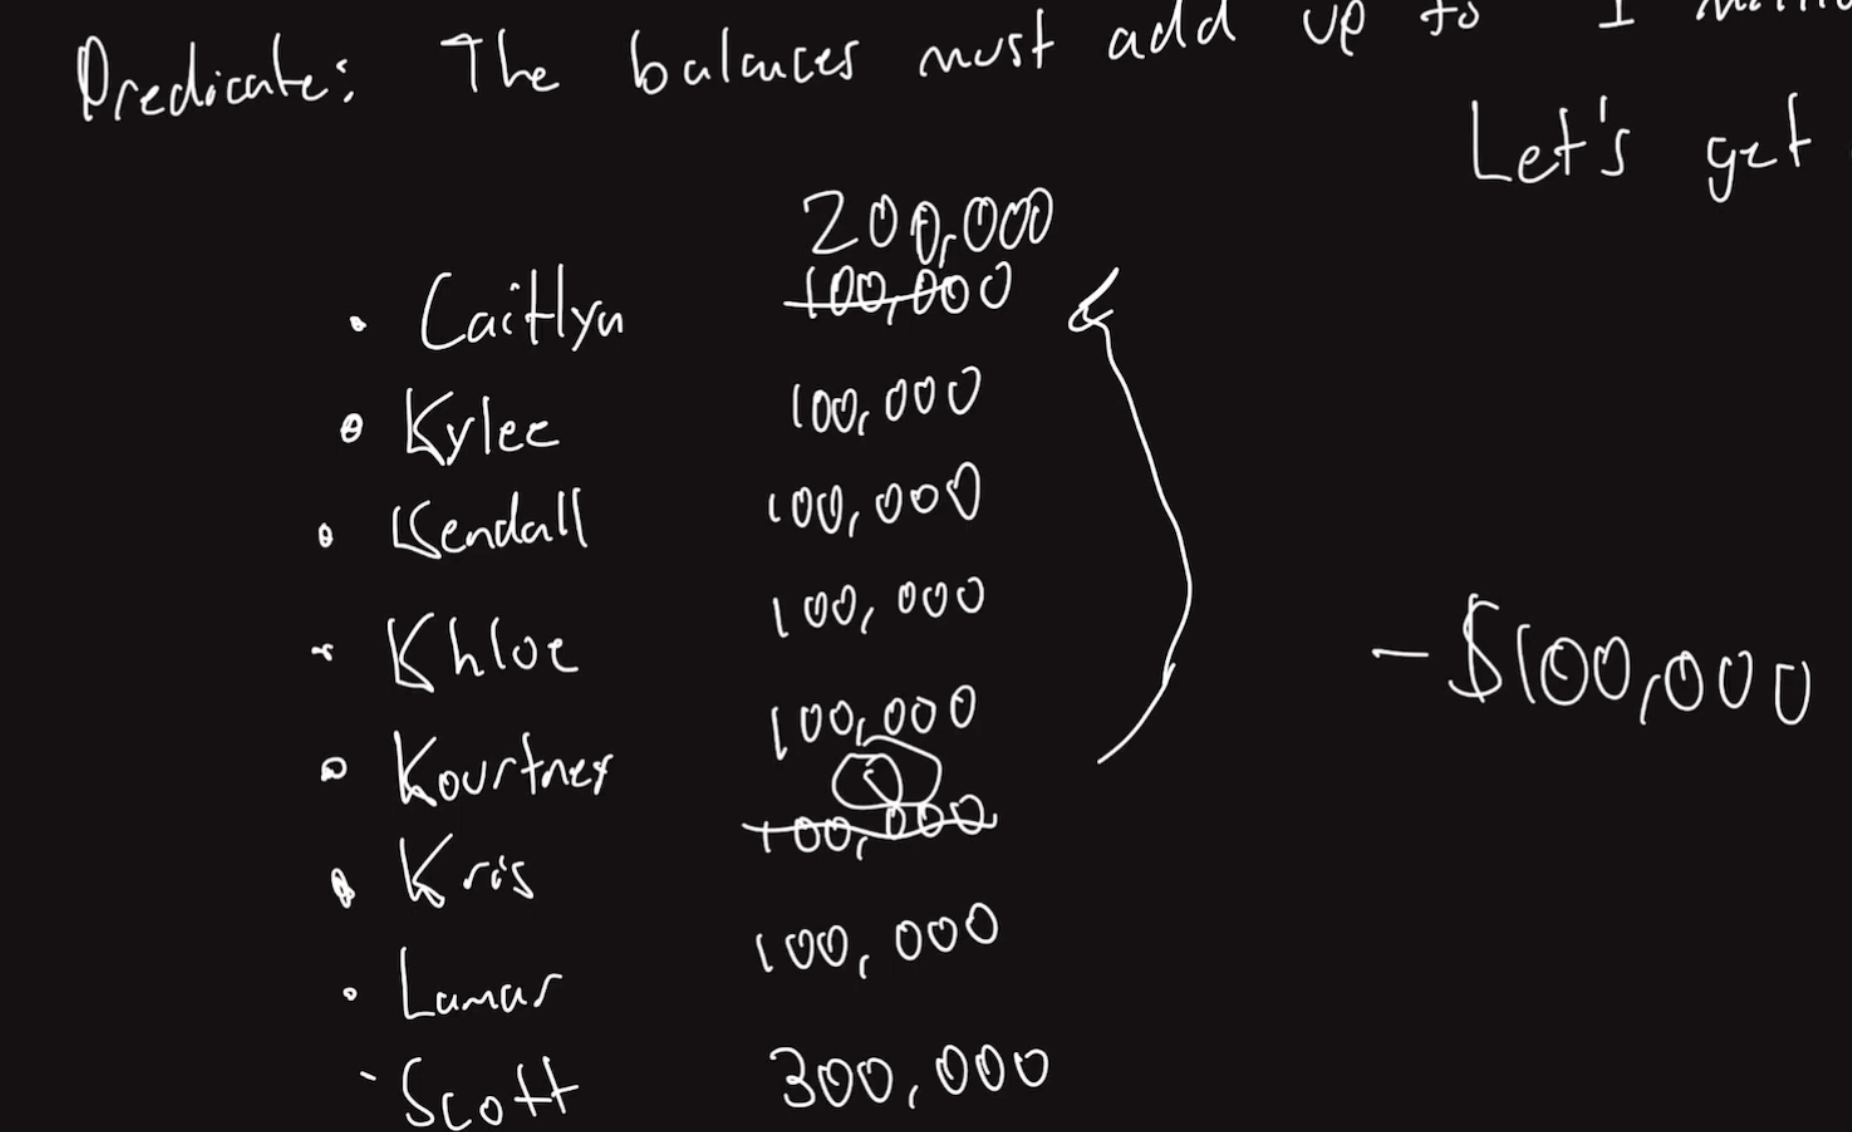
  2. 数据库中所有数据原始相加为100,000, 现在依次读取单个数据所有值,但在读取过程中,还没有commit,中间某个数据K发生变化,由10,000变成0,少的10,000 添加到已读的某个数据C上,这样就会导致最终K 读到0 ,最终所有数据相加比100,000 少10,000,但实际上总和咩有变
  • Repeatable Read 可重复读: 同一个事务里,你第一次读到某条数据之后,即使其他事务把它修改并提交,你再次读取这条数据,仍然得到第一次读到的结果。
    eg. t1 读a = 30; t1 还没commit 时,t2 修改 a = 40 ;t1 再读 a= 30

加锁实现有阻塞
T1 第一次读 → 20
T2 修改 → 等待
T1 第二次读 → 20
T1 COMMIT
T2 才能修改

使用snapshot
T1 第一次读, 创建快照 → 读快照 ->20
T2 修改
T1 第二次读 → 读之前快照 20

write skew

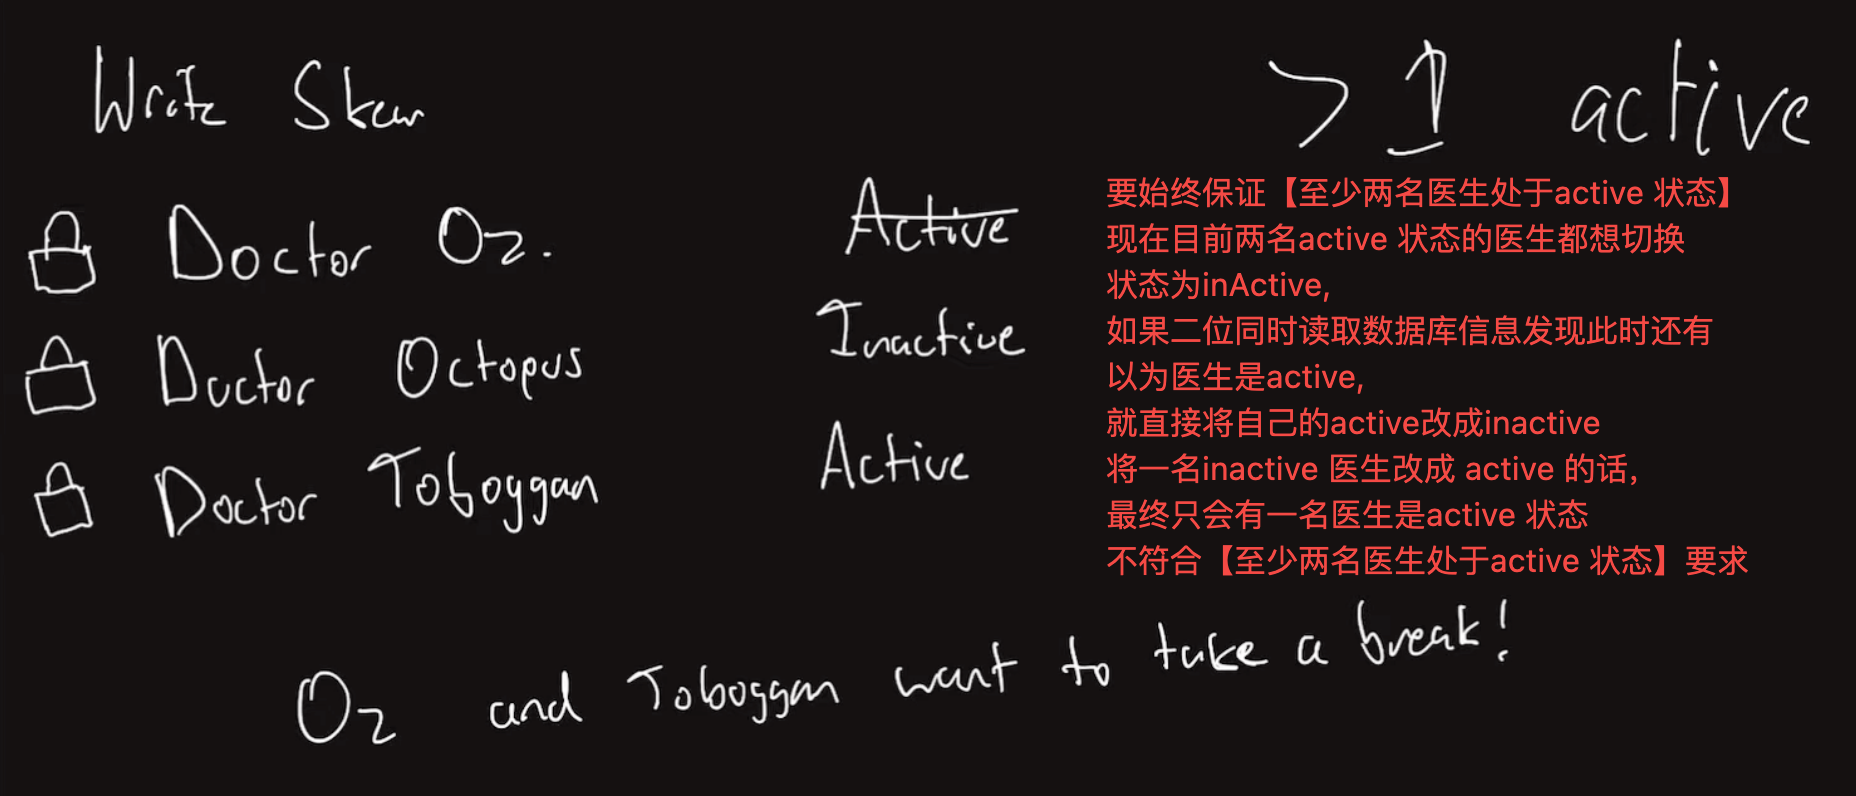
两个事务各自读取到一个一致的快照,然后分别修改不同的数据,最后两个事务都成功提交,但合起来违反了业务规则。

Note: Before setting themselves to inactive, each doctor must first scan the database to check if there is at least one other active doctor
When they both do these reads it looks like there is another doctor active and they both set their statuses to inactive
Because we’re not grabbing the locks of both doctors, each can perform the read
and then write successfully at the same time, thus breaking the invariant

解决方案:写入时将其他active 状态的rows 进行行锁,即更改一个active 后才能更改下一个
对于同时修改的情况,谁先grab 更多的行锁,谁就能先进项写入

If I’m holding the locks of all of the rows that I read, I know that my predicate statement (”there is another active doctor”) will remain true when I write

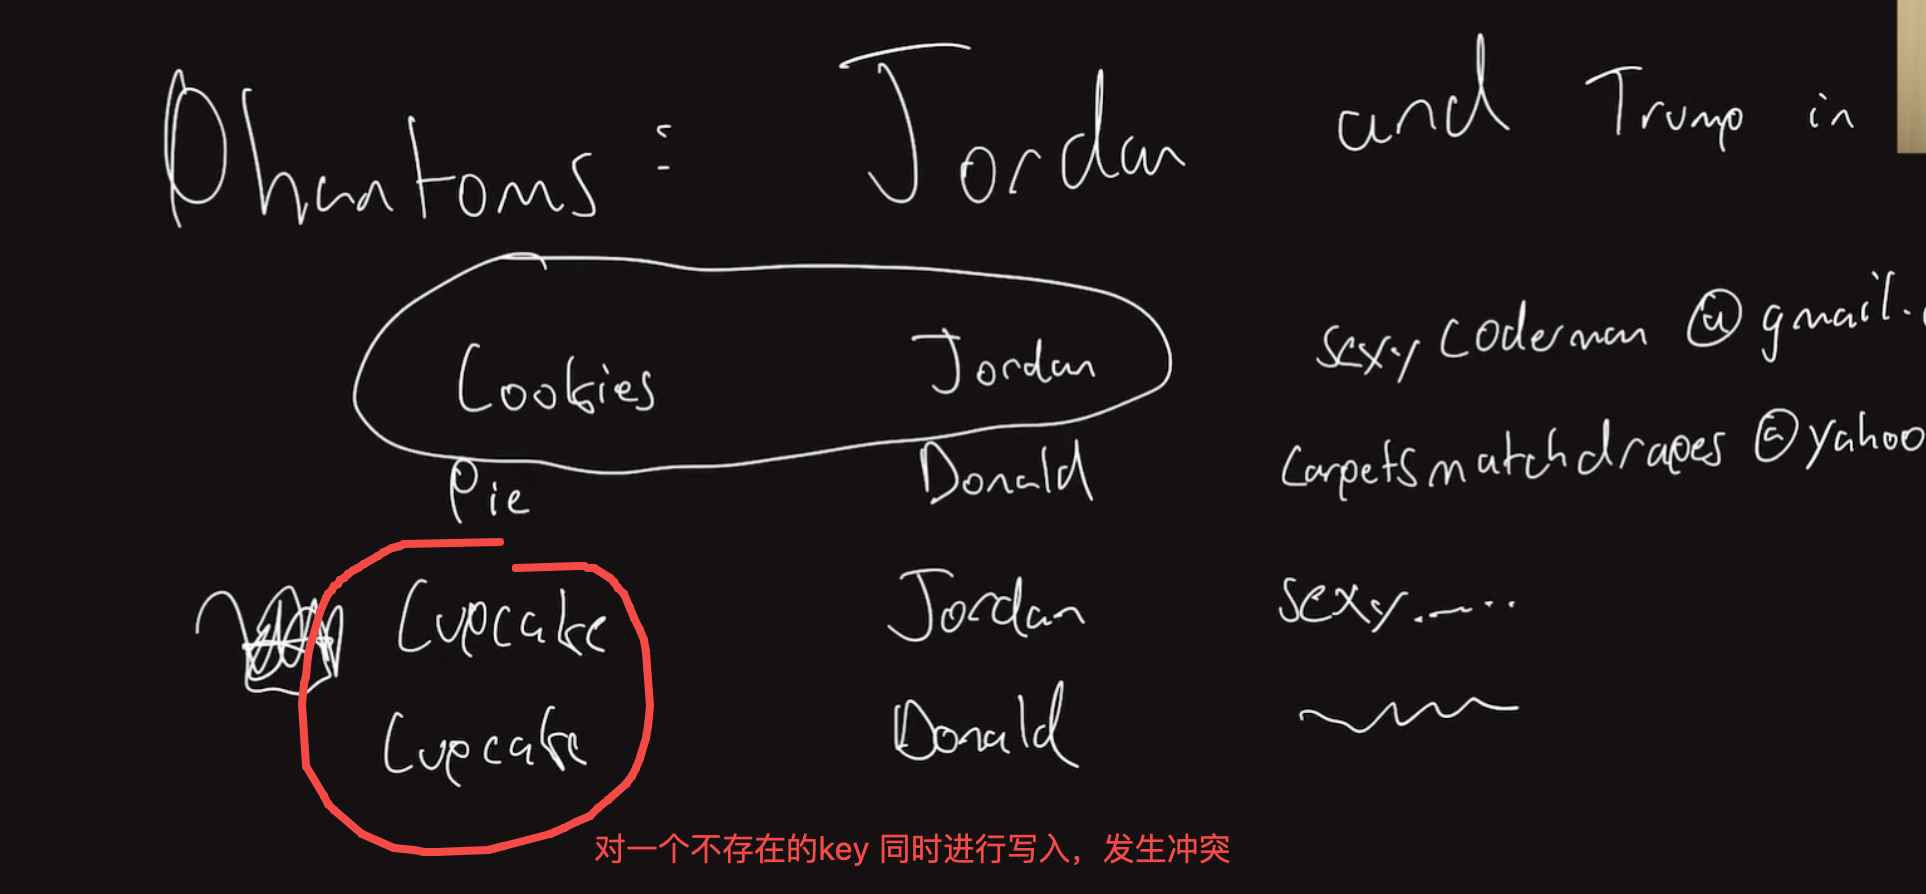
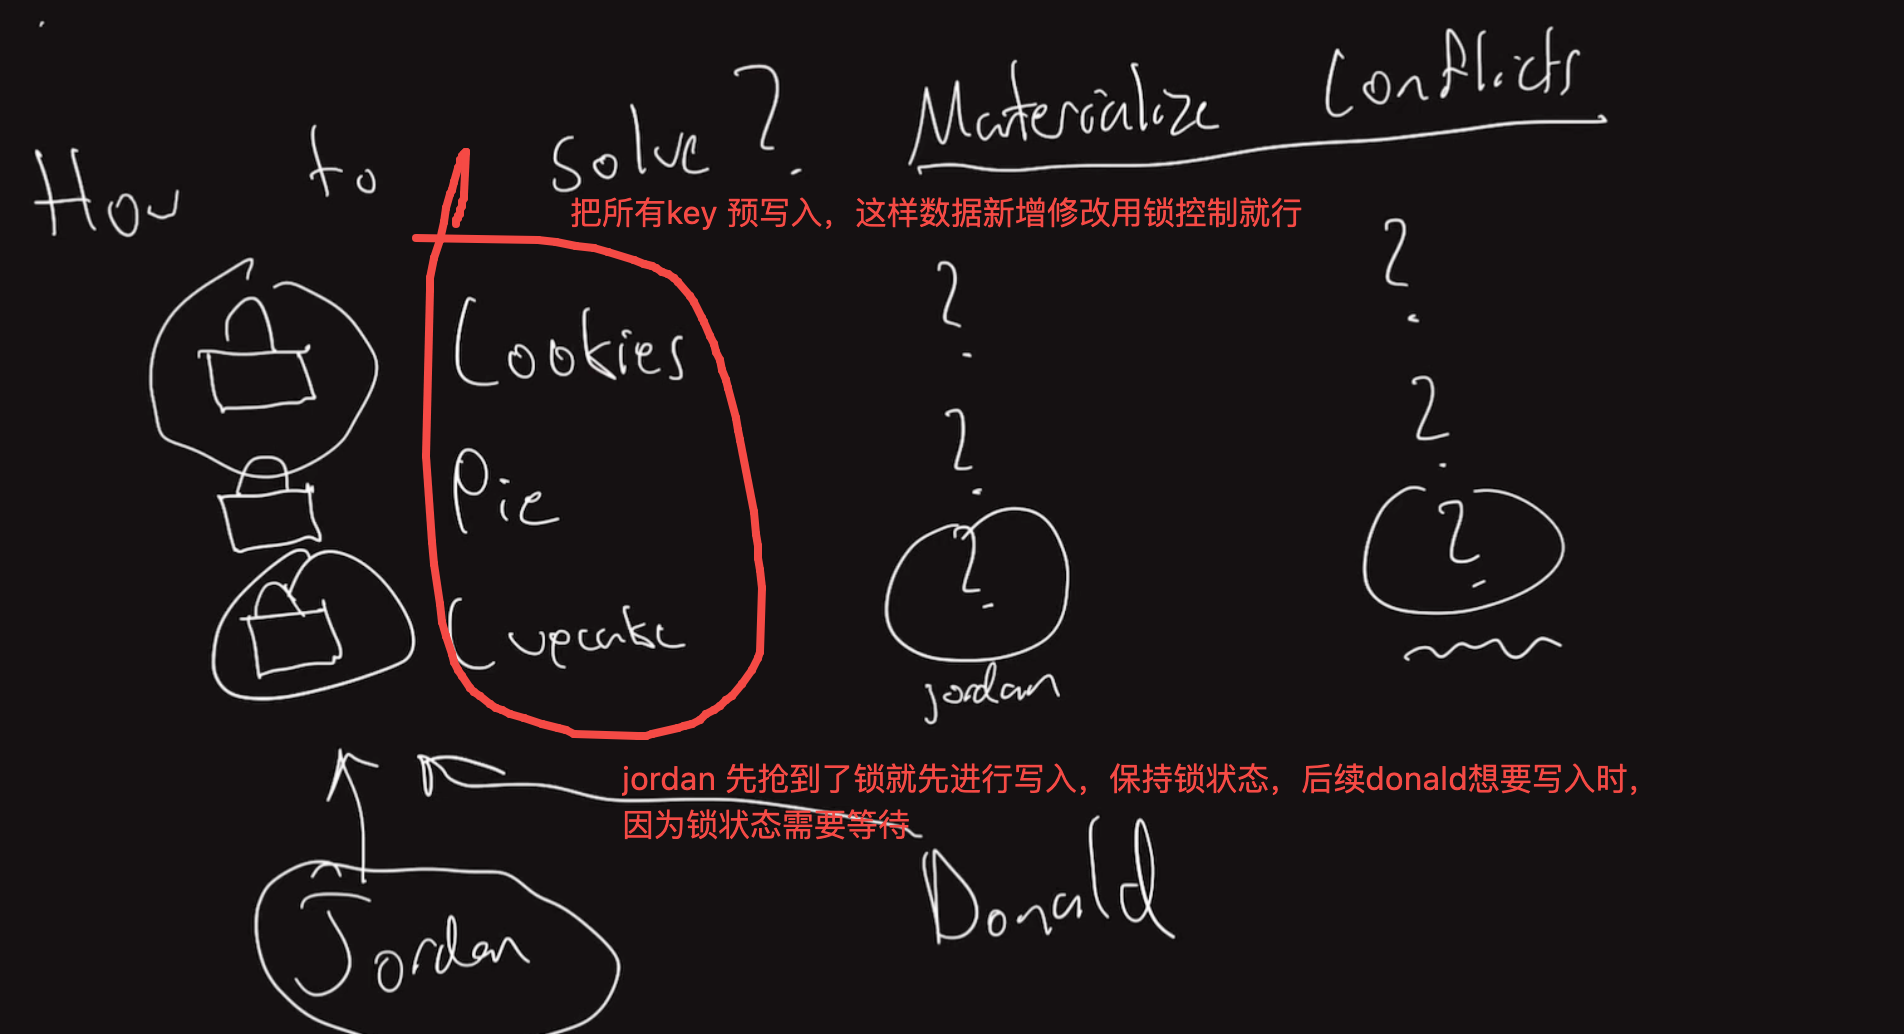
phantom 幻影

occur when two people write new rows that conflict, no locks to grab the new row
两个新数据都需要处理,会造成数据库不一致问题

解决: 预填入
这样为填入的数据就可以拥有相对应锁对象,就能够通过locks对数据写入进行控制

First we check to see if anyone has claimed the cupcakes and then since the email is empty we try to grab the lock to make the write

问题 核心
Non-repeatable Read 同一行变了
Phantom Read 符合条件的行集合变了
Write Skew 两个事务修改不同的数据,导致整体业务规则被破坏

actual serial execution

随着cpu 运算速度的提高,之前依赖多线程多核同时执行的任务现在可以在一个core 按照顺序执行
但这种方式有一定缺陷,
比如在disk 上运行导致速度变慢 —> 把数据放在内存上运行
—> 好处速度快,可以使用hash, 二叉树等手法进行查询 但内存size 有限,不能持久化
—> 网络传输数据量大,导致网络通信时间长,
—>解决,将操作脚本sql function 前提在数据库启动时通过store procedure 过程直接传输到数据库中,之后数据传输仅传数据本身和操作标识,减少数据传输量;但缺点就是要对版本和代码进行管理和维护,对开发不友好,

双相锁定机制(Two-Phase Locking / 2PL)

关系型数据库管理并发事务、保证数据一致性的核心理论基础
这个协议的核心,就是把一个事务的生命周期严格划分为两个阶段,对锁的操作有明确的”单向”要求:

  • 增长阶段(加锁阶段):事务在这个阶段可以按需申请新的锁(如读锁S或写锁X),但绝对不能释放任何已经持有的锁。你可以把它理解为事务在”收集资源”。
  • 收缩阶段(解锁阶段):事务一旦开始释放第一个锁,就立即进入这个阶段。此后,它只能释放已有的锁,不能再申请任何新锁。这标志着事务在”释放资源”。

这个”先增长,后收缩”的规定,保证由2PL管理的事务调度结果是冲突可串行化的,即并发执行的结果与某种串行执行的结果等价,从而保证数据一致性

严格两阶段锁(Strict 2PL)

在2PL上增加
事务持有的所有排他锁(写锁),必须等到事务最终提交(COMMIT)或回滚(ROLLBACK)时才能一次性全部释放

优点:
· 防止级联回滚:避免了其他事务读到未提交的脏数据后,又因源事务回滚而被连带撤销。
· 简化故障恢复:系统恢复时只需关注已提交事务的锁状态,逻辑更清晰

谓词锁

是一种逻辑锁,它锁定的不是一个具体的物理数据行,而是一个满足特定搜索条件(谓词)的“逻辑数据集合”
锁住“一类数据”,而不是“一行数据”
它能从根本上解决“幻读(Phantom Read)”问题,是实现最高隔离级别“可串行化(SERIALIZABLE)”的一种重要理论方案。

它的思想是:即使目标数据行现在不存在,也先把满足 age = 25 这个“条件”锁住。这样,当其他事务想插入满足该条件的新行时,就会发现这个条件被锁住了,必须等待,从而避免了幻读

巨大的实现代价:

  • 实现极其复杂:判断两个复杂查询条件(如 (age > 20 AND city = ‘Beijing’) 与 (age < 30 AND city = ‘Shanghai’))是否存在交集,本质上是一个NP-Complete(NP完全)问题,计算开销极大。

  • 并发度风险:过于严格的逻辑锁可能会锁住一些事实上并不存在冲突的数据范围,反而降低系统的并发处理能力。

索引范围锁定

索引范围锁(Index Range Lock) 是数据库中一种基于索引结构的锁机制,它的核心作用是锁定一个索引范围内的所有记录及其之间的间隙(Gap),以防止其他事务在该范围内插入、修改或删除数据。

在 MySQL/InnoDB 中,它被具体实现为 Next-Key Lock(临键锁),即 Record Lock(记录锁) + Gap Lock(间隙锁) 的组合。它是在 可重复读(REPEATABLE READ) 隔离级别下,解决幻读问题的核心技术手段。


1. 索引范围锁的构成

组成部分 作用 锁定对象
Record Lock(记录锁) 锁定索引树上的具体索引项(即某一行记录) 该索引项本身
Gap Lock(间隙锁) 锁定索引记录之间的间隙(包括记录前、记录后、记录之间) 索引间隙(空位),用于阻止插入
Next-Key Lock Record Lock + Gap Lock 的组合,锁定一个左开右闭区间 (上一个值, 当前值] 索引项 + 其前面的间隙

2. 一个具体的例子

假设有一张表 users,主键 id 目前有数据:1, 3, 5, 7, 9。

1
2
索引(主键)分布:1, 3, 5, 7, 9
间隙:(-∞,1), (1,3), (3,5), (5,7), (7,9), (9,+∞)

现在执行查询:

1
SELECT * FROM users WHERE id = 5 FOR UPDATE;

在 REPEATABLE READ 隔离级别下:

  • 如果 id=5 存在,InnoDB 会加一个 Record Lock,锁定 id=5 这一行,阻止其他事务修改或删除它。
  • 但不会锁间隙,因为这是一个精确等值查询且目标存在。

如果执行范围查询:

1
SELECT * FROM users WHERE id BETWEEN 3 AND 7 FOR UPDATE;

InnoDB 会锁定:

锁定范围 锁类型 说明
id=3 Record Lock 锁定该行
(3,5) Gap Lock 阻止插入 4
id=5 Record Lock 锁定该行
(5,7) Gap Lock 阻止插入 6
id=7 Record Lock 锁定该行
(7, +∞) 或继续到边界 可能继续锁定 取决于查询是否命中了索引边界

这样,整个索引区间 [3, 7] 被彻底锁住,其他事务无法插入任何值在 3~7 之间的新行,也无法修改或删除 3、5、7 这三行,从而保证了当前事务两次查询的结果完全一致——幻读被阻止了。


3. 索引范围锁的触发条件

条件 是否触发 Next-Key Lock
唯一索引 + 等值查询且记录存在 ❌ 只加 Record Lock(无需锁间隙)
唯一索引 + 等值查询但记录不存在 ✅ 在索引间隙上加 Gap Lock(如查询 id=4,锁 (3,5) 间隙)
唯一索引 + 范围查询(>, <, BETWEEN, LIKE 等) ✅ 对命中范围内的所有记录加 Record Lock + 间隙加 Gap Lock
非唯一辅助索引 + 任何查询 ✅ 通常都加 Next-Key Lock,因为辅助索引不是唯一的,需要额外防止幻影行
没有索引(全表扫描) ✅ 锁定整个表(所有行 + 所有间隙),相当于表锁,极影响并发

4. 为什么需要索引范围锁?

解决的问题 说明
幻读(Phantom Read) 防止其他事务在当前事务的查询范围内插入新行,保证可重复读的语义。
数据一致性 在 SELECT ... FOR UPDATE 或 UPDATE/DELETE 时,确保范围操作不会遗漏或错误影响其他并发事务。
唯一性约束 在插入或更新唯一索引时,通过 Gap Lock 防止并发插入相同键值,维护索引唯一性。

5. 索引范围锁的代价与风险

问题 说明
并发度下降 锁定的范围越大,阻塞的其他事务越多,系统吞吐量降低。
死锁风险增加 多个事务对相同间隙加锁,容易产生循环等待(如事务A锁 (1,3),事务B锁 (3,5),A想插4,B想插2,形成死锁)。
性能开销 大量 Gap Lock 会消耗内存和锁管理器资源,特别是在大范围查询时。
间隙锁在只读事务中也会加? 在 REPEATABLE READ 下,普通的 SELECT(非 FOR UPDATE/LOCK IN SHARE MODE)通过 MVCC(多版本并发控制) 实现一致性读,不会加任何锁,因此无此开销。只有写操作(SELECT ... FOR UPDATE、UPDATE、DELETE)才会触发索引范围锁。

6. 如何减少索引范围锁的影响?

策略 说明
尽量使用唯一索引进行等值查询 只加 Record Lock,避免 Gap Lock。
缩小查询范围 避免 SELECT ... FOR UPDATE 扫描大范围,尽量精确命中。
使用 READ COMMITTED 隔离级别 该级别下 InnoDB 只加 Record Lock,不加 Gap Lock,但会丢失可重复读语义,允许幻读。
优化索引设计 确保 WHERE 条件能命中高效索引,减少扫描范围。
合理设计事务 缩短事务执行时间,尽早提交释放锁。

7. 范围锁 vs. 谓词锁

维度 索引范围锁(Next-Key Lock) 谓词锁(Predicate Lock)
实现方式 基于 B+Tree 索引物理结构,锁定具体键值和间隙 基于逻辑谓词条件(如 age = 25),锁定满足条件的所有可能数据
是否真正实现 ✅ MySQL/InnoDB 默认实现 ❌ 理论方案,实际实现极少(性能代价过高)
适用场景 事务的索引范围查询 理想的高隔离级别理论框架
幻读防护能力 ✅ 在可重复读级别下有效阻止幻读 ✅ 理论上完全阻止幻读

总结

索引范围锁(Next-Key Lock)是 InnoDB 在 REPEATABLE READ 隔离级别下,利用 B+Tree 索引结构,通过“记录锁 + 间隙锁”组合实现的、用于防止幻读的实用锁机制。

  • 优点:在索引有序的前提下,能高效锁定范围,保证可重复读语义。
  • 代价:牺牲部分并发性能,增加死锁风险。
  • 最佳实践:尽量使用主键或唯一索引进行精确查询,减少范围锁定;在能接受幻读的场景下,可考虑降级隔离级别到 READ COMMITTED 以换取更高并发。

可串行化快照隔离 Serializable Snapshot Isolation

是一种既提供最高级别“可串行化”事务隔离保证,又能保持“快照隔离”高性能的并发控制算法
结合了两种隔离级别的优点:像可串行化一样严格保证数据一致性,避免各种并发异常;同时在性能上又非常接近快照隔离,避免了传统悲观锁机制带来的大量阻塞和性能损耗

解决了以下两种方案的问题:
快照隔离 (SI):性能好,读操作不阻塞写操作。但存在“写倾斜”等并发异常,无法保证完全可串行化,可能产生不可串行的执行结果。
两阶段锁 (2PL):能保证可串行化,但采用悲观策略。事务在操作前就必须获取锁,容易导致阻塞、死锁,在高并发场景下性能和扩展性较差。

SSI 基于快照隔离,采用了一种更“乐观”的策略:

  1. 乐观执行:事务可以基于其快照自由读写,不会因为潜在的冲突而被阻塞,因此读写性能很高。
  2. 提交前检测:当事务准备提交时,数据库会检查其执行过程中是否与其他并发事务产生了可能导致非可串行化结果的读写依赖关系(如读-写冲突)。
  3. 裁决与重试:如果检测到这类有问题的依赖(例如,形成了一个依赖环),为了保持数据一致性,数据库会中止(Abort)当前事务或相关事务,并通知应用层进行重试。如果未检测到问题,则事务成功提交。

尽管 SSI 很强大,但使用它时仍需注意:

  • 必须处理重试:由于可能存在事务被中止的情况,应用程序必须正确捕获序列化失败错误,并重试整个事务。这是使用 SSI 的代价,也是应用需要承担的职责。
  • 高冲突下的性能:如果系统并发事务间的数据访问冲突非常严重,会导致大量事务被中止和重试,反而可能因为重试的额外开销而降低系统整体性能。
My Little World

数据库索引和冲突解决

发表于 2026-08-31

数据库索引(database index)

索引是一种数据结构,针对特定key, 可以使读取数据加快,但写入速度降低
处理常见数据量过大情况下进行查找问题,避免挨个遍历数据(无论是从前往后还是从后往前找),提高查找效率O(n)
比如
具体查找,找到key = xxx的 那条数据
范围查找,找到key在[xxx, xxx]之间的数据

MySQL官方对索引定义:索引是MySQL存储引擎用于快速查找记录的一种数据结构。
简单理解为:索引是排好序的数据结构,帮助我们快速的查询数据库表中的数据。
• 索引是一种特殊的数据文件
。 MyISAM存储引擎:数据文件和索引文件是分开的。索引文件中保存的是数据记录的地址。
。InnoDB存储引擎:表数据本身就是按照B+Tree组织的索引结构。ibd文件 就是数据+索引存储文件。
• 索引是一种数据结构
。索引是一个独立的、物理的数据结构,它是由一个表中的一个字段或者多个字段的值组合成的集合。
• MySQL中,默认使用的是B+Tree结构管理索引。

没有索引

查找数据需要从磁盘中一条一条进行对比

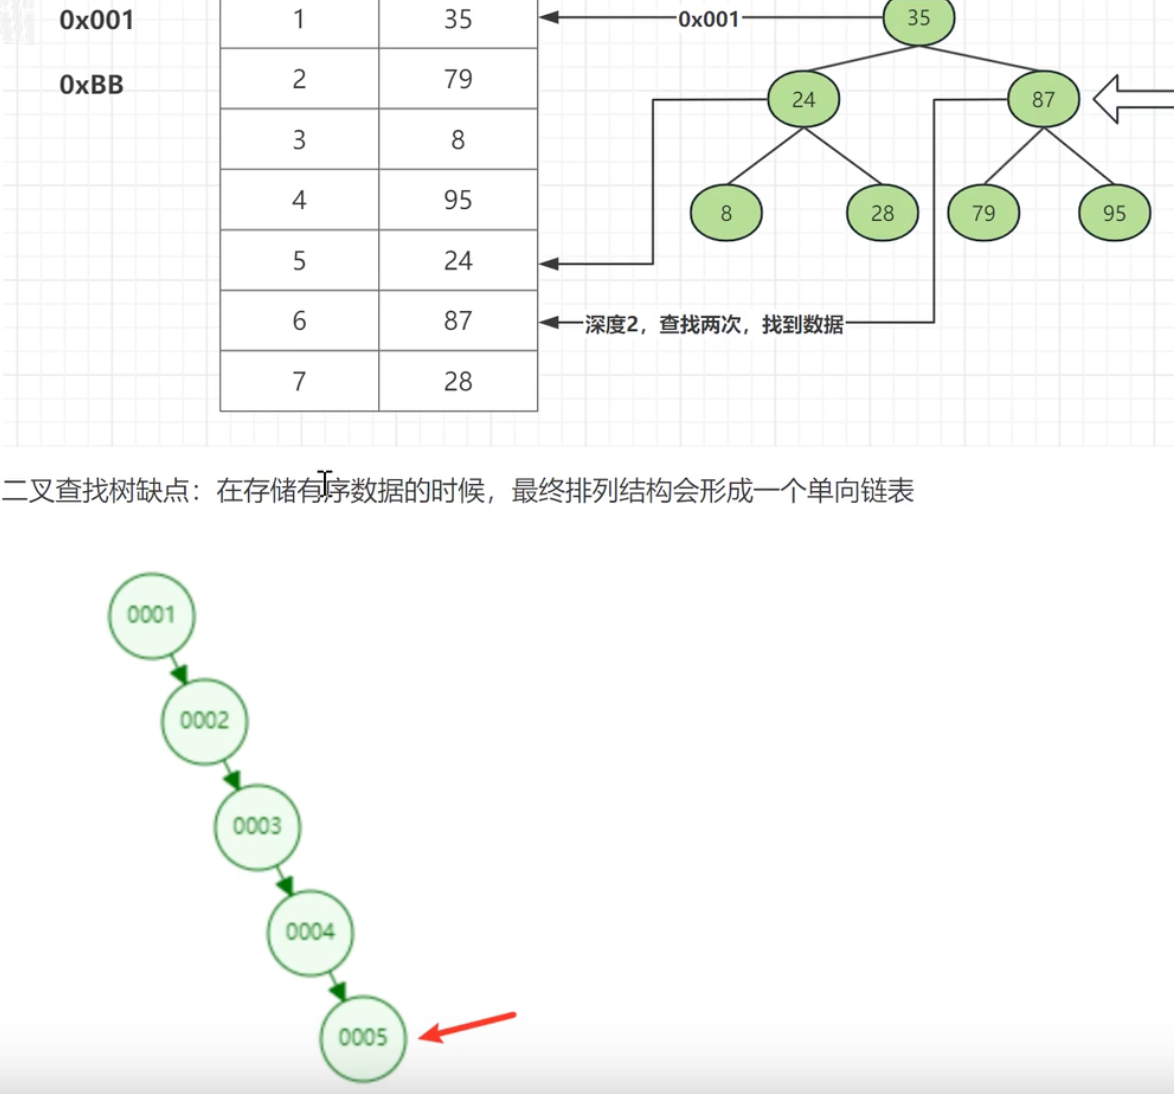
二叉查找树索引

使用二叉查找树,构建索引
• 任何一个节点的左子树上的键值,都必须小于当前节点。
• 任何一个节点的右子树上的键值,都必须大于当前节点。
• 每个节点分别保存,字段数据和指向数据记录的物理地址的指针。|

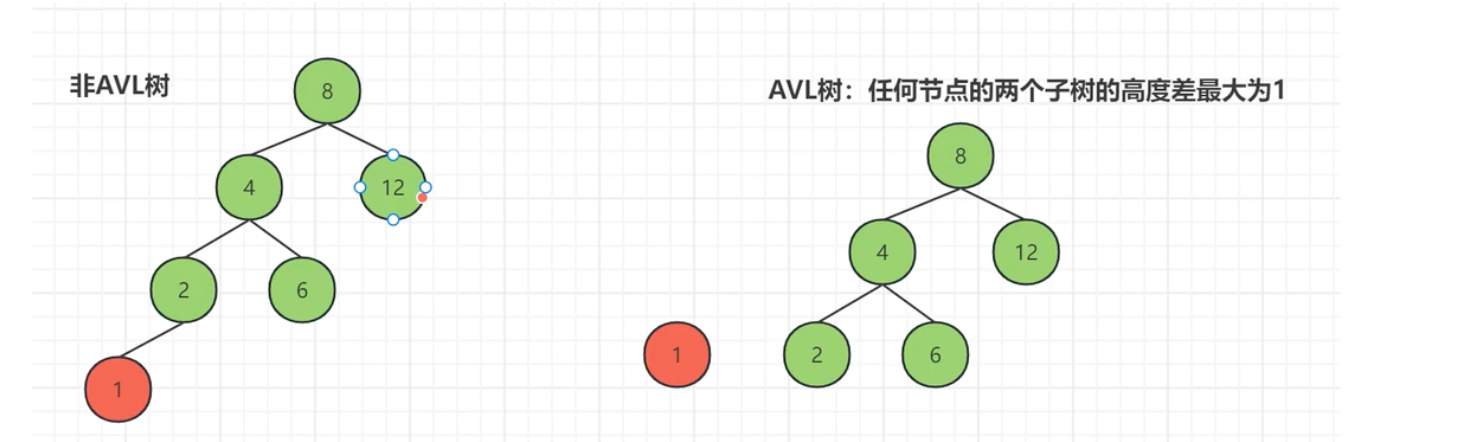
平衡二叉树索引

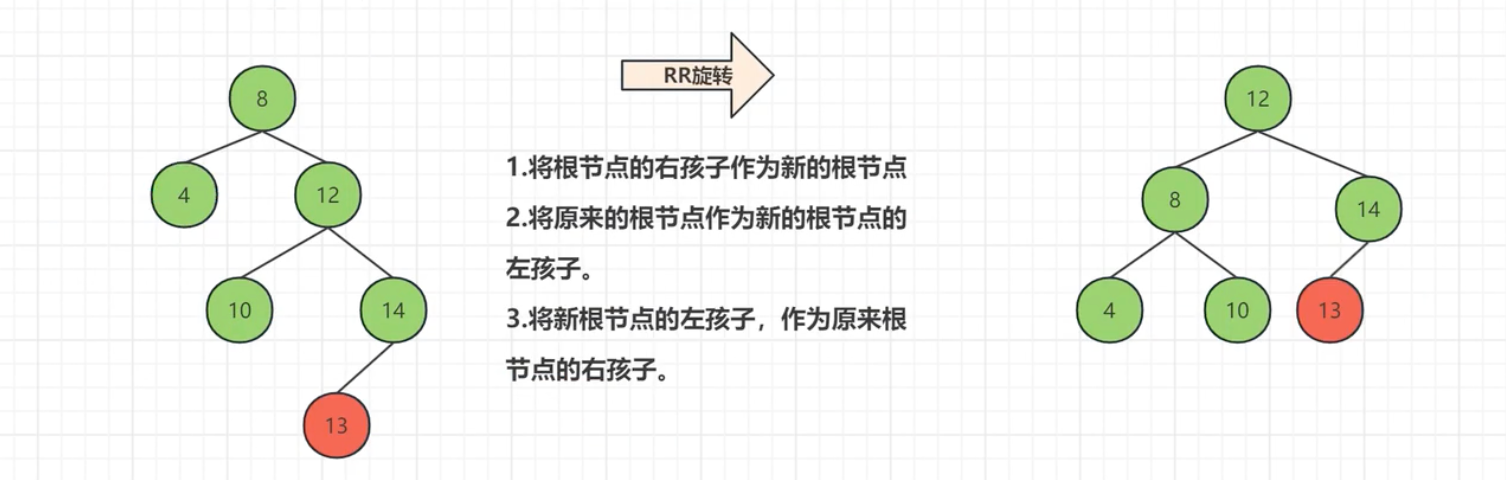
平衡二叉树通过让树的叶子节点自动旋转和调整,让整课树保持平衡状态。
平衡二叉树的特点:
• 在符合二叉查找树的条件下,还满足任何节点的两个子树的高度差最大为1.

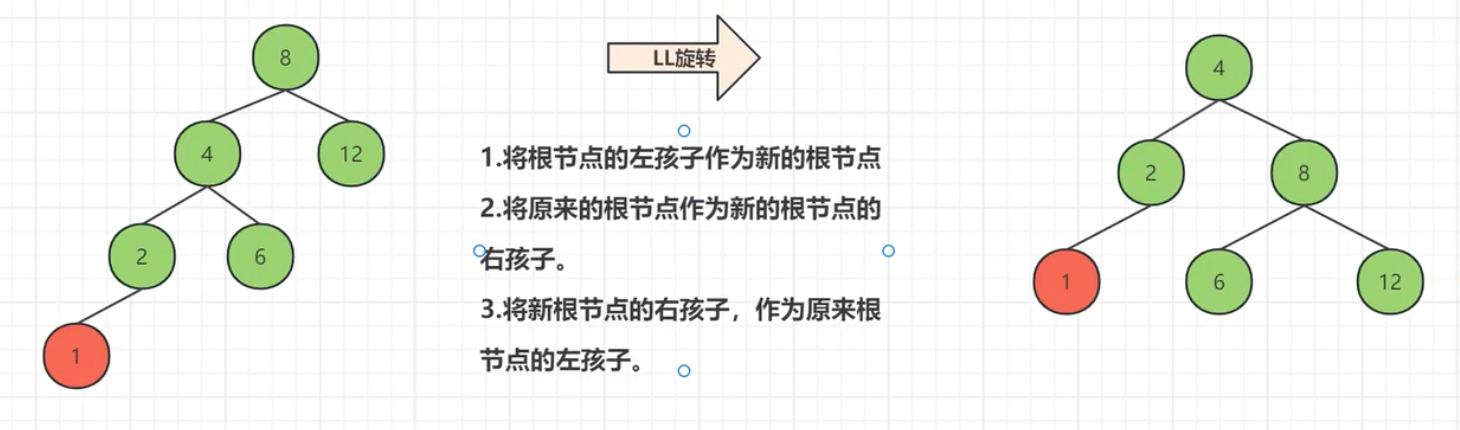
AVL树 在失去平衡之后(两个子树的高度差>1),可以通过旋转使其恢复平衡。

AVL树的优点
•叶子节点的层级相对减少了。
• 形态上能够保持平衡
• 查找效率提升,大量的顺序插入操作也不会导致查询性能下降
AVL树的缺点:
• 一个节点最多分裂出两个子节点,树的高度太高,导致IO次数过多
• 节点里面只保存一个关键字,每次操作获取的目标数据太少

哈希索引(hash index)

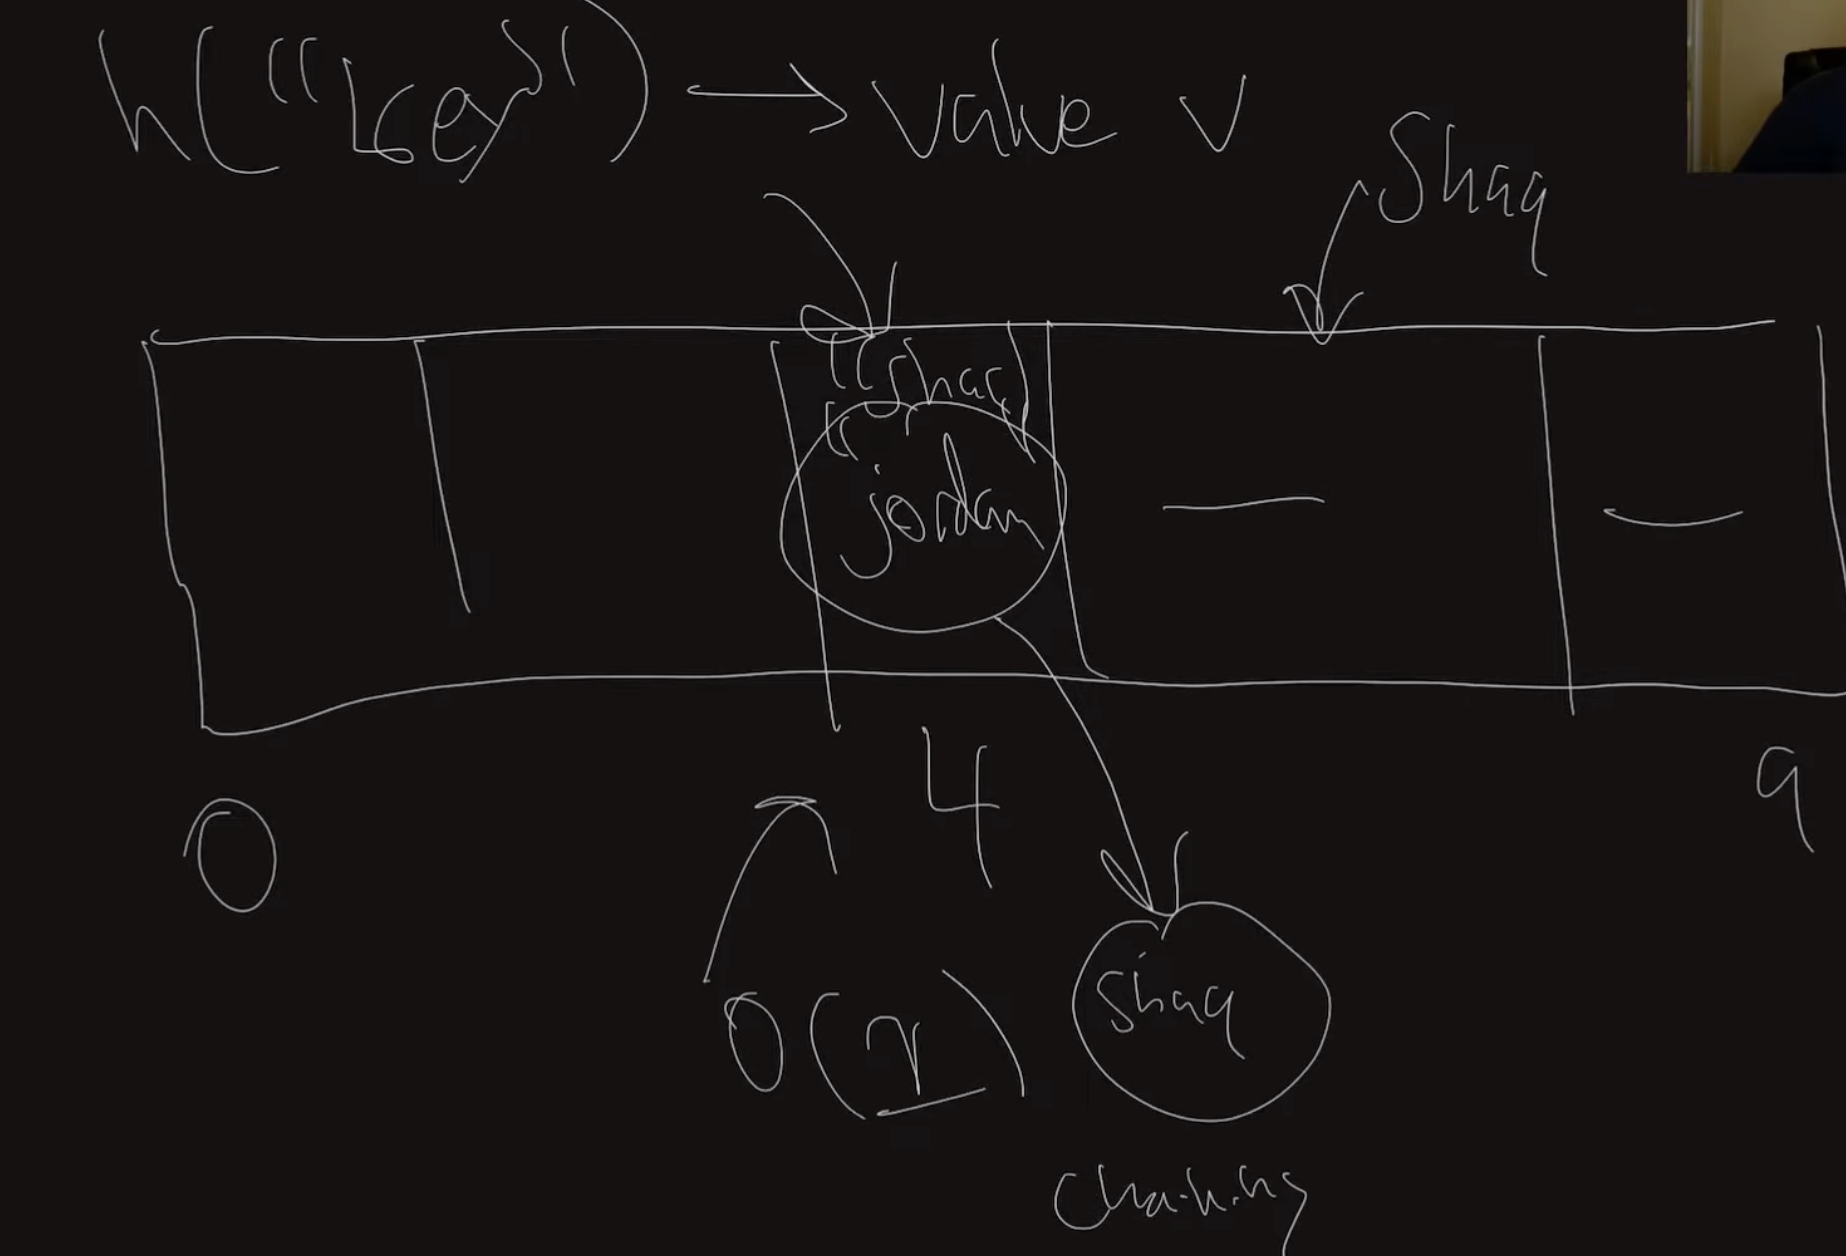
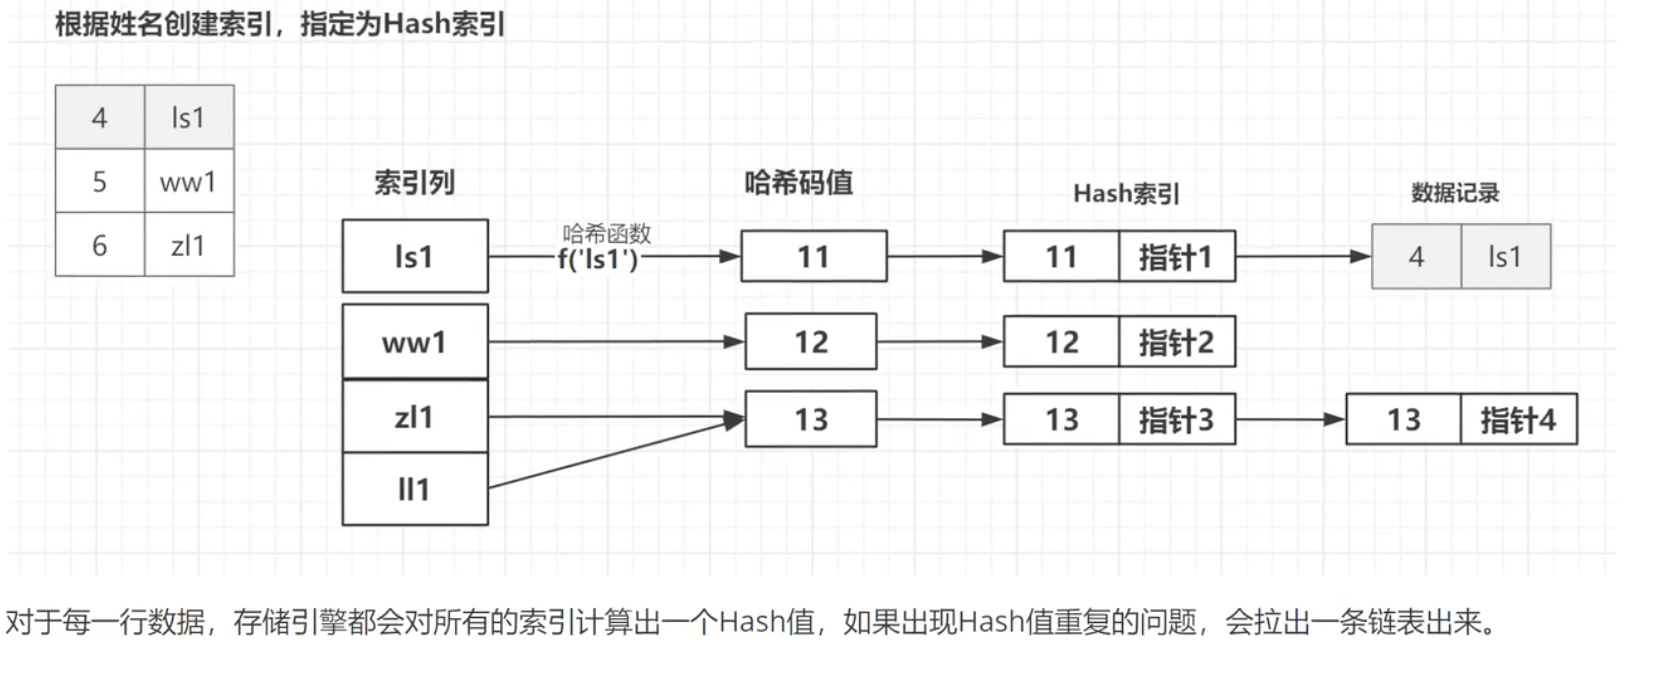
通过哈希函数对某一特定key值进行计算生成hash map key值,将数据存储或者内存地址存在对应的hash map key值对应的bucket中
这样可以实现O(1)时间复杂度的查找效率,对于读写都是
hash map key值唯一且有限,比如从1-100000000
对于哈希函数计算结果相同的情况,可以在bucket中通过链表进行存储或者在hash map 中继续查找有无空位填入

• Hash索引底层是由Hash表实现的,是根据键值<key,value>存储数据。
• Hash索引非常适合 根据Key查找value值,也就是单个key的查询或者说等值查询。

个人理解: 类似将数据根据关键key通过哈希函数强制进行归类,这样在查找的时候,进行同样的哈希计算,直接过滤掉哈希值不同的情况,从而降低挨个查找的工作量

小结

Hash索引的优点:
•O(1) reads and writes
•索引结构是比较紧凑的,因为只存储对应的hash值,如果只是做等值查询,不包含排序或者范围查询的需求,可以选择Hash索引。
•在没有哈希冲突的情况下,等值查询访问hash索引的速度是比较快的,理论上比B+Tree快

Hash索引的缺点:
•索引结构是比较紧凑的,因为只存储对应的hash值,如果只是做等值查询,不包含排序或者范围查询的需求,可以选择Hash
•在没有哈希冲突的情况下,等值查询访问hash索引的速度是比较快的,理论上比B+Tree快。
•哈希索引只包含哈希值和行指针,不存储字段值,不能使用索引中的值来避免读取行。
•哈希索引只支持等值比较查询。不支持任何范围查询。
•哈希索引的数据并不是按照索引值顺序存储的,所以就无法用于排序。
•在遇到大量的Hash值相等的情况时,性能下降明显。

缺点简记:
由于hash function 会将数据均匀分布到不同的bucket中,这使得在存储磁盘中存储地址不连续,导致连续查找性能较差,只能存储在内存中
存内存的话RAM 访问性能高,但是expensive, size less, key 也要适配ram 的存储方式
不能范围查找,O(n), 需要遍历所有数据才能找到符合条件的数据
不能排序,同上

应用场景
• 在MYSQL中 哈希索引主要应用于内存表,也就是Memory引擎。
• InnoDB引擎不支持 对表中字段创建Hash索引

预写日志

主要用于解决数据丢失问题,在对数据进行操作的每一步都将操作日志记录下来存在磁盘中,当数据丢失时,可以通过根据之前的日志进行操作
从而来重建索引和数据
这个方案也适用于其他类型索引情况
对于哈希索引,需要先写入日志,再更改哈希索引

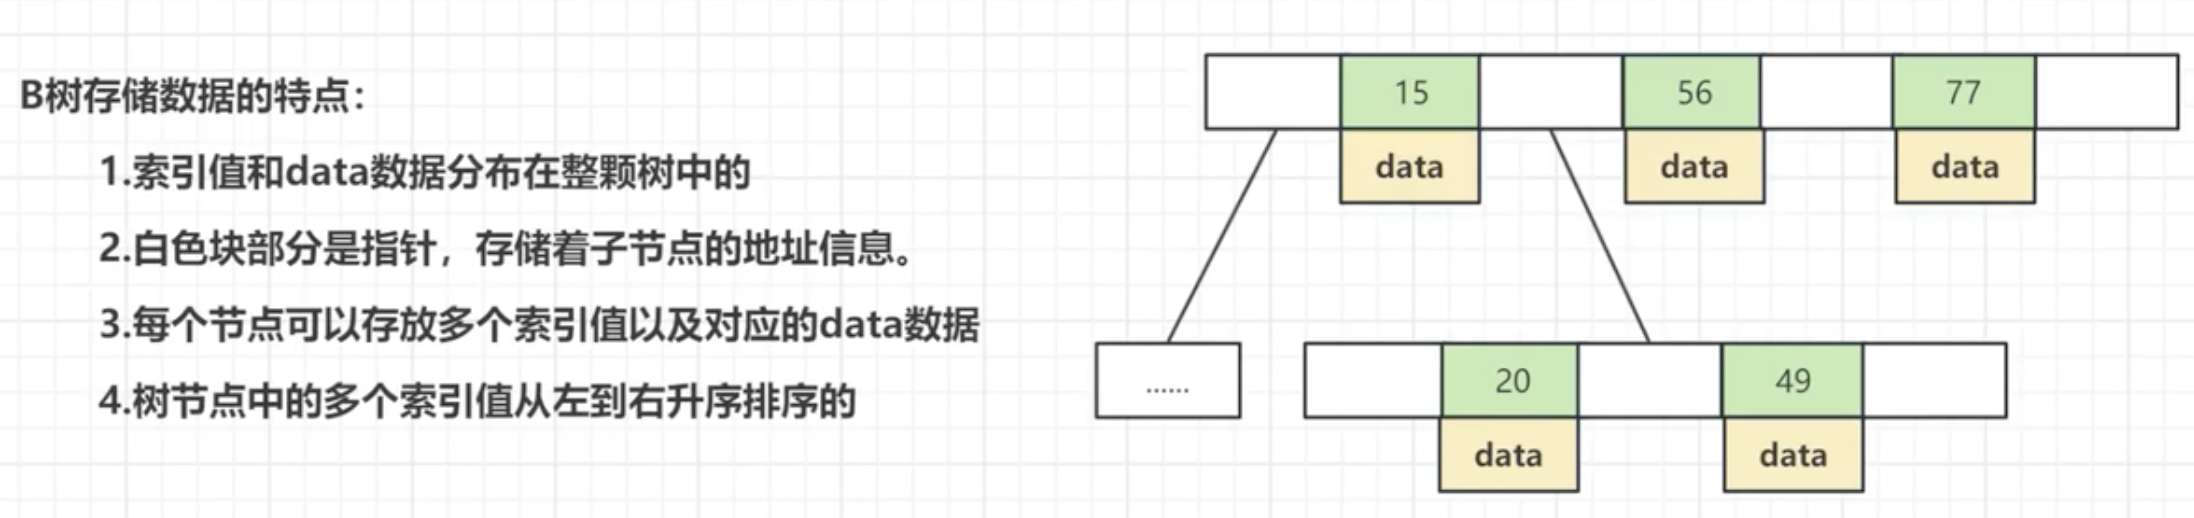
B-tree索引

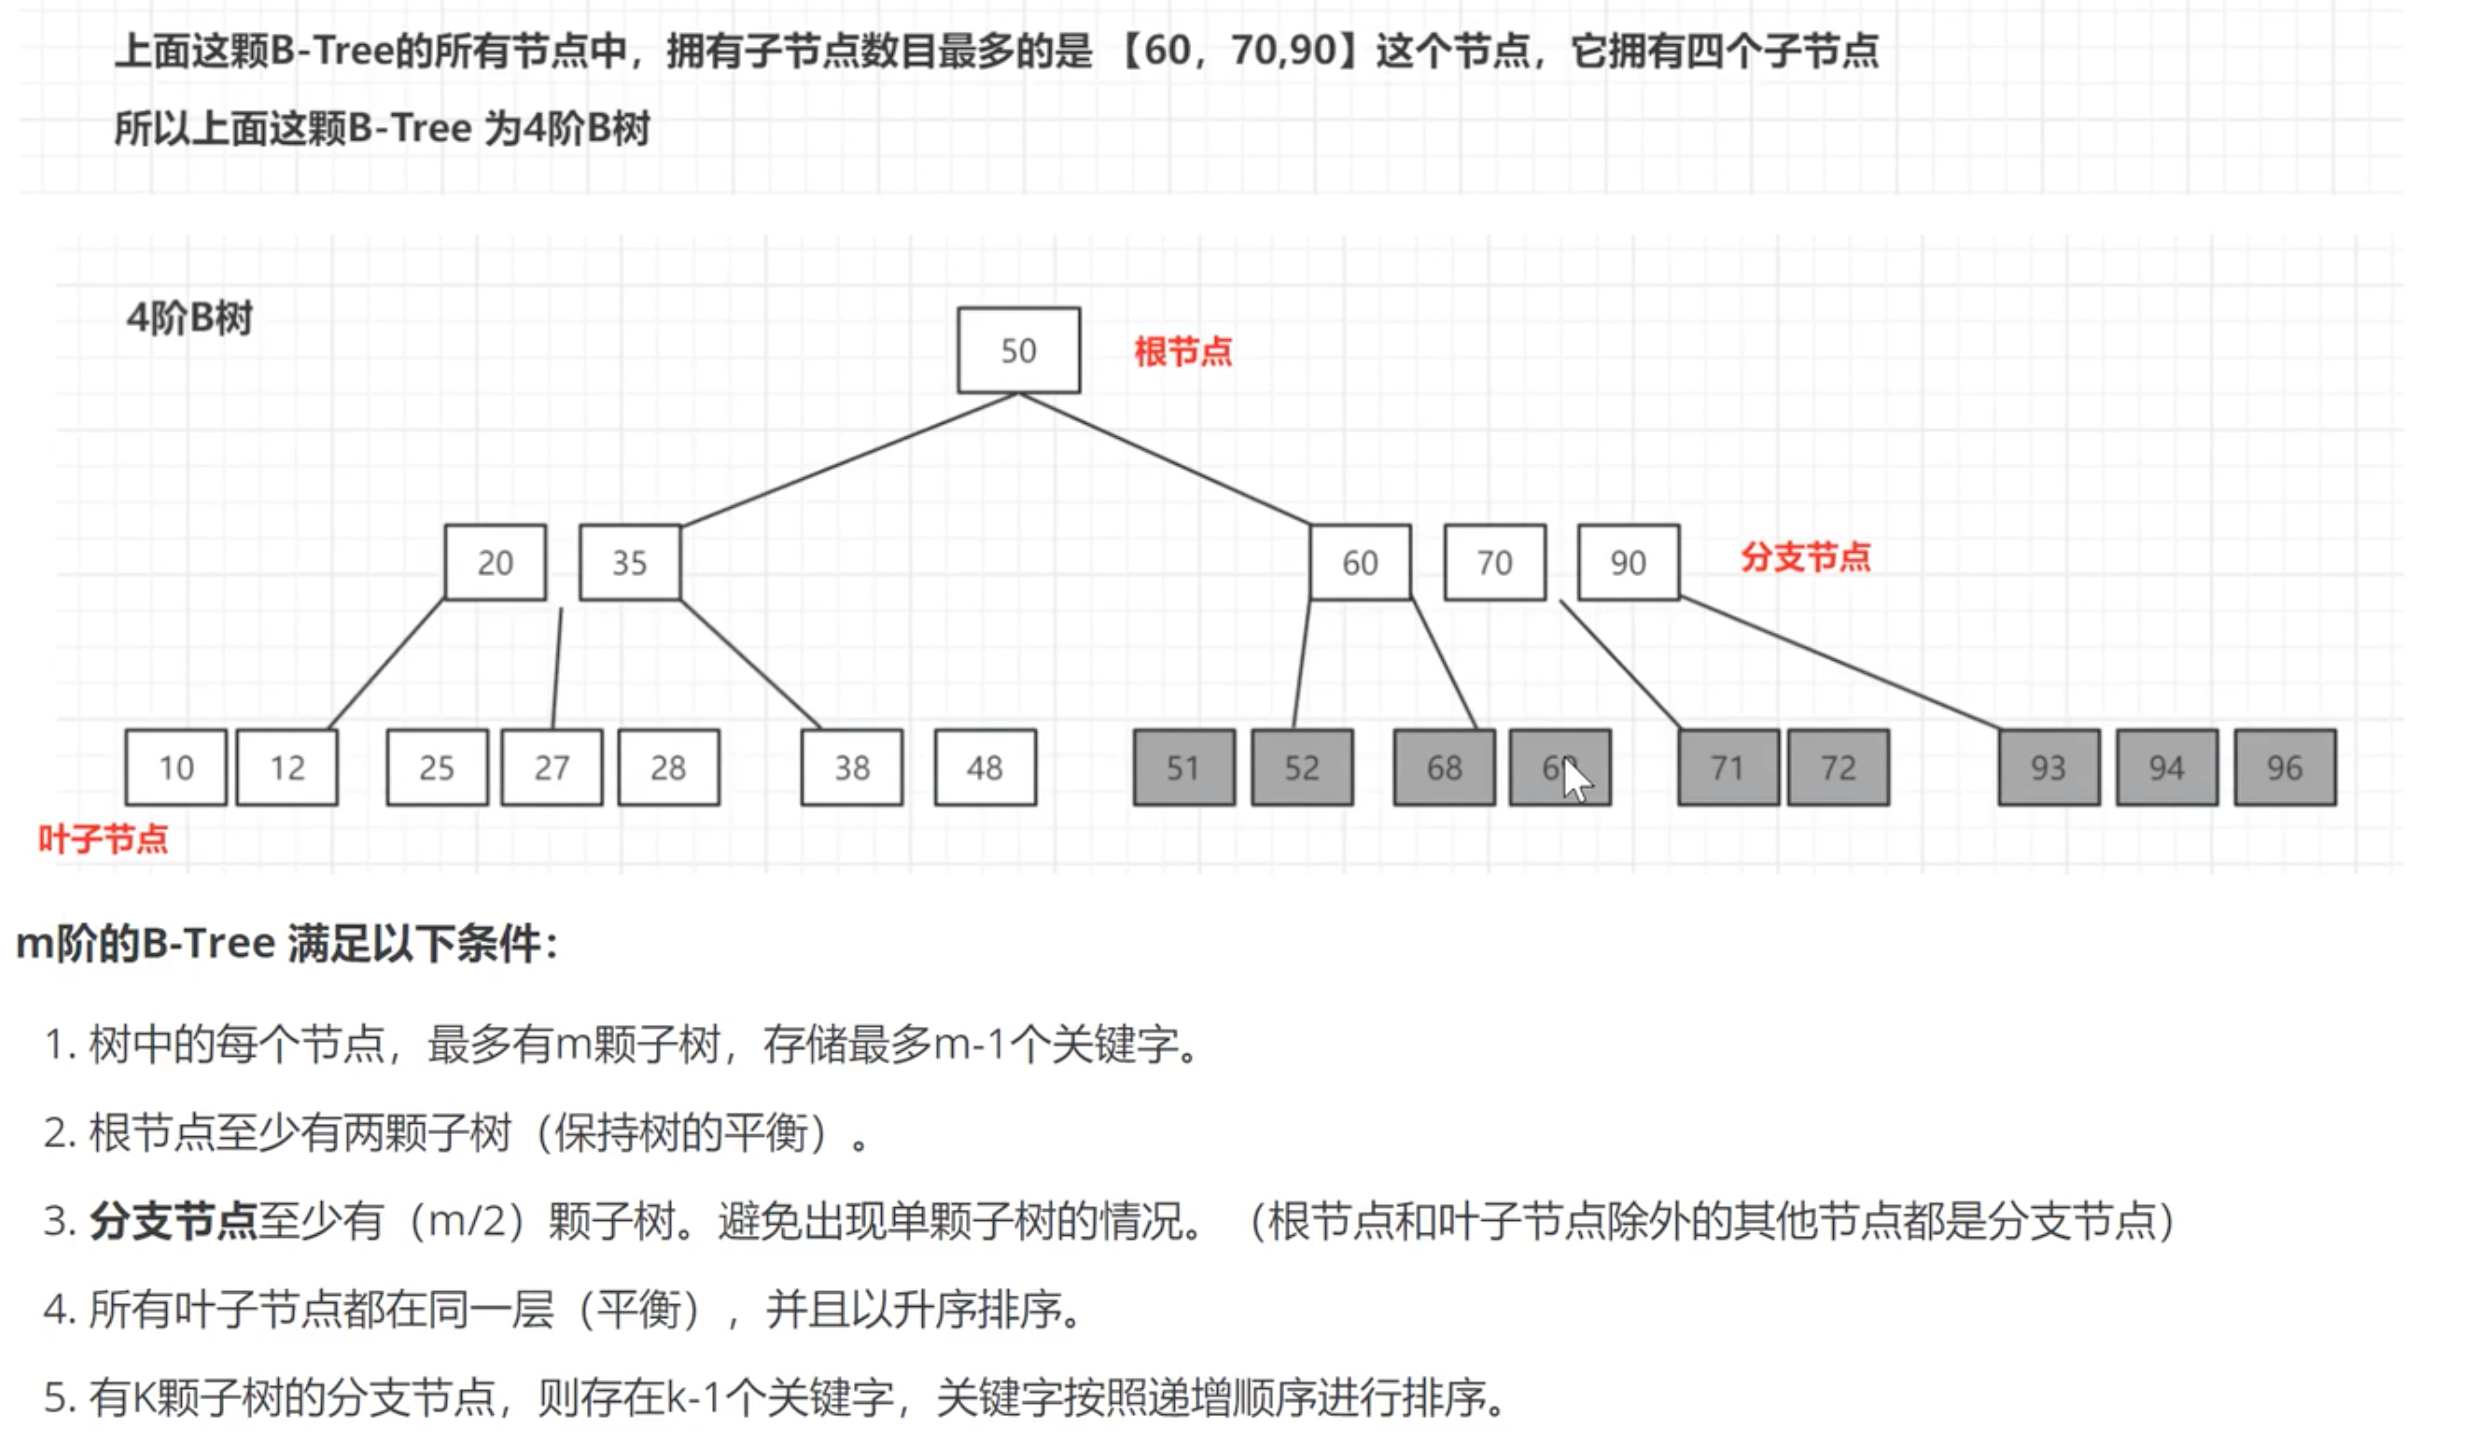
B-tree结构和存储


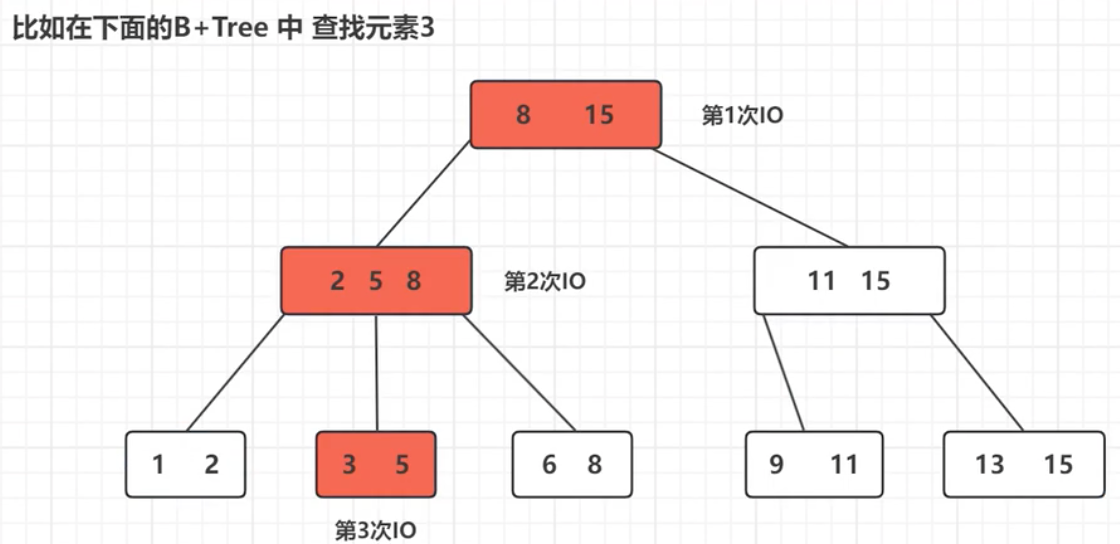
B-Tree的查找操作

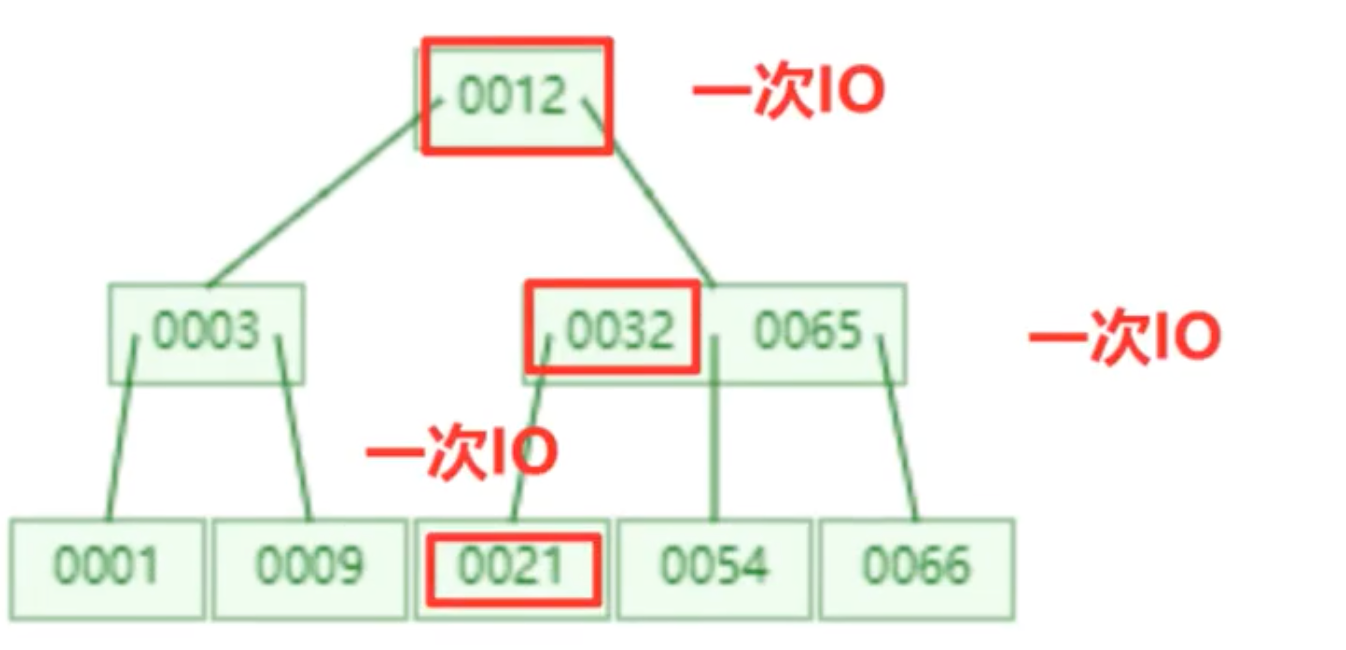
  1. B-Tree的每个节点的元素,可以视为一次I/O的读取,树的高度就表示了最多的IO次数。
  2. 在相同数量的总元素的个数下,每个节点的元素个数越多,高度越低,查询需要的IO次数就越少。

• B-Tree的优点
。 B树可以在内部节点存储键值和相关的记录数据,因此把频繁访问的数据放在靠近根节点的位置,可以提高热点数据的查询效率。
• B-Tree的缺点
。 B-Tree中每个节点不仅包含数据的key值,还有data数据。当data数据较大的时候,会导致每个节点存储的key值減少了,就会导致B树的层数变高。增加查询的1/O次数。
• 使用场景:B树的使用场景主要应用于文件系统以及部分数据库索引,比如MongoDB,大部分的关系型数据库索引是使用的 B+树实现

B+tree索引

B-Tree存在的问题
•在B树中,每个节点都会存储数据,如果每个节点存储的都是行数据,那么占用的内存就会大大的增加,树的高度也会变高,就会增加I/O操作的次数。
•B树适用于随机访问,但是范围查询是不适合的,因为范围查询通常需要顺序访问一系列的键值,不是随机访问。由于B树的结构的特点,无法有效的执行范围查询

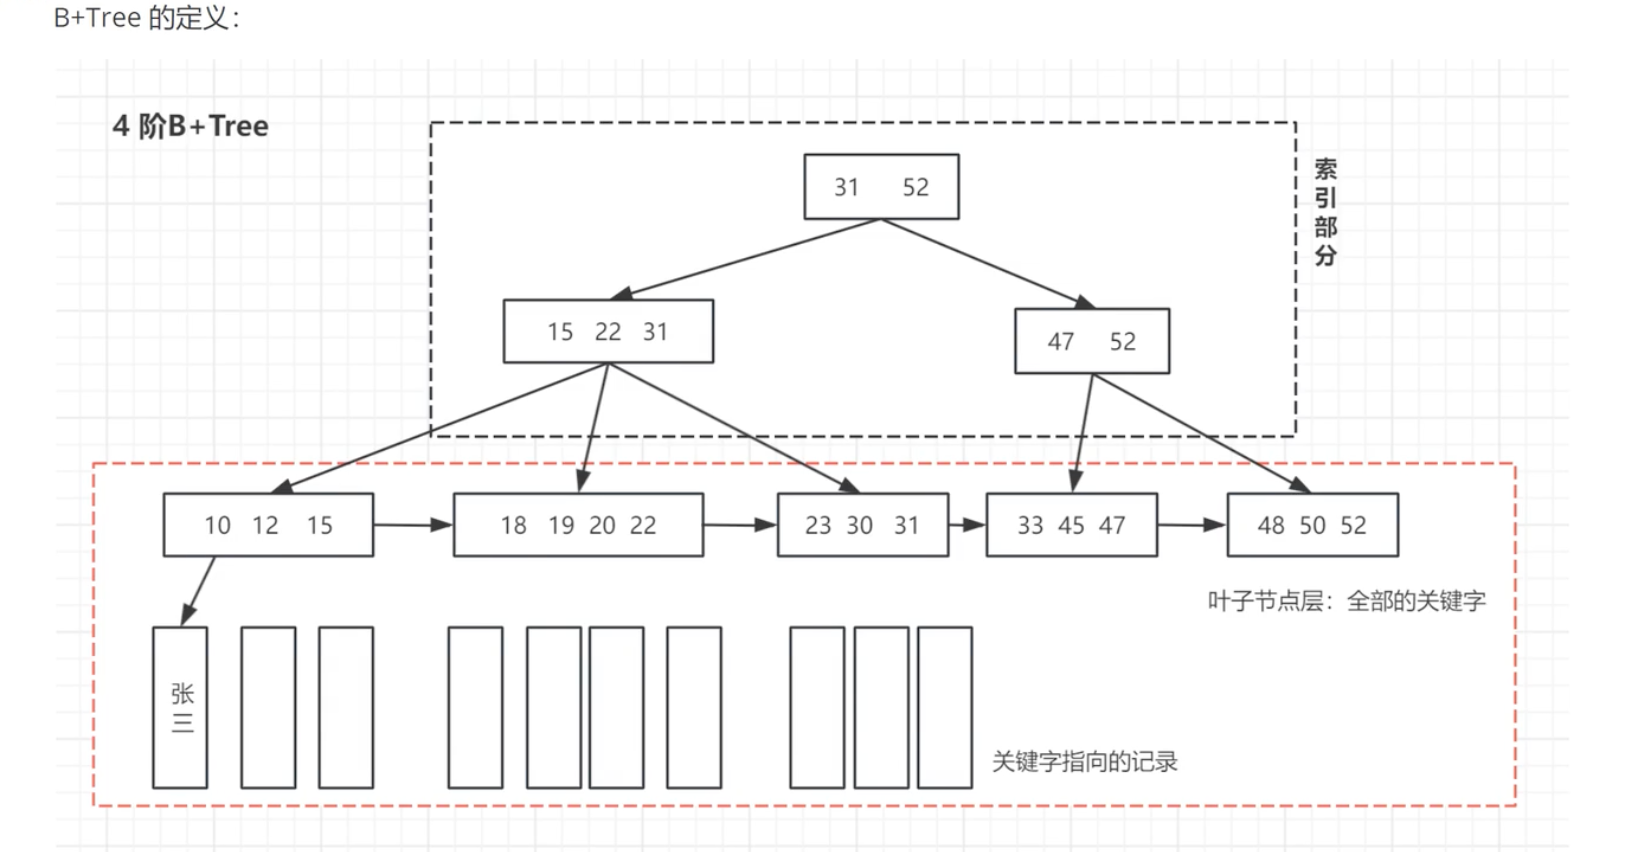
B+Tree 在B-Tree基础之上做了一些优化。B+Tree更加适合实现存储索引结构。InnoDB引擎就是通过B+Tree实现其索引结构的。

【解决读多写少的问题】

一颗m阶的B+树要满足下列要求:

  1. 每个分支节点至多有m颗子树。
  2. 根节点或者没有子树,或者至少有两棵子树。
  3. 除了根节点以外,其他每个分支节点至少要有【m/2】 棵子树。
  4. 有n棵子树的节点,恰好有n个关键字。子树的个数与该节点的关键字的个数相同。(b-tree 有n-1 个关键字)
  5. 所有的叶子节点包含全部的关键字,以及指向相应记录的指针,而且叶子节点的关键字,自小到大顺序链接。并且所有的叶子节点链接到了一起。
  6. 所有的分支节点中,仅包含它的各个子节点中最大的关键字以及指向子节点的指针。
  7. B+树中,只有叶子节点保存数据,其他节点仅仅是索引,没有任何的数据关联

B+Tree结构存储索引的特点
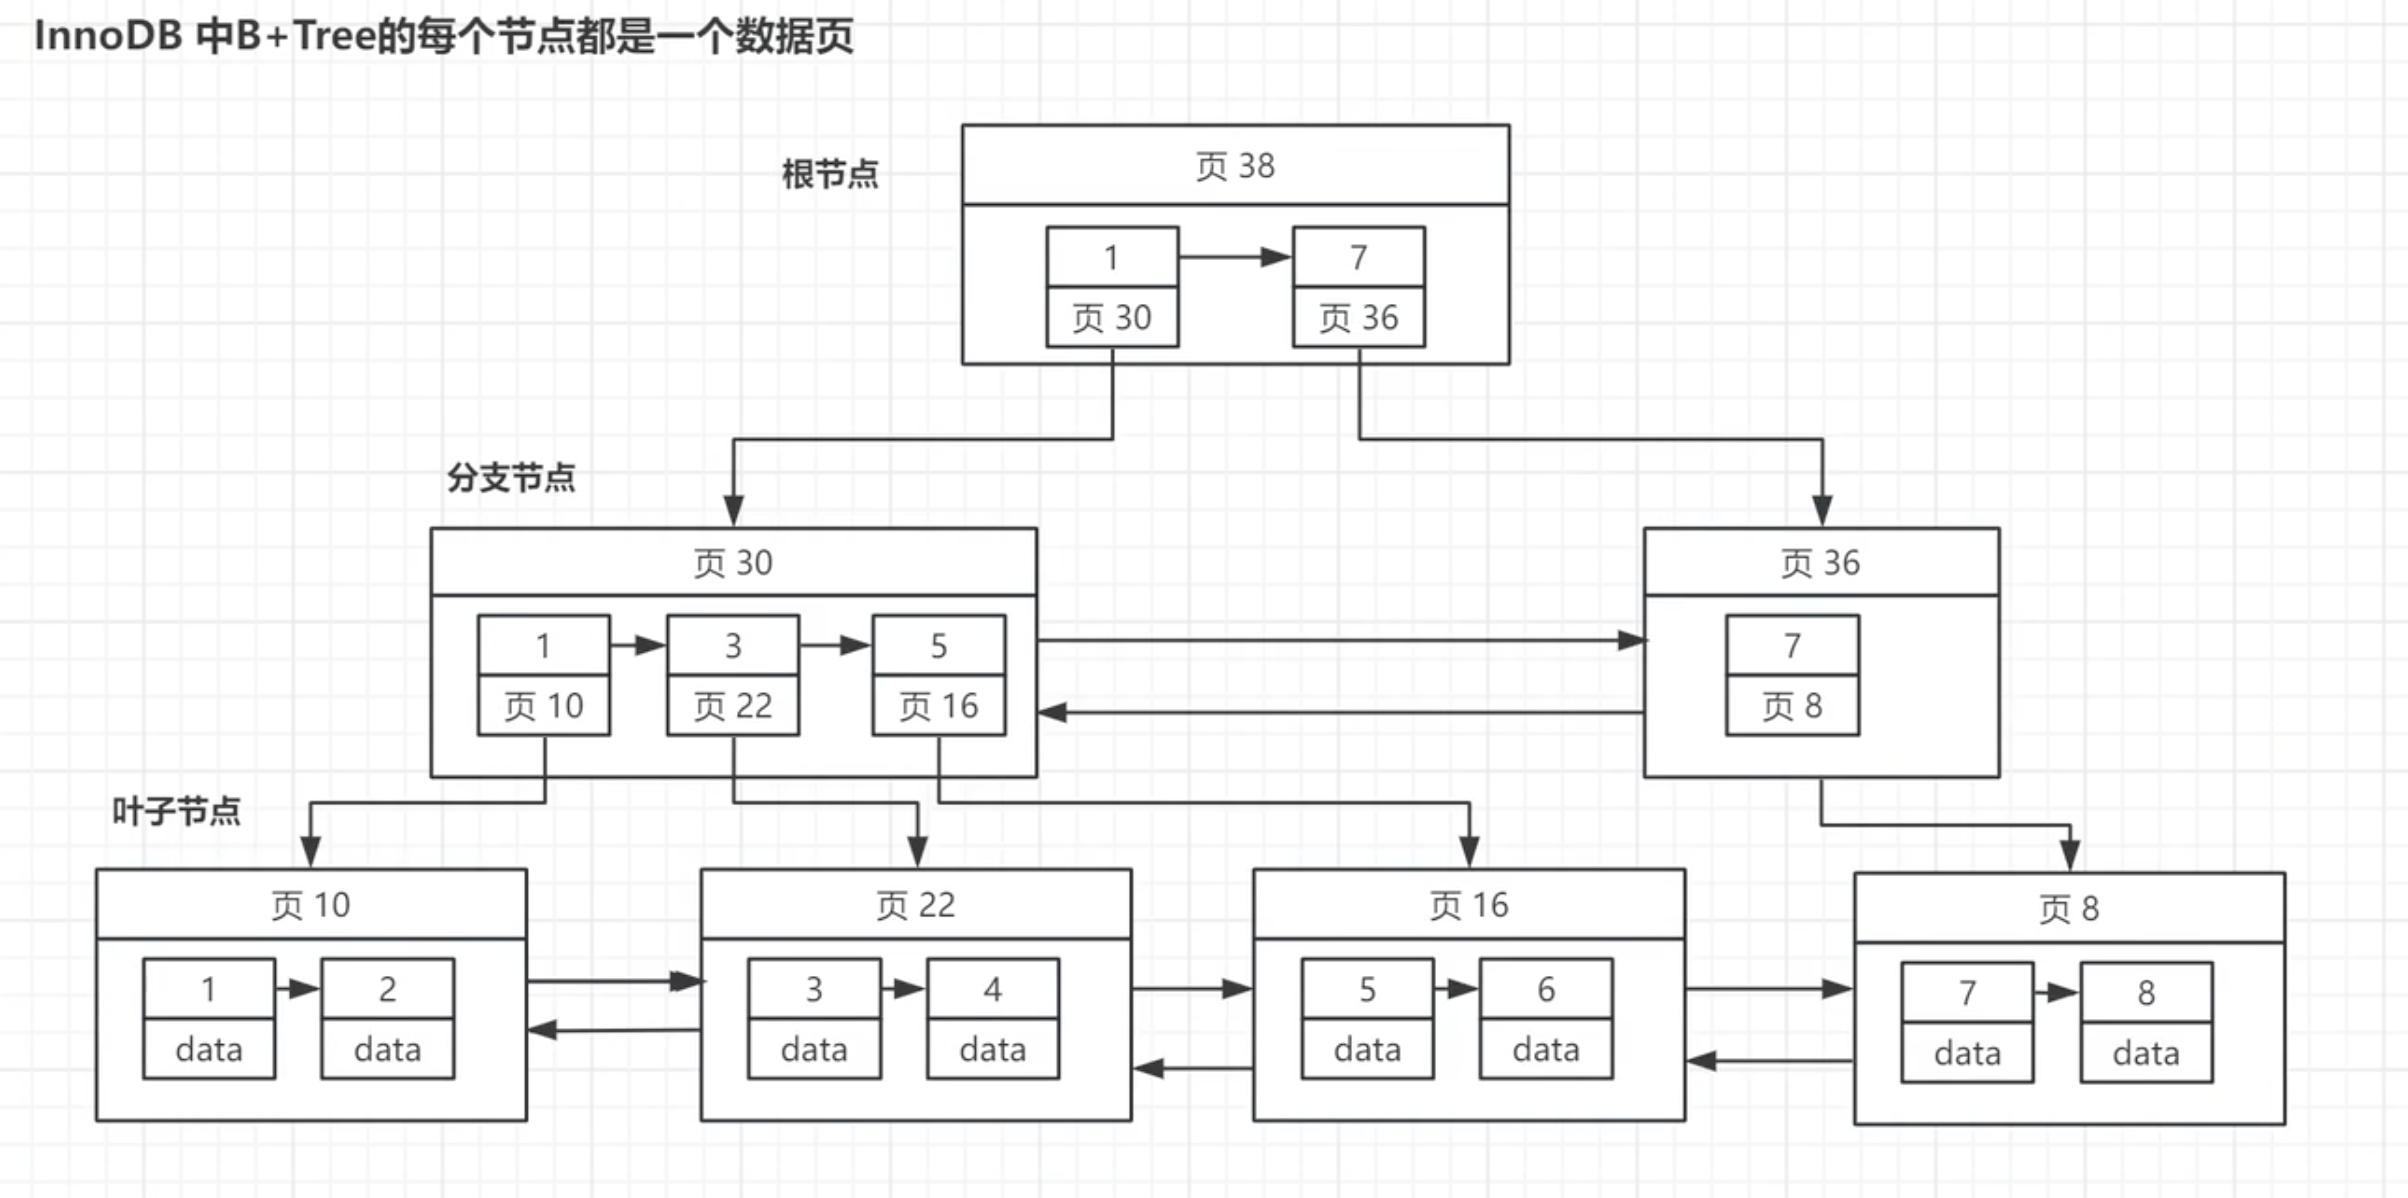
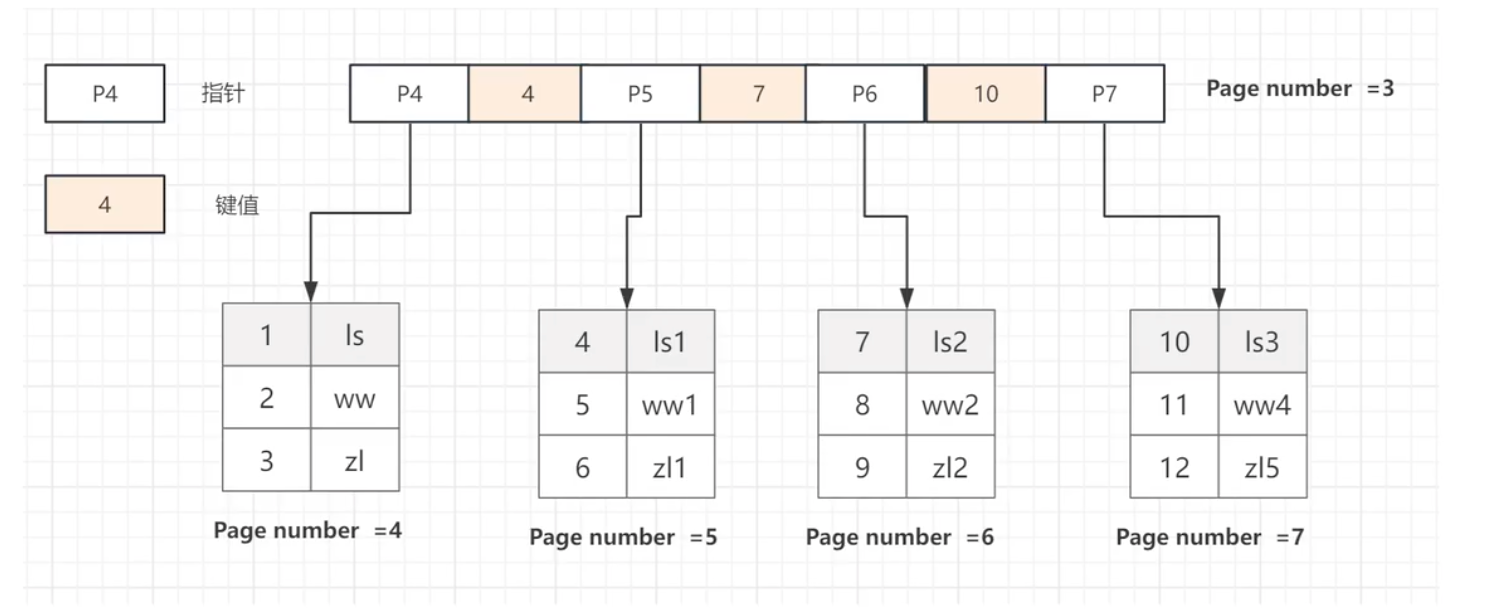
从MySQL数据页的角度看B+Tree:
• MySQL的InnoDB存储引擎中,最小存储单元就是页(每页默认大小是16KB)
•MySQL的设计者将一颗B+Tree的节点的大小 就设置为了等于一个页(16KB),这样做的目的是为了每个节点只需要一次IO就能够完整的载入一页数据。


MySQL B+Tree存储索引的特点

  1. MySQL的B+Tree 分支节点的数据页,存放的是”关键字+指针”。
  2. 叶子节点的数据页,存放的”关键字+全部数据”,这里单指聚簇索引来说。
  3. B+Tree的根节点是保存在内存中的,子节点存储在磁盘上的。
  4. 所有的节点按照索引键大小排序,构成一个双向链表,便于范围查询。

B+Tree的查找操作
两种查找方式:
1.跟B-Tree一样,通过指针实现随机查找,从根节点开始。
2.根据叶子节点进行顺序查找,在一个节点的内部可以实现折半查找,在多个节点之间,因为是通过指针连接的,所以要使用顺序查找。

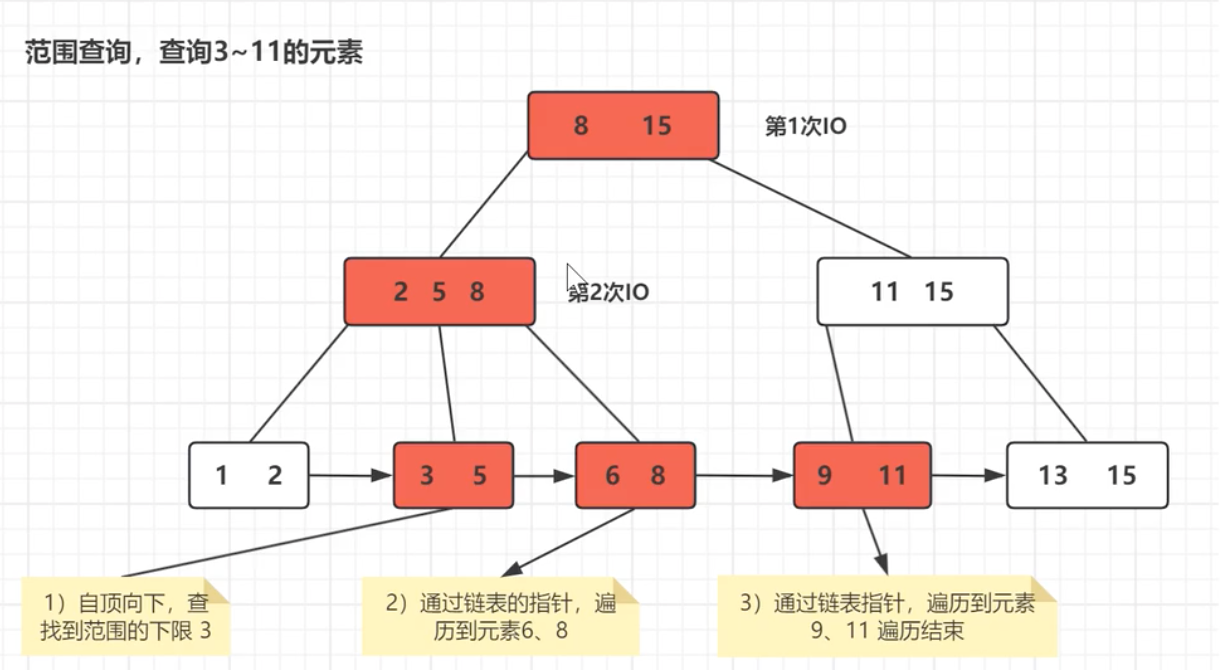
单个元素的查询:

范围查询:IO次数更少,查询简便。

B+Tree的优势
对于B-Tree,B+Tree具有以下优势:

  1. B+Tree的中间节点是没有数据,所以同样大小的磁盘页,B+Tree可以容纳更多的节点元素(保存更多的索引),在数据量相同的情况下,B+Tree比B-Tree会更加的矮胖,因此查询时lO次数也就更少。
  2. B+Tree的查询效率是更加稳定的,B+Tree在查询时必须要找到叶子节点,而B-Tree只需要找到匹配的元素就可以了。因此B-Tree的查找性能是不稳定的,最好的情况是只查根节点,最坏的情况是找到叶子节点,而B+Tree的查找每次都是稳定的。
  3. B+Tree扫库和扫表的能力更强,如果我们需要根据索引进行数据表的扫描,对B-Tree 需要将整棵树遍历一遍,而B+Tree只需要遍历所有的叶子结点即可 +子节点之间有指针连接)。
  4. B+Tree排序能力更强,在上面范围查询的例子中,B+Tree天然具有排序的功能

一棵B+Tree可以存放多少数据?

MySQL中将B+Tree的节点的大小,设置为等于一个页(16KB)•

上面是一棵高度为2的B+Tree,存在一个根节点和 若干的叶子节点,那么这棵B+Tree的能够存放的总记录数为:

根节点指针数*单个叶子节点的记录数

计算步骤:

  1. 计算根节点的指针数:假设表的主键是int类型,占用4个字节,指针大小为6个字节。一个页大概可以存储:
    16384/(4b+ 6b)=1638,一个节点最多存储1638个索引指针。
  2. 计算每个叶子节点存储的记录数:假设一行记录的大小为1KB,那么一页就可以存储16行数据,16KB/ 1KB=16。
  3. 高度为2的B+Tree可以存放的记录数为:16384 x 16=26208条 数据记录,以此可以推算出高度为3的B+Tree可以存放的记
    录数为:1638 x 1638 x 16=4千万条数据。
    InnoDB中的B+Tree高度一般为1~3层,就可以满足干万级别的数据存储

LSM-TREE索引 + SSTable

lsm-tree: log structure merge tree ,日志结构合并树
解决写多读少 (利用顺序I/O)的问题,磁盘利用率比B+Tree(一般为50%左右)高(利用compaction)
sstable: Sorted String Table ,排序字符串表

一些前置相关知识

后端开发常见层式结构:时间轮、跳表、LSM-Tree

  1. 海量并发的定时任务组织:时间轮
  2. 高并发读写的有序结构组织:跳表
  3. 空间利用率以及写性能高的磁盘数据组织:LSM-Tree
    时间轮:linux内核、skynet、kafka、netty
    跳表:redis.lucene(倒排索引)、rocksdb
    Ism-tree: leveldb rocksdb分布式关系型数据库 tidb (mysql) cockroachdlb (pg)

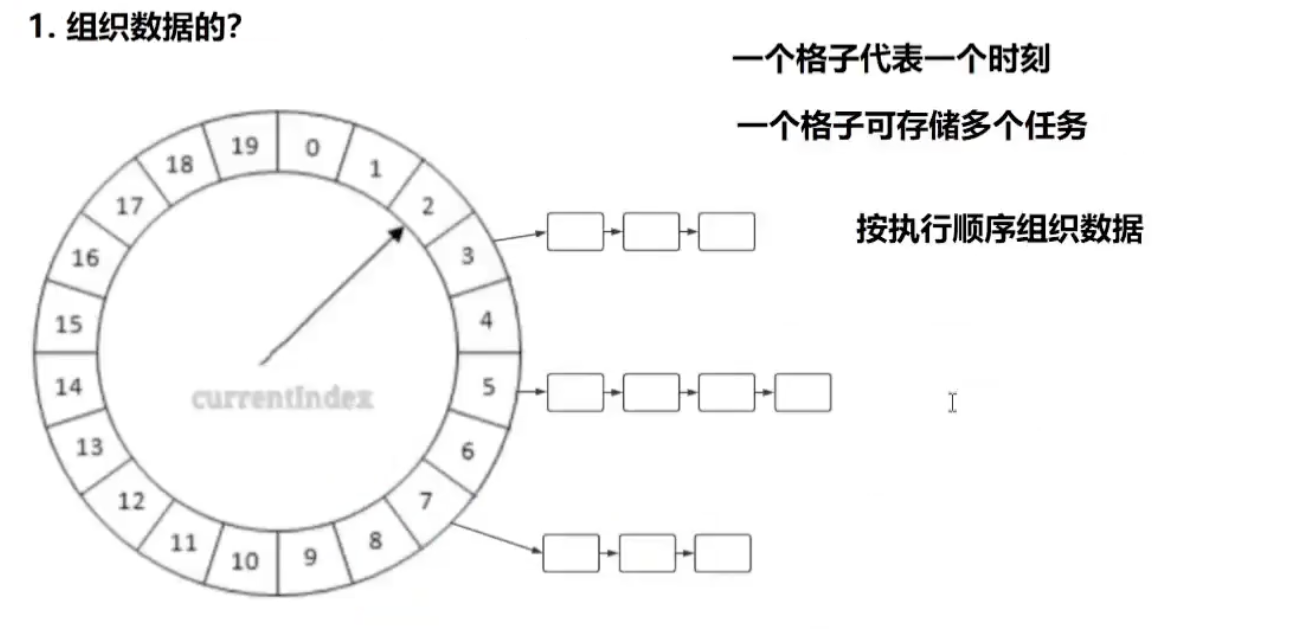
时间轮

适用于在多线程环境执行海量并发定时任务

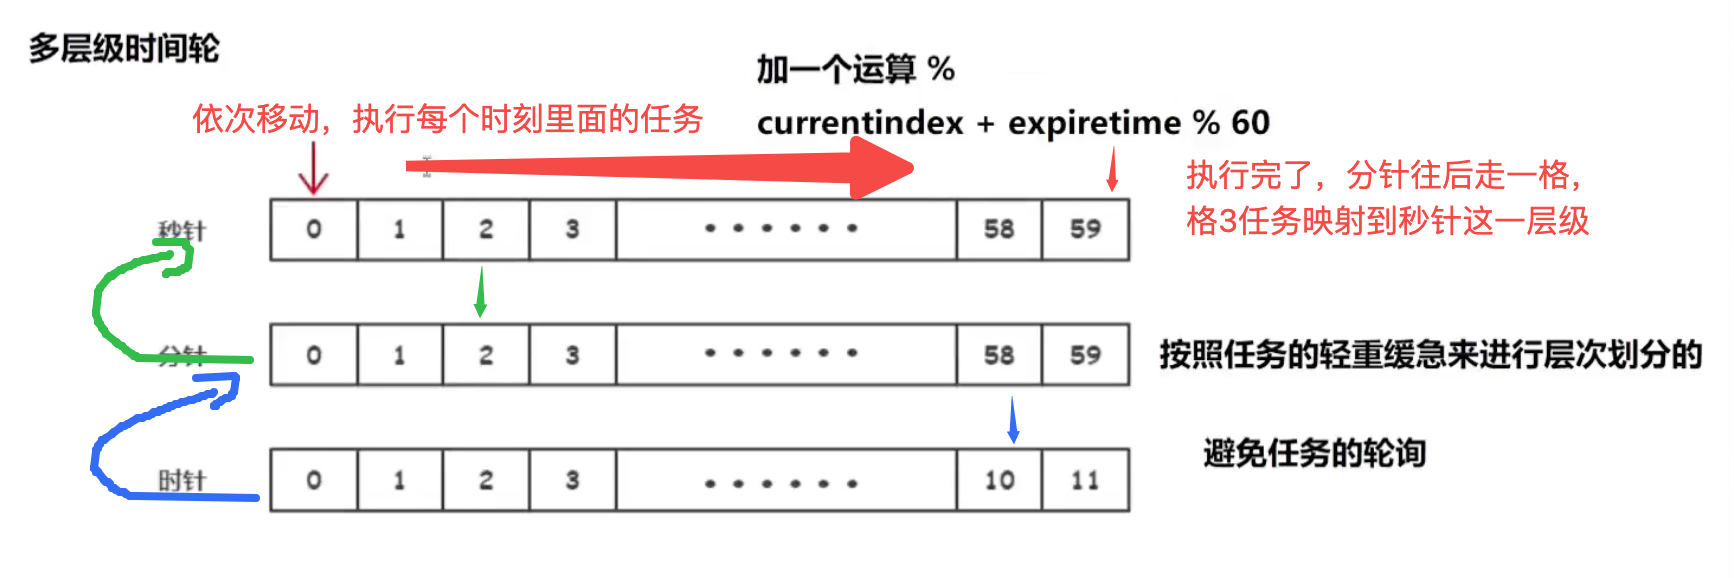
通过指定

  • 最小时间精度(最低层级执行时间误差),min_time_precision,
  • 最大时间范围(整个时间轮的时间范围,周期时长,超出会出错)max_time_range,
  • 层级(决定任务映射次数和每次映射执行时间)level,
    定制时间轮框架

当时间轮运行时,最低层级时间指针minlevelPointer每移动一次(经过min_time_precision时间)
就会执行当前时刻上存储的多个任务,当minlevelPointer移动到的当前层级最后一个时间格子的时候
执行完当前定时任务,就会从更高一层级的当前level(+1)Pointer指定的时间格子获取定时任务
给到当前最低层级的每个时间格子(根据具体任务过期时间与当前时间间隔计算该放在哪个时间格子里)
然后等待时间执行
当更高一层级的level(+1)Pointer移动到的当前层级最后一个时间格子的时候
就会从更高两层级的当前level(+2)Pointer指定的时间格子获取定时任务
给到当前level+1层级的每个时间格子,等待时间执行
以此类推

好处:
只用关心最低层级时间周期minlevelPeriod内的任务,即最近minlevelPeriod 时间范围内的任务
不用过早遍历轮询高层层级时间范围里的任务是否要执行
用空间换时间,把大量不同到期时间的任务映射到有限的时间槽(bucket)中,避免对海量任务进行全局排序或反复扫描。

区分任务队列

优先队列:

“我必须知道谁最早到期。”
↓
排序
↓
找最早任务

时间轮:
“我不关心谁最早。”
↓
按照时间分桶
↓
当前时间到了哪个 bucket
↓
处理 bucket

优先队列解决的是“有序性”,时间轮解决的是“时间范围内的快速定位”。

跳表

多层级有序链表
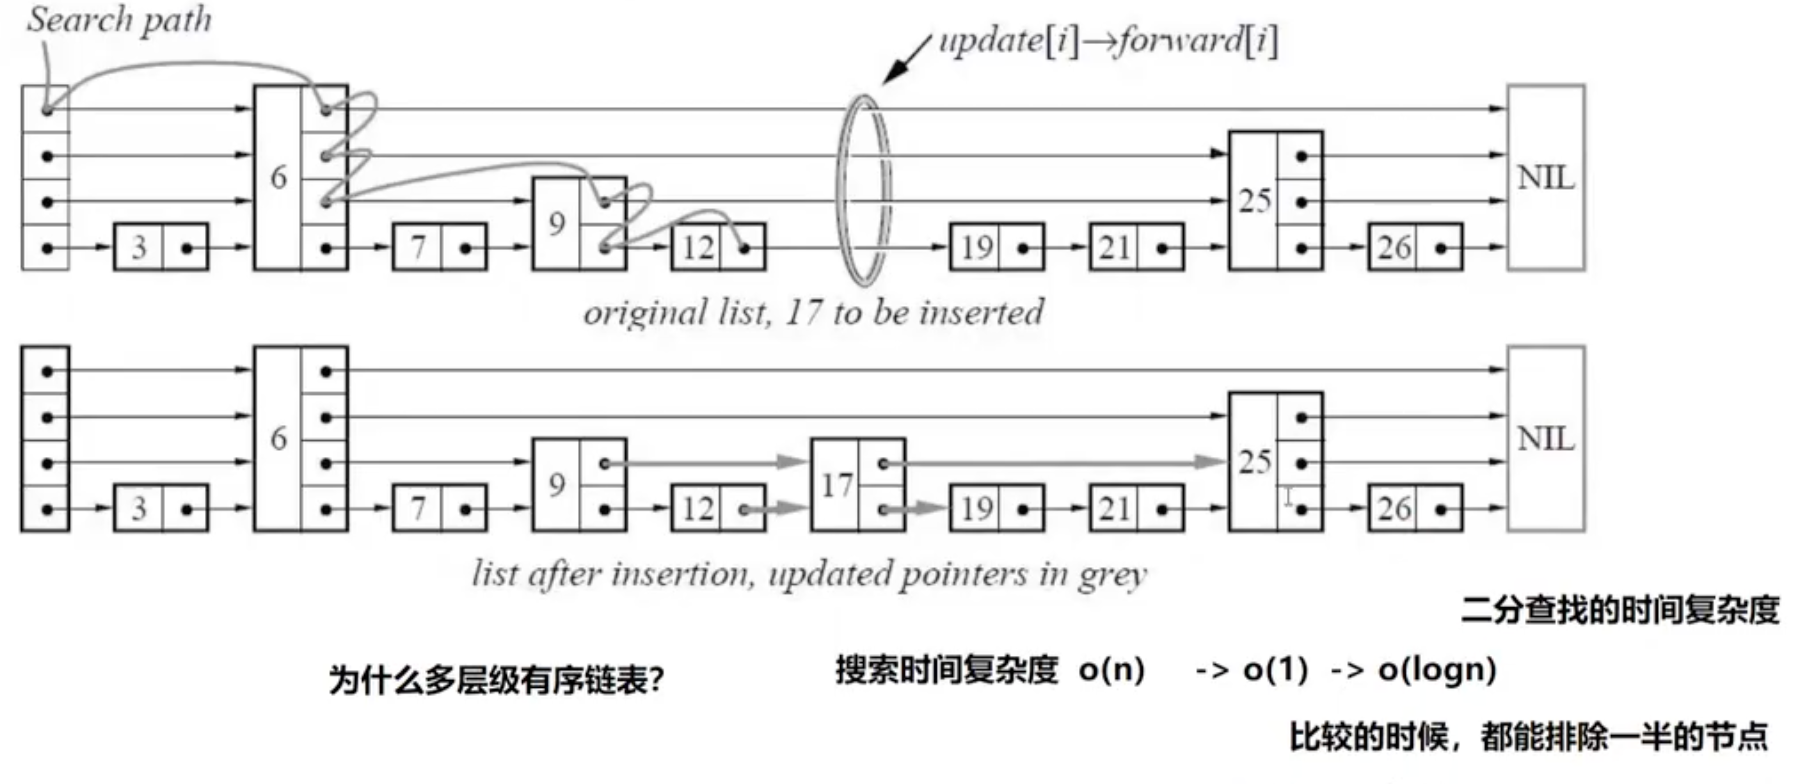
数据的增删改查都要先进行节点的查询,所有数据存在最后一层

数据查找时层级从上到下依次查找,直到找到匹配的节点或者到达最底层
比如现在要插入17,
第一层找到6再往后找是null, 就往下移动一层接着从6开始找
6-25 17小于25,下移
6-9 17大于9,从9开始找
9-25 17小于25,下移
9-12 17大于12,从12开始找
12-19 17小于19,但已经是最后一层
17应该插入在12和19之间,指针层级随机生成,因为如果始终保持理想多层有序链表,那么每次插入删除都要重新生成层级结构,计算开销大


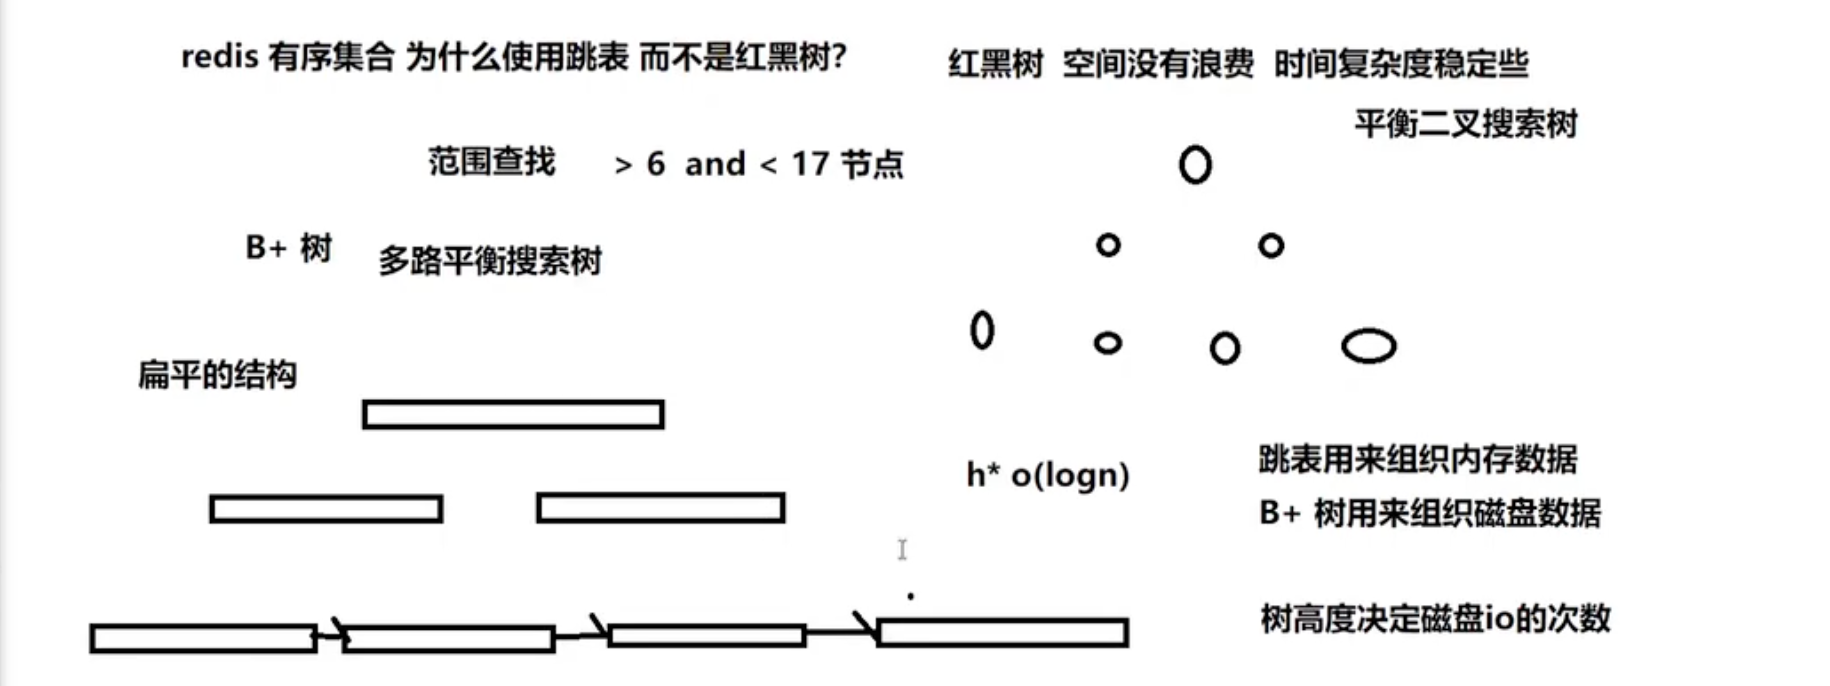
redis 有序集合 为什么使用跳表 而不是红黑树?

红黑树相比跳表本身没有空间浪费,且时间复杂度更稳定,但它本质是平衡二叉树,由于回溯过程复杂,并不能直接用来进行范围查找
B+树相比跳表都是最后一层包含所有数据,但是查找时间复杂度跟树高度有关,比调表更高,二者适用场景不同,
跳表适用于组织内存数据
B+树适用于组织磁盘数据

布隆过滤器

详见

顺序I/O

顺序IO
• 磁盘访问时间:寻道时间 + 旋转时间 + 传输时间; 大概10ms
。寻道时间:8ms~12ms;
。旋转时间:7200转/min(半周 4ms);
。传输时间:50M/s(约0.3ms);
• 磁盘随机 IO < 磁盘顺序IO~内存随机 IO <内存顺序IO(大概10ns);

内存访问速度几乎是磁盘的100w倍

Lsm-tree

【解决写多读少的问题】
B+TREE 添加数据分裂时,空间利用率要占50%,随机IO,写入慢
lsm-tree 为基础的存储引擎空间利用率可以实现30%,顺序IO,写入快,每次追加日志写入
lsm-tree 不是数据结构,而是数据存储组织的一种方式

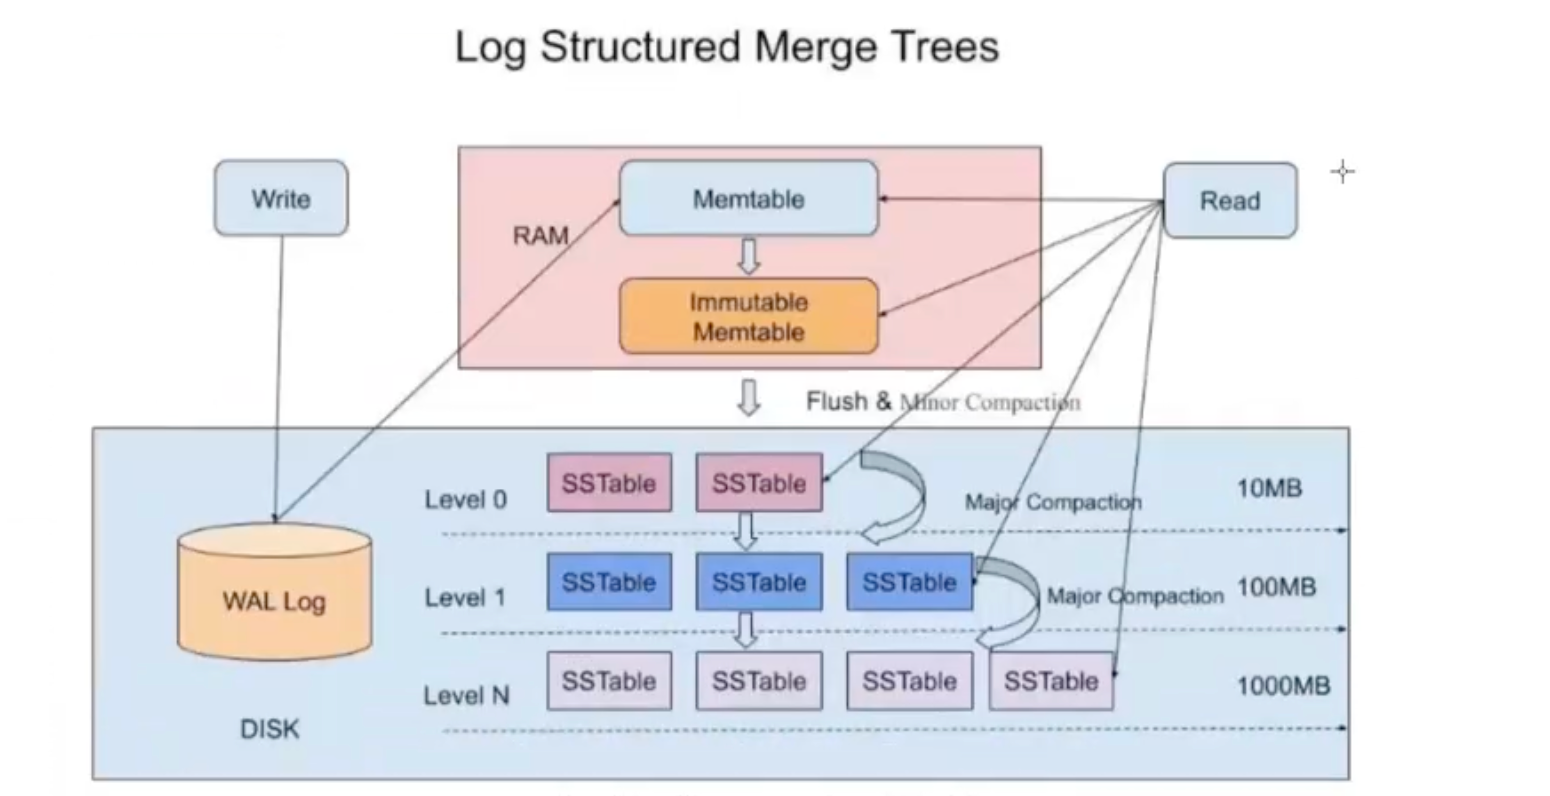
整体运行流程就是当用户写入时,先对磁盘日志进行预写入,然后将数据暂存在内存里面的Memtable(跳表)中
当Memtable 快要写满时,将数据固定下来变成静态数据,存到内存 Immutable Memtable (跳表) 中,不再支持写入,只读,等待刷进磁盘中
数据进入磁盘中以level0 ssTable 形式存在,有序结构,多个ssTable 中 多个操作可能针对同一个key 即同一条数据多次操作,造成数据处理重复
这时可以进行level 0层ssTable数据 compaction,减少数据冗余,形成 level 1 层数据,
level 1 层数据合并压缩排序再生成level 2 以此类推直到level n , n 一般为7
这样到level n 基本可以保证该层没有重复的数据,几乎占整体数据的 90%
同时对于经常操作的数据使用在整个架构的上方,现在内存中,然后在level 0 中
这样对于读取来说,热key 甚至可以直接在内存中读到
另外对于不同层的数据读取,可以引入布隆过滤器判断数据是否存在,误差可控

稀疏索引

稀疏索引不是给“列”分类,而是给“索引项”分类:索引不为每一条数据都建立索引项,只为部分数据建立索引项。
稀疏索引(Sparse Index) 是一种索引结构,它不为表中的每一行数据都建立索引项,而是为部分数据块(如数据页)或特定间隔的数据建立索引条目。

你可以把它理解为书的目录页——目录只列出每个章节的起始页码,而不是每个字、每句话出现的页码。


1. 稀疏索引 vs. 稠密索引

维度 稀疏索引 稠密索引(Dense Index)
索引条目数量 只为部分数据建立索引(如每个数据页一条) 为表中的每一行数据都建立一个索引项
存储空间 小,占用空间少 大,可能和表数据相当甚至更大
查找过程 先通过索引定位到近似位置,再在数据块内顺序扫描找到目标 通过索引直接定位到具体行
适用场景 数据量大、索引列值有序且变化不频繁 需要精确定位、对查询响应时间要求极高
典型例子 文件系统的目录索引、数据库的聚簇索引(主键) 辅助索引(二级索引)的叶子节点

2. 稀疏索引在数据库中的典型应用

(1)InnoDB 的聚簇索引(主键索引)

InnoDB 的聚簇索引本质上是一个稀疏索引 + 稠密索引的混合体:

  • B+Tree 的内部节点:只存储每个子页的最小键值作为索引条目 → 这是稀疏索引。
  • B+Tree 的叶子节点:存储了完整的行数据,且所有数据都在这层 → 叶子节点内部是稠密的(所有行都存在)。

当你通过主键查找时,过程是:

  1. 从根节点开始,利用稀疏的索引条目(每个节点的最小键值)快速定位到目标数据页。
  2. 到达叶子节点(数据页)后,在页内进行顺序扫描或二分查找找到具体行。

(2)文件系统中的目录索引

操作系统中的文件目录也是一种稀疏索引:

  • 每个目录项只记录文件名和对应的数据块起始地址。
  • 查找文件时,先在目录中定位到文件元数据,再根据元数据去数据区读取具体内容。

3. 为什么需要稀疏索引?

✅ 优点

优点 说明
节省存储空间 索引条目数量远少于数据行数,特别适合大表场景。
降低维护成本 INSERT/UPDATE/DELETE 时,不需要频繁更新索引条目(只在数据页分裂或合并时才调整)。
内存友好 索引体积小,更多索引数据可以缓存在内存中,提升查询速度。

❌ 缺点

缺点 说明
查询效率略低 定位到数据页后,还需要在页内进行扫描,无法像稠密索引那样一步到位。
不适合等值查询为主的场景 如果大量查询是 WHERE id = 12345 这种精确查询,稠密索引更快。

4. 稀疏索引 vs. 覆盖索引

维度 稀疏索引 覆盖索引
关注点 如何减少索引条目数量(降低存储) 如何避免回表(提升查询速度)
索引内容 只记录关键位置信息(如页最小键值) 索引中包含查询所需的所有列数据
目标 节省空间,支持范围查找 提升查询效率,减少 I/O
能否同时存在 ✅ 可以。一个联合索引如果是稀疏的(如页级索引),同时又包含了查询所需的所有列,那它既是稀疏索引又是覆盖索引。

5. 实际例子

场景:用户表 users,主键 id 自增列

1
2
3
数据页1:id 1~100
数据页2:id 101~200
数据页3:id 201~300

稀疏索引(聚簇索引内部):

索引条目 指向
1 数据页1
101 数据页2
201 数据页3
  • 查询 SELECT * FROM users WHERE id = 150:

    1. 在稀疏索引中找到 101(最大的 ≤ 150),定位到数据页2。
    2. 在数据页2内顺序扫描,找到 id=150 的行。
  • 查询 SELECT * FROM users WHERE id BETWEEN 50 AND 250:

    1. 稀疏索引定位到起始页(数据页1)。
    2. 顺序扫描所有数据页(1、2、3),直到超出范围。

6. 什么时候该考虑稀疏索引?

推荐使用 不建议使用
表数据量极大(亿级) 数据量小(几千行),索引开销可忽略
存储空间有限 查询以精确等值查询为主(如 WHERE id = xxx)
查询以范围查询或全表扫描变种为主 需要频繁更新索引列值(维护成本高)
索引列值有序且变化不频繁 索引列值无序(如 UUID),无法利用稀疏索引的有序性

总结

  • 稀疏索引是一种用空间换时间的反向策略——它牺牲了一点查询精度(需要额外扫描),换来了更小的索引体积和更低的维护成本。
  • 在数据库中,聚簇索引(主键)天然就是稀疏索引,而辅助索引(二级索引)通常是稠密索引。
  • 如果你在建表时选择了自增主键,实际上已经在享受稀疏索引带来的好处了——主键索引的 B+Tree 内部节点就是稀疏的,大大减少了内存占用和 I/O 次数。

聚簇索引

索引的分类:
1.按照字段的特性分类:主键索引、普通索引、前缀索引。
2.按照数据结构分类:B+Tree索引、Hash索引。
3.按照物理存储方式分类:聚簇索引、辅助索引(二级索引)。

聚簇索引的定义
聚簇索引并不是一种单独的索引类型,聚簇索引是一种数据存储的方式。
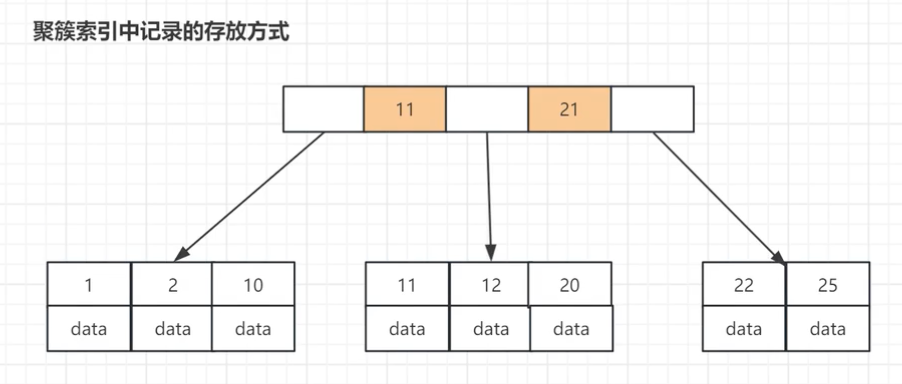
例如InnoDB的聚簇索引使用的数据结构就是B+Tree存储索引和数据。

• ‘聚簇”含义:表示数据行和相邻的键值是紧凑的存储在一起。
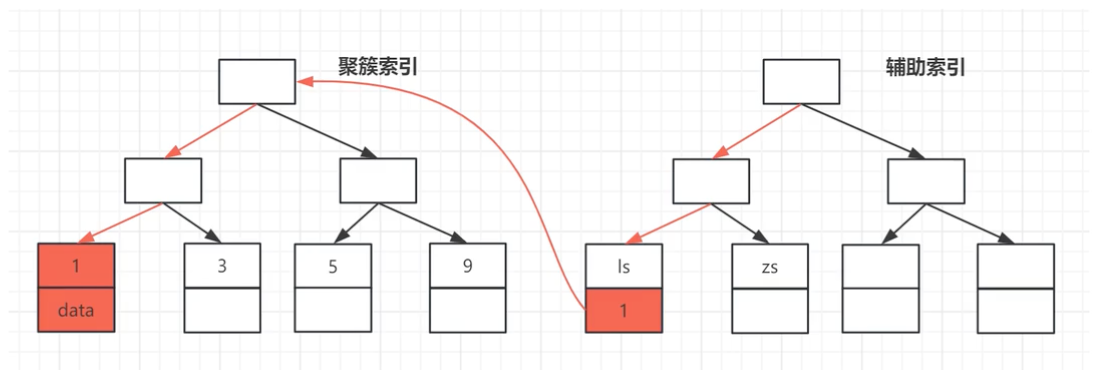
• 辅助索引(二级索引):叶子节点是不会保存引用行的物理地址的,而是保存行的主键值

聚簇索引 VS 非聚簇索引

• 聚簇索引(主键索引):将数据存储与索引放到了一起,索引结构的叶子节点保存了具体的行数据。
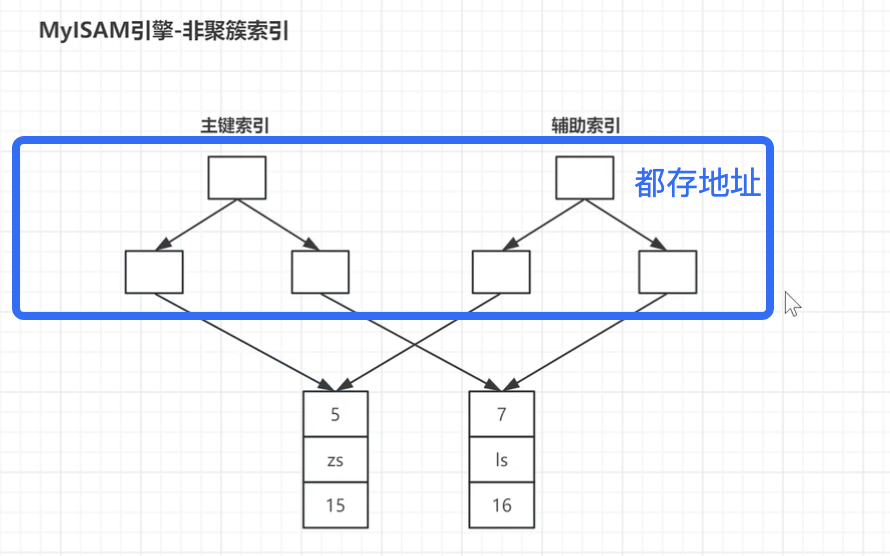
• 非聚簇索引:将数据与索引分开存储,索引结构的叶子节点存储的是指向数据行对应的地址。
从存储引擎的角度去看,聚簇索引和非聚簇索引的区别:

• InnoDB存储引擎【聚簇索引】
。在InnoDB存储引擎中,默认使用B+Tree存储索引和数据,InnoDB中利用主键创建的索引,就是聚簇索引。
。聚簇索引的二级索引:叶子节点是不会保存引用行的物理地址的,而是保存行的主键值
。对于聚簇索引,数据的物理存放顺序与索引顺序是一致的(主键必须是自增id)。

•MyISAM存储引擎【非聚簇索引】
。在MyISAM存储引擎中,默认也是B+Tree索引,但是主键索引和辅助索引都是非聚簇索引。
。非聚簇索引不管是主键索引还是二级索引,其索引结构的叶子节点保存的都是一个指向对应行记录的物理地址。
。非聚簇索引中辅助索引的检索无需访问主键索引。
。非聚簇索引的存储引擎,表数据存储与索引顺序是无关


• InnoDB聚簇索引就是按照主键索引的顺序构建B+Tree。B+Tree的叶子节点就是行记录,行记录和主键值紧凑的存储在一起
的。
•InnoDB中主键索引就是数据表本身。主键索引中存放了整张表的数据。
InnoDB表中 要求必须要有聚簇索引:
。如果表定义了主键,主键索引就是聚簇索引。
。 如果表没有定义主键,则第一个非空unique列 作力聚簇索引。
• 否则以上都没有,InnoDB会重建一个隐藏的row-id 作为聚簇索引

回表

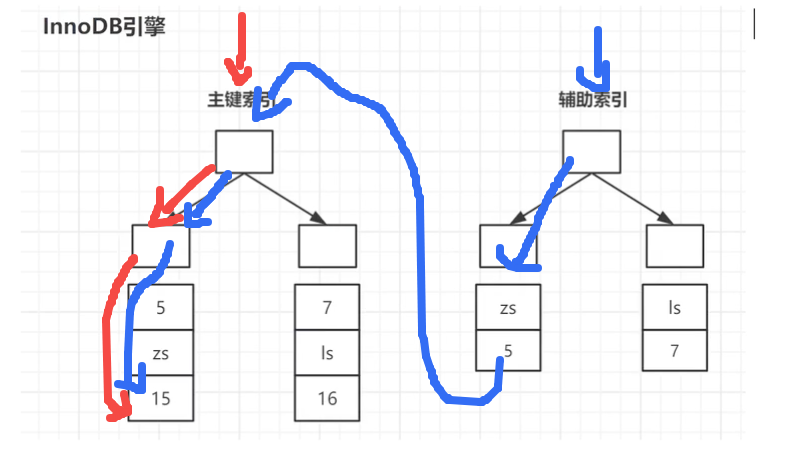
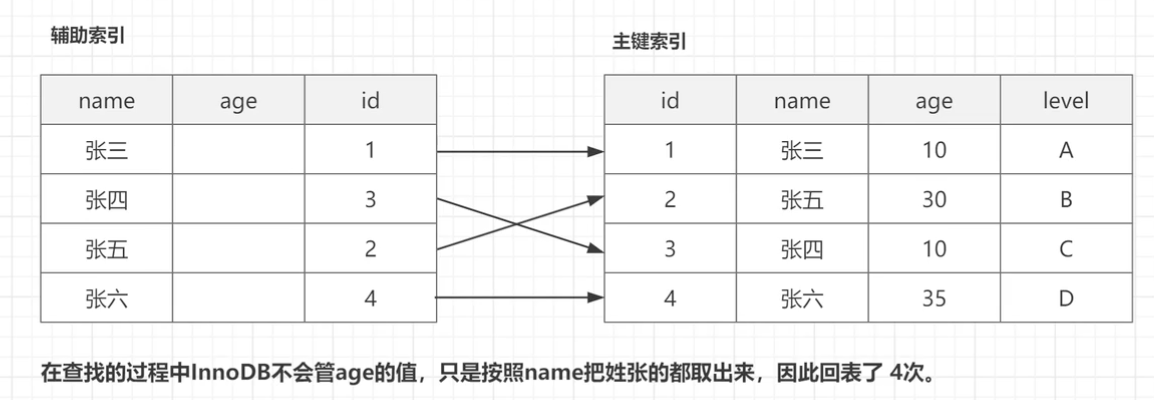
回表是数据库执行查询时的一种操作过程,简单来说就是:先通过辅助索引找到主键值,再根据主键值到主索引(聚簇索引)中取回整行数据。
这个动作之所以叫“回表”,是因为数据读取路径走了两步(索引 -> 主键 -> 数据行),相当于“返回”到主表(聚簇索引)中去查找。

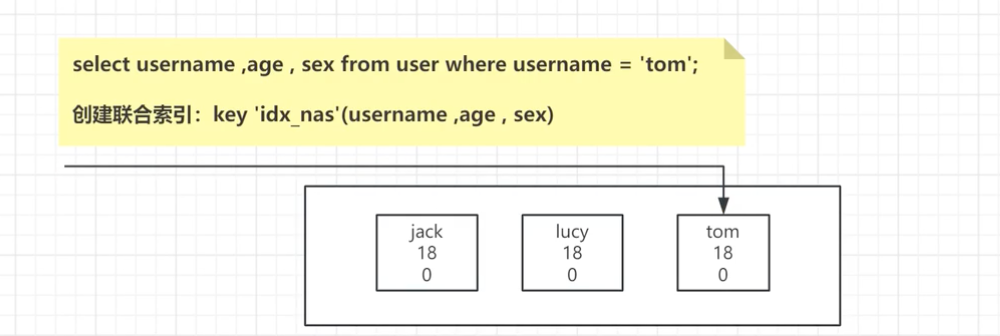
如何解决回表问题?答:使用覆盖索引。(覆盖索引: 所查询信息在当前索引值中能找到,“索引和查询之间的关系”,而不是一种索引结构。)
• 如果一个索引包含了所要查询的所有的字段值(不需要回表),这个索引就是覆盖索引。
如何实现覆盖索引?
•将被查询的字段建立联合索引,这样就可以直接返回索引中的数据了,避免了去聚簇索引中去定位行记录。

索引下推

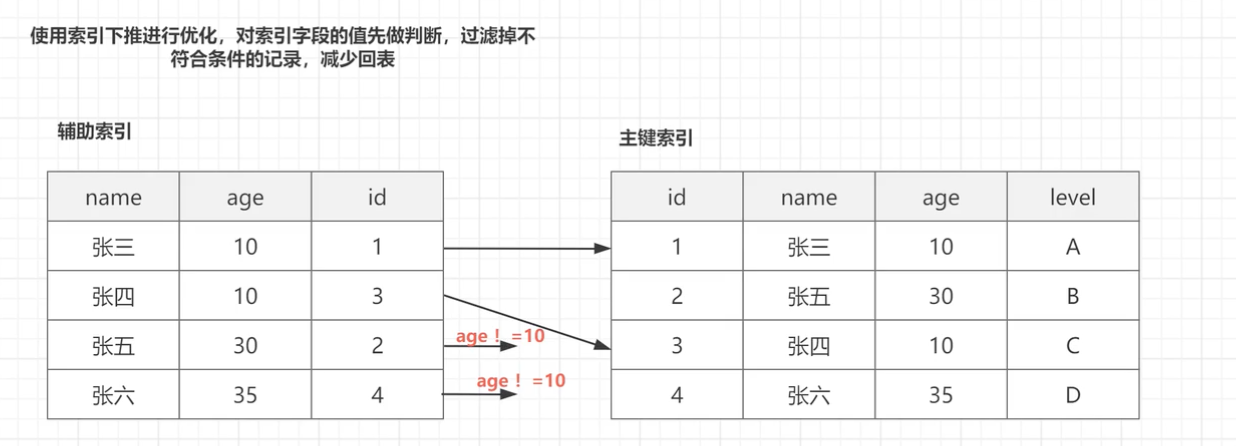
用于查询优化。可以在索引遍历的过程中,对索引中包含的字段先做判断,不符合条件的记录过滤,作用就是减少回表的次数
将存储引擎层(Engine)的过滤条件下推到索引遍历的过程中,提前过滤掉不符合条件的记录,从而减少回表次数

比如下面在辅助索引中添加age 信息后,同时满足age 要求才会去主键索引中获取完整行数据

在不使用 ICP 时,存储引擎会先通过索引把所有满足“索引键范围”的记录全部回表,然后在 Server 层再过滤;使用 ICP 后,存储引擎在索引遍历时就直接把不满足条件的记录过滤掉,只有满足条件的才回表。

数据库主键类型选择

自增的优点
•字段长度比UUID小。
•在写的方面,由于是自增,新增的数据永远是在后面,有序,这点对性能有很大的提升。
•数据库自动编号,速度快,增量增长按顺序存放,检索比较快。
•数字型,占用的空间小,容易排序。
自增的缺点
•由于自增,比较容易通过网络爬虫获取当前系统的业务量。
•高并发场景下,竞争自增锁会降低数据库吞吐能力。
•数据迁移或者是分库分表场景下,自增方式不再适合

自增主键的本质是单库单表内的局部唯一,它依赖单个数据库实例的全局计数器(由 MySQL 的 AUTO_INCREMENT 机制维护)。
一旦数据被拆分到多个库/表,或需要合并多个数据源,这个”局部唯一”就失效了,会导致主键冲突、无法全局排序、迁移困难等问题。
因此分库分表和迁移场景下,需要改用全局唯一 ID 生成方案(如雪花算法)

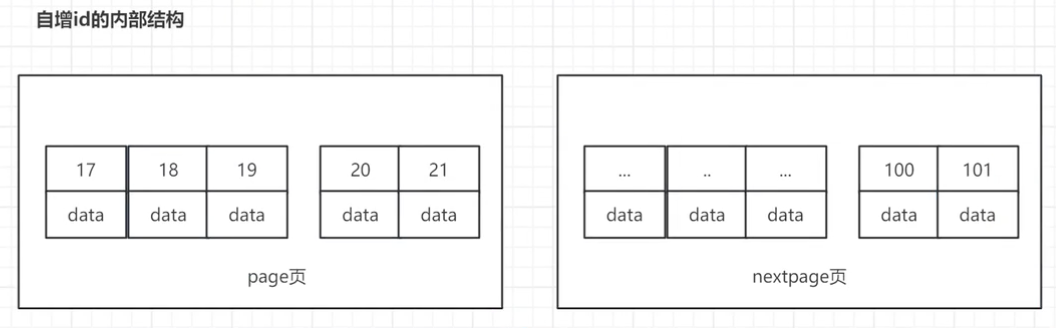
自增ID的内部结构:
新增的行一定会在原有最大数据行的下一行,MySQL的寻址定位很快,不会为计算新行的位置而作出额外的消耗,较少了页的分裂。


UUID的优点:
•主键在任何时候都不会冲突。进行分库分表,还是做合并存储的时候,都能保证主键全局的唯一性。
•可以在应用层生成,提高数据库的吞吐能力。
UUID的缺点:
•与自增相比,最大的缺陷就是随机IO。
•字符串类型要比整数类型更加消耗空间,而且要比整数类型操作慢

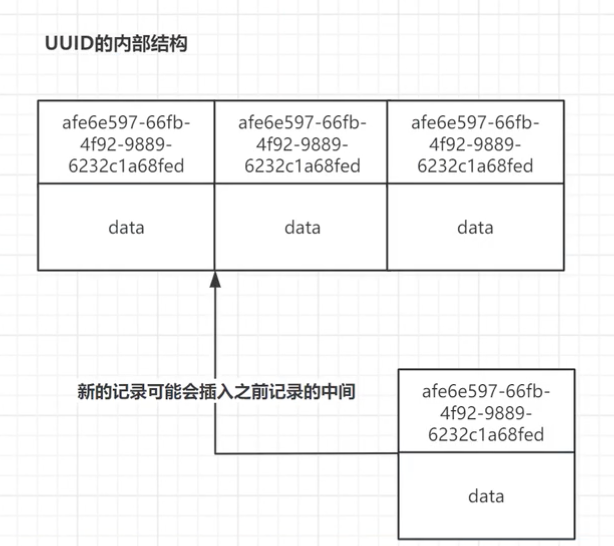
UUID的内部结构:
如果是uuidInnoDB无法做到总是把新插入的行放到索引的最后,每次都需要为新的行寻找合适的位置,分配新的空间。
还包括一些问题:
• 产生大量的随机IO
• 页分裂操作频繁

页分裂:
页分裂(Page Split) 是数据库(如 MySQL InnoDB)或操作系统文件系统中,当数据页(Page)已满,却需要插入新数据时,系统被迫将当前页拆分成两个页的过程。
简单来说:一个数据页装不下了,必须分一分为二,腾出空间给新数据。

总结:
如果是使用InnoDB应该尽可能的选择主键自增顺序插入。
但是如果是在分库分表场景下,分布式主键ID的生成方案优先选择:雪花算法生成全局的唯一ID。

雪花算法:
一种开源分布式 ID 生成算法,在分布式系统中生成全局唯一且有序的 ID,非常适合作为分库分表后的主键 ID 或全局订单号
它生成的 ID 是一个 64 位的长整型(Long)数字,由以下部分组成:

  • 1位符号位:固定为 0,保证 ID 是正数。
  • 41位时间戳:记录毫秒级时间,可以使用约 69 年,让 ID 整体趋势递增。
  • 10位机器标识:通常拆分为 5 位数据中心 ID 和 5 位机器 ID,最多支持 1024 个节点,保证不同机器生成的 ID 不重复。
  • 12位序列号:同一毫秒内可生成 4096 个不同的 ID,应对高并发场景。

小结

聚簇索引的优点:
1.可以将相关的数据保存在一起。
2.数据访问更快。
3.使用覆盖索引进行扫描查询时,可以直接使用叶节点中的主键值。
4.辅助索引使用的是主键作为指针,不是使用地址值。
聚簇索引的缺点:

  1. 随机主键会导致页分裂问题(主键生成选择UUID的情况)
  2. 使用辅助索引查询时,需要回表

多维索引(multi dimensional index)

一种为了高效处理基于多个属性(维度)进行查询而设计的数据库索引结构,是处理多条件、空间、向量等复杂查询需求的利器。无论是用树结构的R树、KD树,还是搜索引擎风味的倒排索引,或是OLAP的数据立方体,它们的目标都一样:在海量数据中,让多维度、组合式的查询变得更快。

相关实现数据结构:
R-Tree
R*-Tree
KD-Tree
QuadTree
GiST / SP-GiST

维度 联合索引 (Composite Index) 覆盖索引 (Covering Index) 多维索引 (Multi-Dimensional Index)
核心目的 如何排序——把多个列拼成一个索引键,决定查询时能走哪个索引 如何偷懒——让索引里直接包含查询要的数据,避免回表 如何划分空间——把多个列看作多维空间,决定如何快速定位数据
底层结构 单棵 B+Tree,键值是 (col1, col2, ...) 拼接而成 不特定结构,任何索引(联合或单列)只要包含所需字段即可 R-Tree、KD-Tree、倒排索引等,将数据映射为空间中的点或区域
核心规则 最左匹配原则:只有索引最左边的列能用上,跳过一个列,后面的就失效 无特殊规则:只要 SELECT 的列都在索引里,就能生效 无固定顺序要求:可以对所有维度同时进行范围或邻近查询,没有“最左”限制
典型查询 WHERE a = 1 AND b = 2
WHERE a = 1 ORDER BY b
SELECT a, b FROM t WHERE a = 1 (无需回表) WHERE x BETWEEN 0 AND 10 AND y BETWEEN 20 AND 30
(查找矩形区域)
性能特点 对 = 和范围查询效果好,但受顺序限制,有一定维护开销 极高,直接省去随机 I/O,是查询优化的首选手段 对多维范围查询高效,但结构复杂,维护成本高,非所有数据库都支持

用例子加深理解

假设有一张地图数据表 places,有 x(经度)、y(纬度)、name 三个字段。

1. 联合索引:INDEX idx_xy (x, y)

  • 它的排序规则是:先按 x 排,x 相同再按 y 排。
  • 查询 WHERE x = 1 AND y = 2:能高效利用索引(先定位 x=1,再在结果中找 y=2)。✅
  • 查询 WHERE y = 2 AND x = 1:优化器通常能调整顺序,也能用上。✅
  • 查询 WHERE y = 2:由于 y 不是联合索引的最左列,这个索引基本失效,无法用于减少扫描范围。❌
  • 这是典型的一维有序列表(先排第一列,再排第二列)。

2. 覆盖索引:INDEX idx_xy_cover (x, y, name)

  • 当我们执行 SELECT x, y, name FROM places WHERE x = 1 时,查询所需的所有列 (x, y, name) 都包含在这个联合索引中。
  • 因此,数据库直接读取索引页就能返回结果,完全不用去读原始数据行(主键聚簇索引),省去了昂贵的回表操作。这就是“覆盖”的含义。

3. 多维索引(如 R-Tree):SPATIAL INDEX idx_xy_mdi (x, y)

  • 它将 (x, y) 视为二维平面上的一个点,所有点构成一个空间。
  • 查询 WHERE x BETWEEN 0 AND 10 AND y BETWEEN 20 AND 30:这是个典型的二维矩形范围查询。多维索引能直接在这个平面空间里进行搜索,同时利用 x 和 y 两个维度的信息来剪枝,效率很高。
  • 而联合索引面对这个查询,通常只能利用 x 的范围(0-10)来定位,然后对命中的每一行再检查 y 是否在 20-30 之间,无法同时利用两个维度的范围信息,效率相对较低。

一句话总结核心区别

  • 联合索引:解决多条件排序和查找的问题,但受“最左匹配”约束。
  • 覆盖索引:解决减少数据读取的问题,是一种避免回表的优化技巧。
  • 多维索引:解决多维度同时过滤的问题,无顺序限制,专为空间、向量等复杂场景设计。

所以,在实际业务中,它们经常是组合使用的。比如,创建一个联合索引,恰好覆盖了查询需要的所有列,那这个联合索引同时也是一个覆盖索引。而当你遇到地理围栏、图像特征匹配等场景时,才需要考虑引入多维索引这种更专业的结构。

My Little World

数据库索引和冲突解决

发表于 2026-08-31

为什么要有系统设计

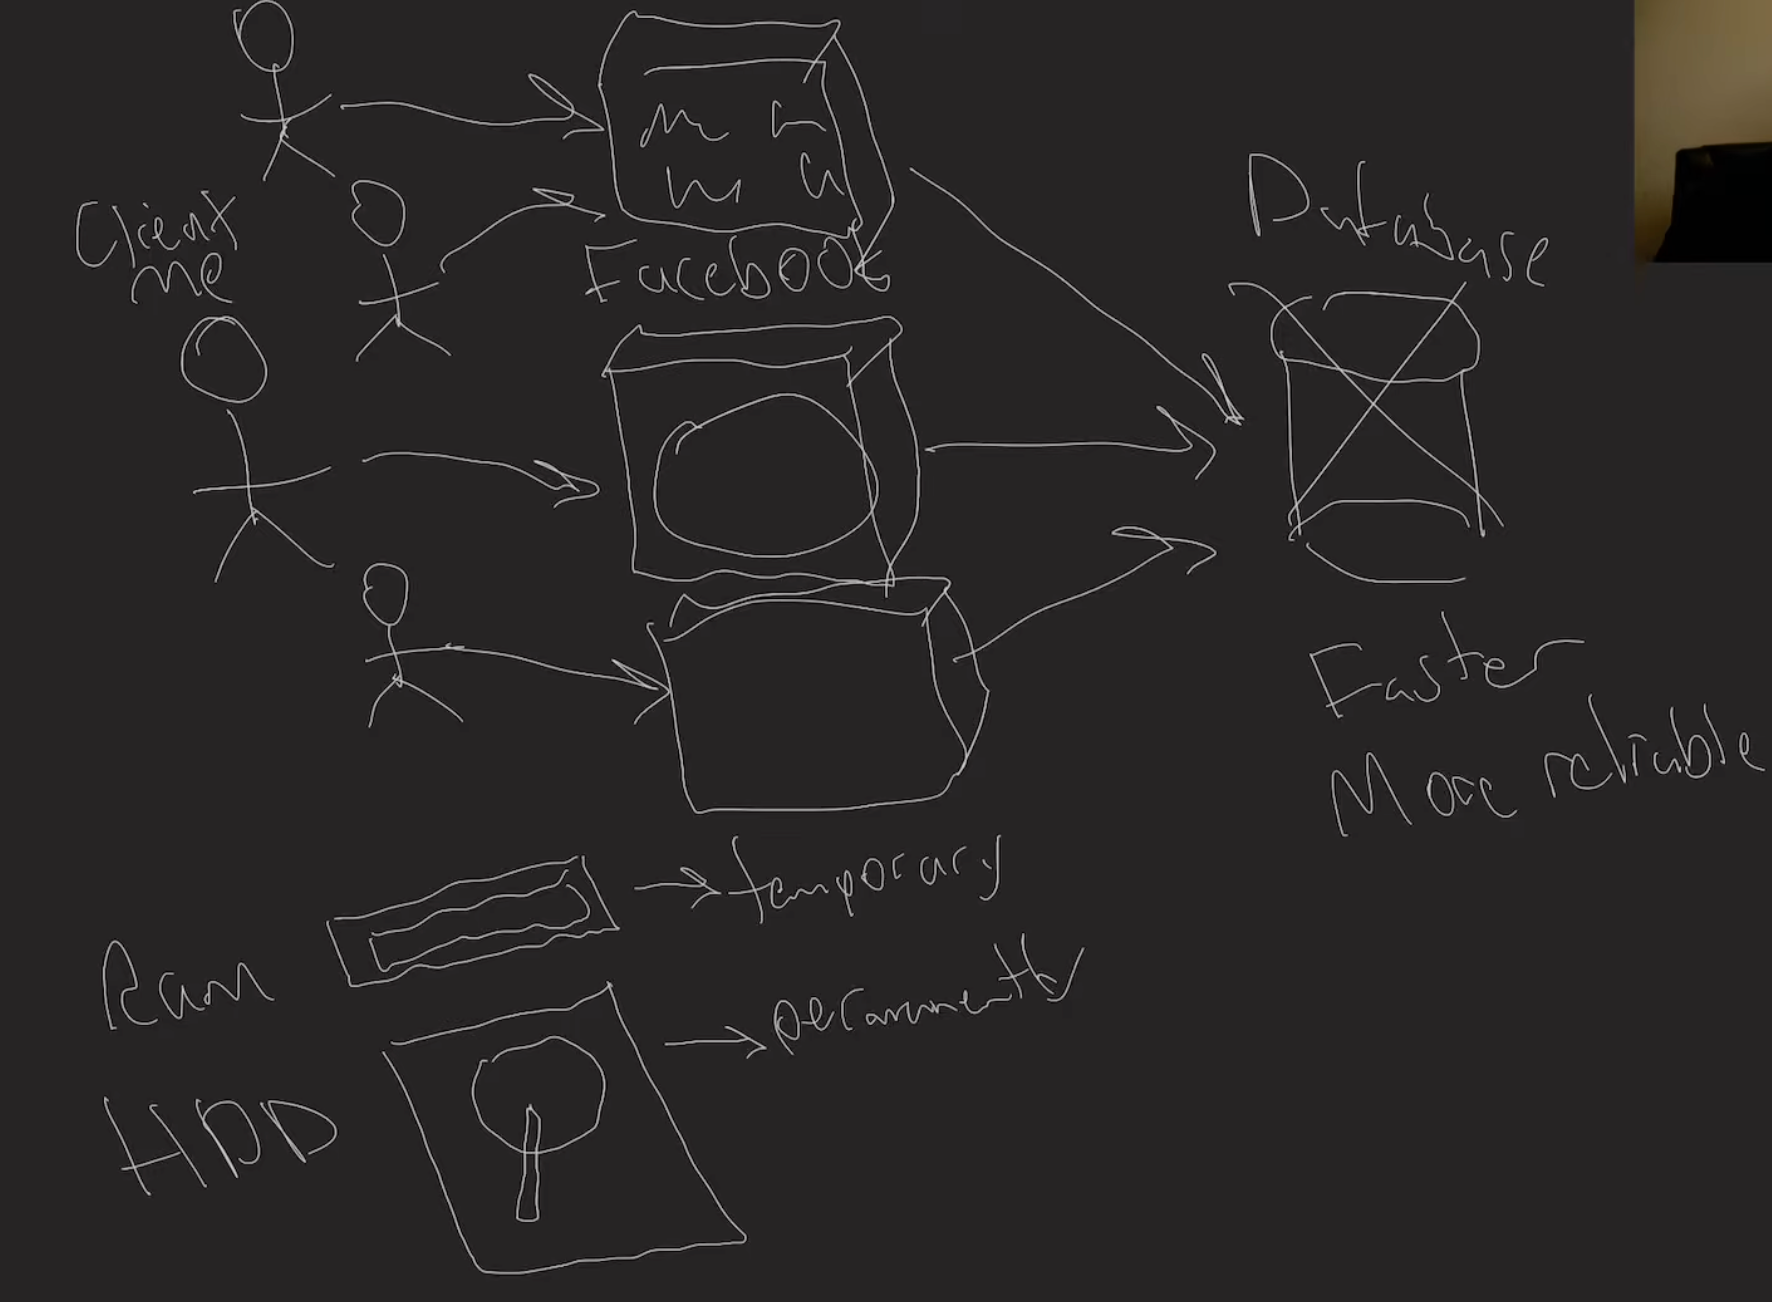
当我们作为用户去访问社交媒体或者互联网数据时,这些数据肯定是需要已存在一个地方,我们才能访问到
假如数据存放在一台计算机内存上面,计算机的存储一般分为ram 和硬盘,ram 读取速度快,但是只能临时存储
硬盘读取速度慢,但可以永久存储,虽然也会面临断电导致存储异常问题
在这种情况下,我们更倾向于使用硬盘存储
假如现在使用一台计算机上的硬盘存储,一个用户只访问这一台计算机是理想的
但成千上万的用户同时访问这一台计算机
就会面临访问性能问题
为了解决访问性能问题,可以选择通过提供多台服务器来分担访问压力
但是数据是在一台服务上面的,如果用户访问了其他没有存储数据的服务器,就不会访问到数据
即数据不能共享
这样为进一步解决数据共享的问题,引入数据库单纯处理数据存储的问题,所有服务器都通过数据库来访问数据
这时数据库就要承担起数据能够快速访问(读写),更高可靠性的责任
比如断电时如何备份数据
实际情况是一个数据库还不能承担所有的数据存储任务,往往还会同时存在多个数据库,
当一个数据库数据量足够大时,如何进行分片存储

My Little World

Crewai 课程一些杂记

发表于 2026-08-26

The 80/20 Rule: Focus on Tasks Over Agents
When building effective AI systems, remember this crucial principle: 80% of your effort
should go into designing tasks.
Even the most perfectly defined agent will fail with poorly designed tasks, but
well-designed tasks can elevate even a simple agent.

● 80% effort:
○ Craft clear tasks

● 20% effort:
○ Polish agent personas

Pitfalls(陷阱)

  1. Not spending time on planning use cases
  2. Not clear definition of success
  3. Not breaking the process into smaller chunks
  4. Not measuring / evaluating

Tactics for Debugging, Observing, Optimizing

  • TESTING
  • Training
  • Guardrails

Why Agent Design Matters

  • Output quality
    Well-designed agents produce more relevant, high-quality results
  • Collaboration effectiveness
    Agents with complementary skills work together more efficiently
  • Task performance
    Agents with clear roles and goals execute tasks more effectively
  • System scalability
    Thoughtfully designed agents can be reused across multiple crews and contexts

How to provide deterministic controls on probabilistic systems?

  • Memory
    Dynamically update context to help agents learn and get better over time


    How to provide agents the ability to remember information?
    – Short Term
    Stores data from past executions to add context that gets shared among agents
    – Long Term
    Reflects on differences between expect outputs and actual outputs on tasks to improve agents through feedback
    – Entity
    Collects facts about recognizable people, companies, locations, products, etc


    Agentic Memory
    ● Internal information adapted from previous executions
    ● Selectively added to agent’s context during current execution
    ● Updated from feedback by human users or LLM-as-a-Judge
    Agentic Knowledge
    ● External information retrieved from different sources
    ● Selectively added to agent’s context from flat files or vector databases
    ● Not updated from feedback. Pre-filled at run-time.


  • Guardrails
    Adding either deterministic or probabilistic (LLM as judge) checks on output
    ● Probabilistic Guardrails / LLM Guardrail: LLM as a judge
    ● Deterministic Guardrails / Code Guardrail: Traditional Code

  • Hooks
    Execute deterministic code either before or after Agents
    before:
    ● Fetch input data
    ● Clean input data
    ● Check inputs for PII
    …
    after:
    ● Validate outputs
    ● Moderate output content
    ● Log outputs
    …

How to configure tools for reliable run-time behavior?
– Force Return
Directly return the output of tool by specifying return_direct=True in agent
– Rate Limits
Use retry logic and a max usage limit to help agents recover from temporary failures while preventing infinite loops
– Tool Repository
Promotes reuse and sharing of tools across multiple agents and tasks

Before using an MCP server, you must trust it!
● SSE transports can be vulnerable if not properly secured.
● Always validate Origin headers on incoming SSEconnections
● Avoid binding servers to all interfaces locally - bind only to localhost instead
● Implement proper authentication for all SSE connections

Without these protections, attackers could use DNS rebinding to interact with local MCP servers from remote websites.

Mental Models for Agentic Systems

  • Agents : Real-time planning
  • Graphs : Nodes and edges
  • Events : Trigger-based workflows

State provides shared context across each step of your flow

  • During Execution
    ● Each step of the flow consists of a function with access to state
    ● All functions can read / write state throughout execution
    ● Accumulated data in state can inform routing of the flow

  • After Execution
    ● Optionally you can persist state. Persistence store state for later use.
    ● Note persistent state of flows is different from the memory of crews in the flow
    ● Using persistence is especially important with conversational agents

How to Build Agents you Trust
Flows
Guardrails
Reasoning agents
Human-in-the-loop oversight
Testing
Training
Structured output
Safe code execution

Reliable agents aren’t just accurate,they’re predictable, measurable, and recoverable
Observability: Debuggability , Quality Monitoring
Security: Data Governance, Prompt Injection Safeguards,Secure Code Generation
Compliance: Protecting PII

Common Success Patterns
● High Frequency
● Consensus on Evaluation Criteria
● Reasonable Fallback Paths
● Measurable Outcomes

Common Failure Modes
● Ill-defined goals
● Lack of observability
● No clarity on evaluation criteria
● No way of tracking proper ROI
● No owner for iteration or QA

Open Source
● can be fine-tuned for specific application domains
● can be run locally for privacy protected workflows
● can reduce usage costs and avoid rate limits

Closed Source
● offer advanced reasoning models for complex tasks
● provide safety and robustness features for predictable behavior
● allow for easy integration through managed services

Don’t chase automation Build reliability
● Ease of Use
● Repeatable Outcomes
● Scalable Solutions

My Little World

Agent Memory

发表于 2026-08-15

Building Memory-Aware Agents

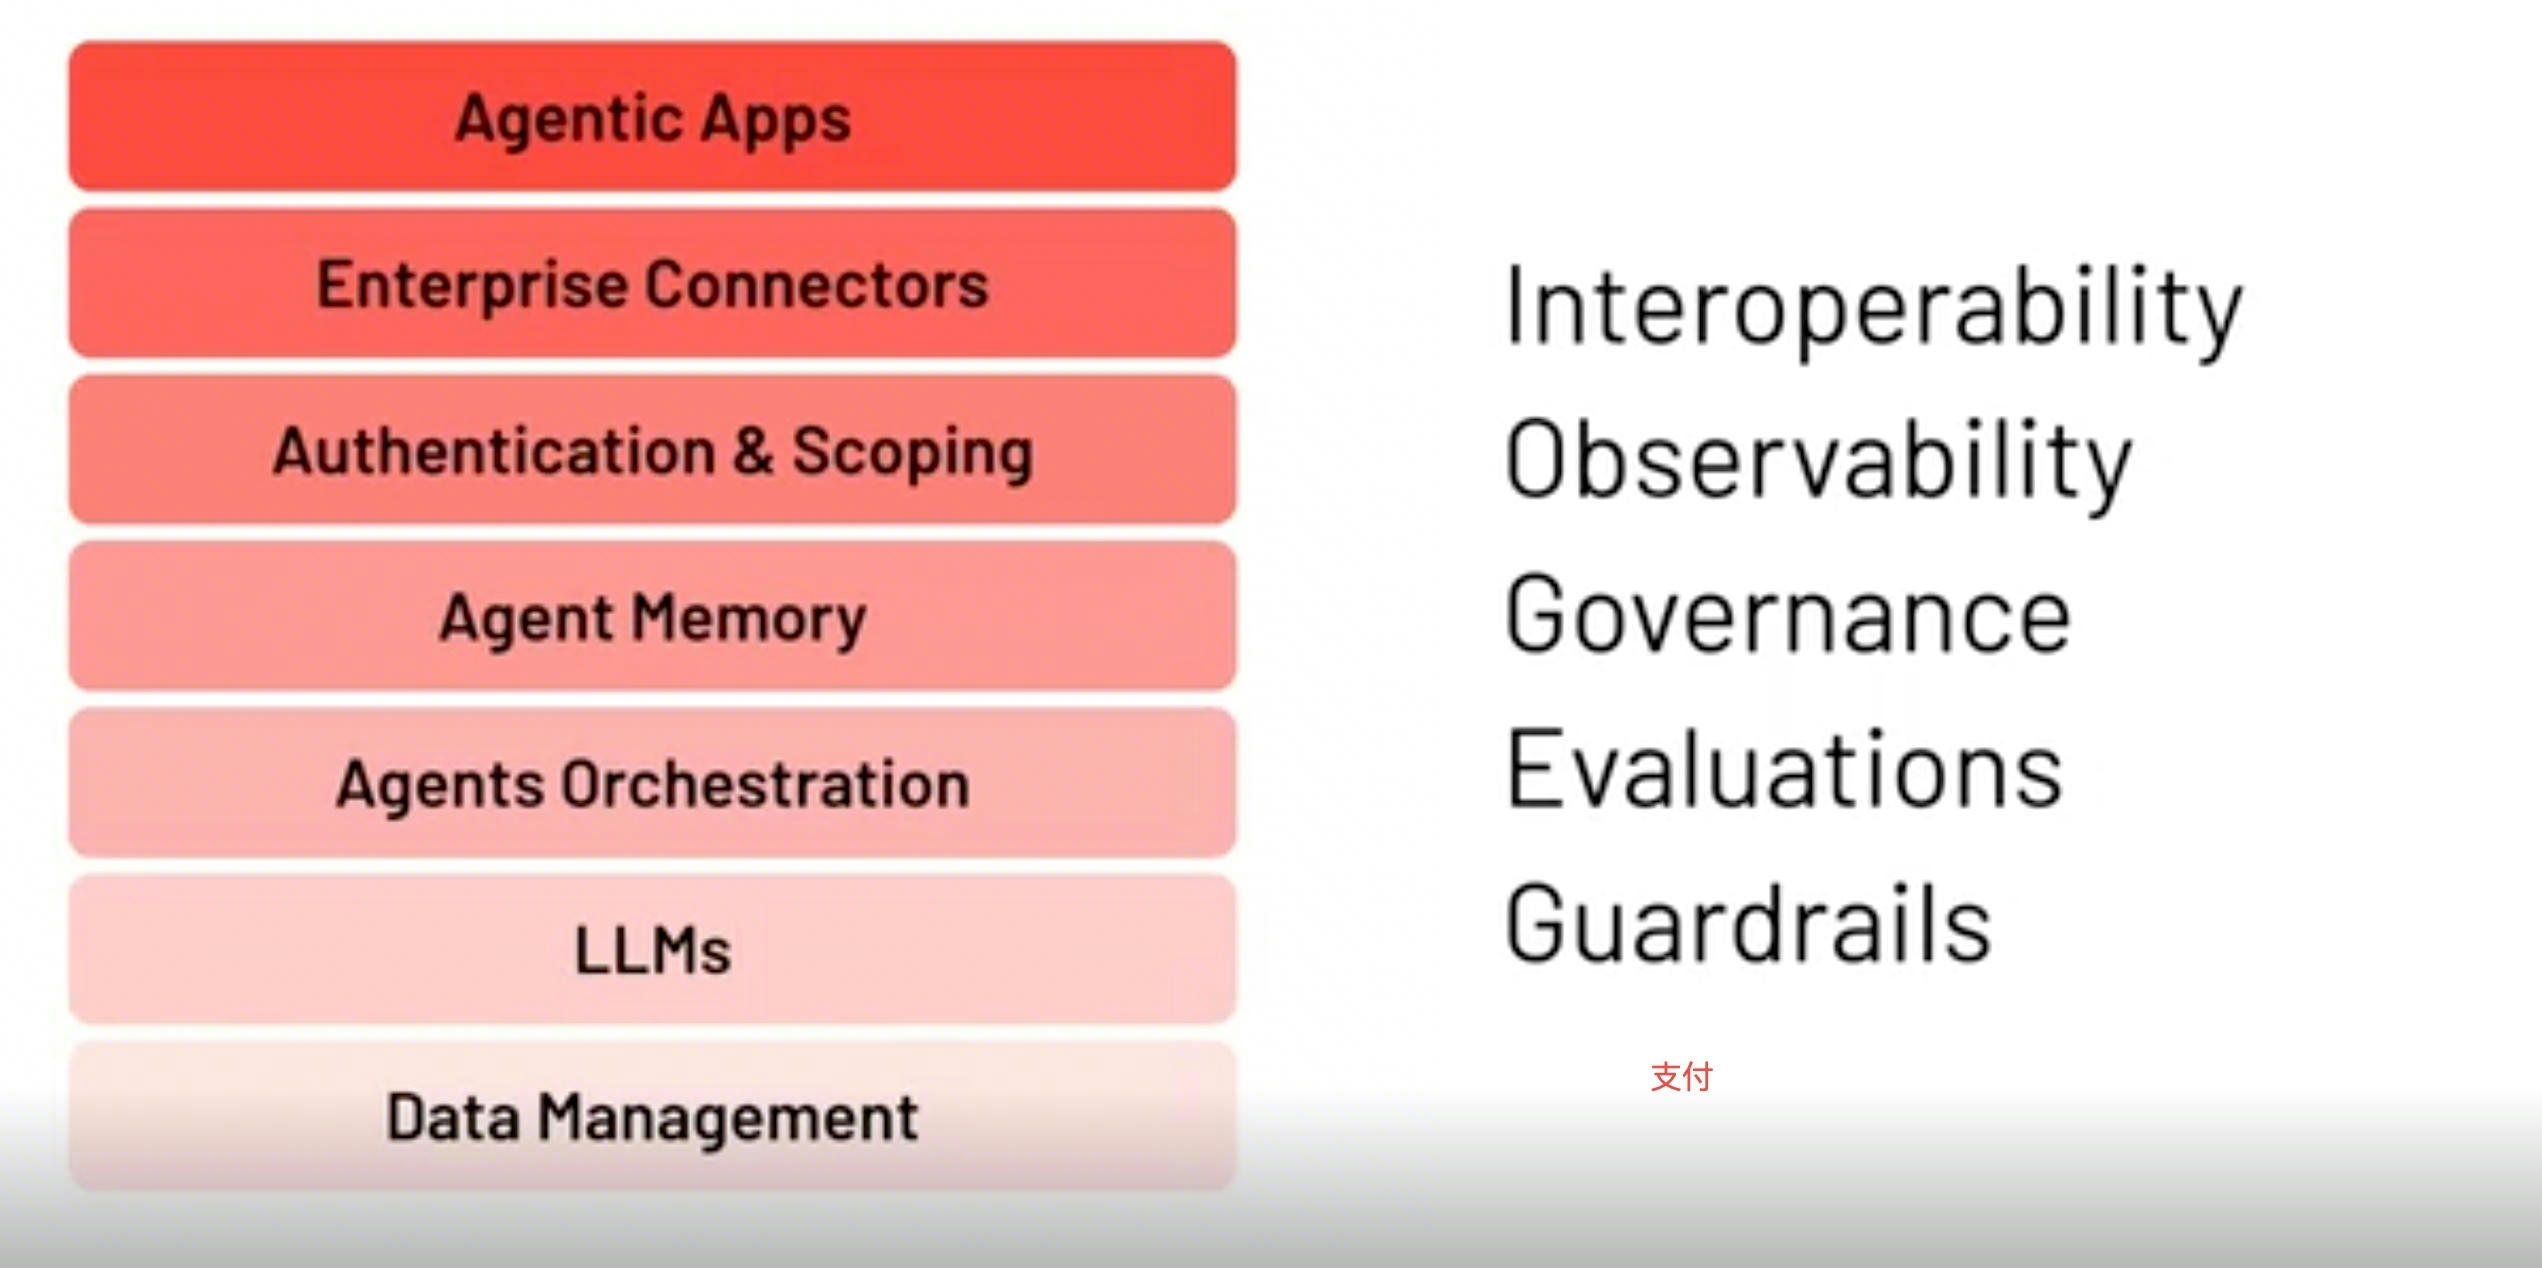
Ai agent:

An Al agent is a computational entity that perceives its environment through inputs, reasons and plans using a
large language model as its cognitive engine, takes actions through tools and integrations, and is augmented
with persistent memory to store, retrieve, and apply knowledge across interactions

AI Agent memeory

Agent memory refers to the system of architectural components, control mechanisms, tools and
software harness that enables an Al agent to persistently store, organize, retrieve, and reuse
information across time, interactions, and execution contexts, ensuring temporal and contextual
continuity, even across fragmented interactions

the reason why Memeory in Agent

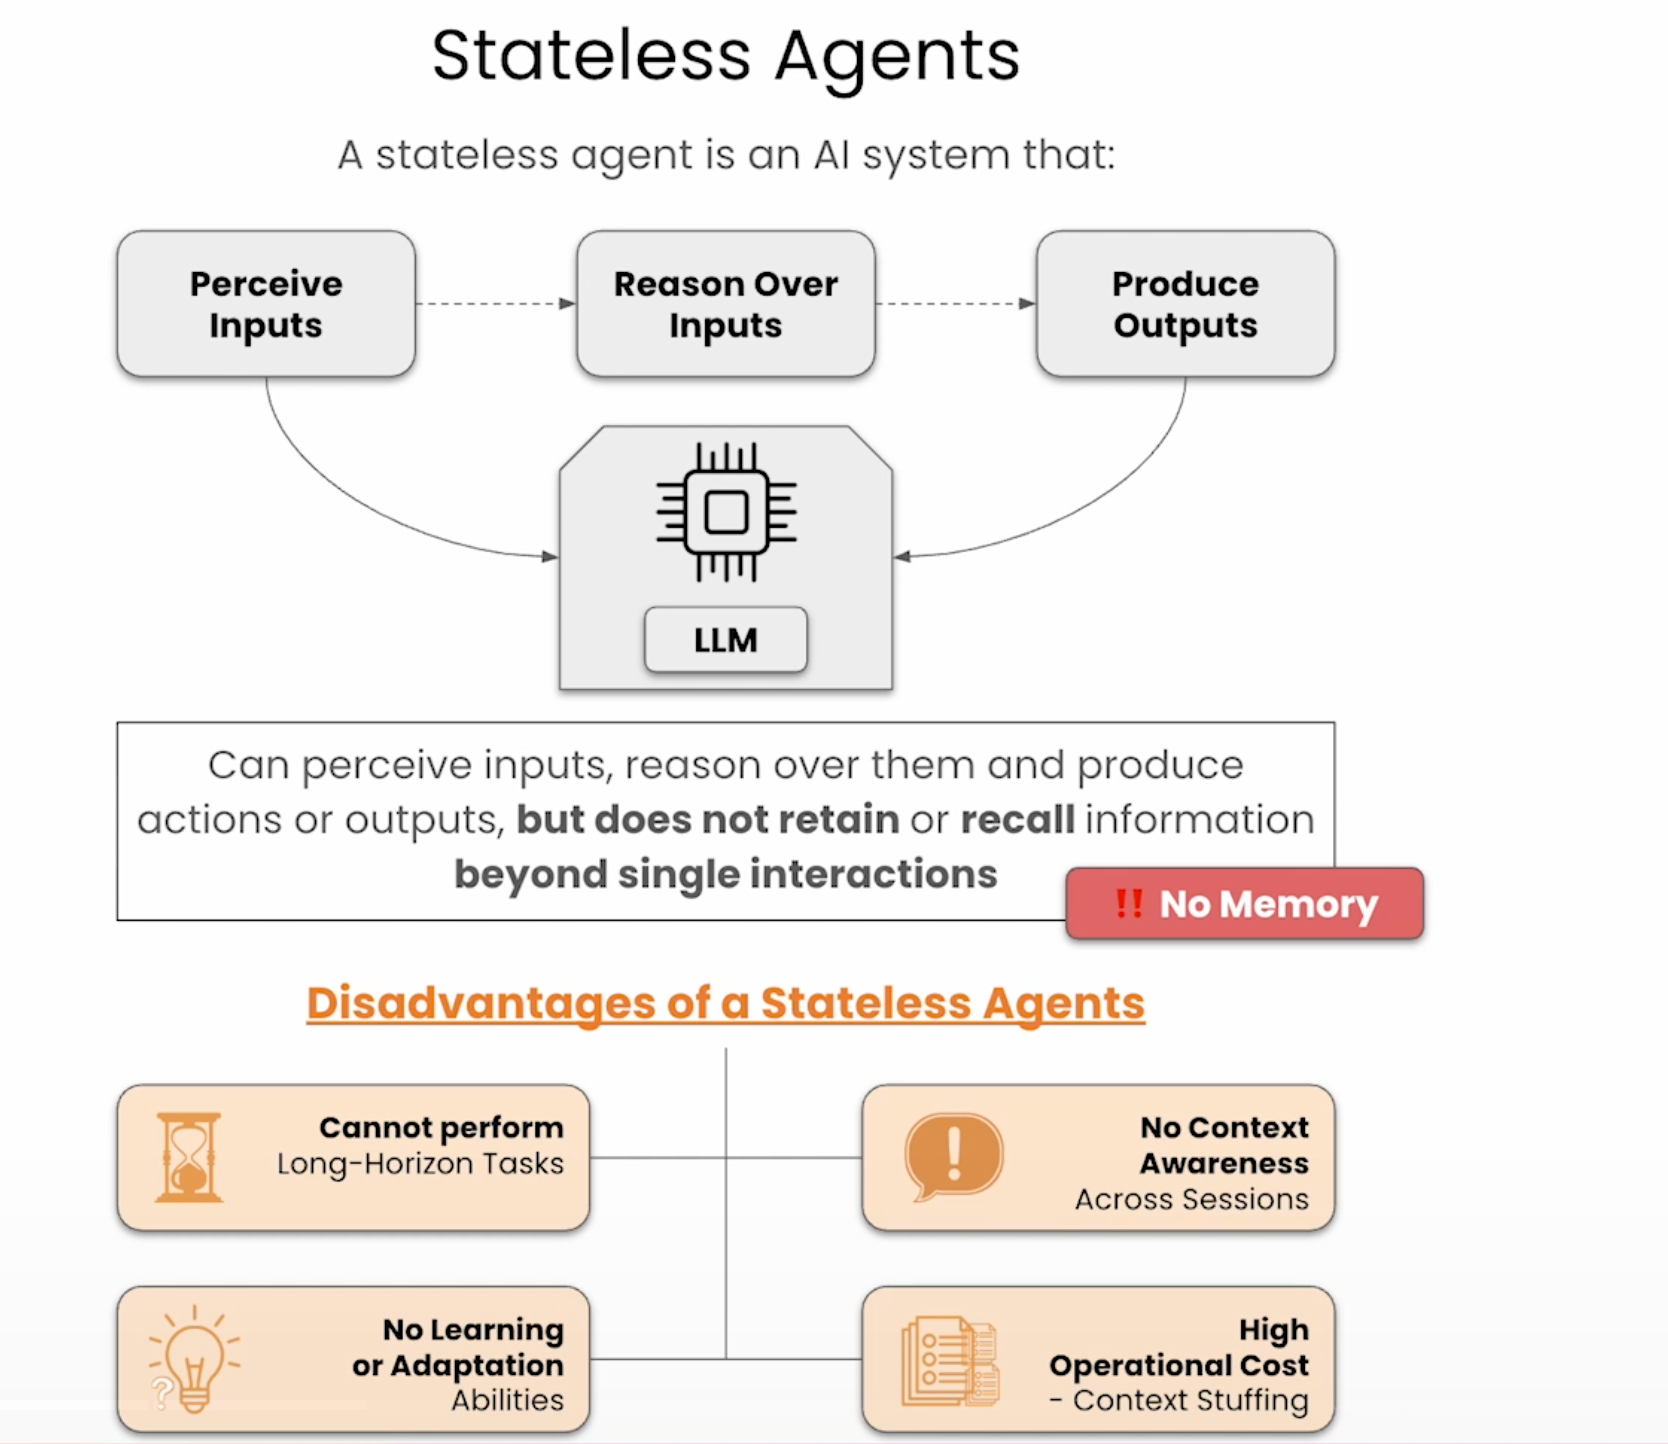
stateless agent

无状态agent, 一轮游,llm只根据输入给出输出
缺点:
无法处理长周期任务
没有跨session的上下文意识
不能学习和更新最新的能力
过长的prompt 造成操作成本较高

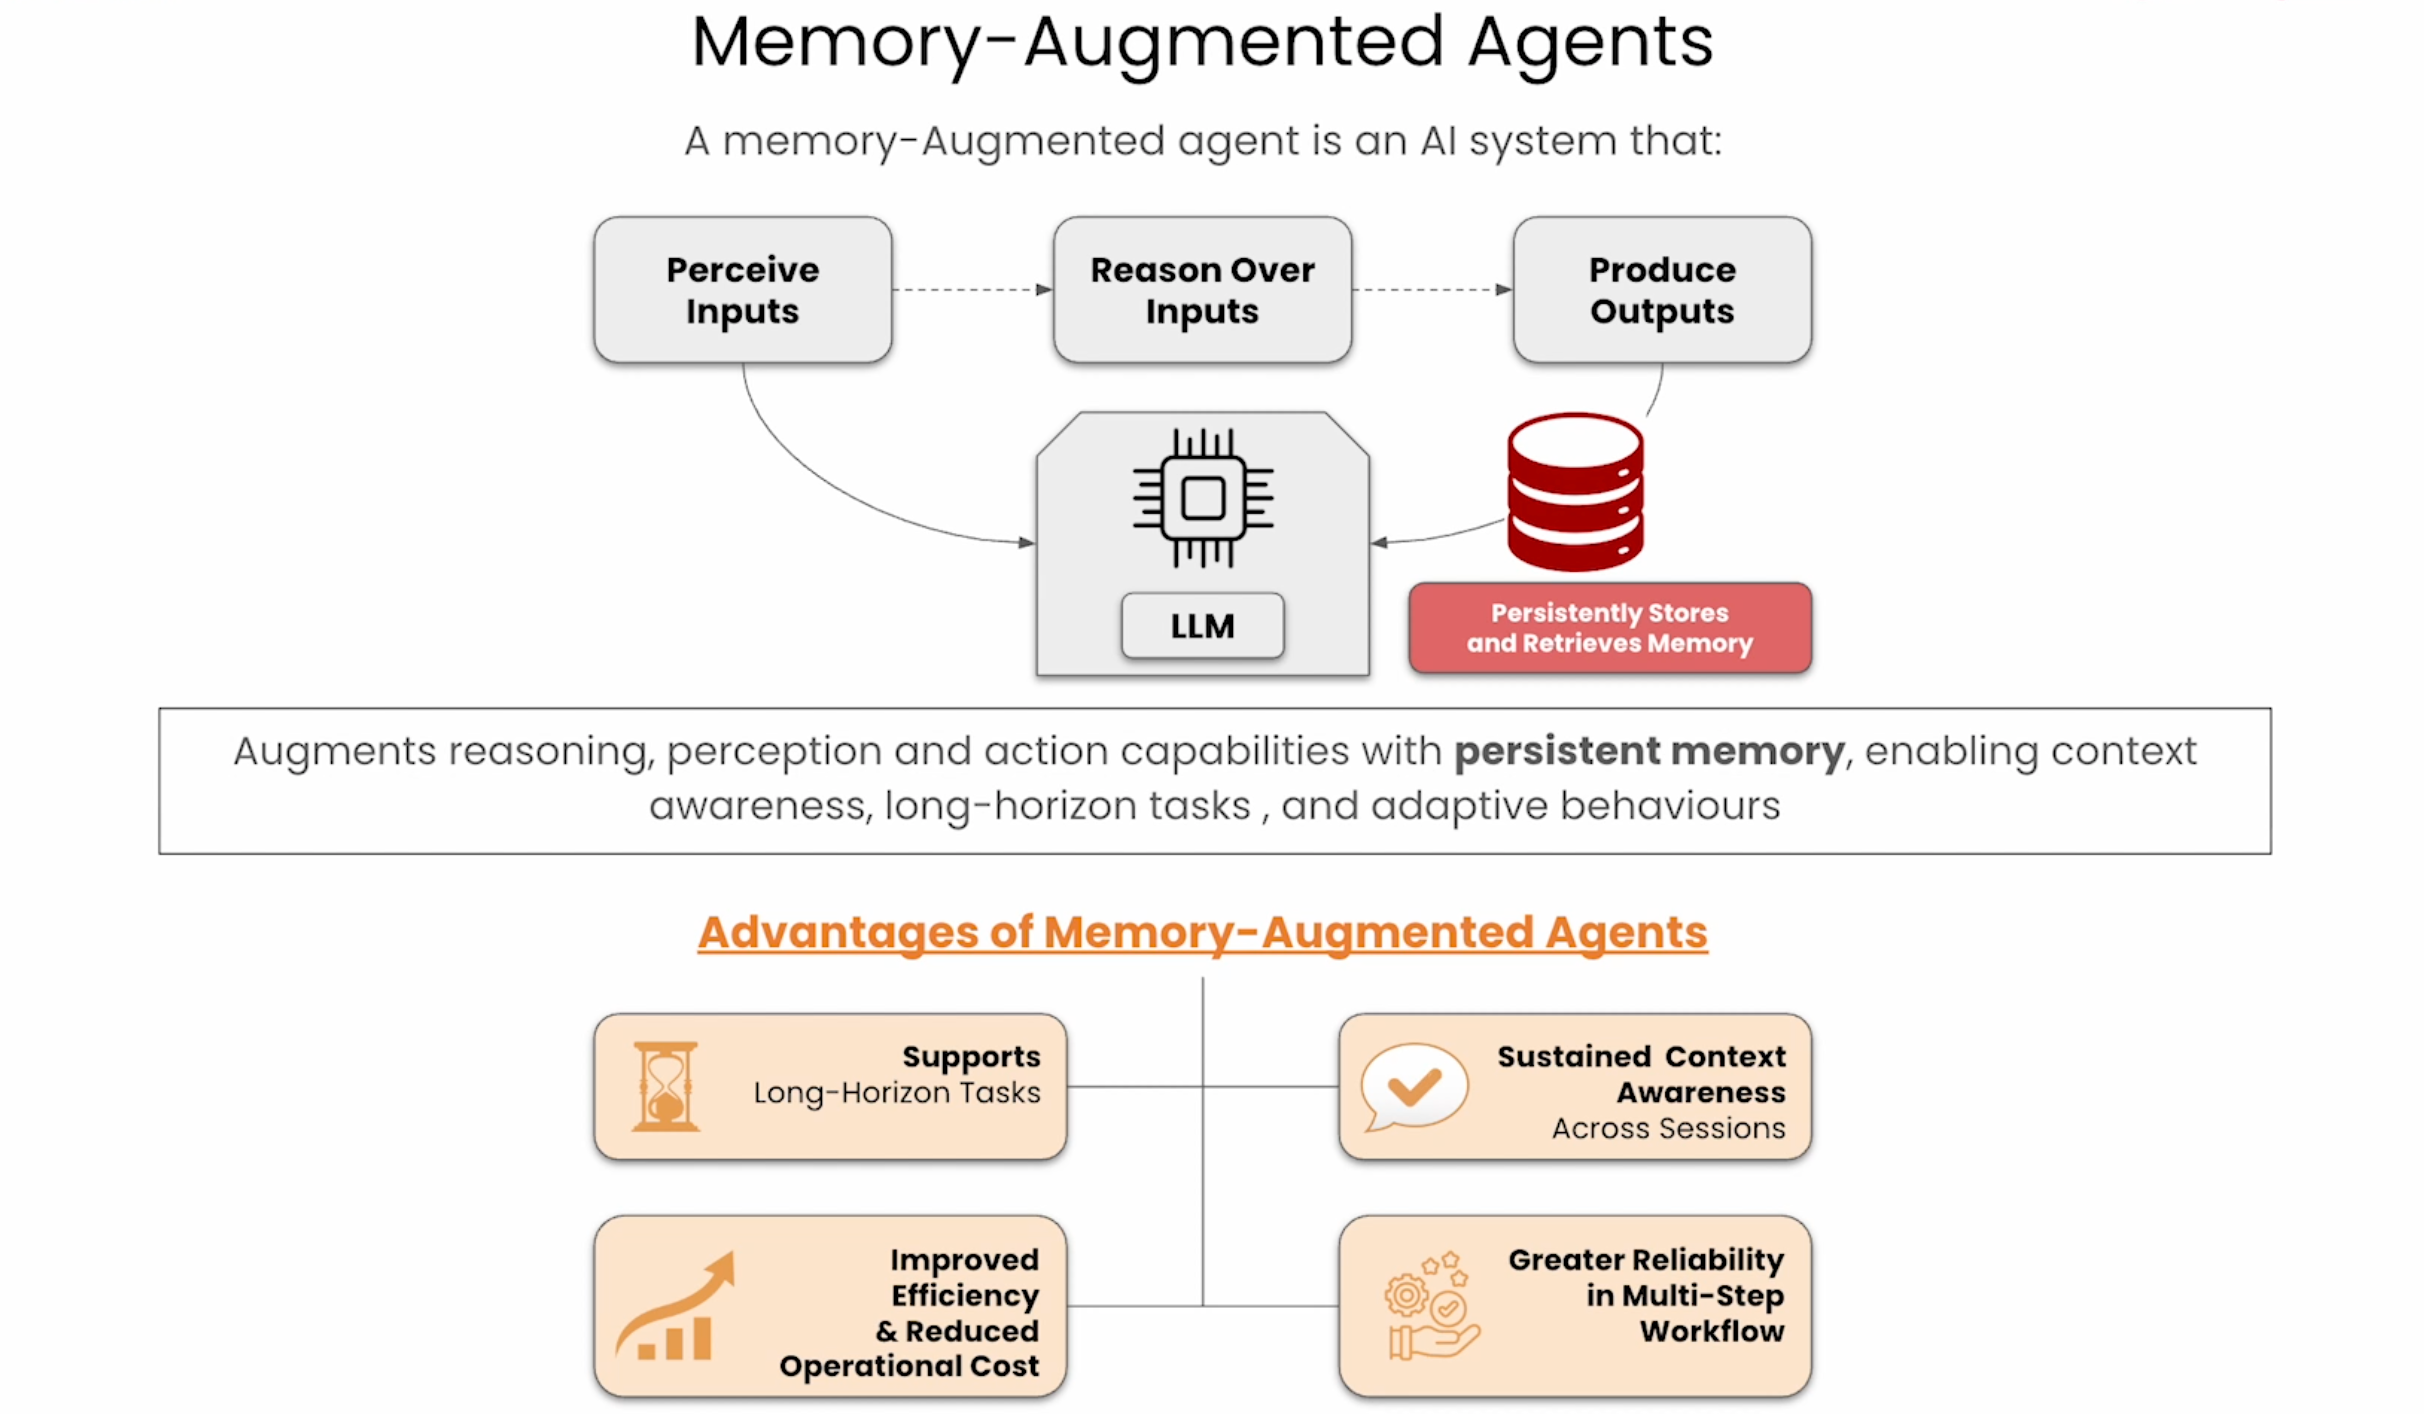
memory-augmented agent/conversation agent

记忆增强的agent,将之会话存储起来,会后续提问,提供更多信息
优点:
可处理长时任务
可以跨session保持上下文
提高处理效率,降低token成本
更适合在多步骤工作流中使用

beyond conversation agent

除了将会话内容进行存储
还需要考虑以下问题
对话窗口是有限的,用户关系不是
不是所有的有用信息都在一个会话中
agent 需要一个结构化的,可查询的知识,不止是对话日志

agent memory forms

RAG + MEMORY

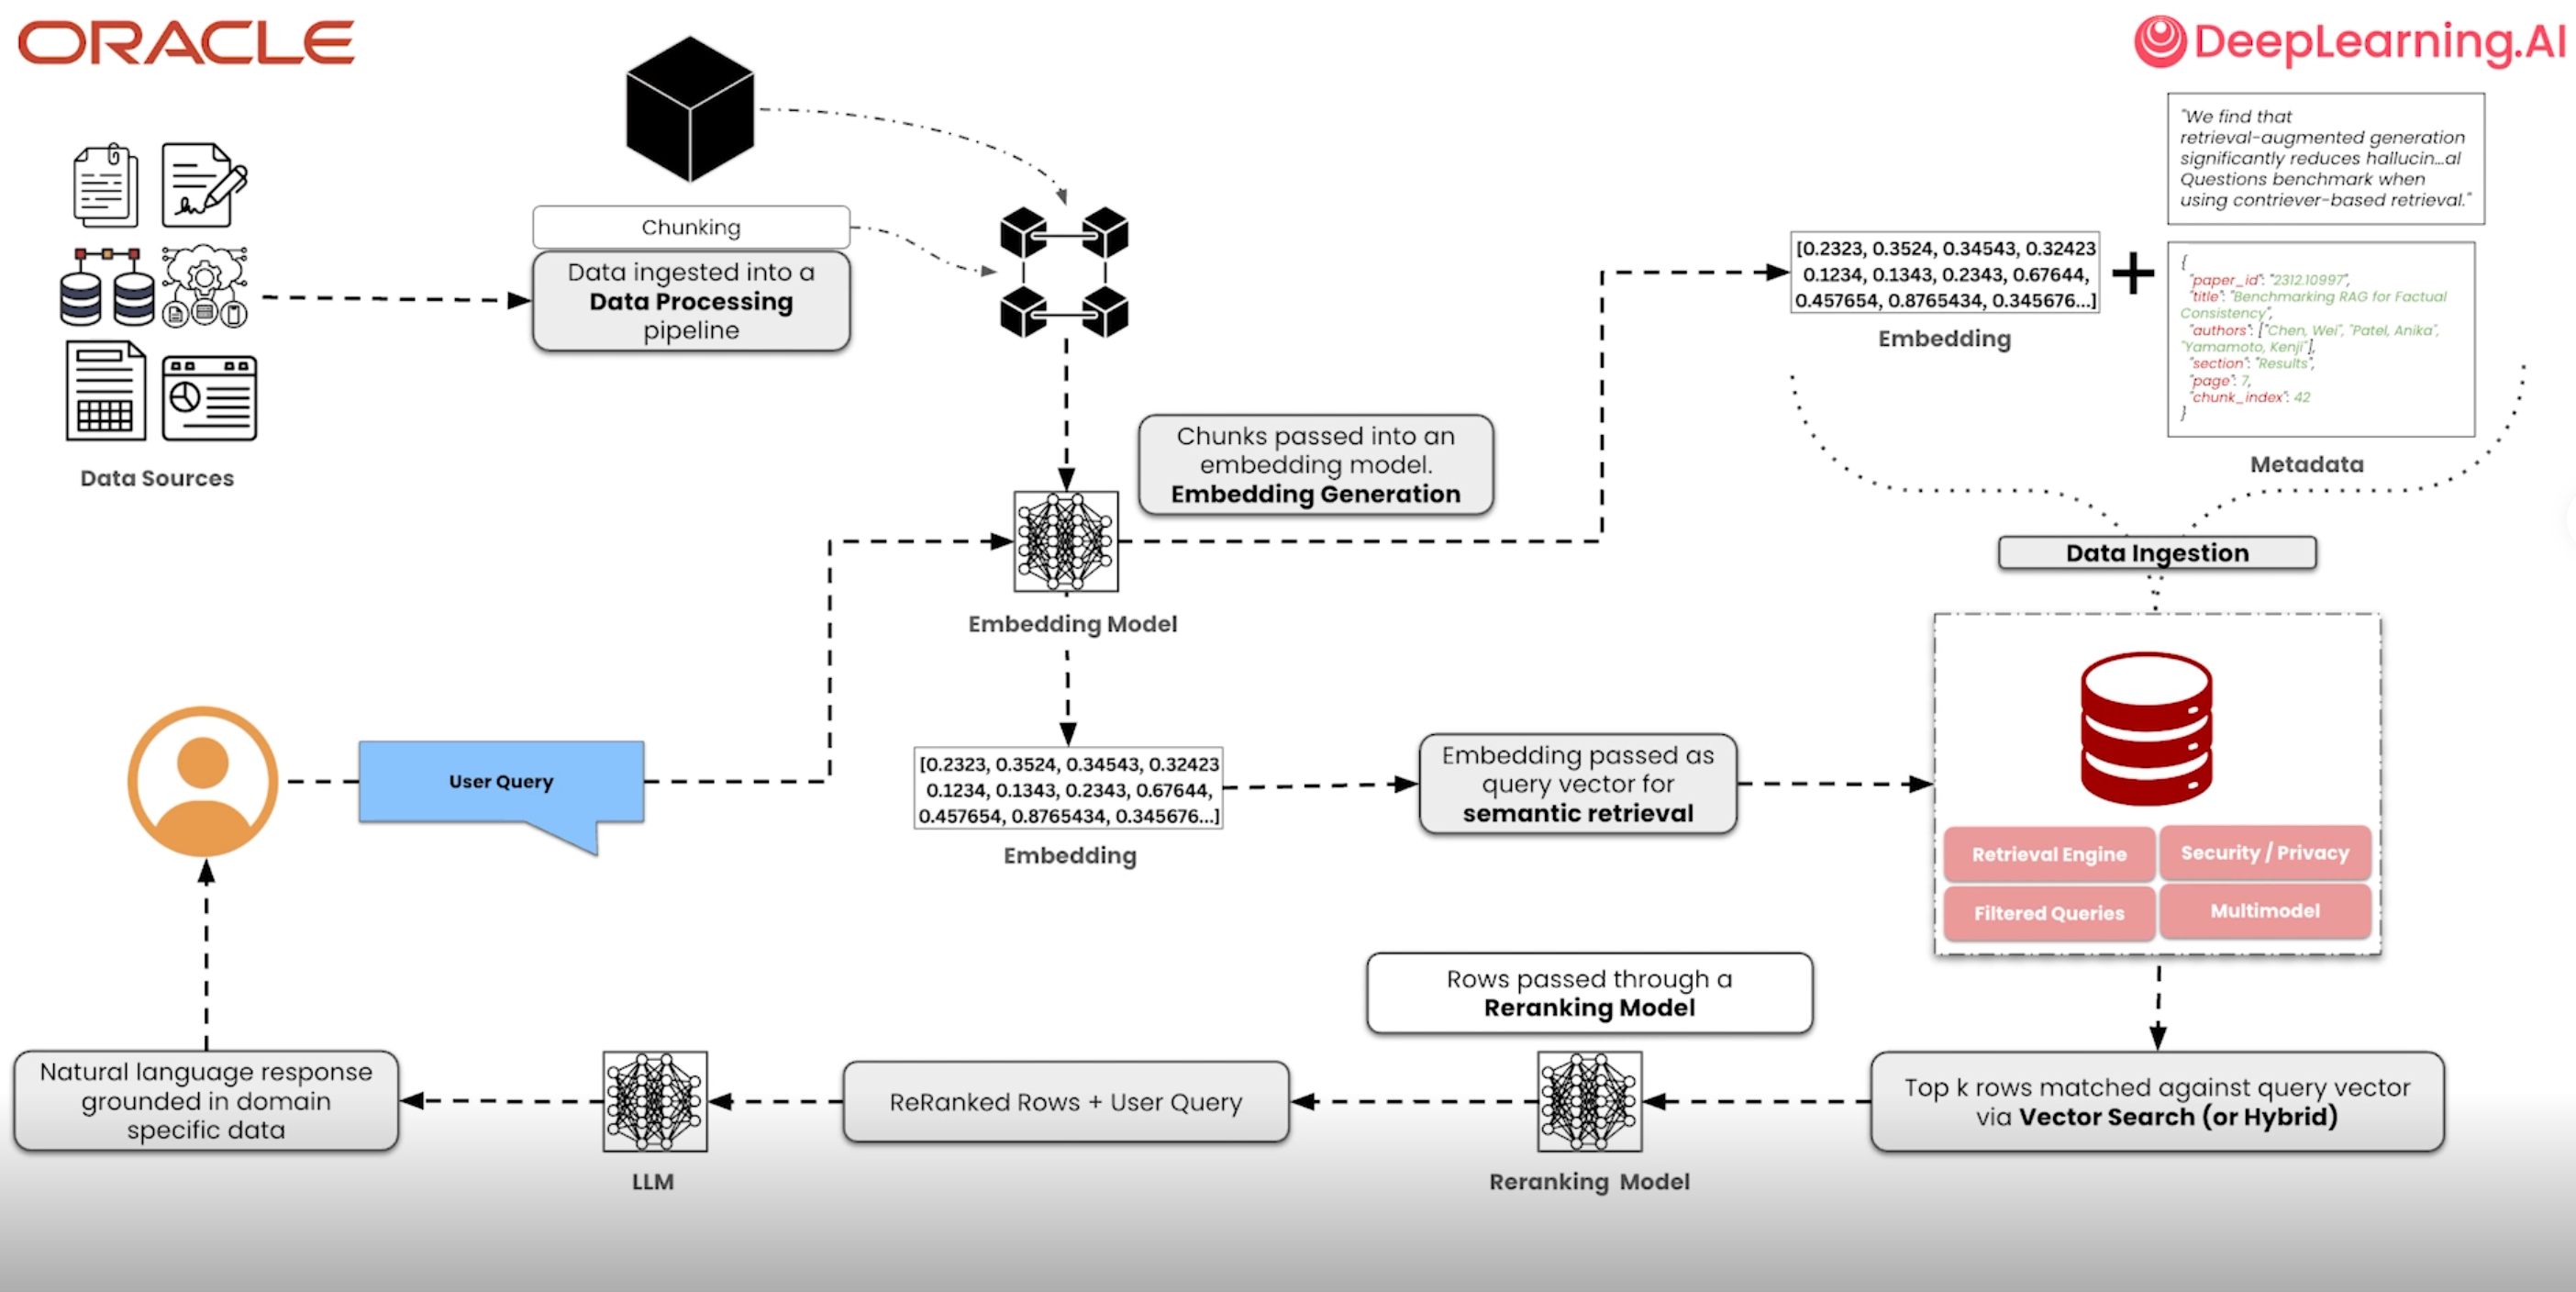
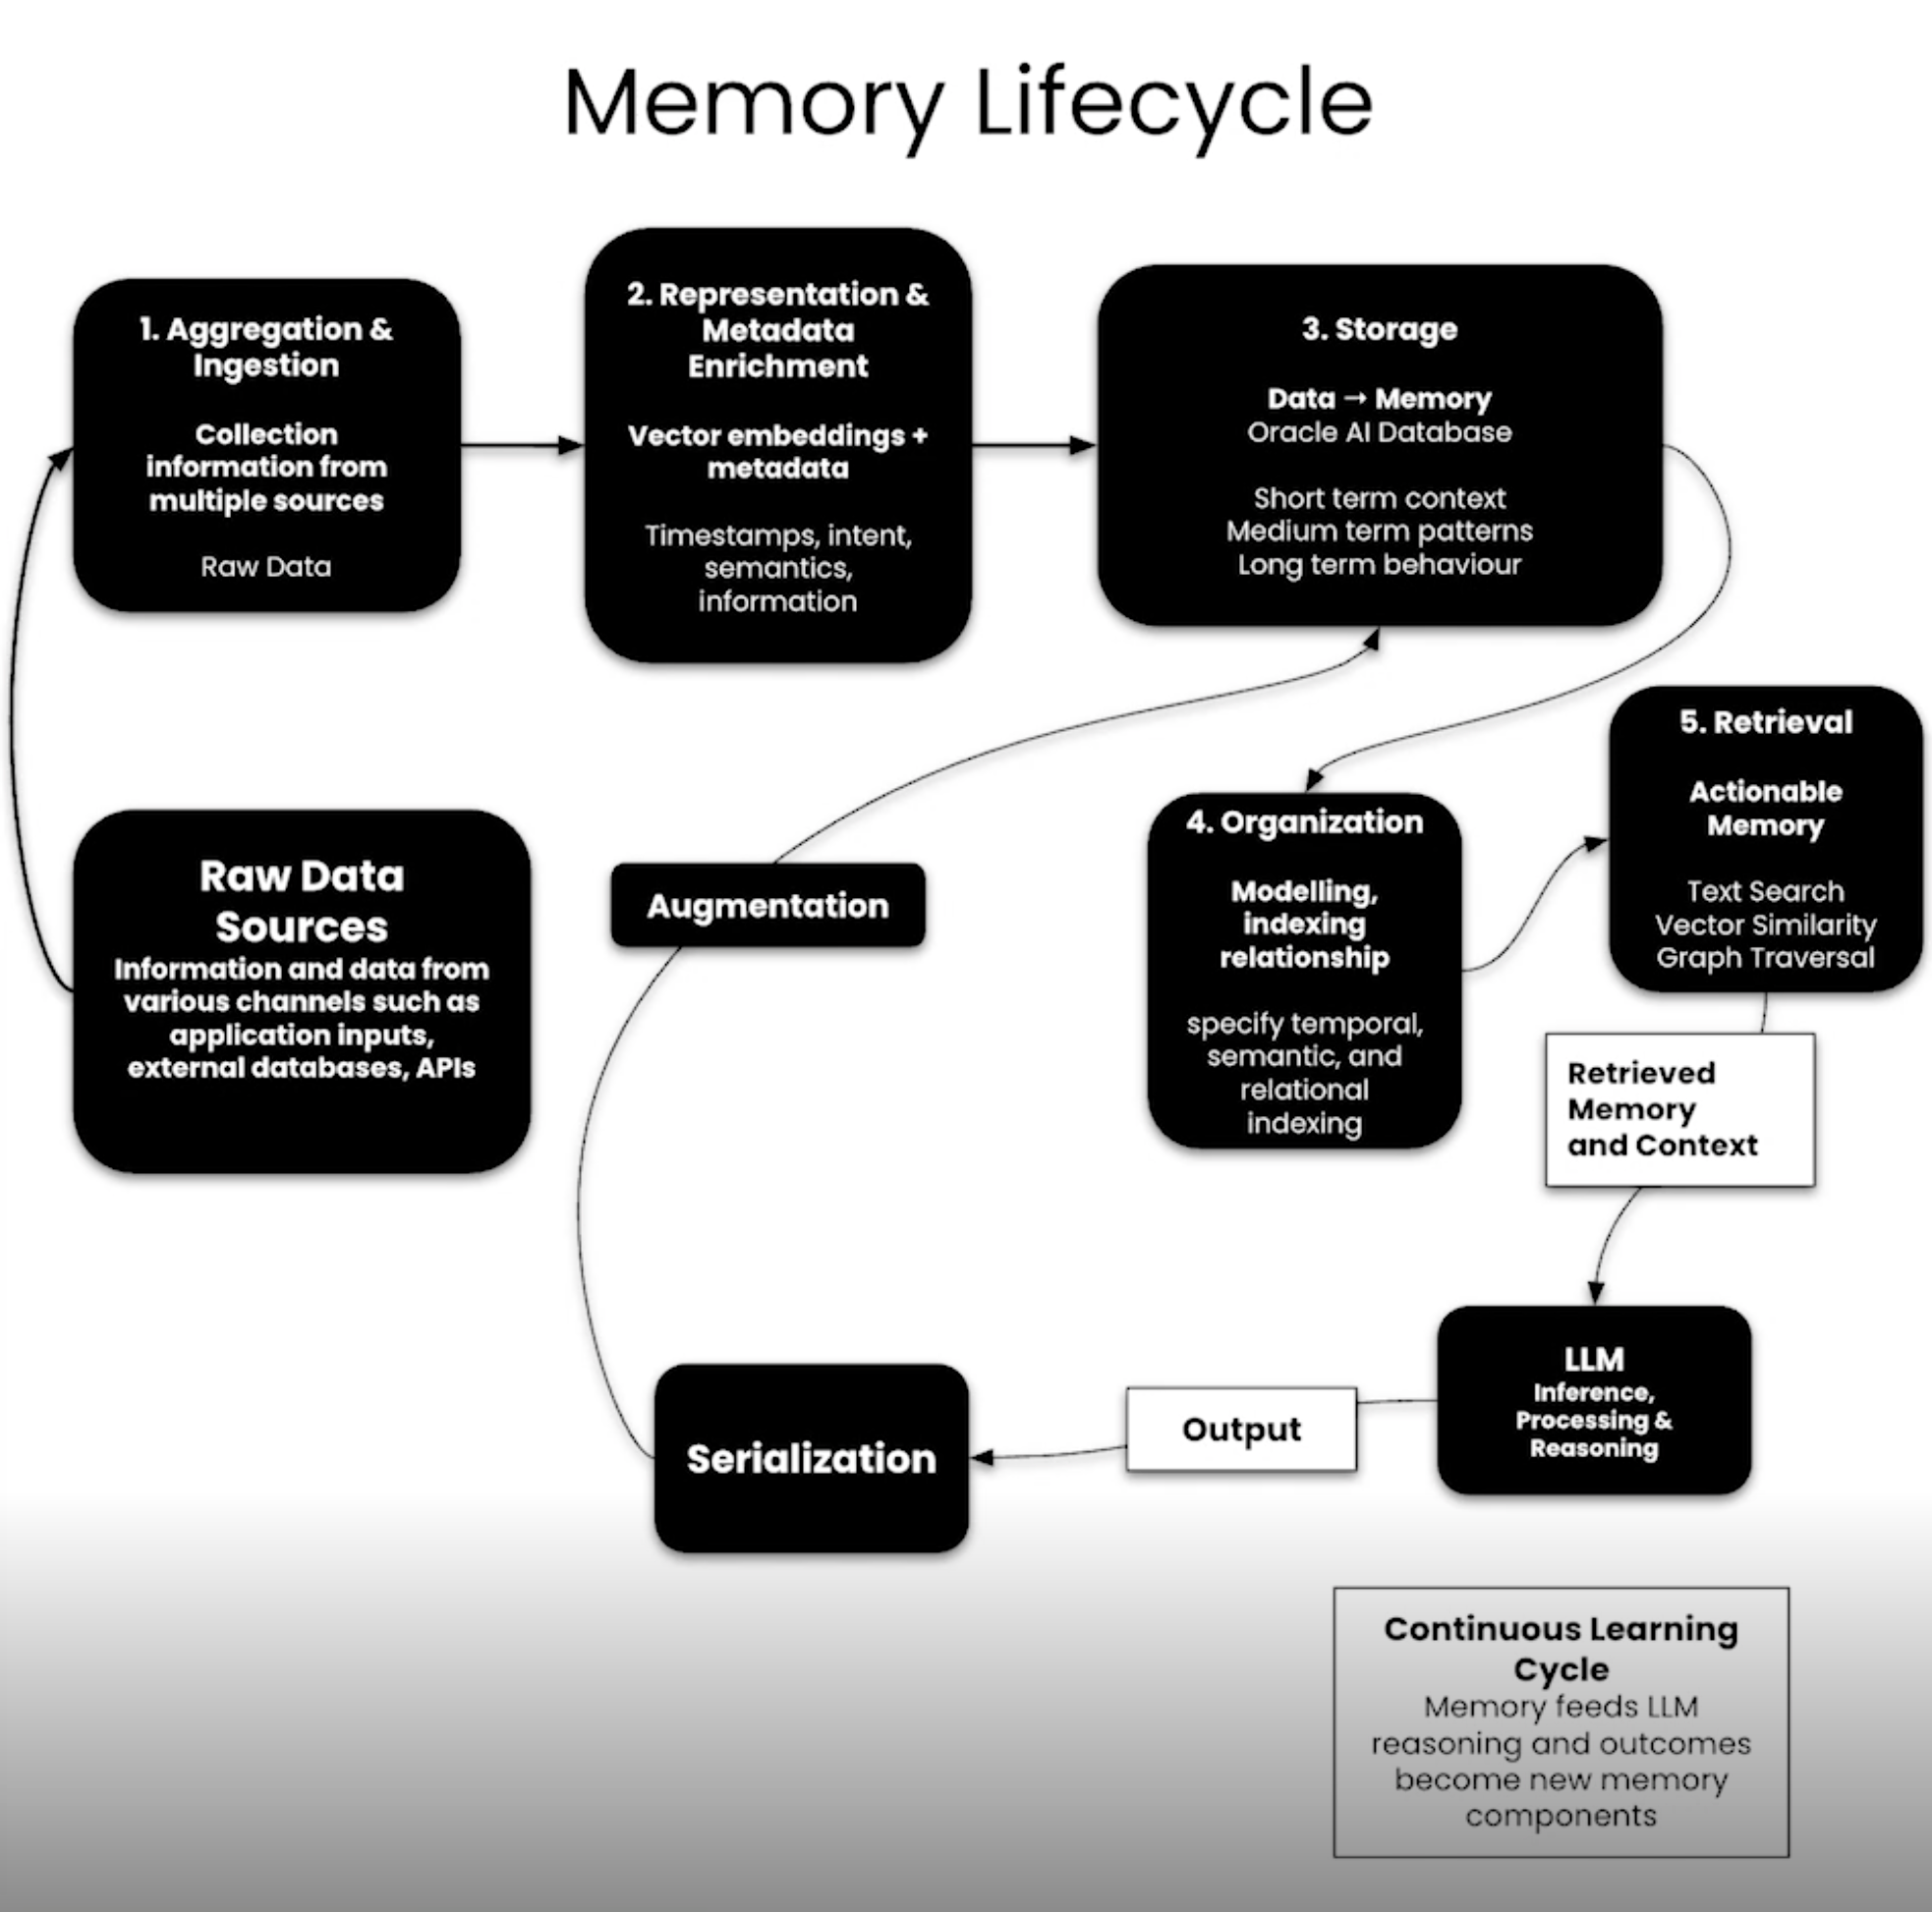
传统RAG处理流程

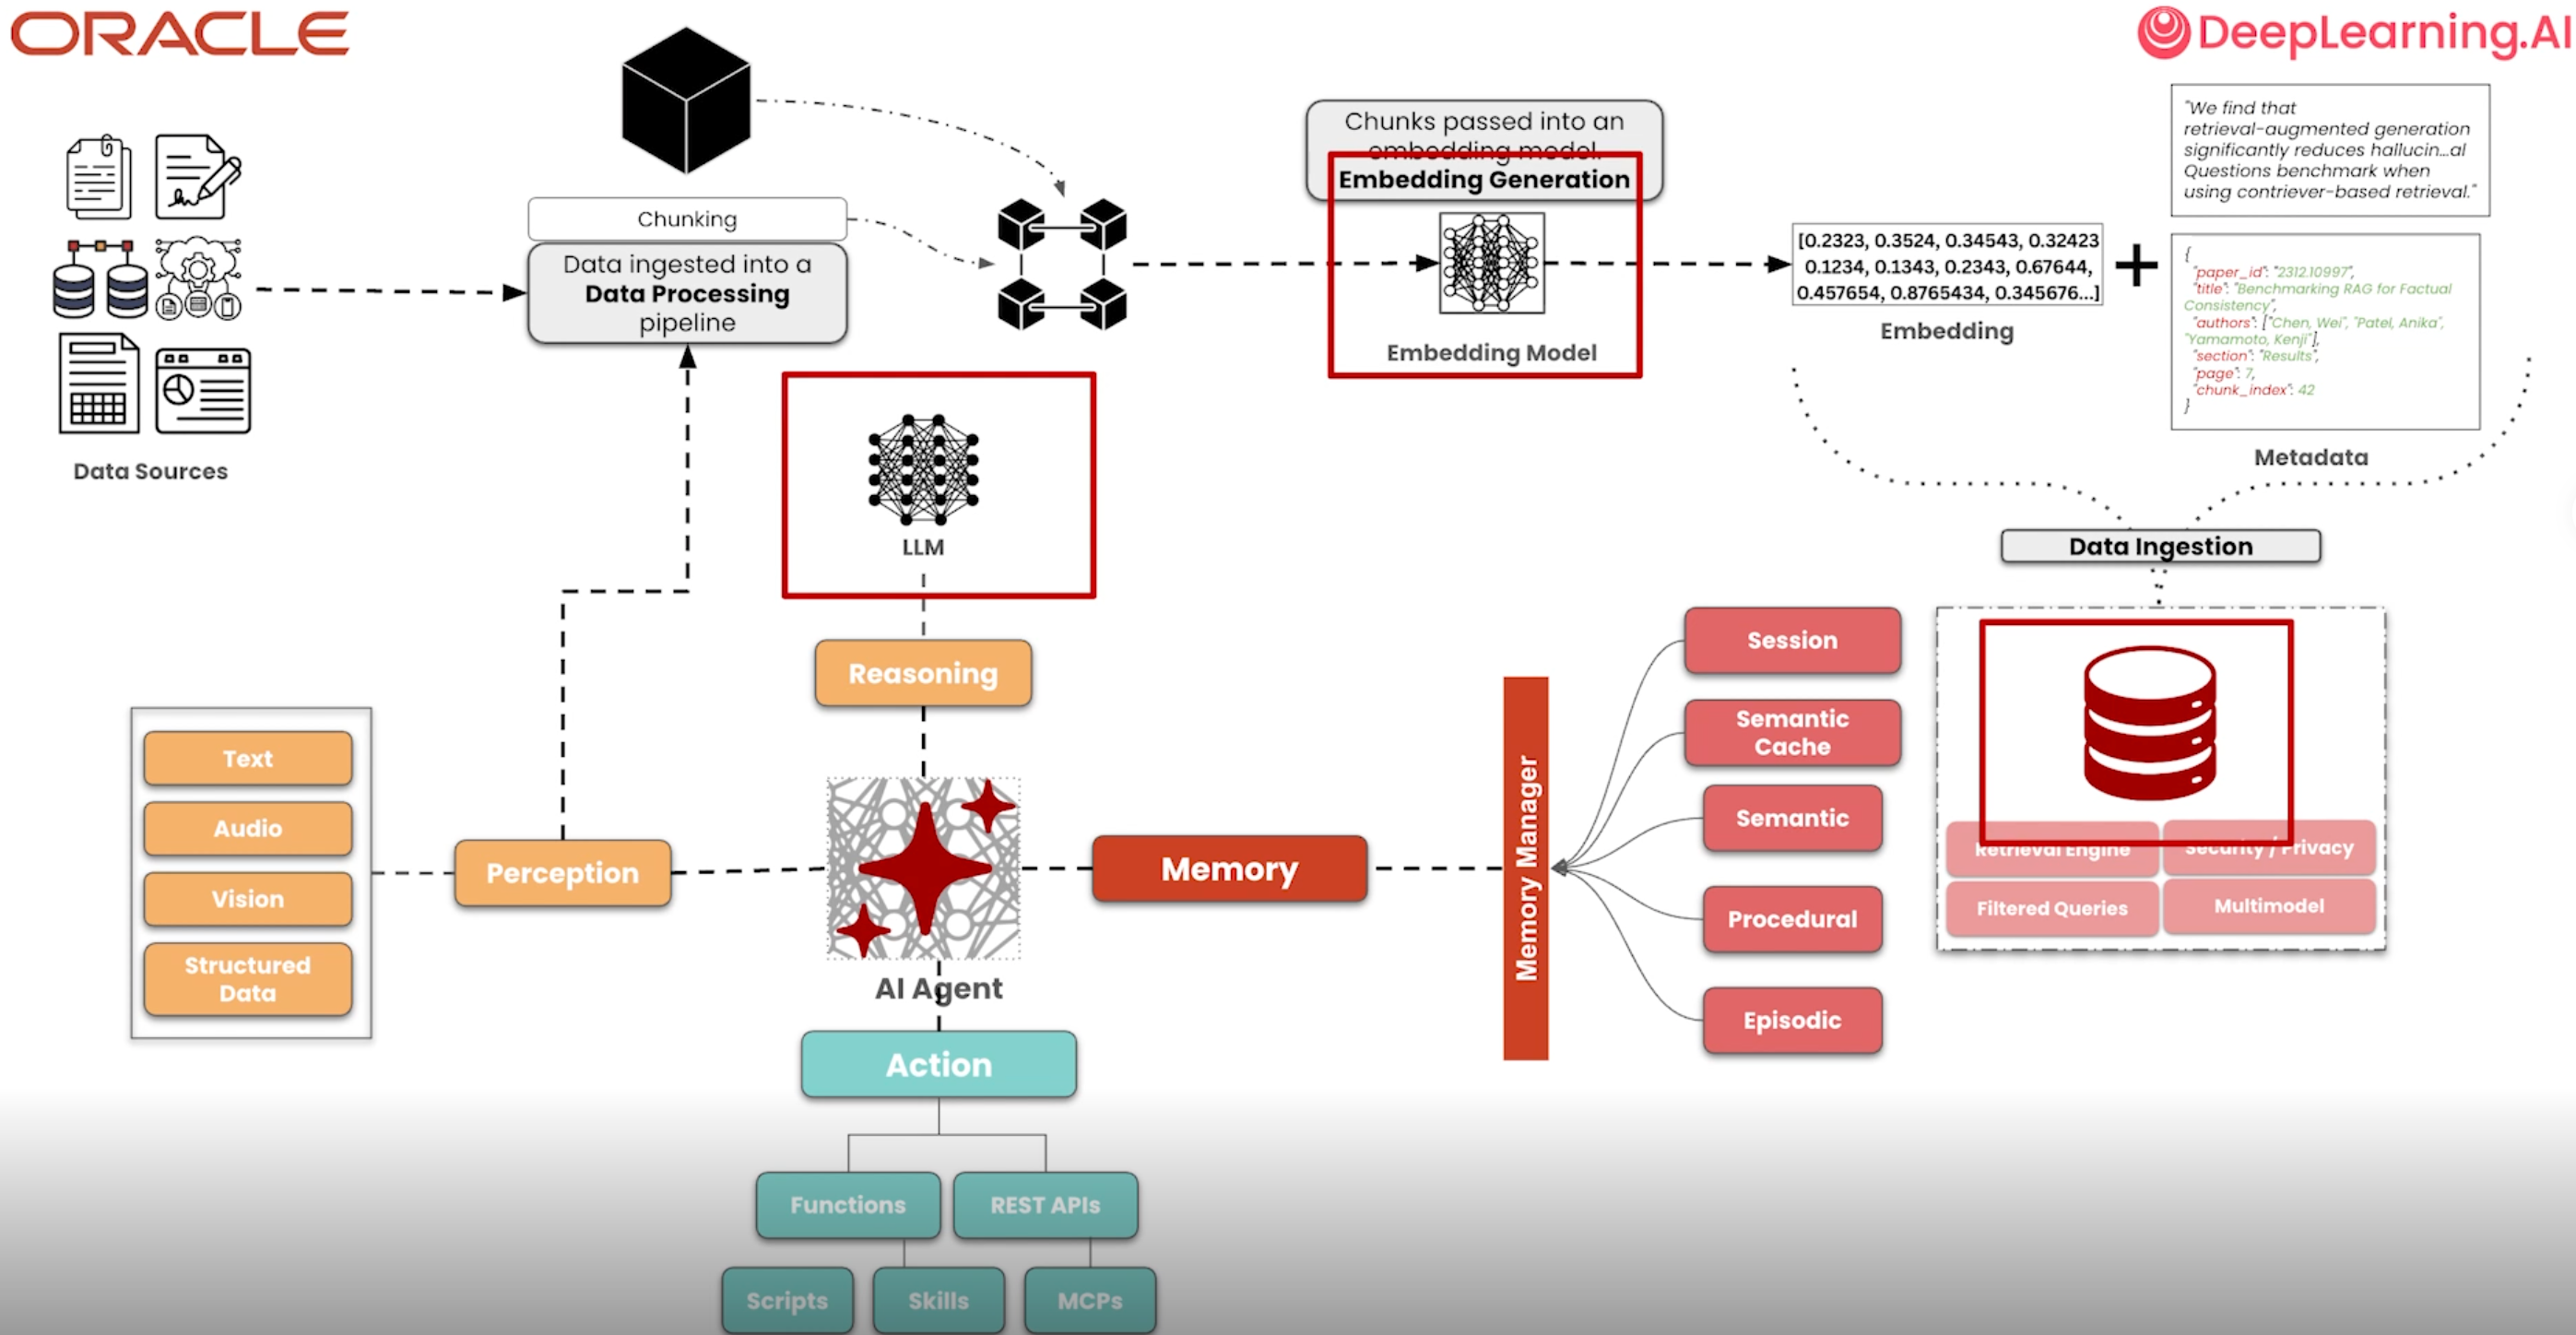
具备memory能力的agent的处理流程

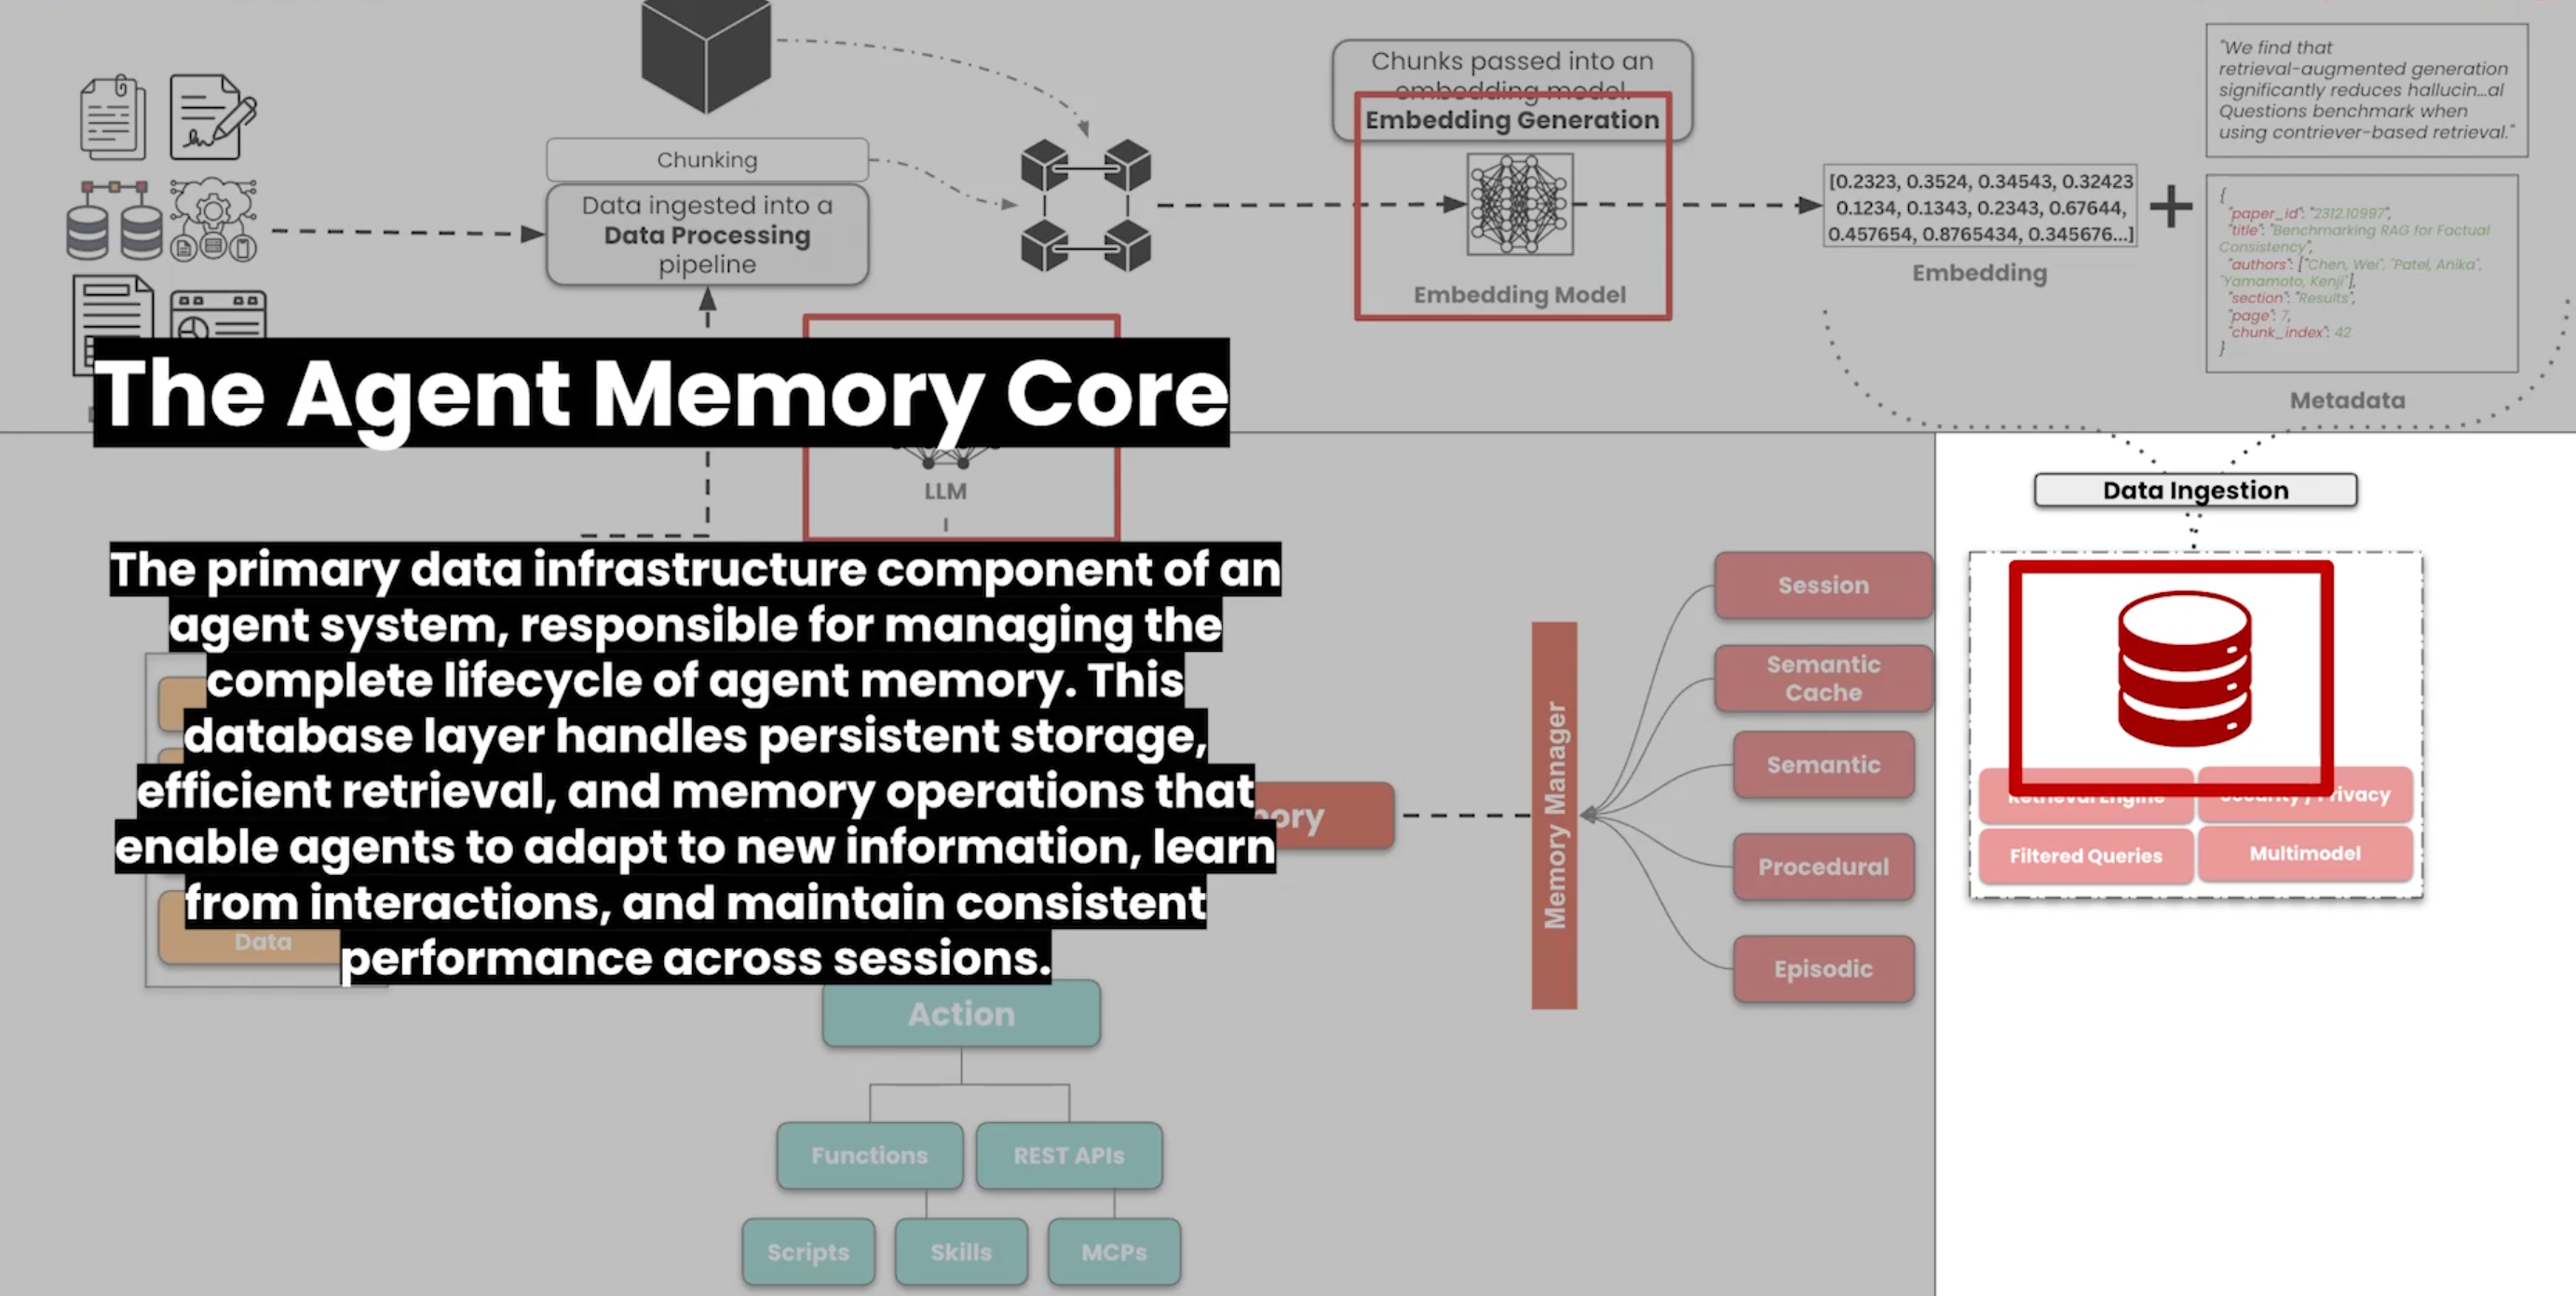
the agent memory core

The primary data infrastructure component of an agent system, responsible for managing the complete lifecycle of agent memory.
This database layer handles persistent storage,efficient retrieval, and memory operations that enable agents to adapt to new information,
learn apry from interactions, and maintain consistent Datd performance across sessions.

contructing the memory manager

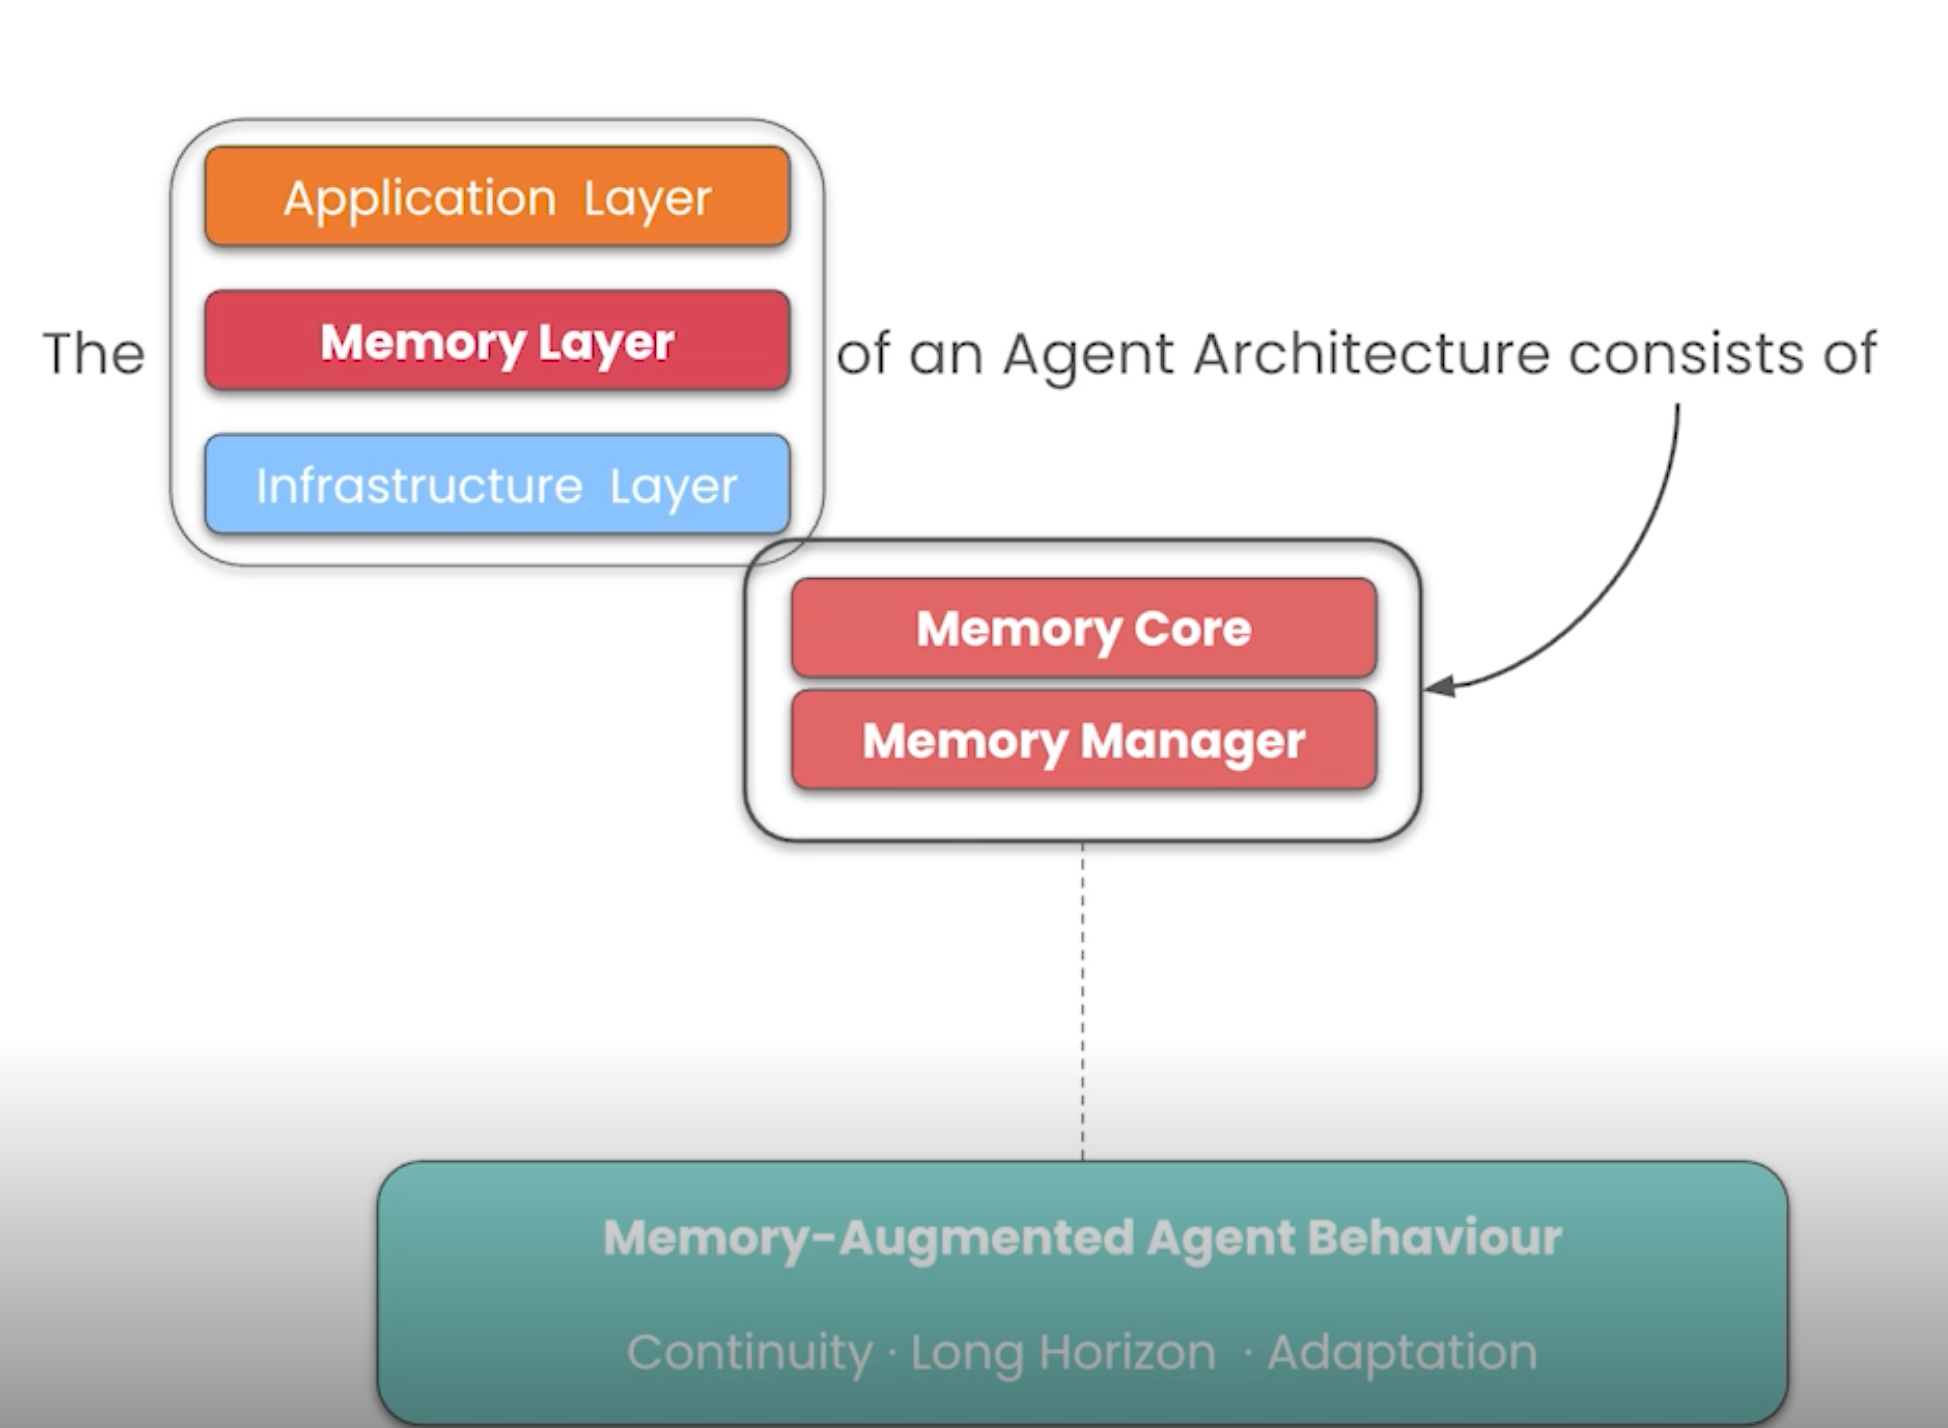
存储层分两部分,存储核(数据库) 和存储管理
为agent对话连续性,长时记忆以及信息能力更新的提供帮助

Memory Manager

A Memory Manager is the control logic in the Agent Stack that decides
what becomes memory, how it’s structured, how it’s updated, and when it should be recalled during execution.

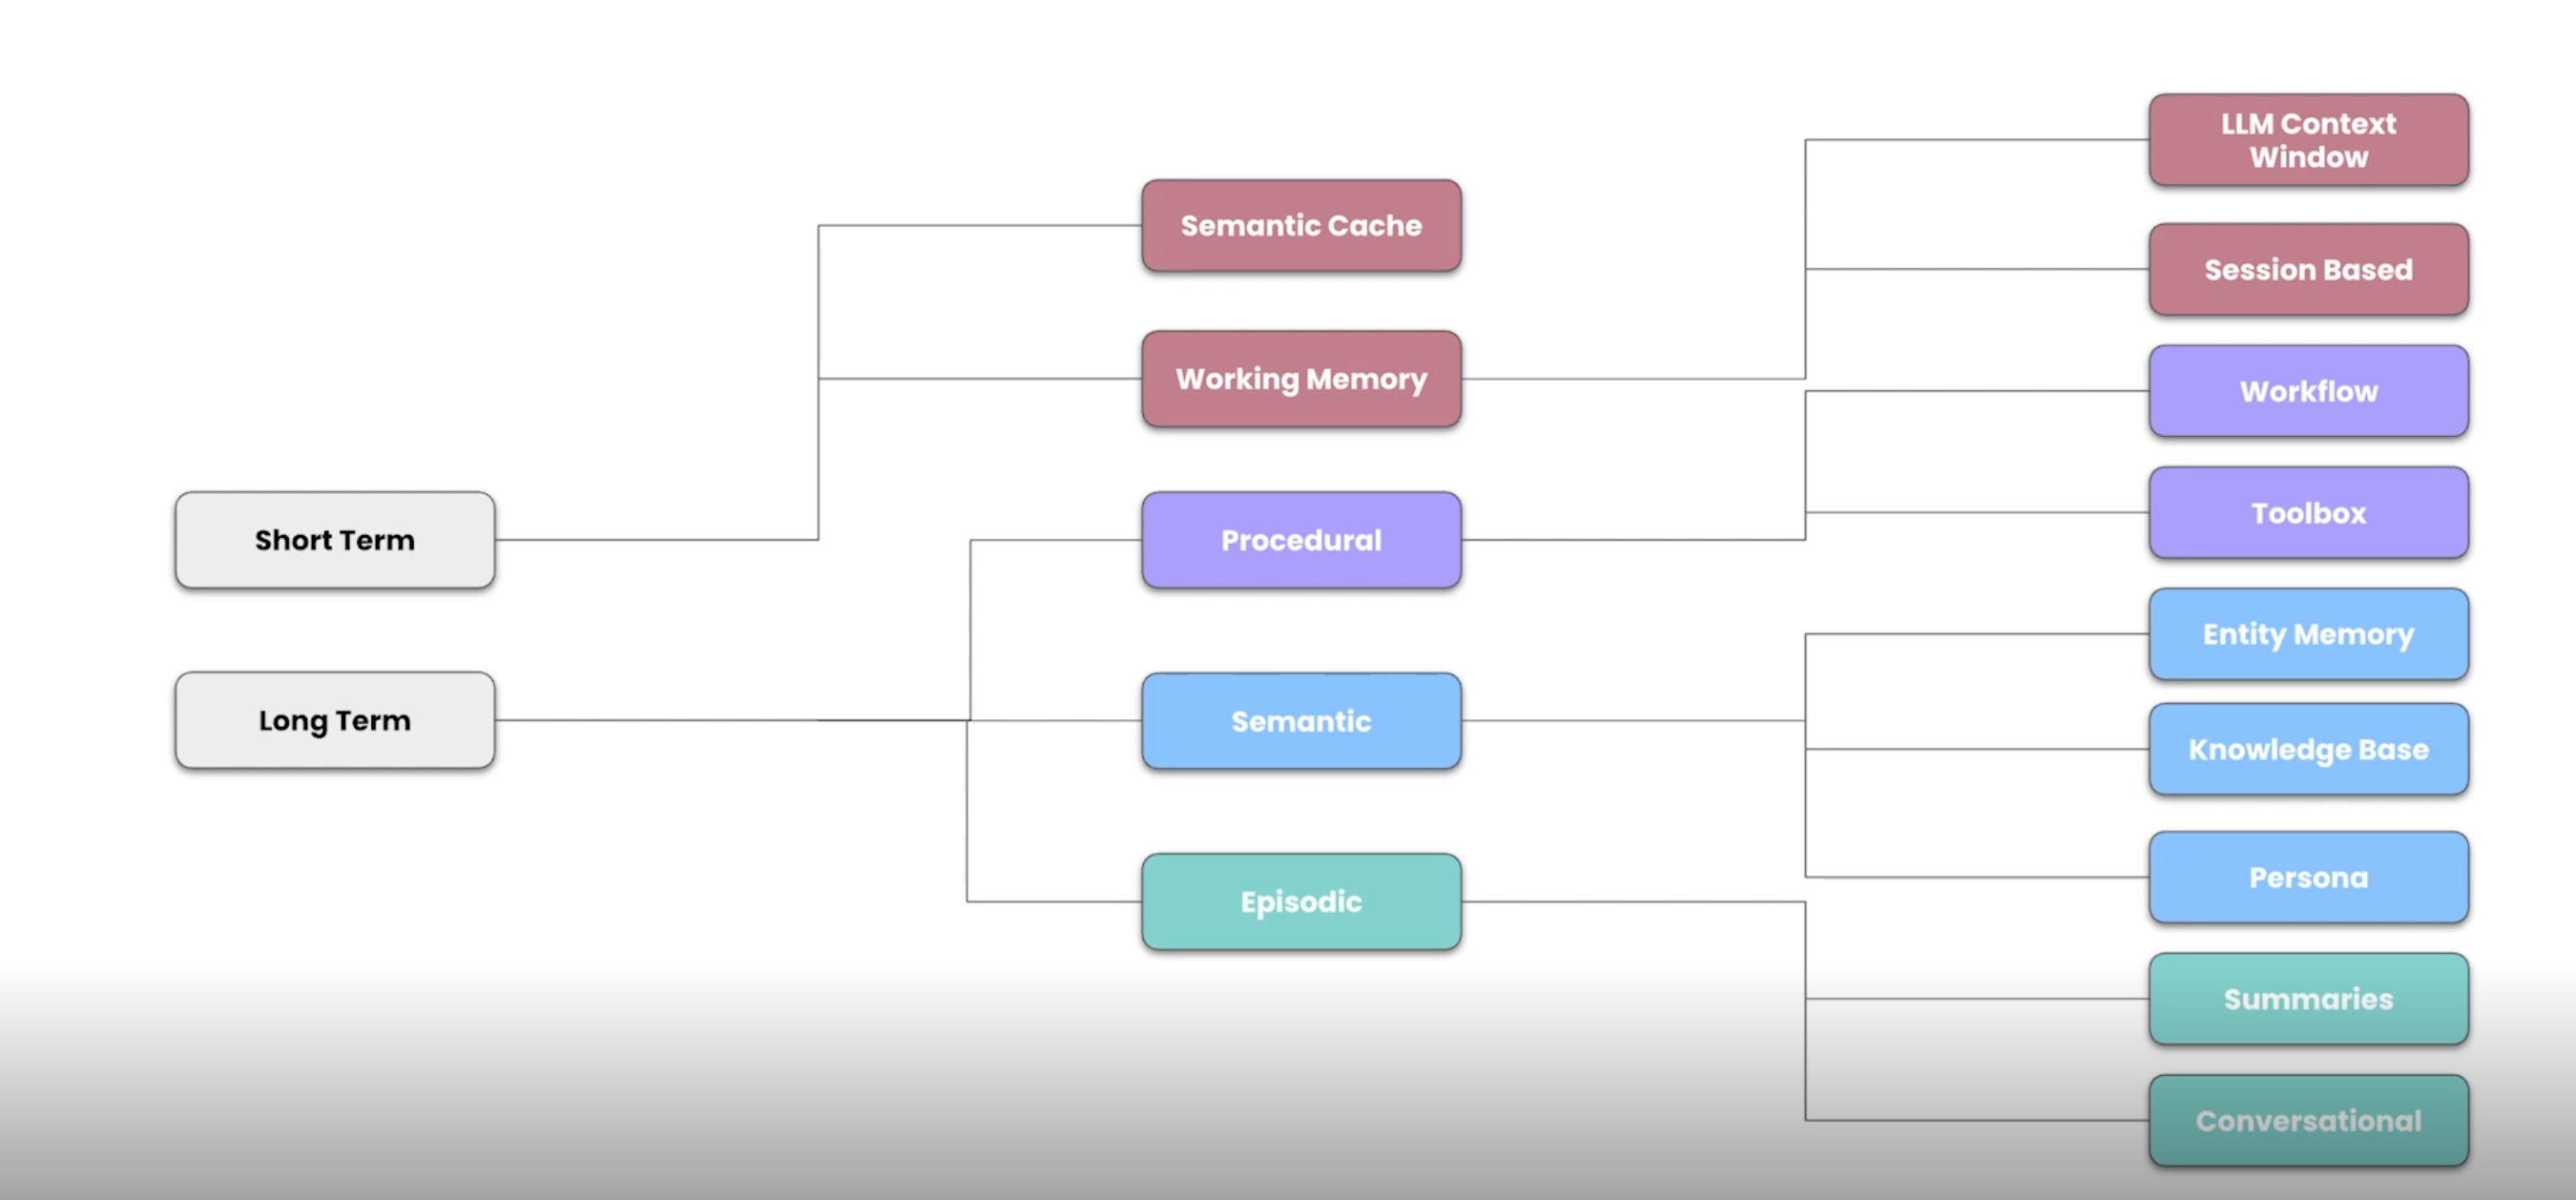
存储类型

不同的记忆形式,有不同的存储类型,存储需求不同进而对应不同操作方法

存储操作分类

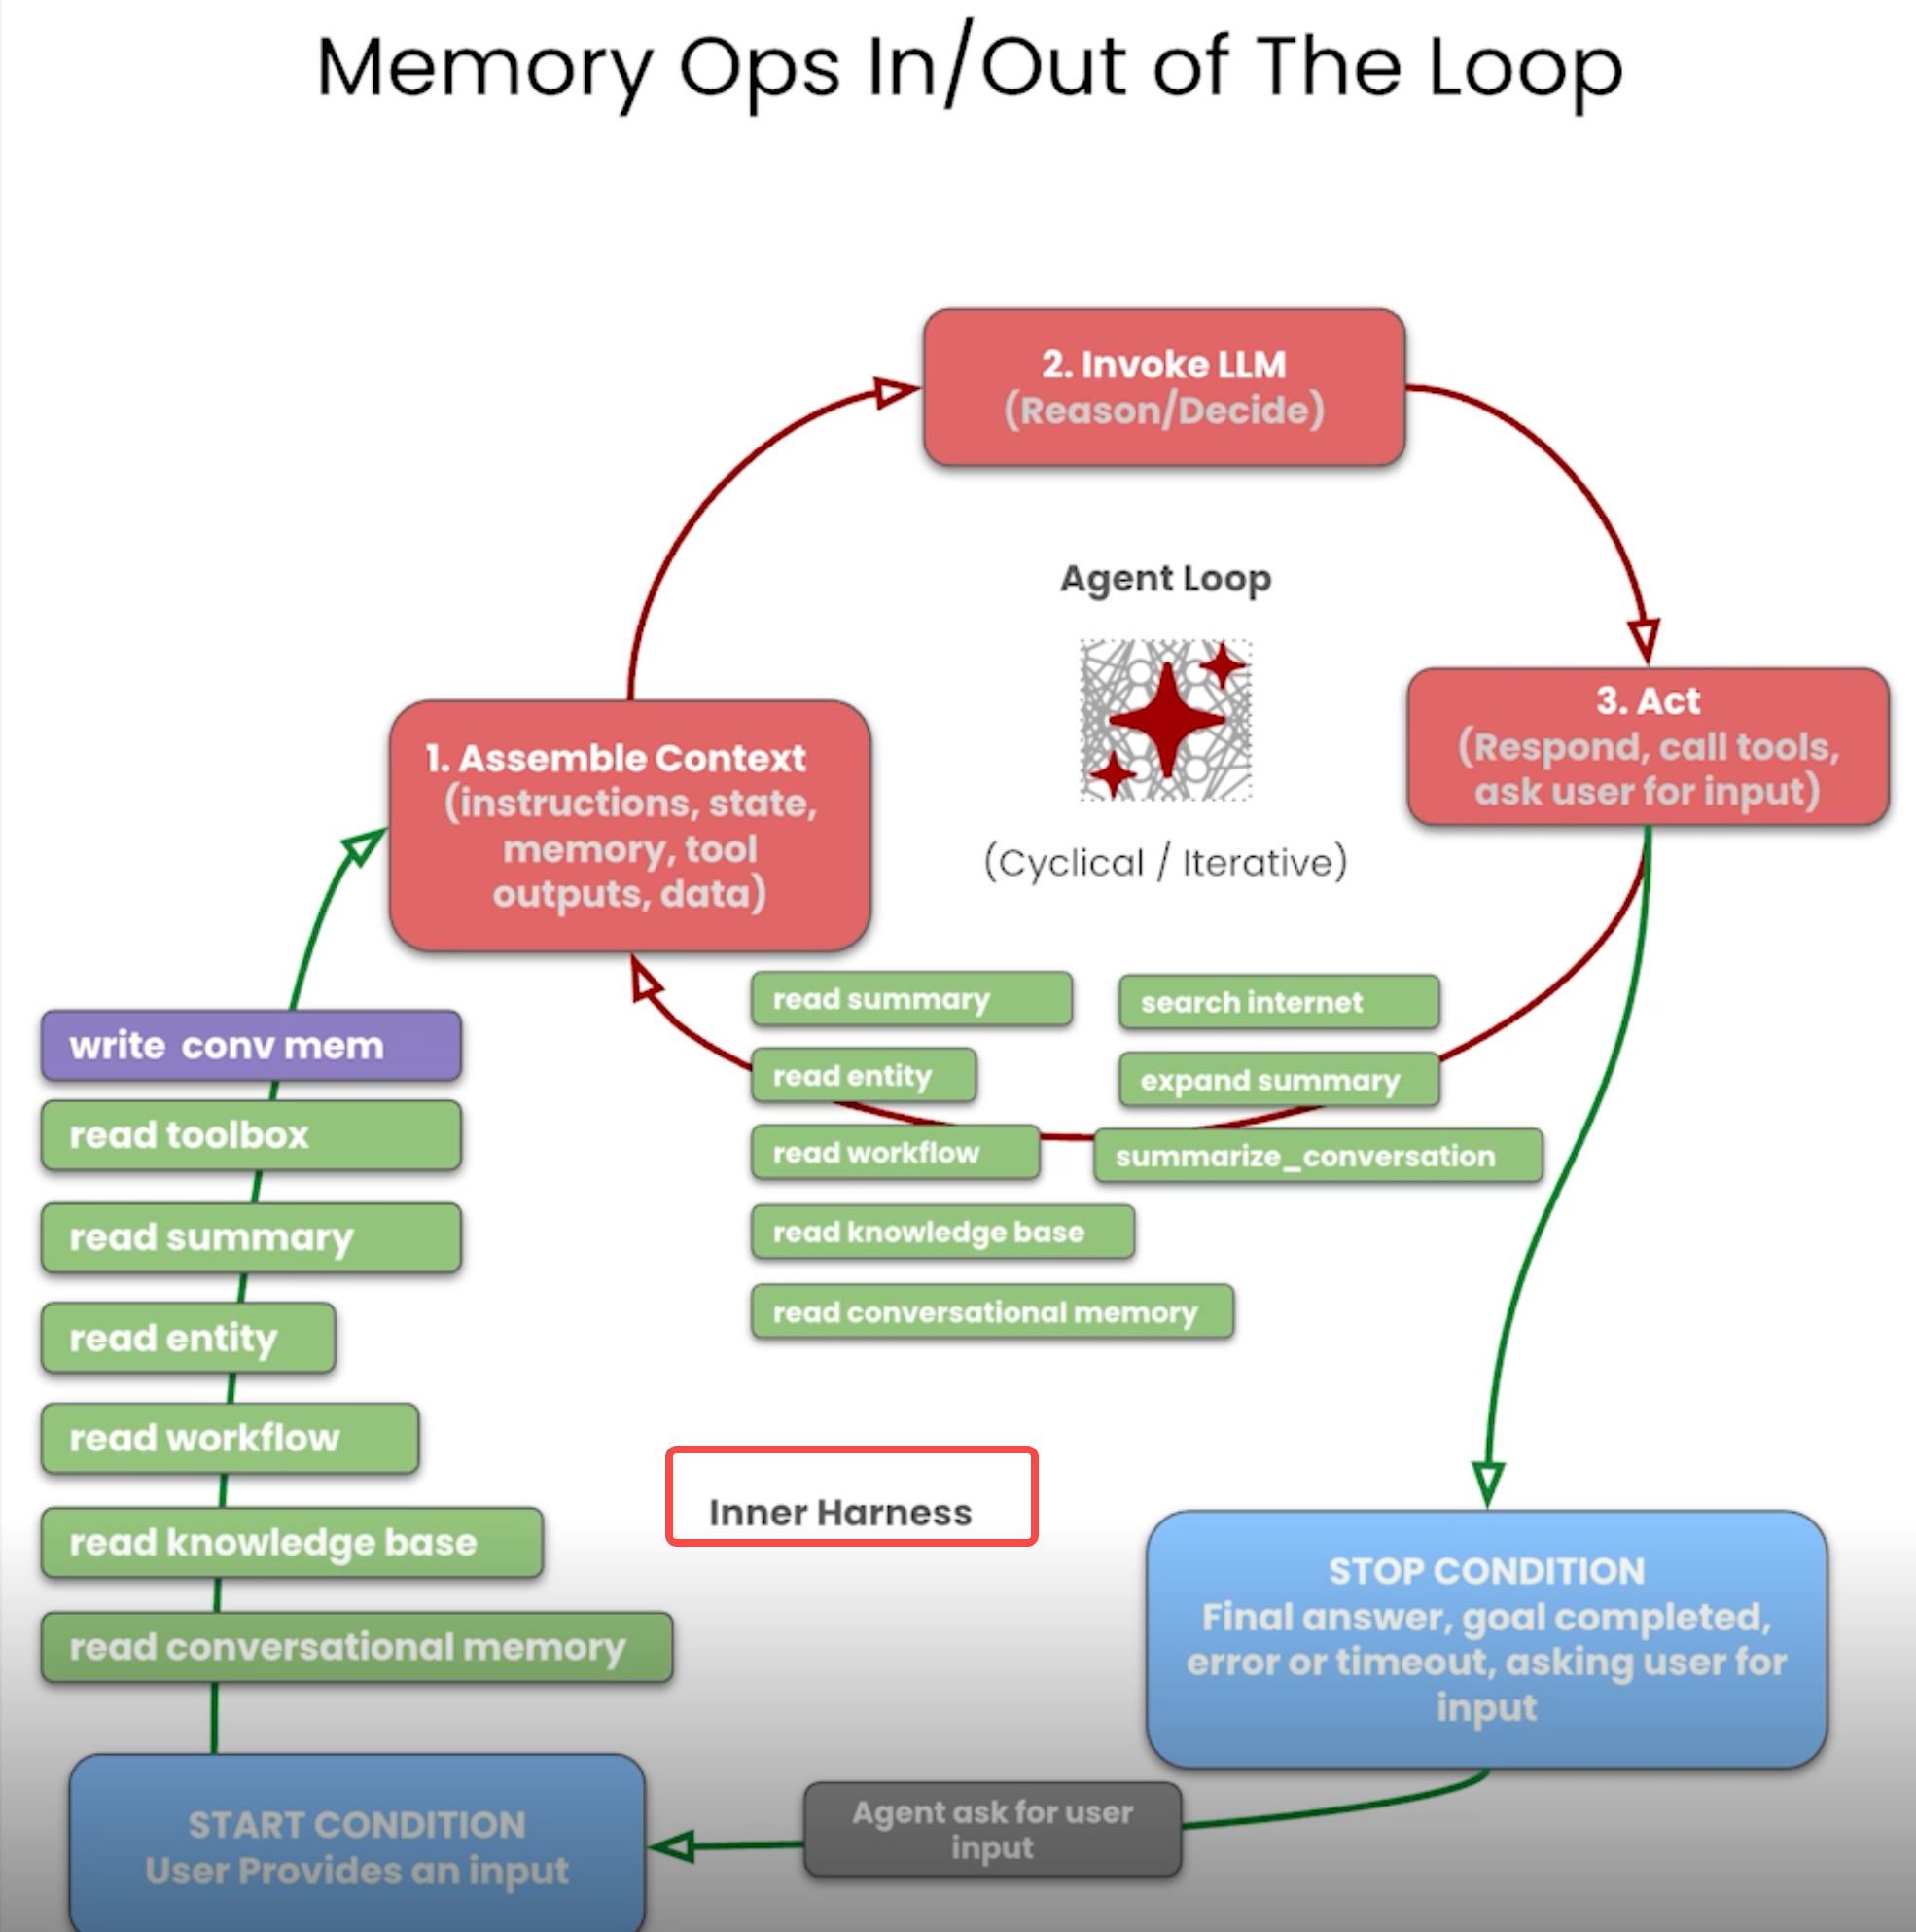
  • Deterministic: Memory reads/writes that run automatically on a fixed schedule or predefined condition, independent of the agent‘s judgment.
    确定性,由固定代码执行的操作
  • Agent Triggered: Memory reads/writes that the agent decides to invoke based on its own real-time assessment of need.
    不确定性,由agent 自主决定什么时候调用什么方法进行什么操作

A key design decision in memory engineering is determining which operations should be Deterministic (executed automatically by code) versus Agent-Triggered (decided by the LLM at runtime).

  • A deterministic memory operation is one that runs based on system rules, not the model’s discretion. It is executed every time (or under clearly defined, non-negotiable conditions) so the system behaves predictably.
  • An agent-triggered memory operation runs only when the model decides it’s necessary, based on intent and situation.
Operation Deterministic Agent-Triggered
read_conversational_memory() ✅ ❌
read_knowledge_base() ✅ ❌
read_workflow() ✅ ❌
read_entity() ✅ ❌
read_summary_context() ❌ ✅
write_conversational_memory() ✅ ❌
write_workflow() ✅ ❌
write_entity() ❌ ✅
search_tavily() ❌ ✅
expand_summary() ❌ ✅
summarize_and_store() ❌ ✅
read_toolbox() ✅ ✅

Deterministic memory operations run:

  • every turn, or
  • under explicit, fixed conditions (e.g., “always at the start of the agent loop”, “always after tool execution”)

Why Deterministic Retrieval Is Useful

Memory retrieval is commonly run at the start of each agent loop because:

  1. Context bootstrapping is non-negotiable

    • The agent needs prior context to remain consistent and avoid repeating mistakes.
    • Without deterministic retrieval, the agent behaves “stateless” and starts from scratch.
  2. The agent can’t choose to look up what it doesn’t know exists

    • If the agent must decide whether to check memory, it must guess what’s stored.
    • This creates a chicken-and-egg problem: you need memory to know which memory you need.
  3. Predictability

    • Always loading memory produces consistent behavior and makes the system easier to evaluate and debug.

Why Deterministic Storage Is Useful

Persisting conversations, workflows, and entities is often deterministic because:

  1. Reliability

    • You don’t want the agent to “forget to save” important information.
    • If continuity matters, persistence must be consistent.
  2. Completeness

    • Every interaction should be recorded to avoid gaps.
    • Selective saving creates missing context that later breaks long-horizon tasks.
  3. Reduced cognitive load

    • The model should focus on task execution, not memory bookkeeping.

Advantages of Deterministic Memory Operations

  • Predictable behavior across runs and turns
  • Stronger continuity (fewer “stateless resets”)
  • Fewer missed memories (higher reliability)
  • Easier debugging and evaluation (clear expectations of what should be loaded/saved)

How Tool Calls Fit In

External tool calls (e.g., web search, external DB lookups, expensive summarization jobs) are typically agent-triggered because:

  1. Intent matters

    • Only the agent can judge whether extra information is needed.
    • Automatically using tools for every query is wasteful.
  2. Cost considerations

    • Tools often introduce latency and may incur API costs.
    • The agent should call tools only when the expected value is high.
  3. Judgment required

    • Choosing what to search for or what to expand requires understanding the user’s goal.

three terms

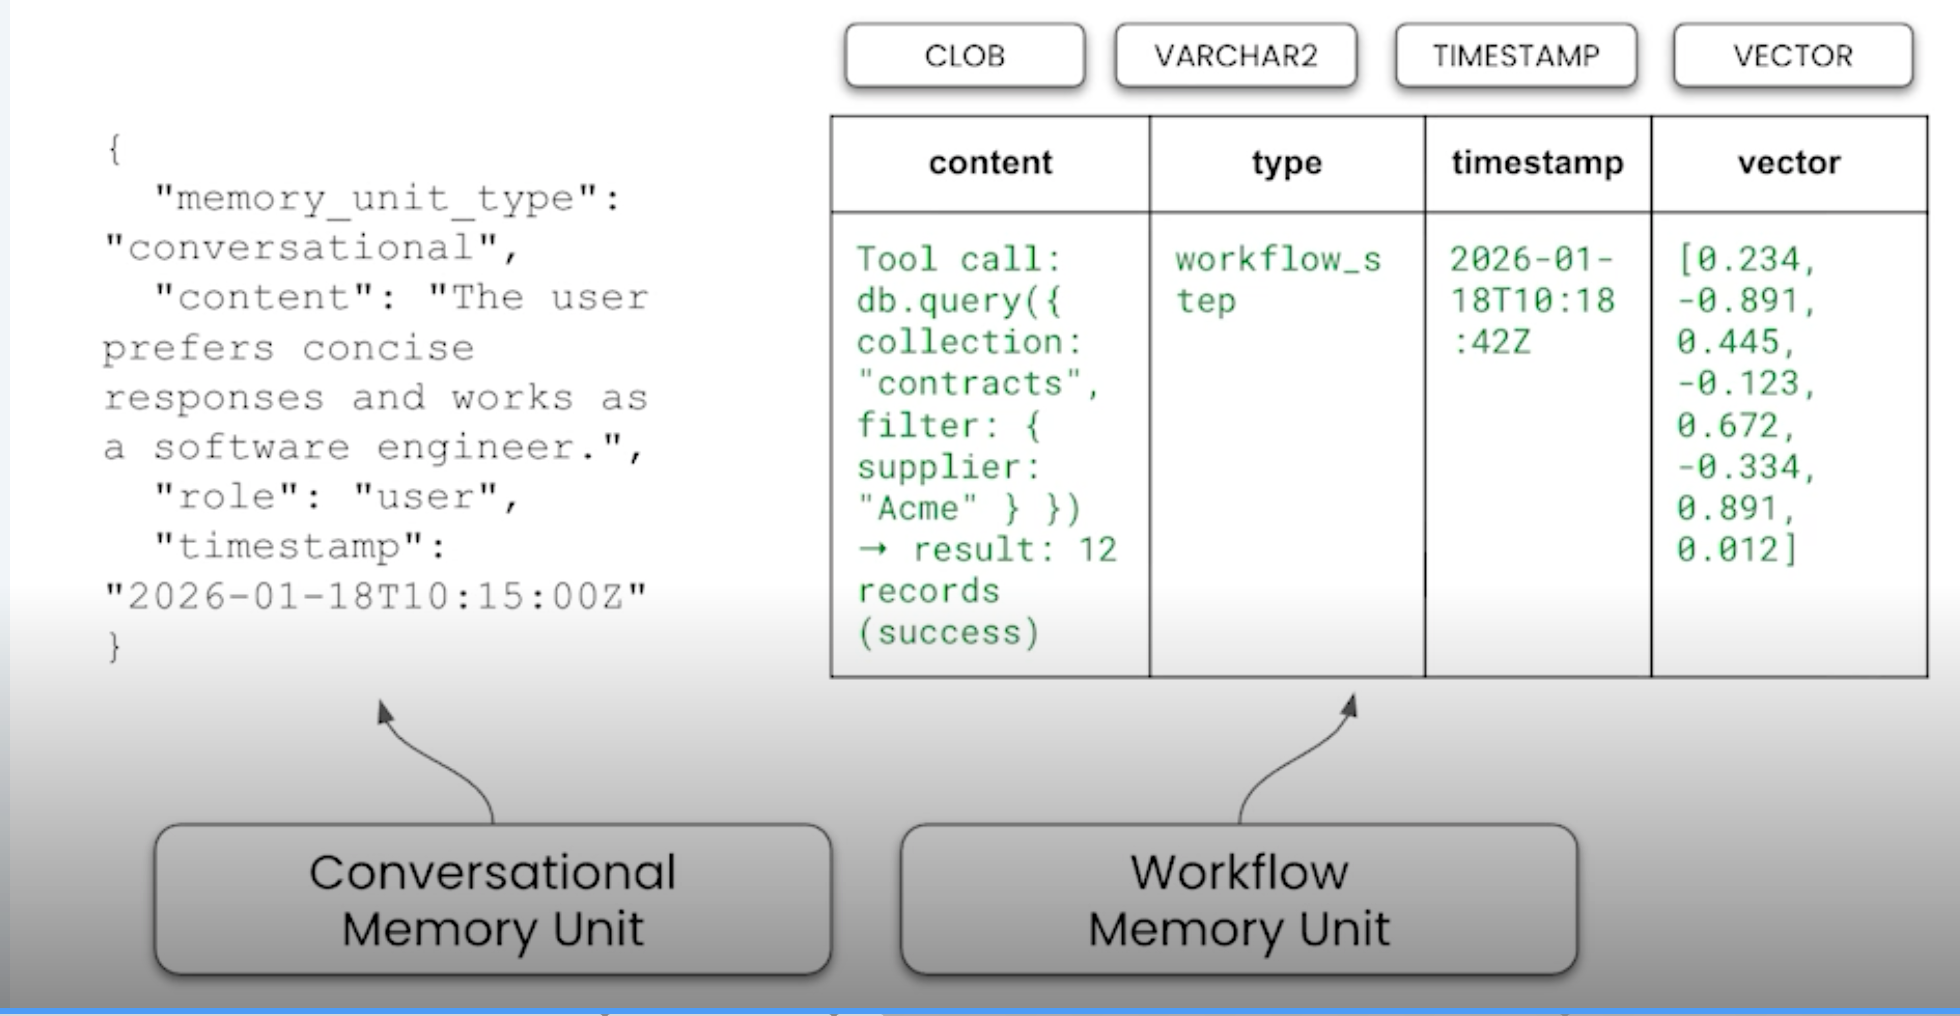
Memory Unit

A Memory Unit is the smallest atomic piece of stored information,
represented with a minimal set of attributes
so it can be captured, retrieved, and updated by a memory-augmented agent.

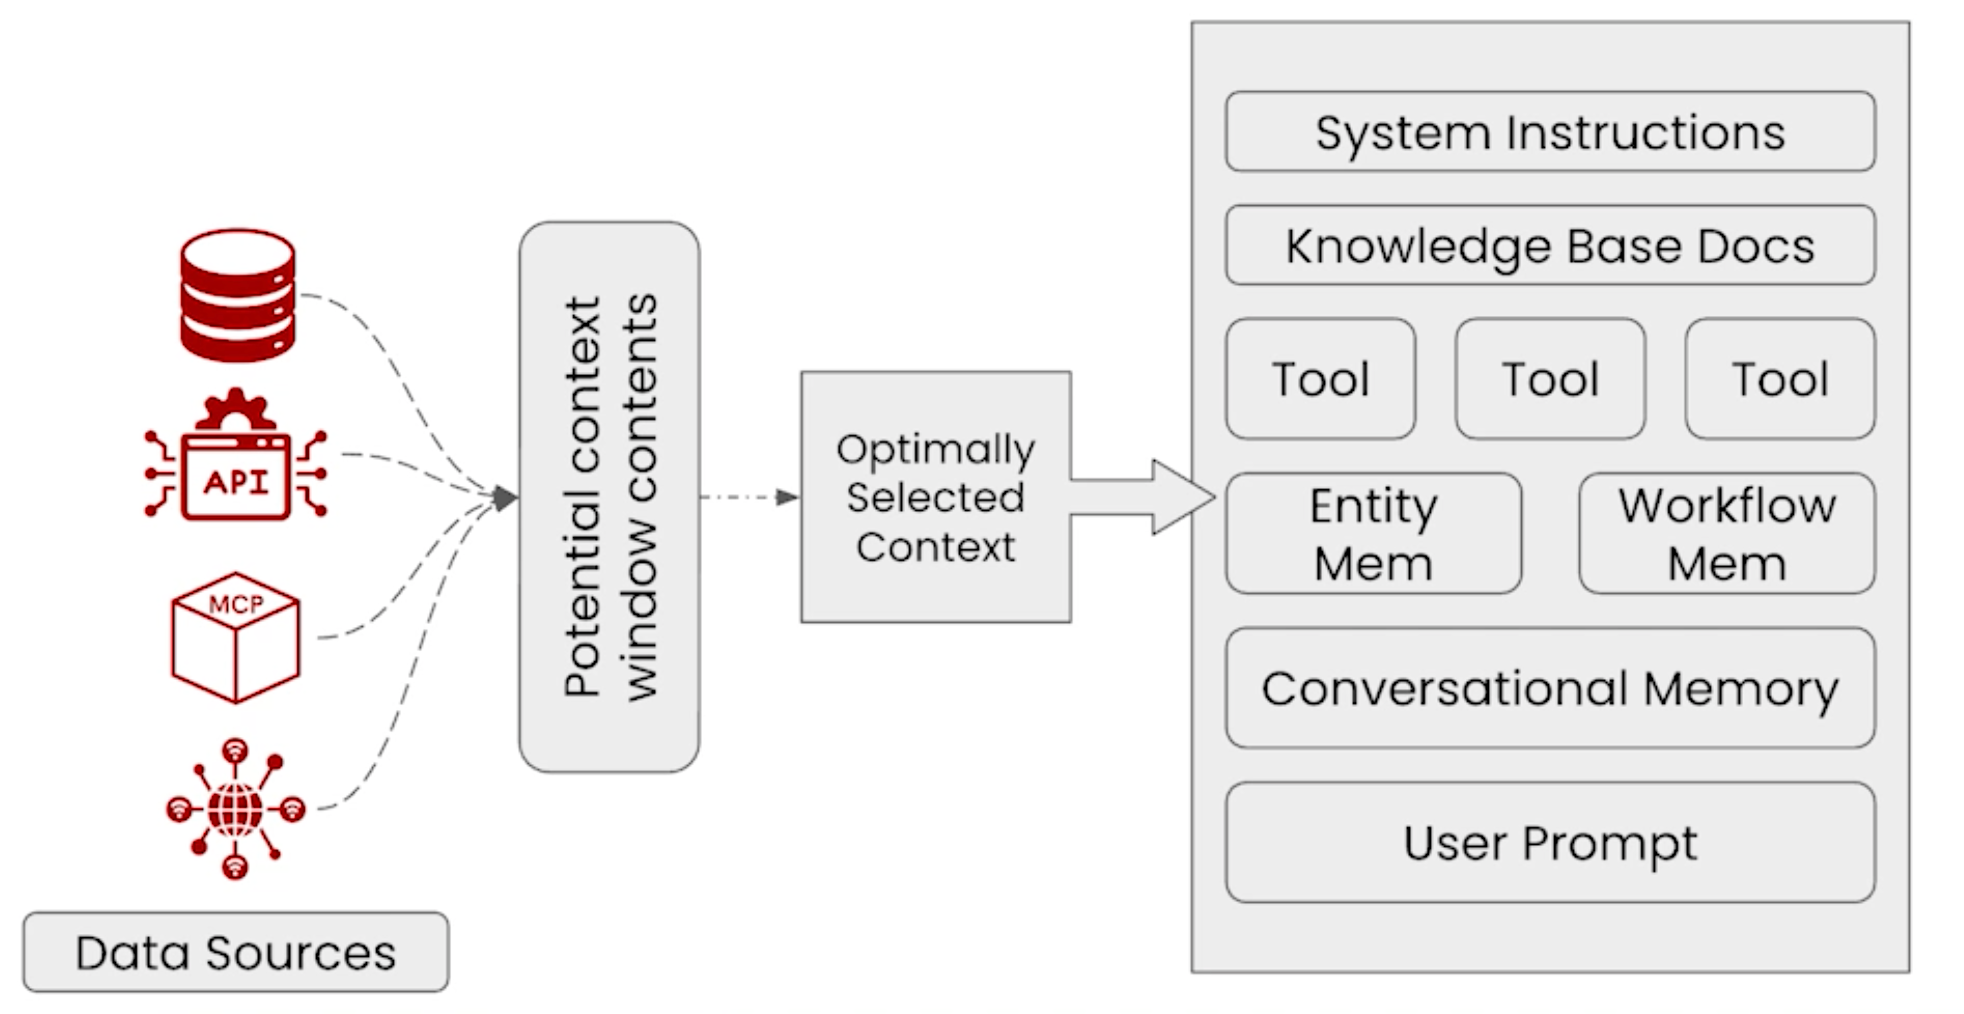
Context engineering

Context engineering is the practice of optimally selecting and
shaping the information placed into an LLM context window
so it can perform a task reliably-while explicitly accounting for context window limits and model constraints.

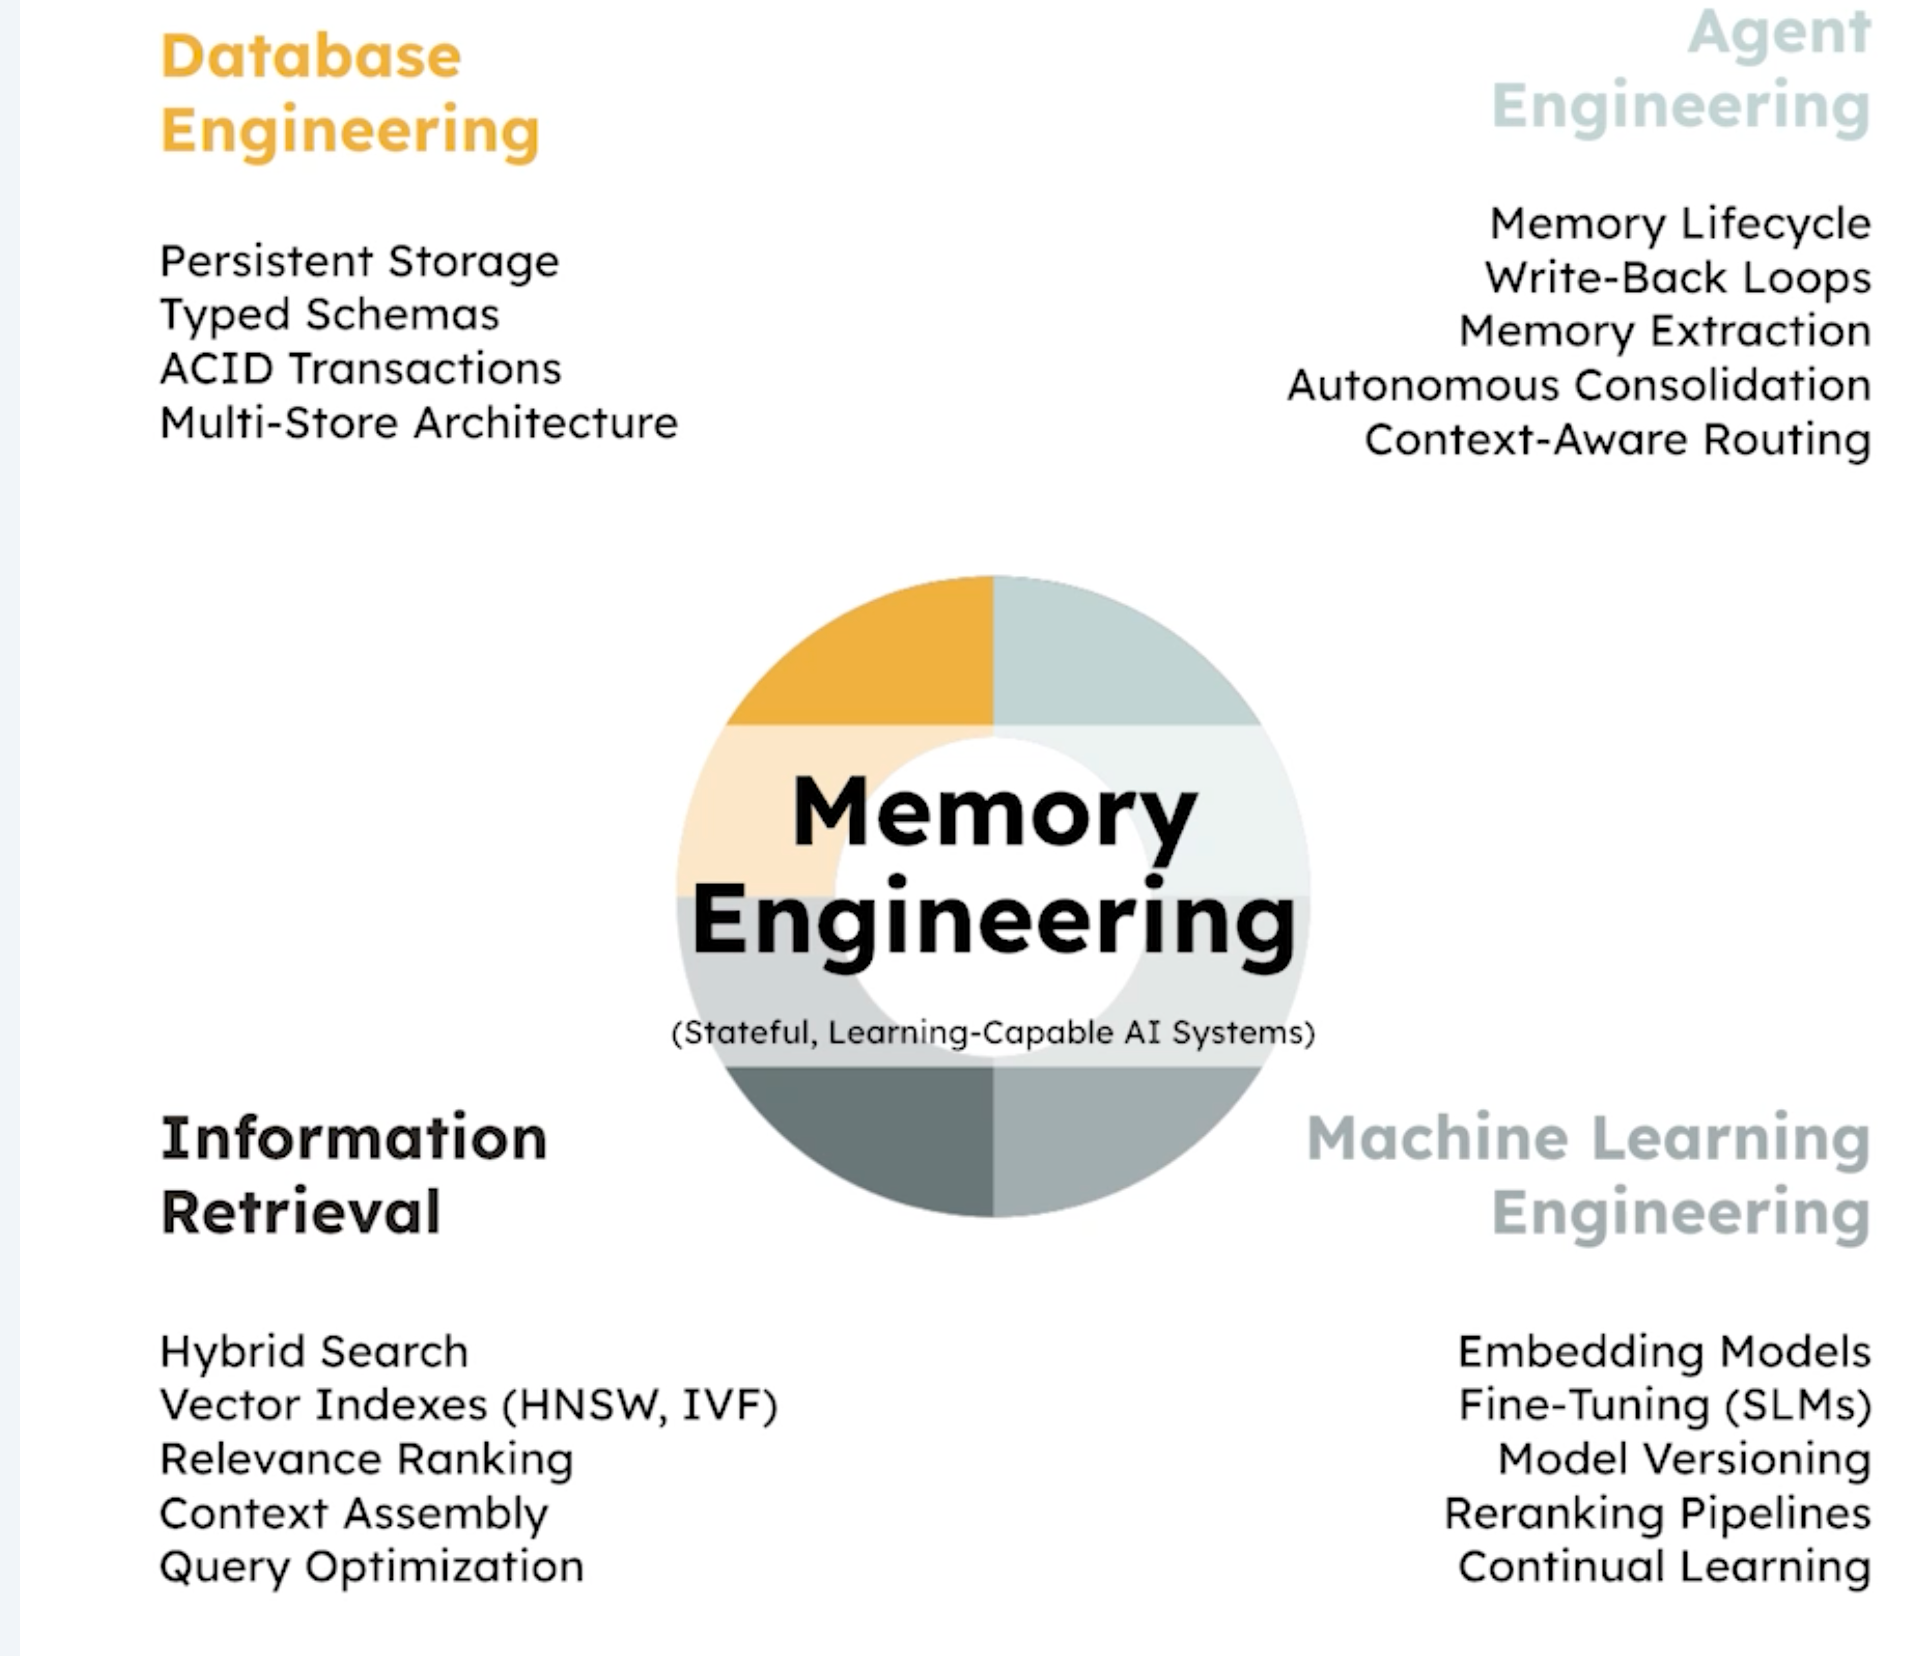
Memory engineering

The engineering discipline focused on designing, building,
and maintaining memory systems for Al agents.
It encompasses the storage, retrieval,classification, and lifecycle management of agent memory.

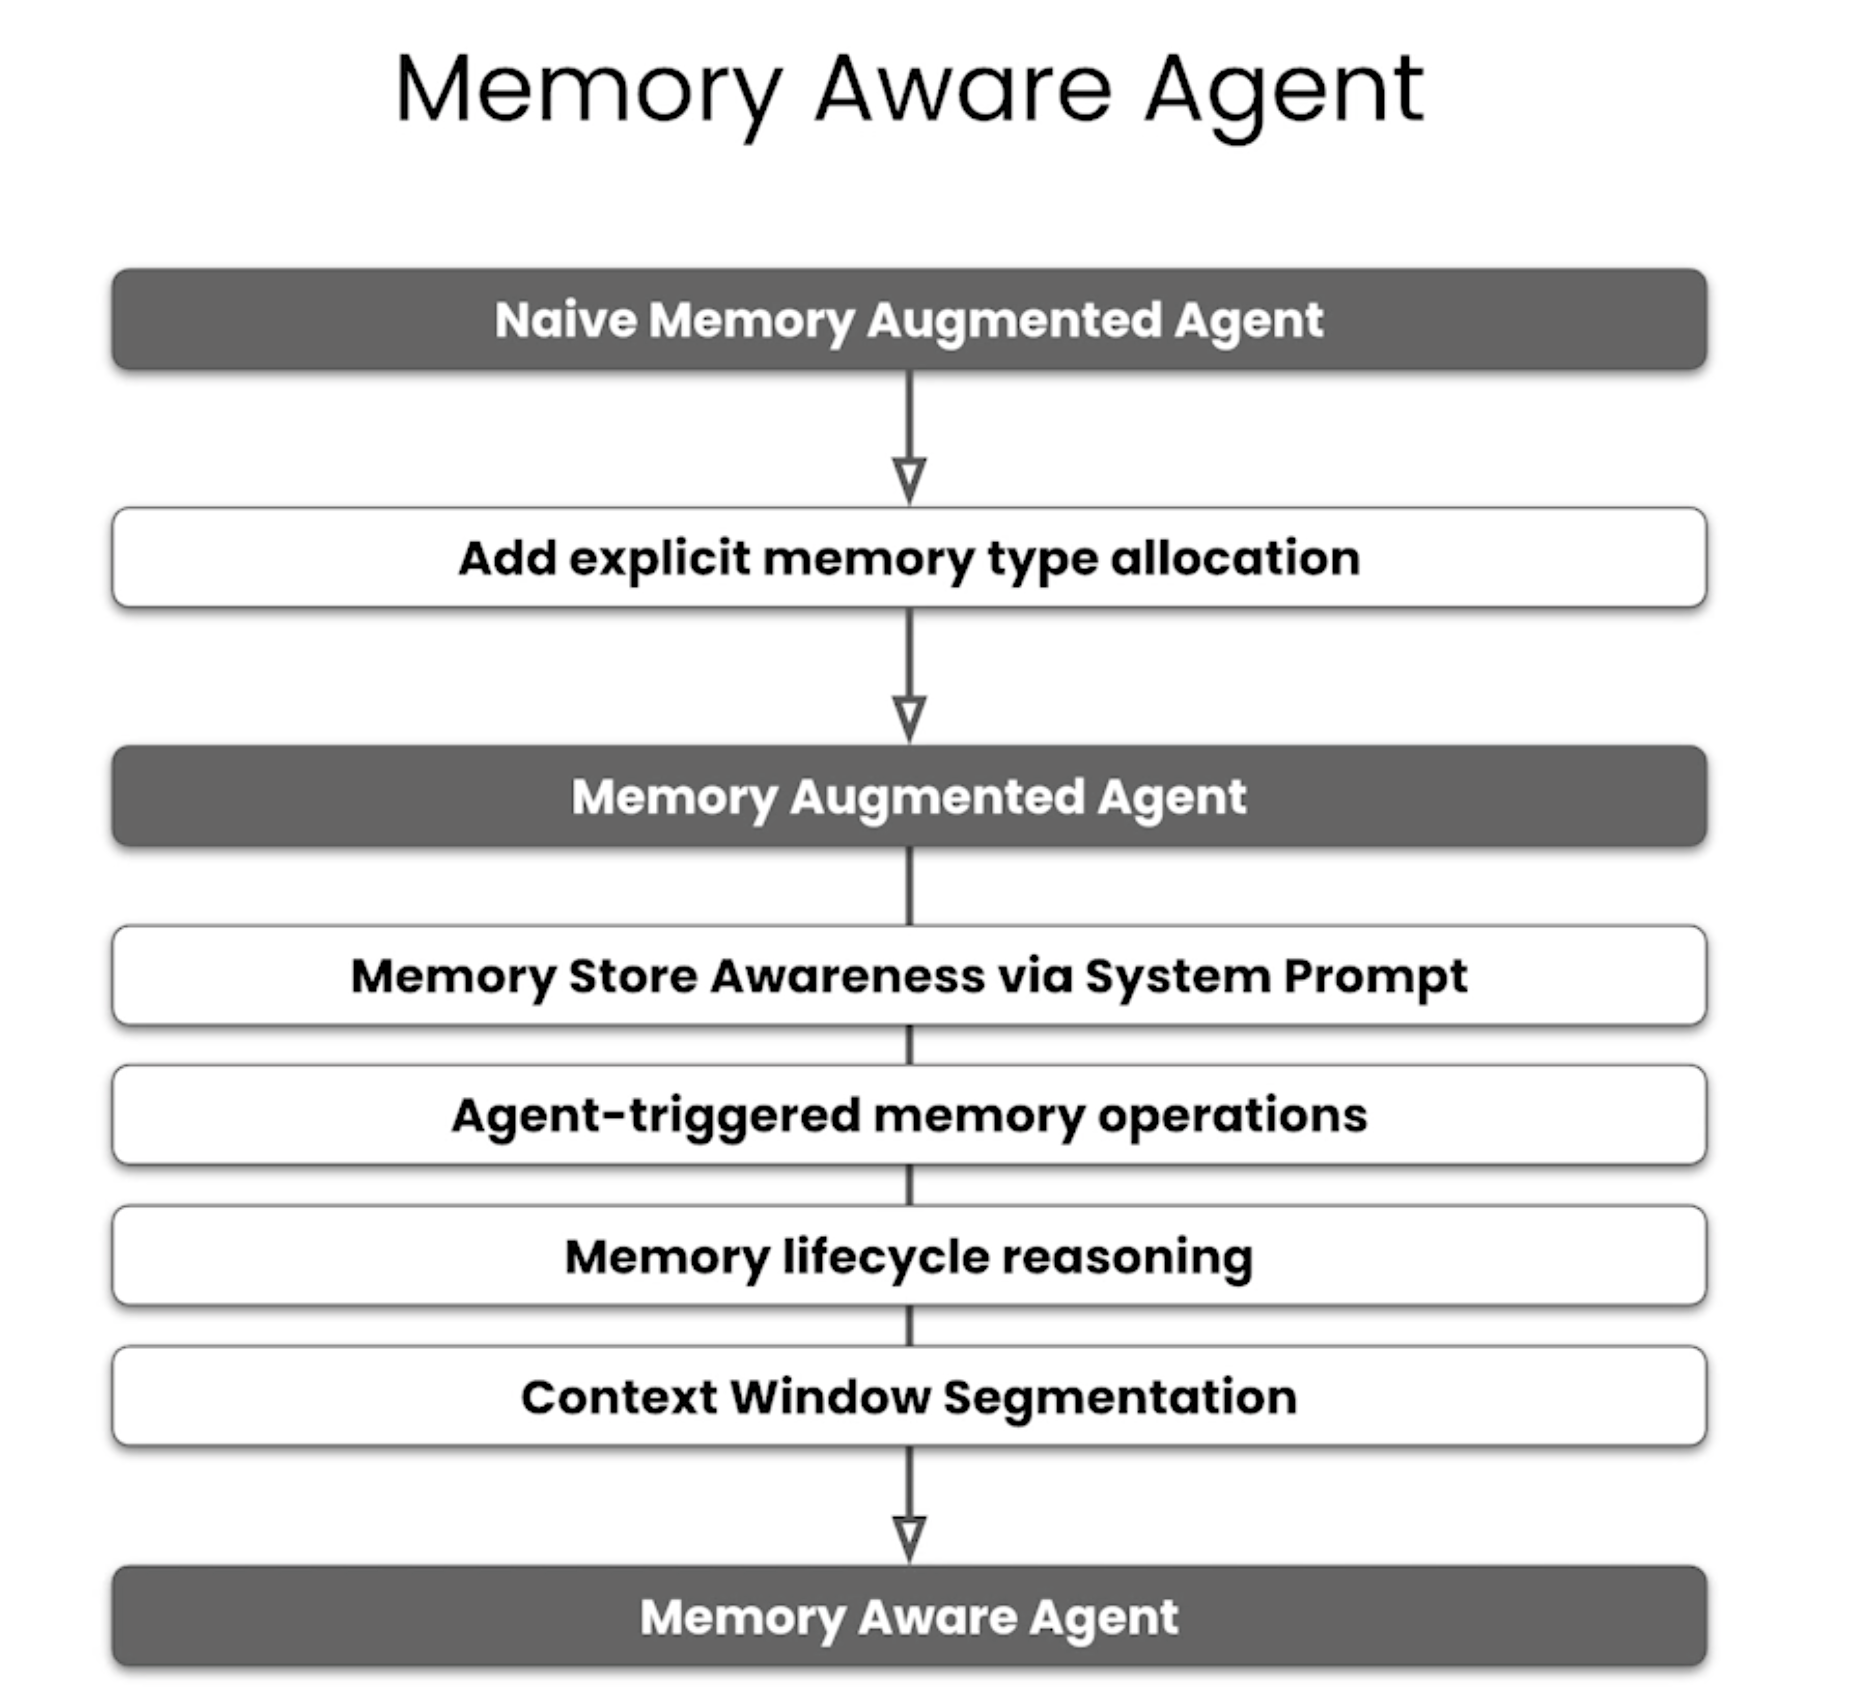
memory aware agent

练习

Step Description
1. Initialize Embeddings Load a HuggingFace embedding model to convert text into vectors
2. Create Vector Store Set up an Oracle-backed vector store with distance strategy
3. Create Index Build an HNSW index for fast similarity search
4. Add Documents Store text with metadata in the vector database
5. Query Search for similar documents using natural language
6. Filter Results Use metadata filters to narrow down search results

Key Components

  • OracleVS: LangChain’s Oracle vector store integration
  • HuggingFaceEmbeddings: Converts text to 768-dimensional vectors
  • DistanceStrategy.EUCLIDEAN_DISTANCE: Measures similarity between vectors
  • HNSW Index: Speeds up similarity search with graph-based nearest-neighbor traversal

These tables will be created in Oracle Database to persist agent memory.

Memory Types We’ll Implement

Memory Type Human Analogy Purpose Storage Retrieval Strategies Used
Conversational Short-term memory Chat history per thread SQL Table Exact match by thread_id
Knowledge Base Long-term semantic memory Facts, documents, search results Vector Store Semantic similarity search
Workflow Procedural memory Learned action patterns Vector Store Semantic similarity search + metadata filtering
Toolbox Skill memory Available tools & capabilities Vector Store Semantic similarity search
Entity Episodic memory People, places, systems mentioned Vector Store Semantic similarity search
Summary Compressed memory Condensed context for long conversations Vector Store Semantic similarity search (with optional ID filter)
Tool Log Execution audit trail Raw tool inputs/outputs and execution status SQL Table Exact match by thread_id + timestamp ordering

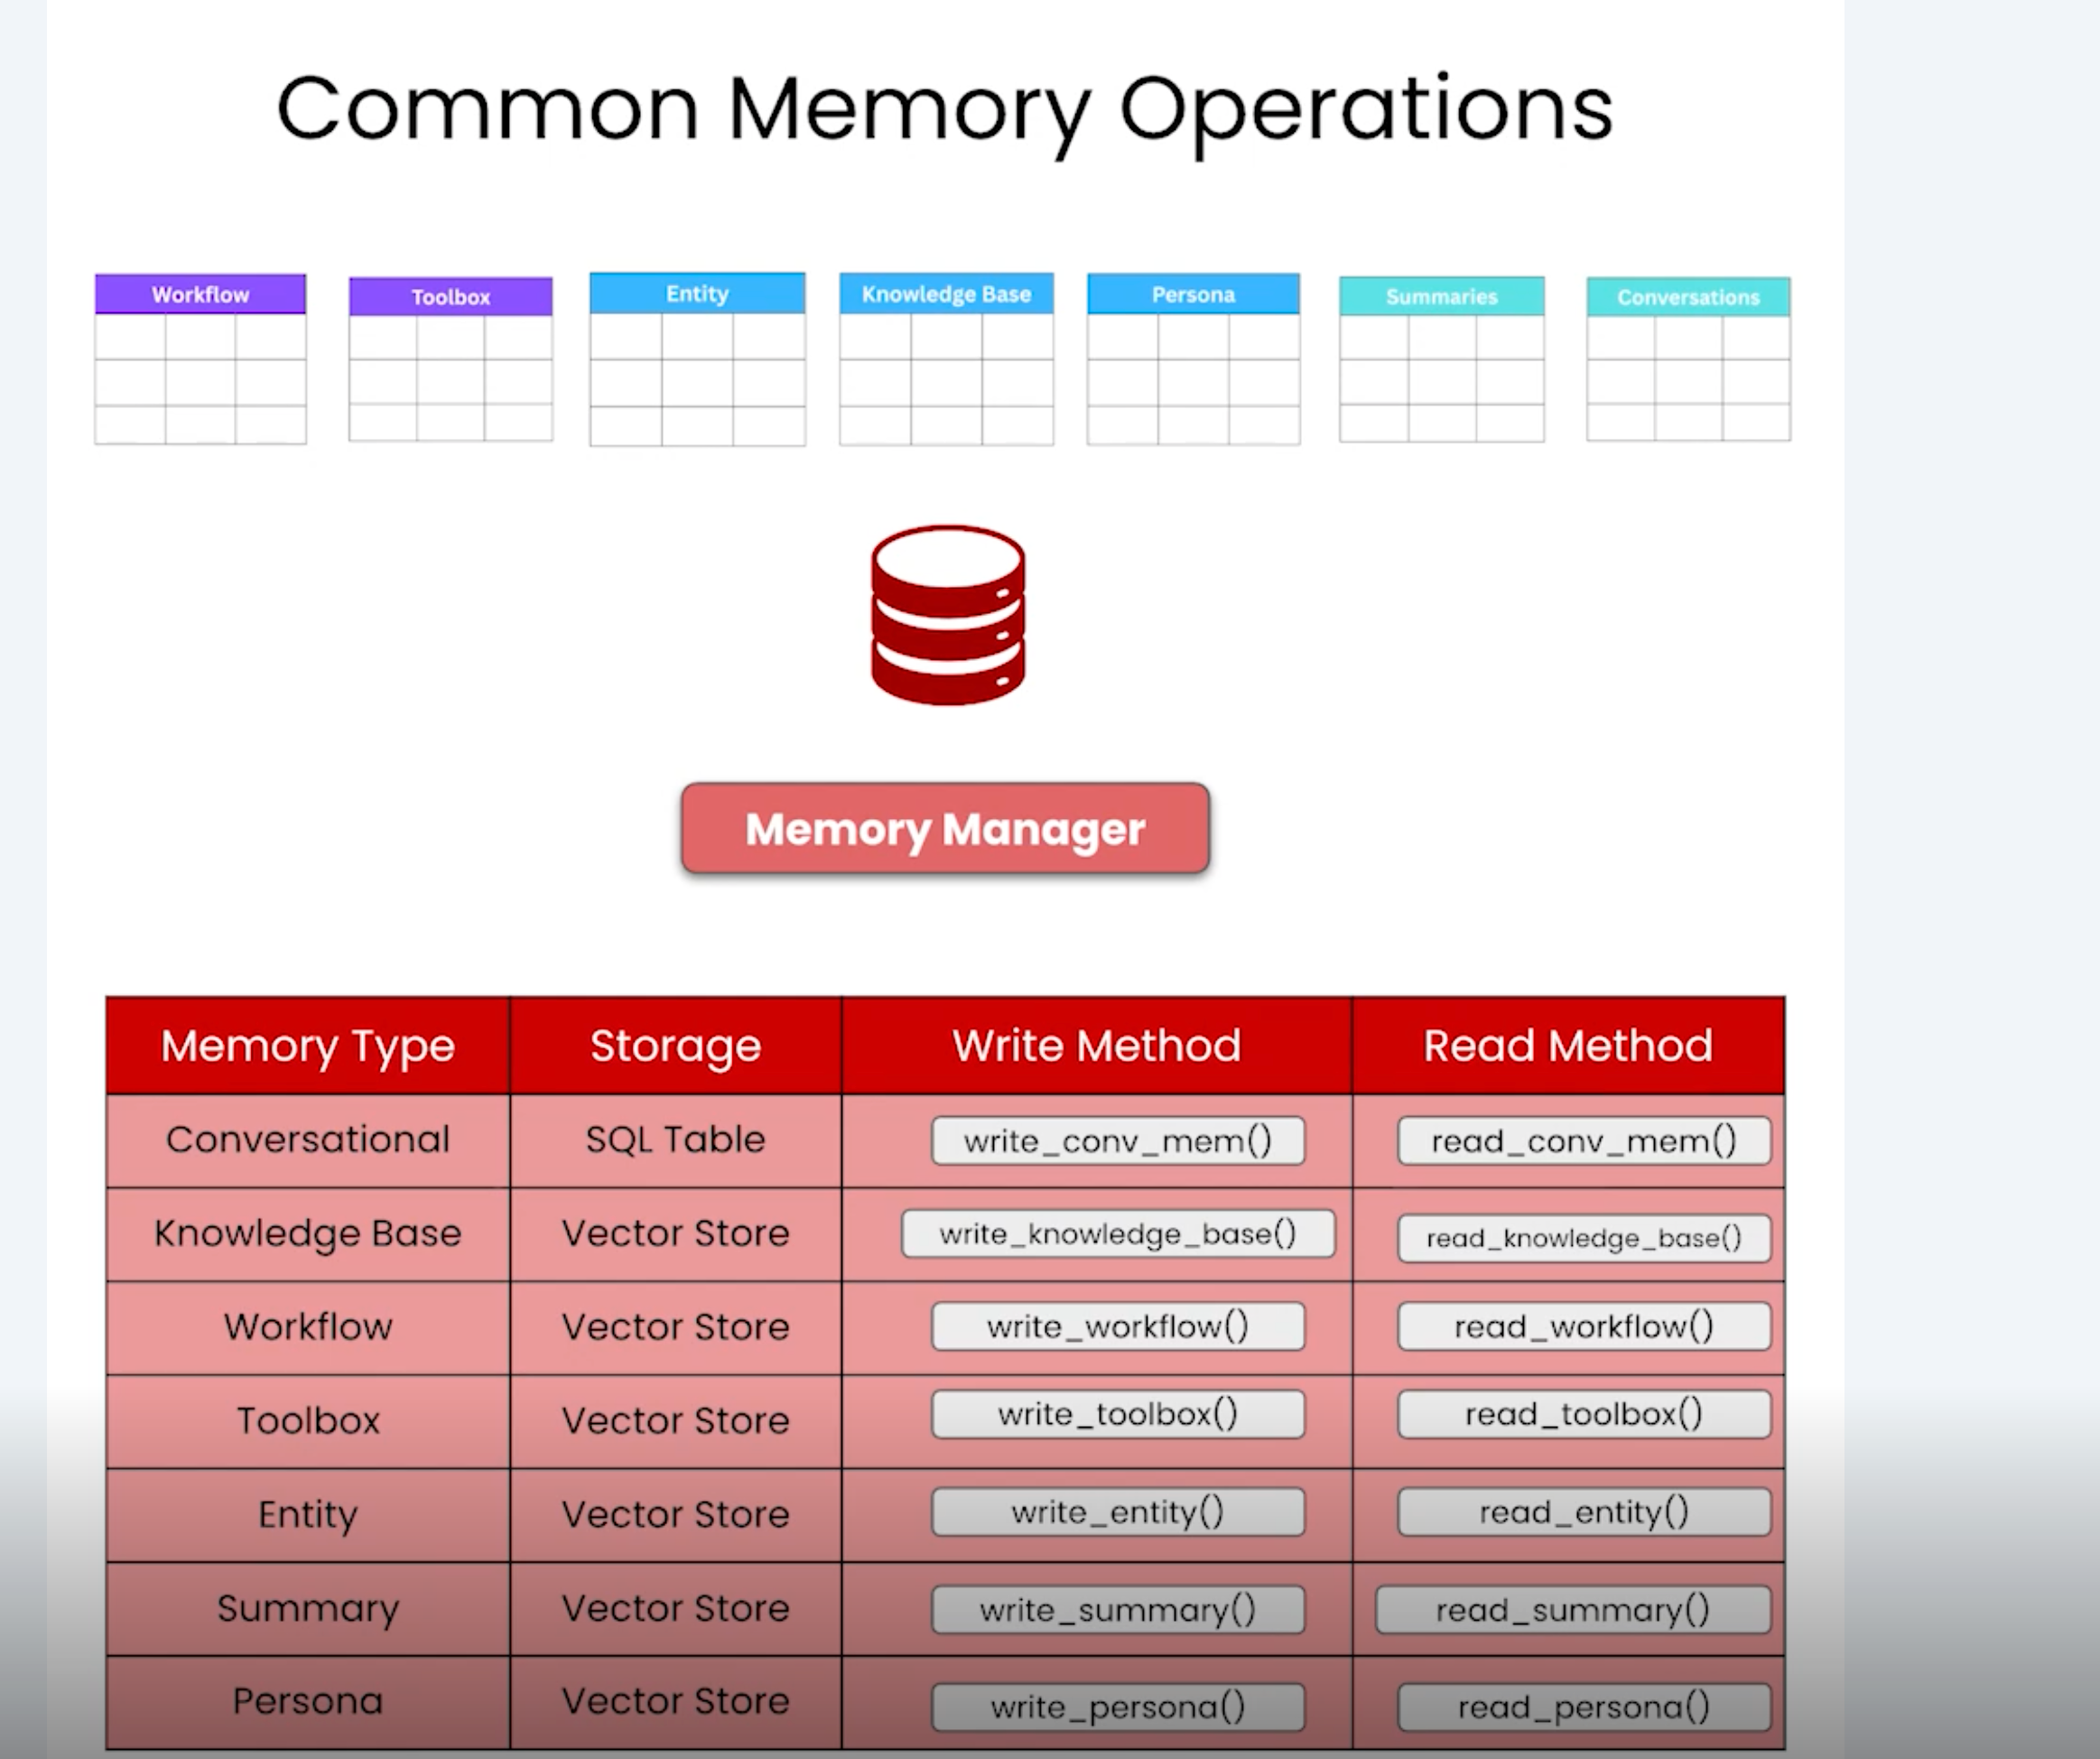
The MemoryManager class is the central abstraction that unifies all memory operations. It provides a clean interface for reading and writing to different memory types, hiding the complexity of SQL queries and vector store operations. It is a single class that manages 7 types of memory with consistent read/write patterns:

Memory Type Storage Write Method Read Method
Conversational SQL Table write_conversational_memory() read_conversational_memory()
Knowledge Base Vector Store write_knowledge_base() read_knowledge_base()
Workflow Vector Store write_workflow() read_workflow()
Toolbox Vector Store write_toolbox() read_toolbox()
Entity Vector Store write_entity() read_entity()
Summary Vector Store write_summary() read_summary_memory(), read_summary_context()
Tool Log SQL Table write_tool_log() read_tool_logs()

实验: AgentMemoryCore

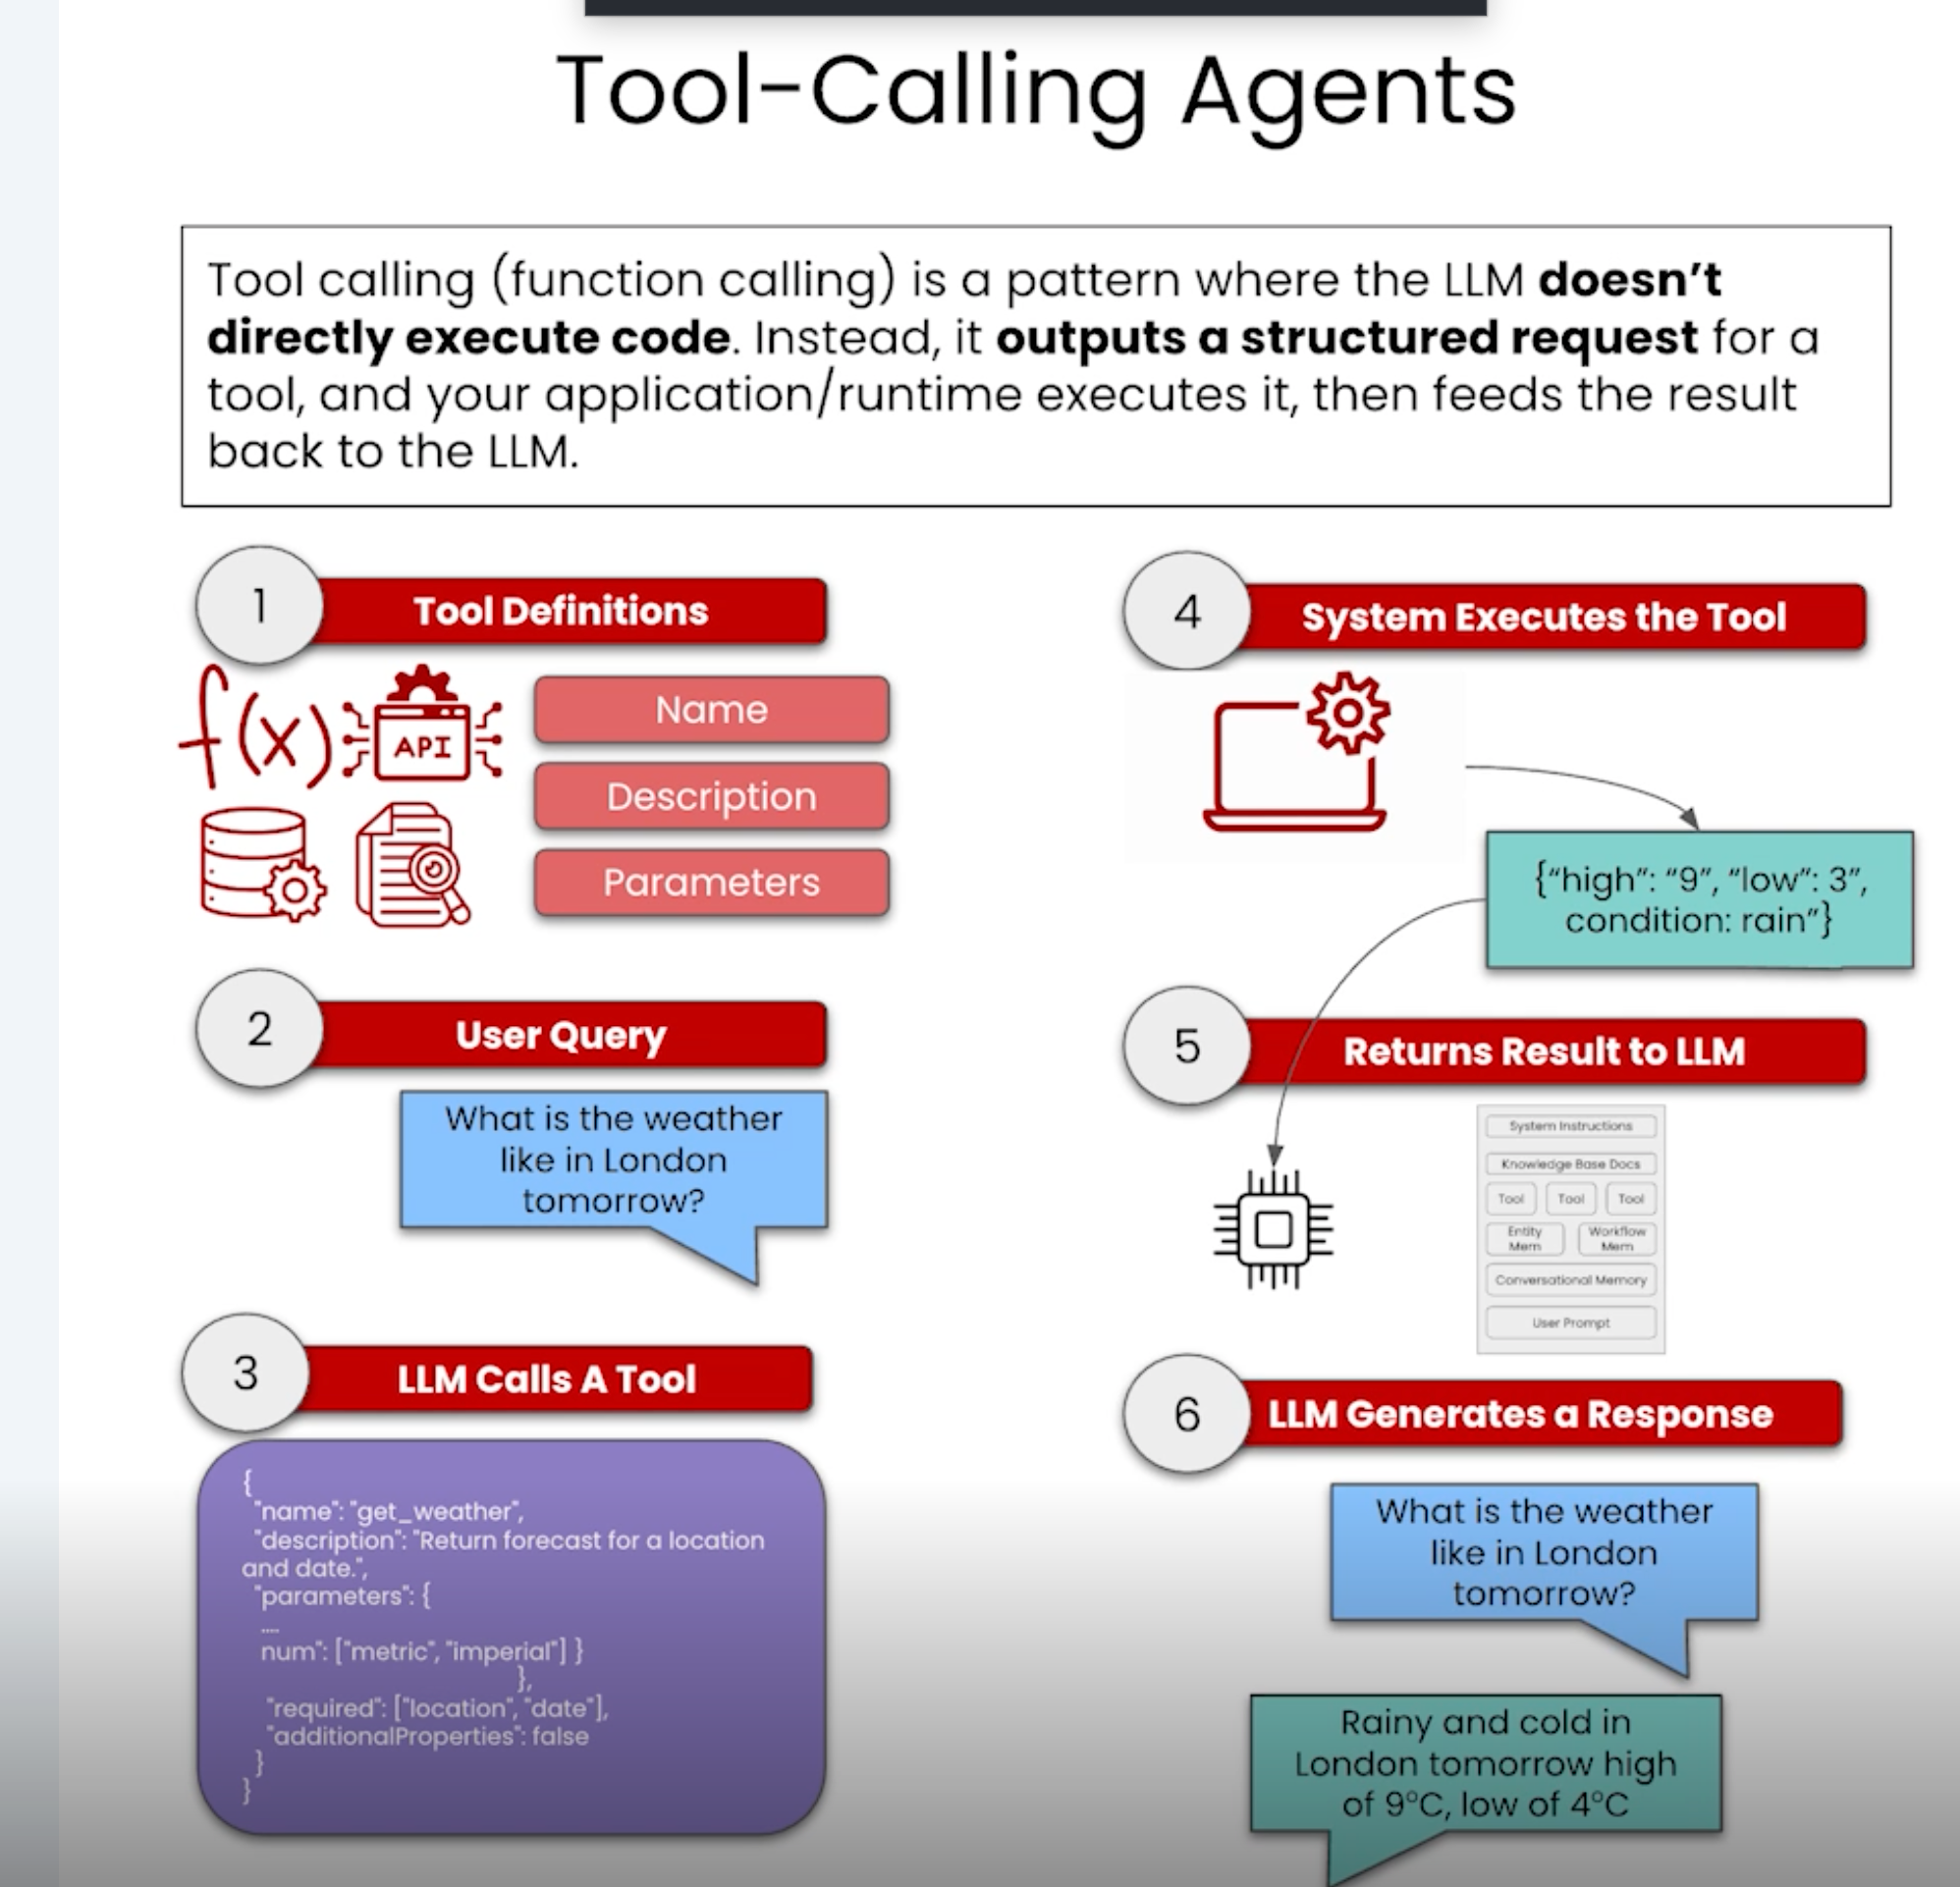
Scaling agent tool use with semantic tool memory

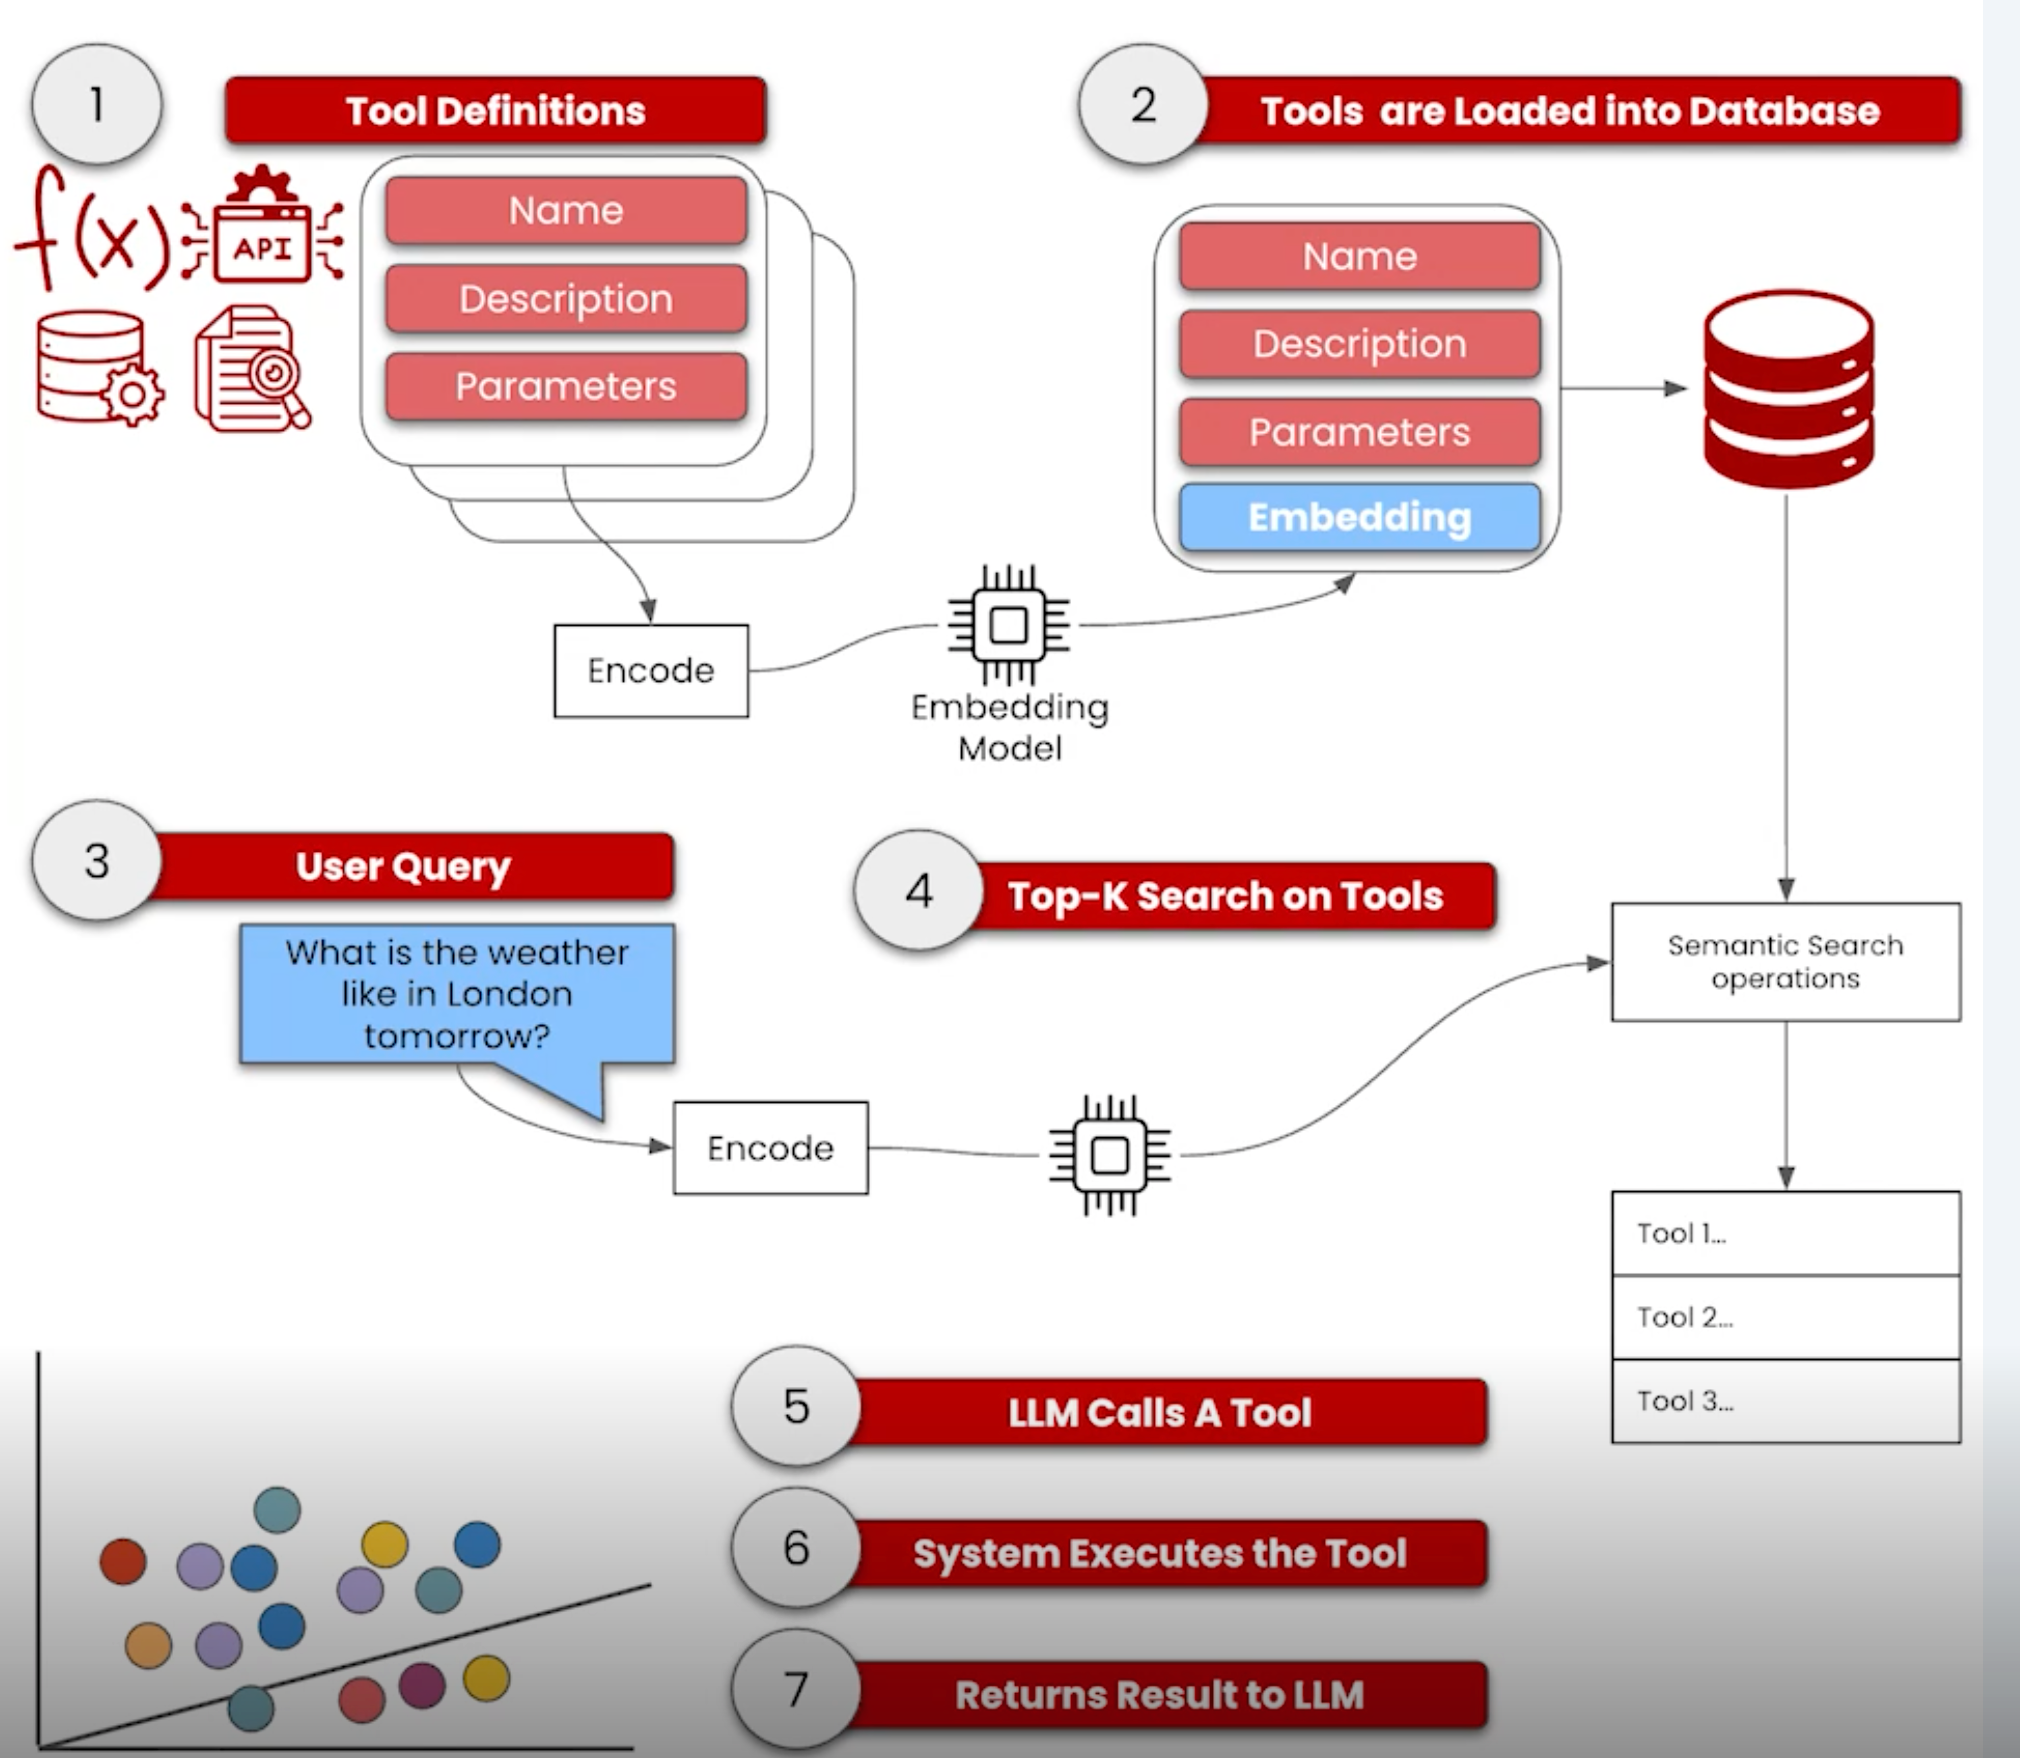
原始tool use 流程

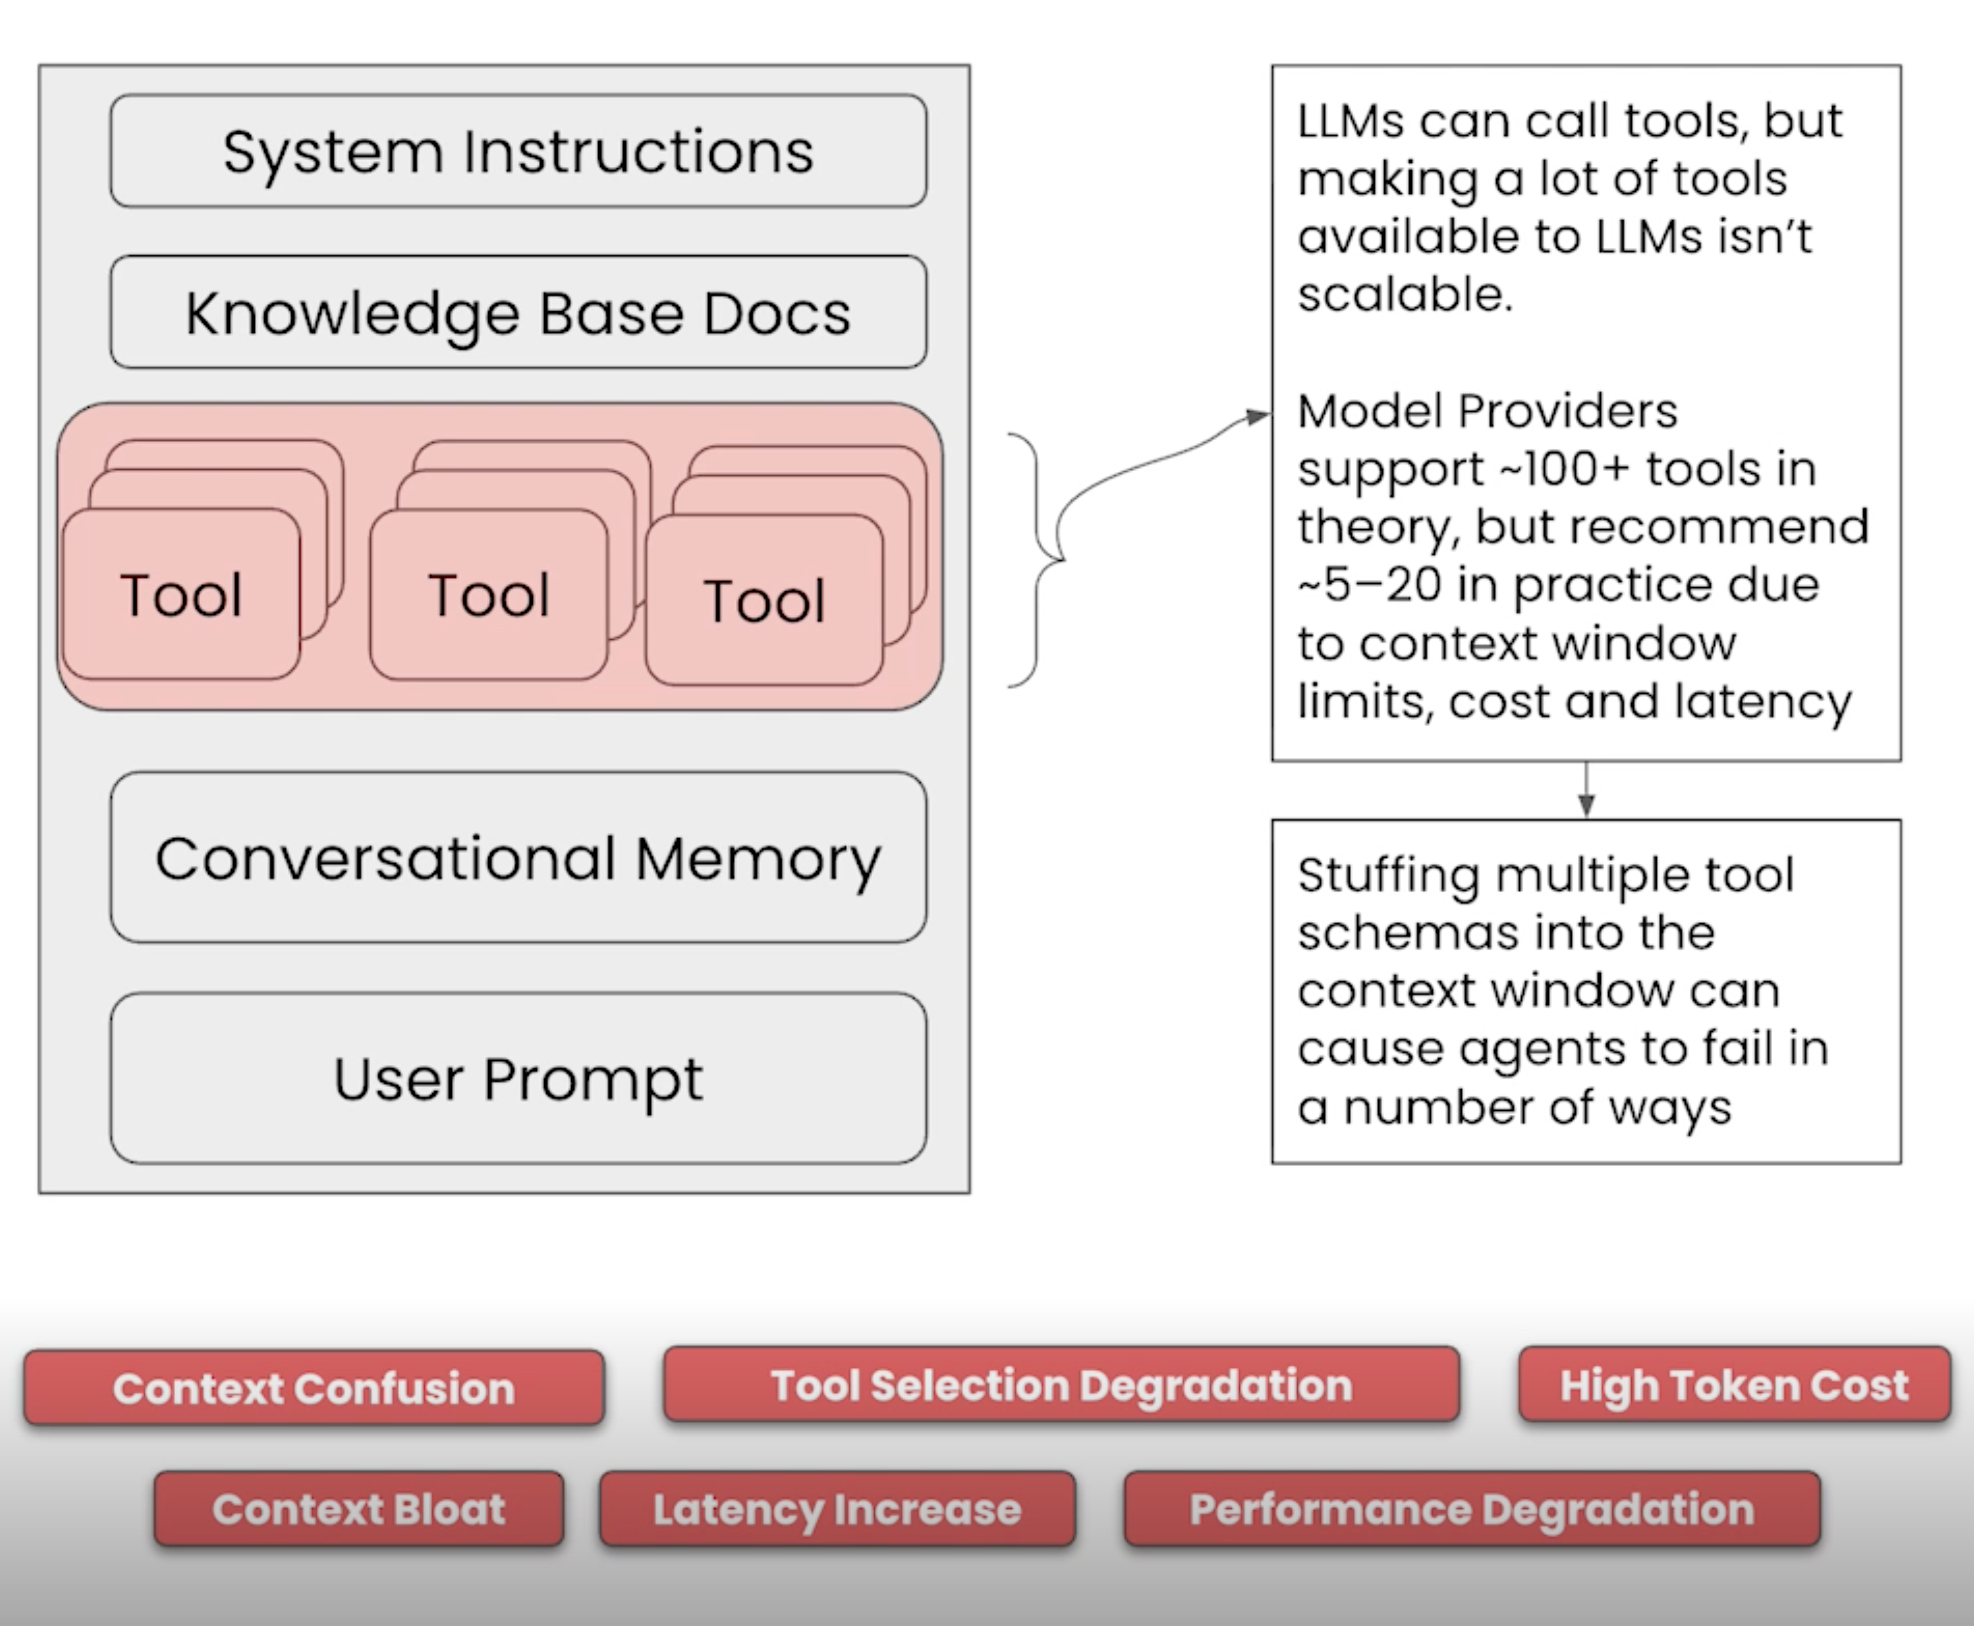
缺点
大量使用tool 工具,不仅会占用context空间,造成token 成本提升,还会造成上下文迷惑,工具选择降级(响应的内容反而使模型性能下降), 延时增加

Problem Impact
Context bloat Tool definitions consume tokens, leaving less room for actual content
Tool selection failure LLMs struggle to choose the right tool when presented with too many options
Increased latency More tokens = slower inference
Higher costs More tokens = higher API costs

Model providers like OpenAI and Anthropic typically recommend limiting the number of tools exposed to an LLM (often 10-20 max for reliable selection).

解决办法一:
将tool 信息不注册到上下文中,编码后存在数据库中,当用户提问时,从数据库中查找topk可用tool 再调用使用

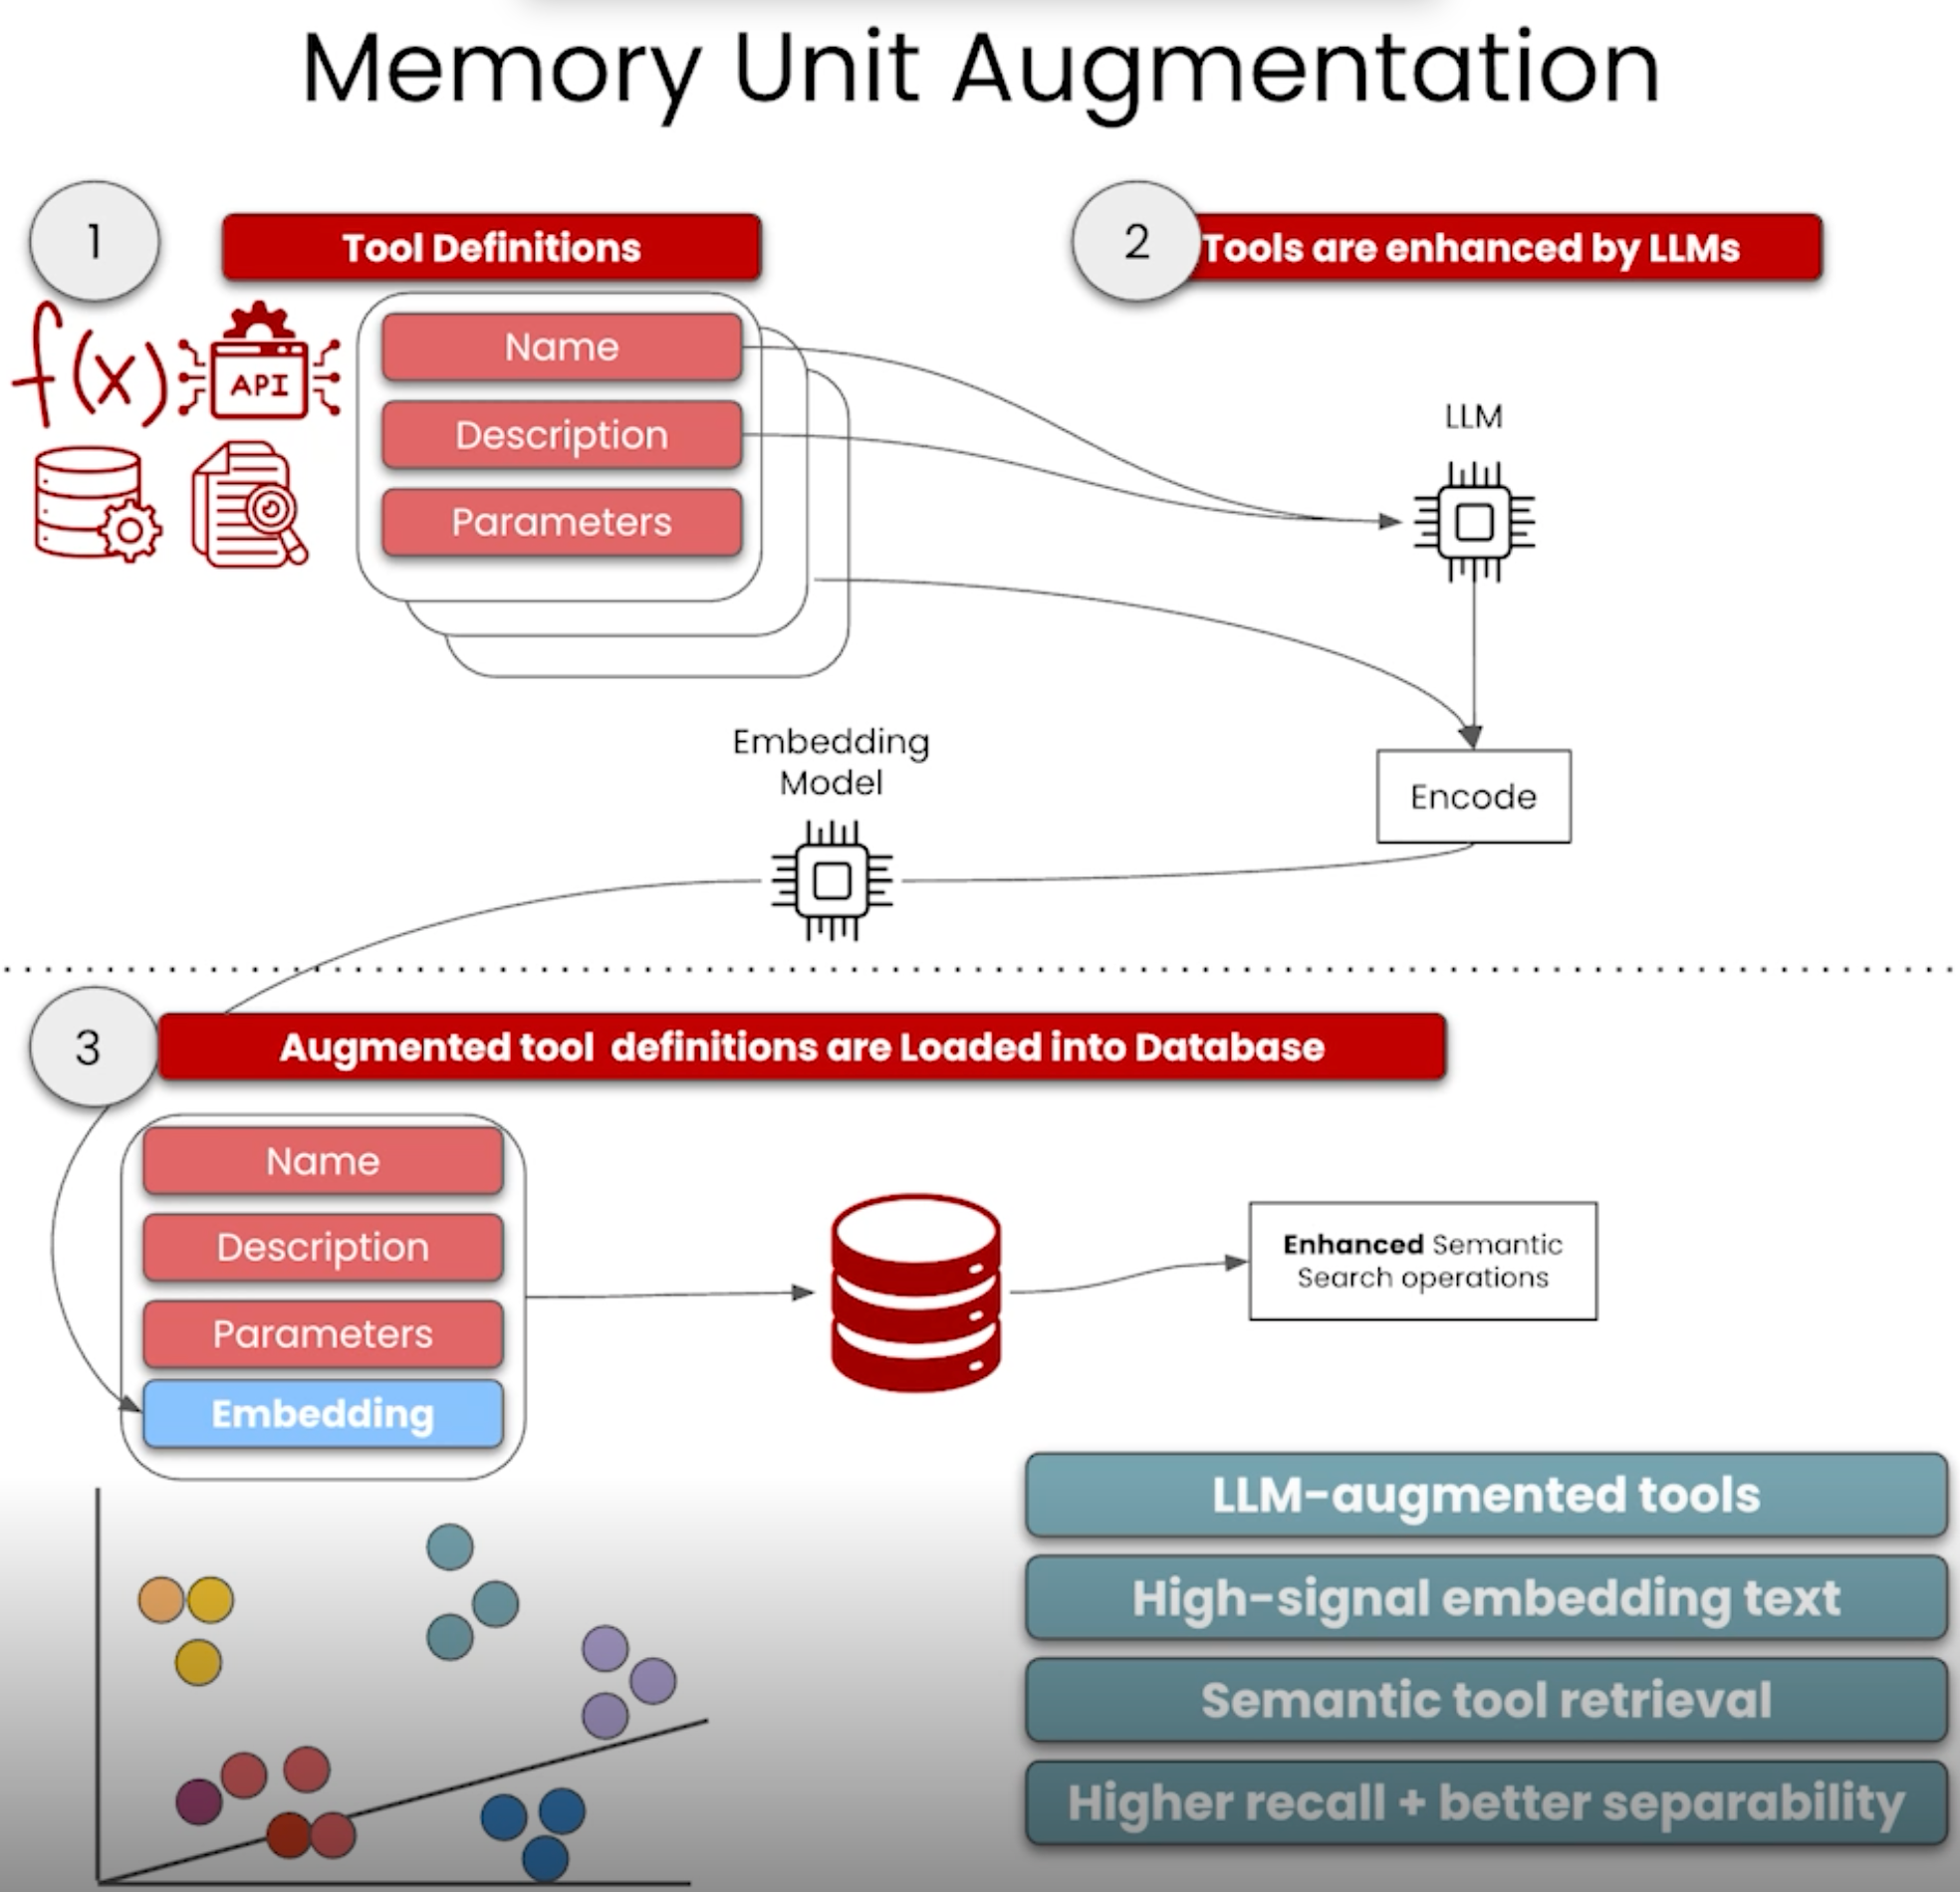
解决办法二:
在方法一基础上,对tool 存储单元信息通过llm 进行优化,在数据库中存储优化后的名称和描述
优点:
LLM增强工具
高信号嵌入文本, 方便llm更好查找
语义工具检索
更高的召回率 + 更好的可分离性

The Solution: Semantic Tool Retrieval

The Toolbox class solves this by treating tools as a searchable memory:

  1. Register hundreds of tools — Store all available tools with their descriptions and embeddings
  2. Retrieve only relevant tools — At inference time, use vector search to find tools semantically relevant to the current query
  3. Pass a focused toolset — Only the retrieved tools (typically 3-5) are passed to the LLM

This approach means your system can scale to hundreds of tools while the LLM only sees the most relevant ones for each query.

How the Code Works

The Toolbox class uses docstrings as the retrieval key:

1
User Query → Embed Query → Vector Search → Find tools with similar docstrings → Return relevant tools
Component Purpose
Toolbox (from helper.py) Shared class used across lessons to register and retrieve tools
ToolMetadata (inside helper.py) Stores tool name, description, signature, parameters
_augment_docstring() Uses LLM to improve the docstring for better retrieval
_generate_queries() Creates synthetic queries that would trigger this tool
register_tool() Decorator that stores tool with its embedding in the toolbox

When you call memory_manager.read_toolbox(query), it performs a similarity search to find tools whose docstrings are semantically similar to the query.

the Toolbox uses embeddings to map natural-language queries to the most relevant tools. This means tool retrieval is semantic: the agent can discover capabilities even when the query wording does not exactly match a tool name.

1
2
3
4
5
6
7
8
9
10
11
12
13
14
15
16
17
18
19
20
21
22
23
24
25
26
27
28
29
30
31
32
33
34
35
36
37
38
39
40
41
42
43
44
45
46
47
48
49
50
51
52
53
54
55
56
57
58
59
60
61
// 在toolbox 里面注册 tool 
from tavily import TavilyClient
from datetime import datetime

tavily_client = TavilyClient()

# When `augment=True`, the `Toolbox` sends both the **original docstring** and the **function's source code** to an LLM,
# which produces a richer, more detailed description.
# This enriched text is what gets embedded and stored — improving semantic separability and retrieval recall.


@toolbox.register_tool(augment=True)
def search_tavily(query: str, max_results: int = 5):
"""
Use this function to search the web and store the results in the knowledge base.
"""
response = tavily_client.search(query=query, max_results=max_results)
results = response.get("results", [])

# Write each result to the knowledge base
for result in results:
# Create the text content to embed
text = f"Title: {result.get('title', '')}\nContent: {result.get('content', '')}\nURL: {result.get('url', '')}"

# Create metadata
metadata = {
"title": result.get("title", ""),
"url": result.get("url", ""),
"score": result.get("score", 0),
"source_type": "tavily_search",
"query": query,
"timestamp": datetime.now().isoformat()
}

# Write to knowledge base
memory_manager.write_knowledge_base(text, metadata)

return results

// 获取tool 的源码和描述,用llm augment

import inspect

# Original docstring (what the developer wrote - just one line)
original = ("Use this function to search the web"
" and store the results in the"
" knowledge base.")

# Get the actual source code of the function
fn = toolbox._tools_by_name["search_tavily"]
source = inspect.getsource(fn) // 上面注册的代码

print("ORIGINAL DOCSTRING:")
print(f' "{original}"')
print()

# The LLM reads both the docstring AND the source code
augmented = toolbox._augment_docstring(original, source)

print("AUGMENTED DOCSTRING (LLM-enhanced):")
print(f" {augmented}")

toolBOX
实验: 基于tool memory unit优化的存储方案

Memory operations: extraction,consolidation,and self-updating memory

处理原始交互信息为持久知识

Context Window Reduction
Context Window Reduction is the process of shrinking the amount of information placed in an LLM’s context window,
by summarizing, compressing,deduplicating, or filtering content,
while preserving the signals needed for the current task.

Context Window Reduction 有以下两种方式
Context Summarization

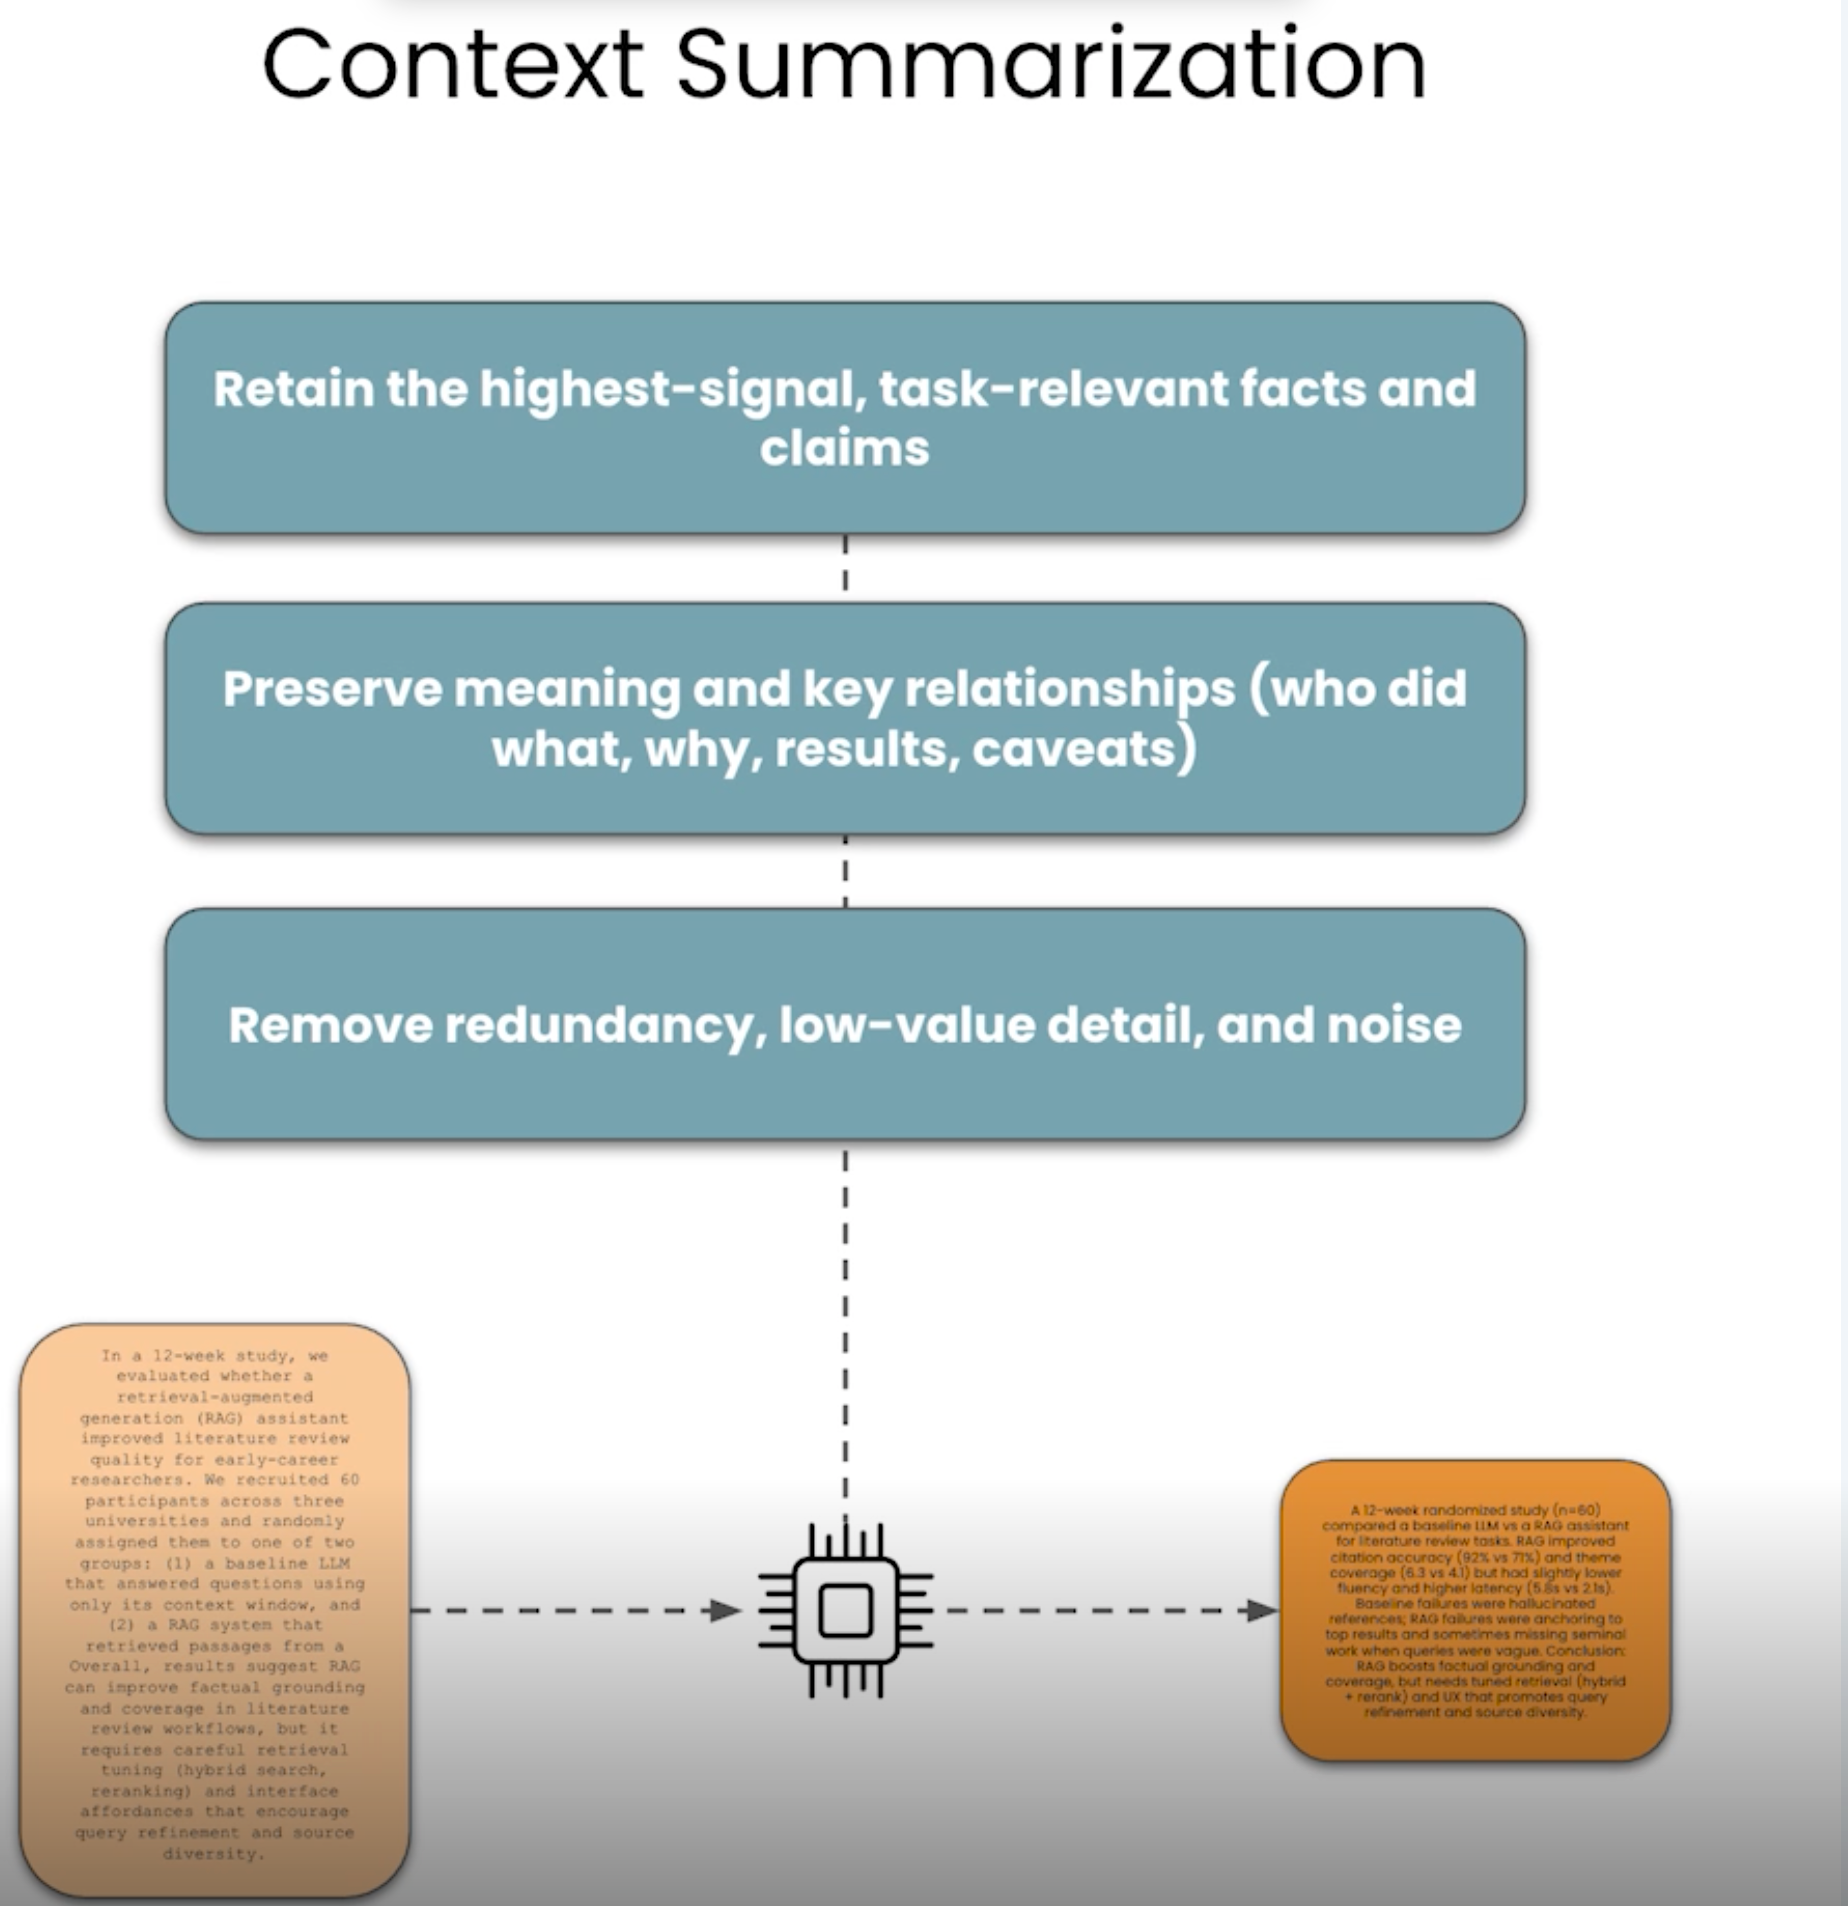
Context Summarization

上下文总结,通过提取关键,相关,高识别度高价值信息,摒弃低价值,无关,冗余信息,减少context 大小

Context summarization is the process of compressing content into a shorter representation that preserves the most salient, task-relevant information from the original.

Summarized content is injected into a clean context window.
For certain tasks, retrieving summaries via semantic search provides the LLM with high-signal context.
But naive summarization is a lossy technique

上下文总结有缺点: 容易造成信息丢失

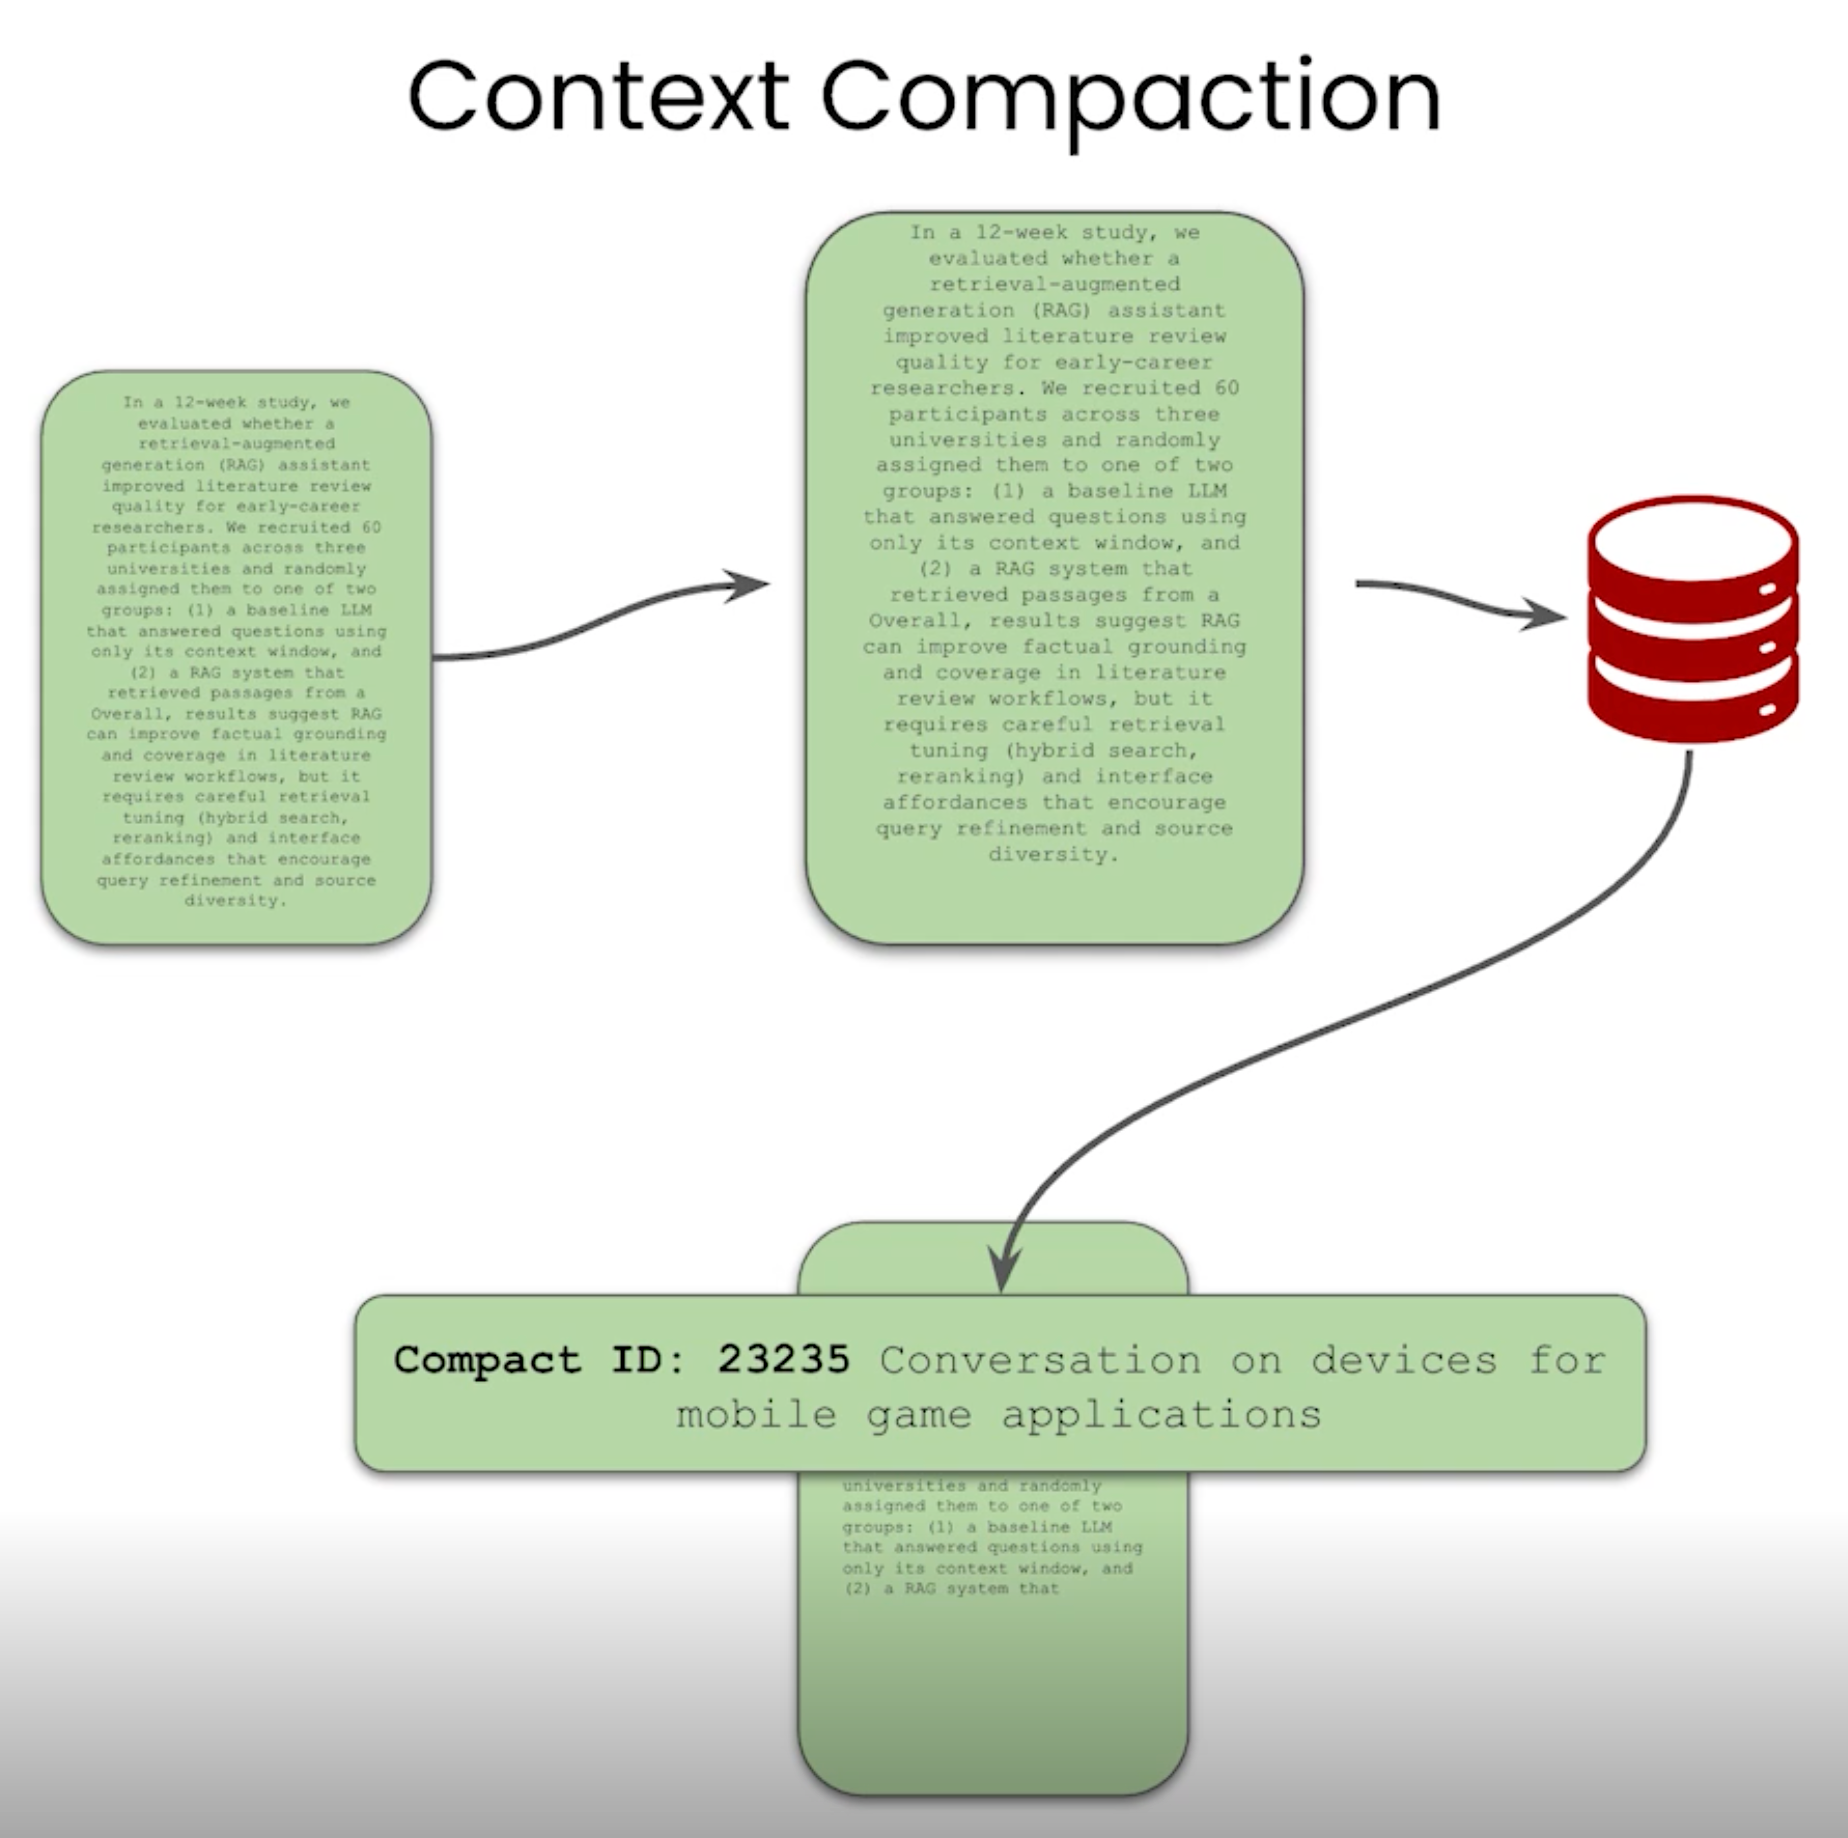
Context Compaction

上下文压缩,将context 放到数据库中,把数据库当外部组件使用,在大模型里注册数据库有哪些信息,如果有需要,可以去数据库获取全量信息

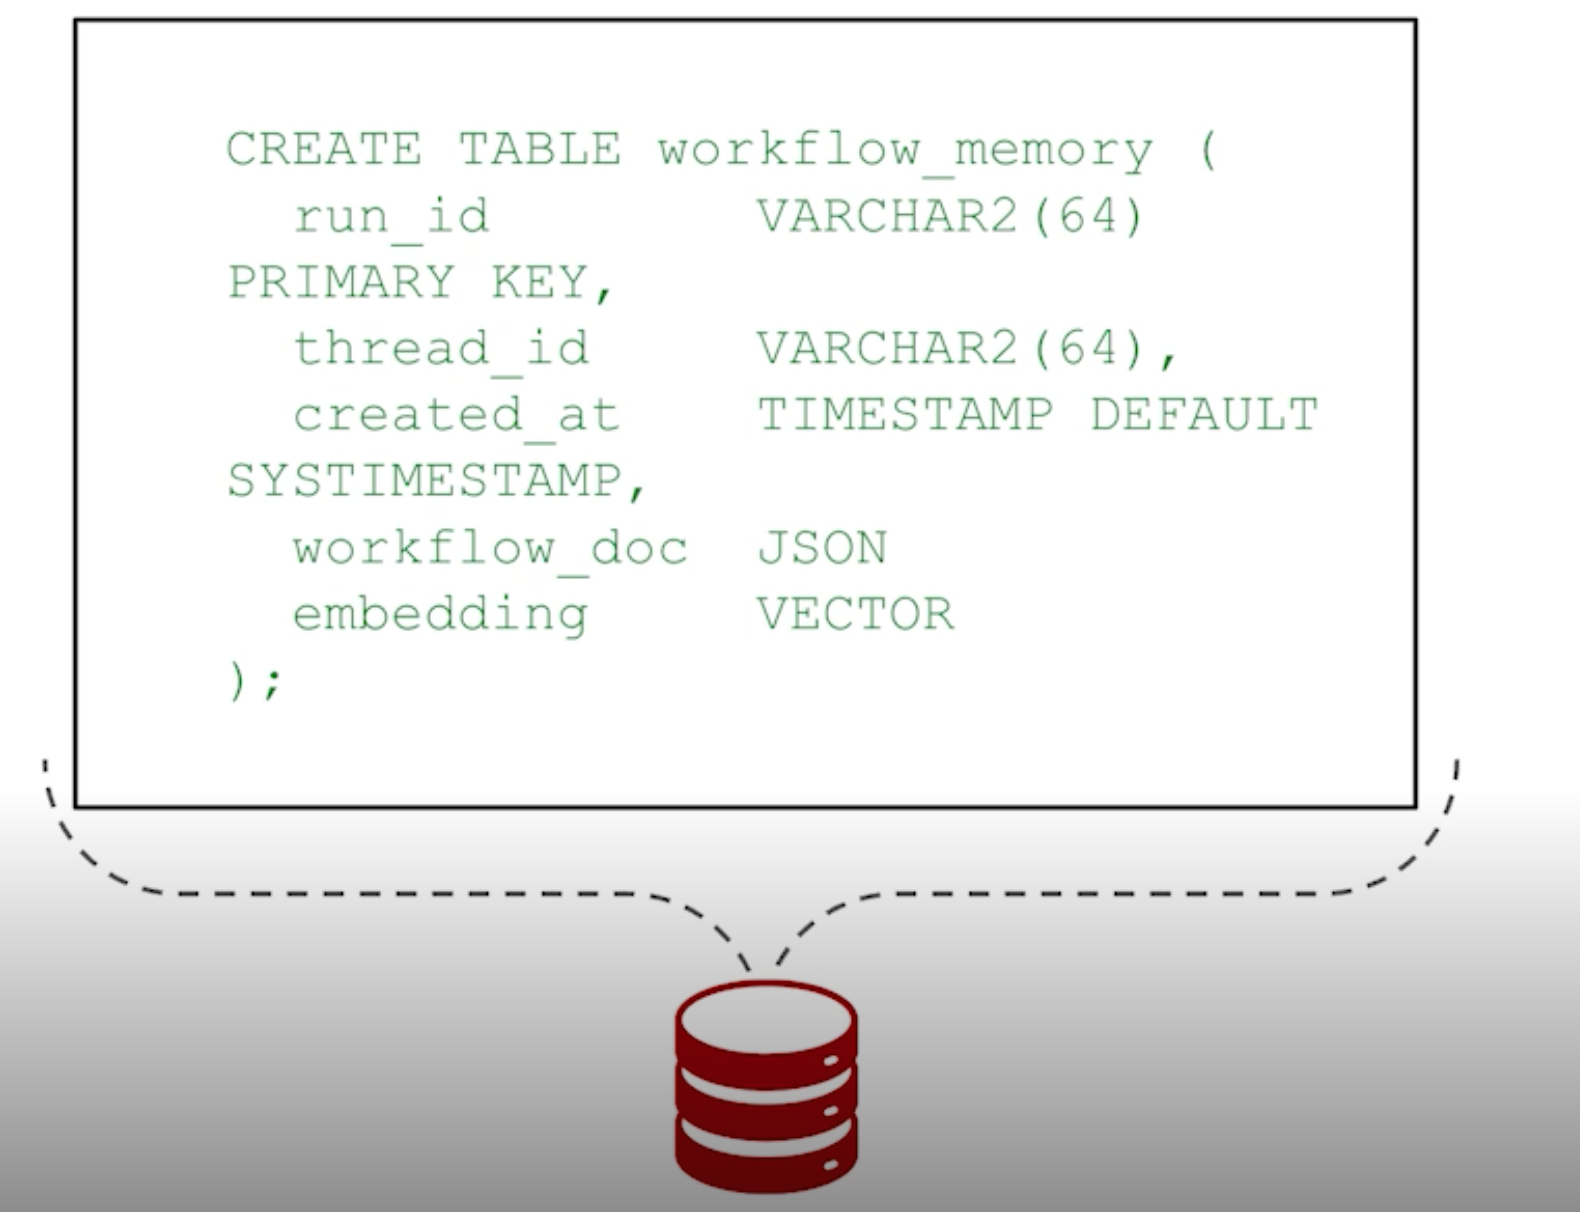
Workflow Memory

Workflow memory is the agent’s ability to persist and reuse the state and structure of work over time,
so multi-step tasks can be continued, resumed, audited,or repeated reliably.

将明确的工作流顺利也同样存储起来,当下次遇到同样问题,直接按历史存储的工作流顺去做就行,减少思考时间,提高产出效率

1
2
3
4
5
6
7
8
9
10
11
12
13
14
15
16
17
18
19
20
21
22
23
24
25

{
"workflow_name":"get_current_weather",
"user_request": "Get me the current weather",
"steps":[
{ "step": 1, "action": "Get current user location", "type":
"tool_calI","tool":"get_user_location","input": {},
"output":{
"lat":51.76,"lon":-0.24 },"status" : "OK" },
{ "step": 2,"action": "Use weather application tool", "type":
"tool_cal1","tool":"weather_api","input":{},"output":{
"'provider":"weather_app" },"status": "OK" },
{ "step": 3,"action": "Pass the lat/long into application
tool","tyPe":"tool_call","tool":"weather_api","input":{
"lat":51.76,"1on":-0.24 },"output": null,"status": "OK" },
{"step": 4,"action" : "Get the current weather", "type":
"tool_call","tool":"weather_api","input":{ "lat": 51.76,
"lon":-0.24 },"output": { "temp_c": 7.2,"condition": "Cloudy"
},"status": "OK" },
("step": 5, "action": "Return weather to user as response",
"type":"assistant_response","tool":null,"input": null,
"output": {"text":"It's 7°C and cloudy right now." },"status":
"OK" }
]
}

练习

Large Language Models have finite context windows. When conversations grow long, we face a critical challenge: how do we preserve important information while staying within token limits?

This section implements the core memory consolidation pipeline:

1
Long Conversation → Monitor Usage → Summarize → Store Summary → Mark Original as Processed

Why This Matters

Problem Solution
Context overflow crashes the agent Monitor token usage and summarize proactively
Summaries lose important details Capture technical, emotional, and entity information
Can’t access original conversation Store summary ID links back to original messages
Re-summarizing already processed messages Mark messages with summary_id after processing

Summarization Functions

The summarization pipeline captures four types of information:

  1. Technical Information — Facts, code, configurations, solutions
  2. Emotional Context — Tone, sentiment, urgency levels
  3. Entities & References — People, systems, projects mentioned
  4. Action Items & Decisions — Next steps, agreements, pending tasks

小结

Capability Implementation
Monitor calculate_context_usage() tracks token consumption
Summarize summarise_context_window() extracts structured information
Store Summaries persist in SUMMARY_MEMORY with links to originals
Expand expand_summary() tool retrieves original conversations
Self-Update mark_as_summarized() prevents re-processing

Key Insight: Memory consolidation isn’t just about compression—it’s about structured extraction that preserves technical details, emotional context, entities, and action items.

实验: 利用context 压缩还原减少上下文

Memory Aware Agent

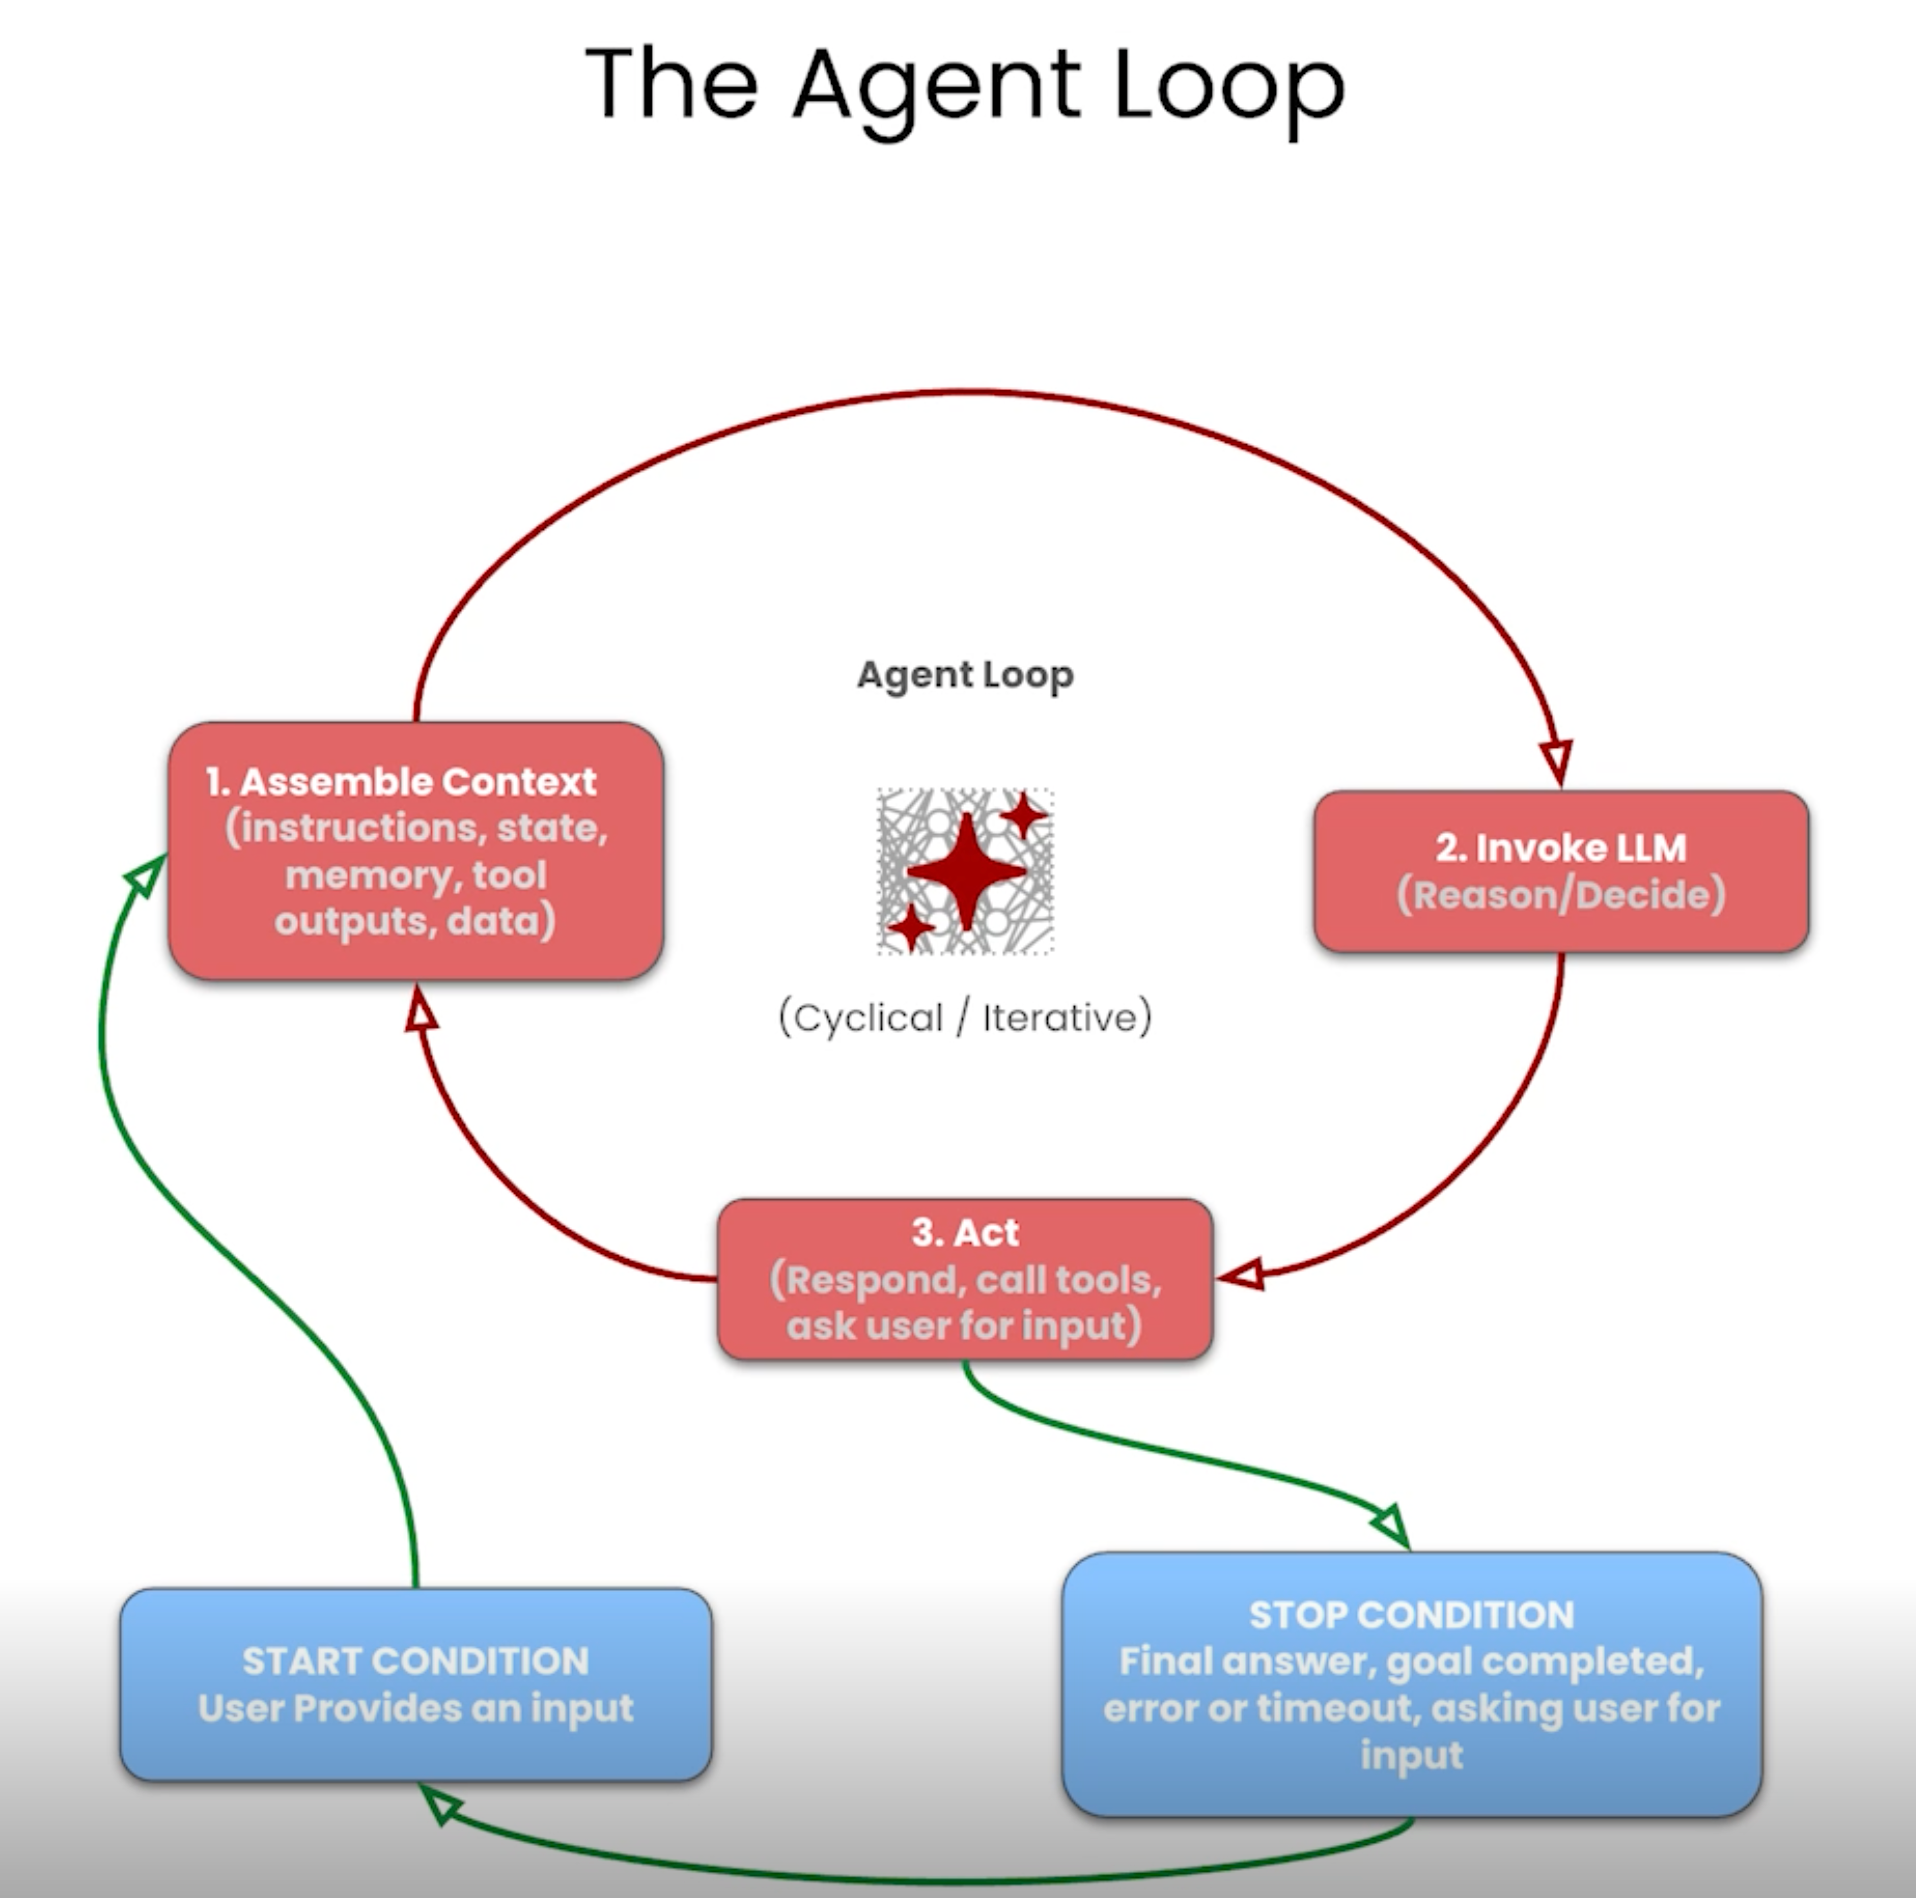
agnet loop

A cyclical, iterative execution pattern inside a single agent run/turn where an agent repeatedly:

  1. assembles context (instructions, conversation state, retrieved memory, tool outputs, relevant data)
  2. invokes an LLM to reason/decide, and then acts (responds, calls tools, writes memory/state, or updates the plan),until a stop condition is met,
    e.g., a final answer is produced, a goal is completed, an error/timeout occurs, or the agent explicitly decides to exit.

练习

  • Integrate all memory types (conversational, semantic, workflow, entity, summary, tool logs) into a unified agent
  • Implement context window management with automatic summarization
  • Build an agent loop that retrieves relevant context before each response
  • Use Just-In-Time (JIT) retrieval to expand summaries on demand

Key Concepts

Concept Description
Memory Aware Agent An agent that reads from and writes to persistent memory stores during execution
Context Engineering Dynamically building the optimal context window for each query
Just-In-Time Retrieval Fetching detailed information only when the agent needs it
Automatic Summarization Compressing context when usage exceeds thresholds

小结

Capability Implementation
Reads Memory Retrieves from 7 memory types before each response (tool logs remain JIT by default)
Manages Context Monitors tokens, summarizes when >80% capacity
Uses Tools Semantic search selects relevant tools per query
Persists Learning Saves conversations, workflows, entities, and raw tool logs
Expands On-Demand JIT retrieval via expand_summary() tool

Key Insight: A memory-aware agent doesn’t just respond to queries—it learns from each interaction. Information discovered, decisions made, and patterns executed are all persisted, making the agent more capable over time.

实验: 具备上下文总结长时记忆能力的智能体

My Little World

Agentic AI

发表于 2026-08-10

Agentic AI 一些知识

自动化程度(Degrees of autonomy)

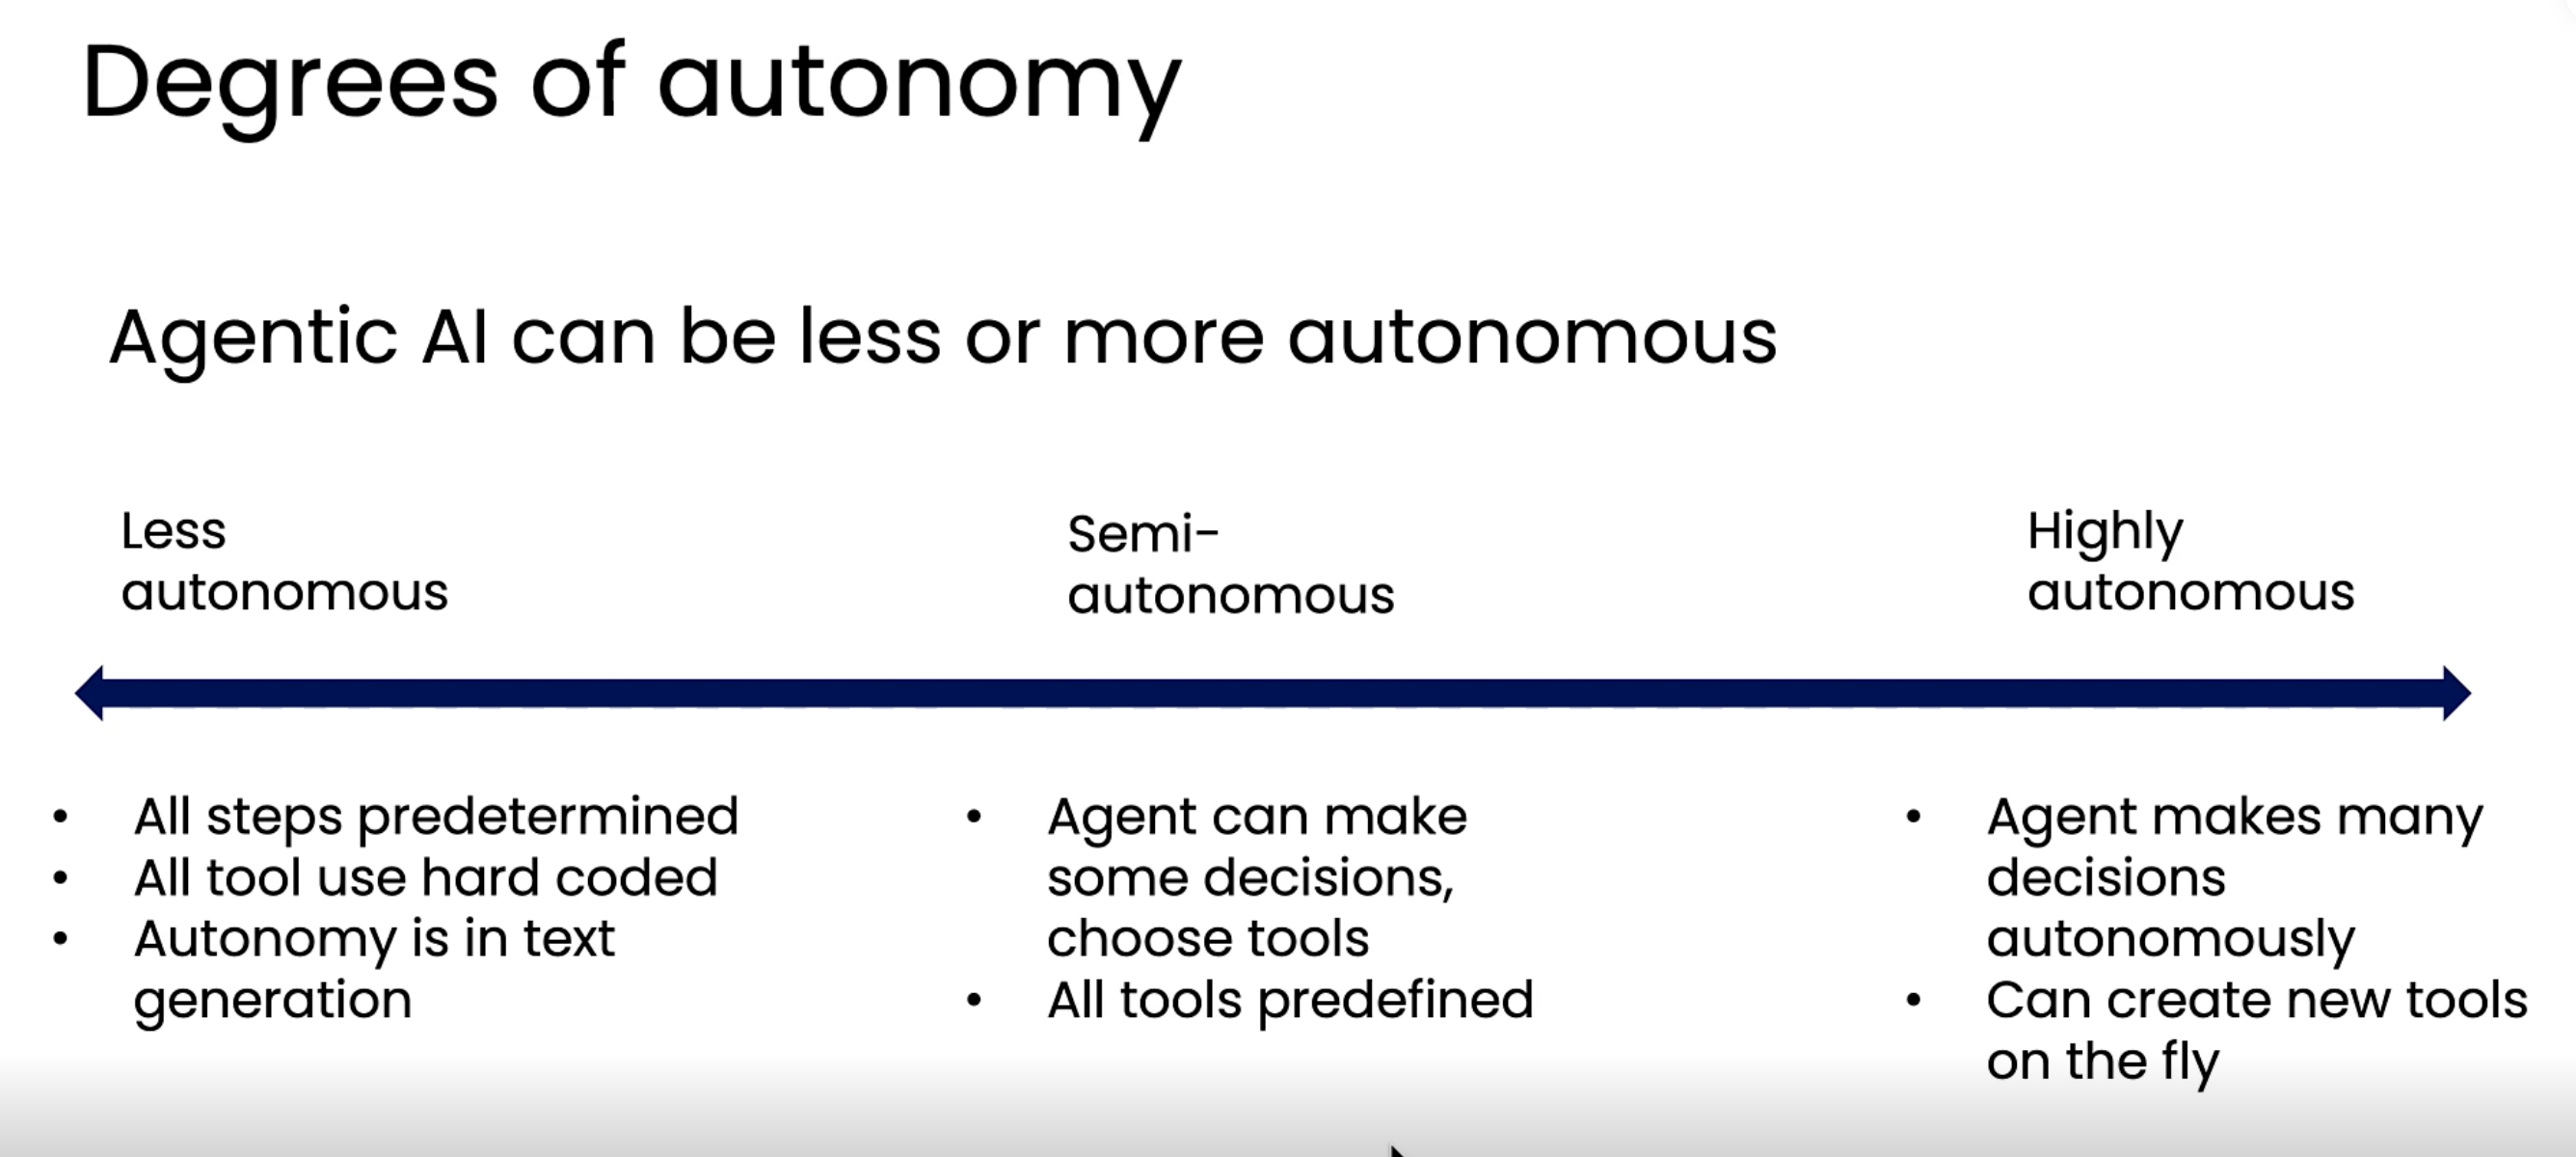
Agentic AI 可以从低到高拥有不同的自主程度:

Less autonomous(低自主) Semi-autonomous(半自主) Highly autonomous(高自主)
• All steps predetermined
所有步骤预先确定
• All tool use hard coded
所有工具调用均为硬编码
• Autonomy is in text generation
自主性仅体现在文本生成阶段
• Agent can make some decisions, choose tools
Agent 可做部分决策、选择工具
• All tools predefined
所有工具为预先定义
• Agent makes many decisions autonomously
Agent 可自主做大量决策
• Can create new tools on the fly
可即时动态创建新工具


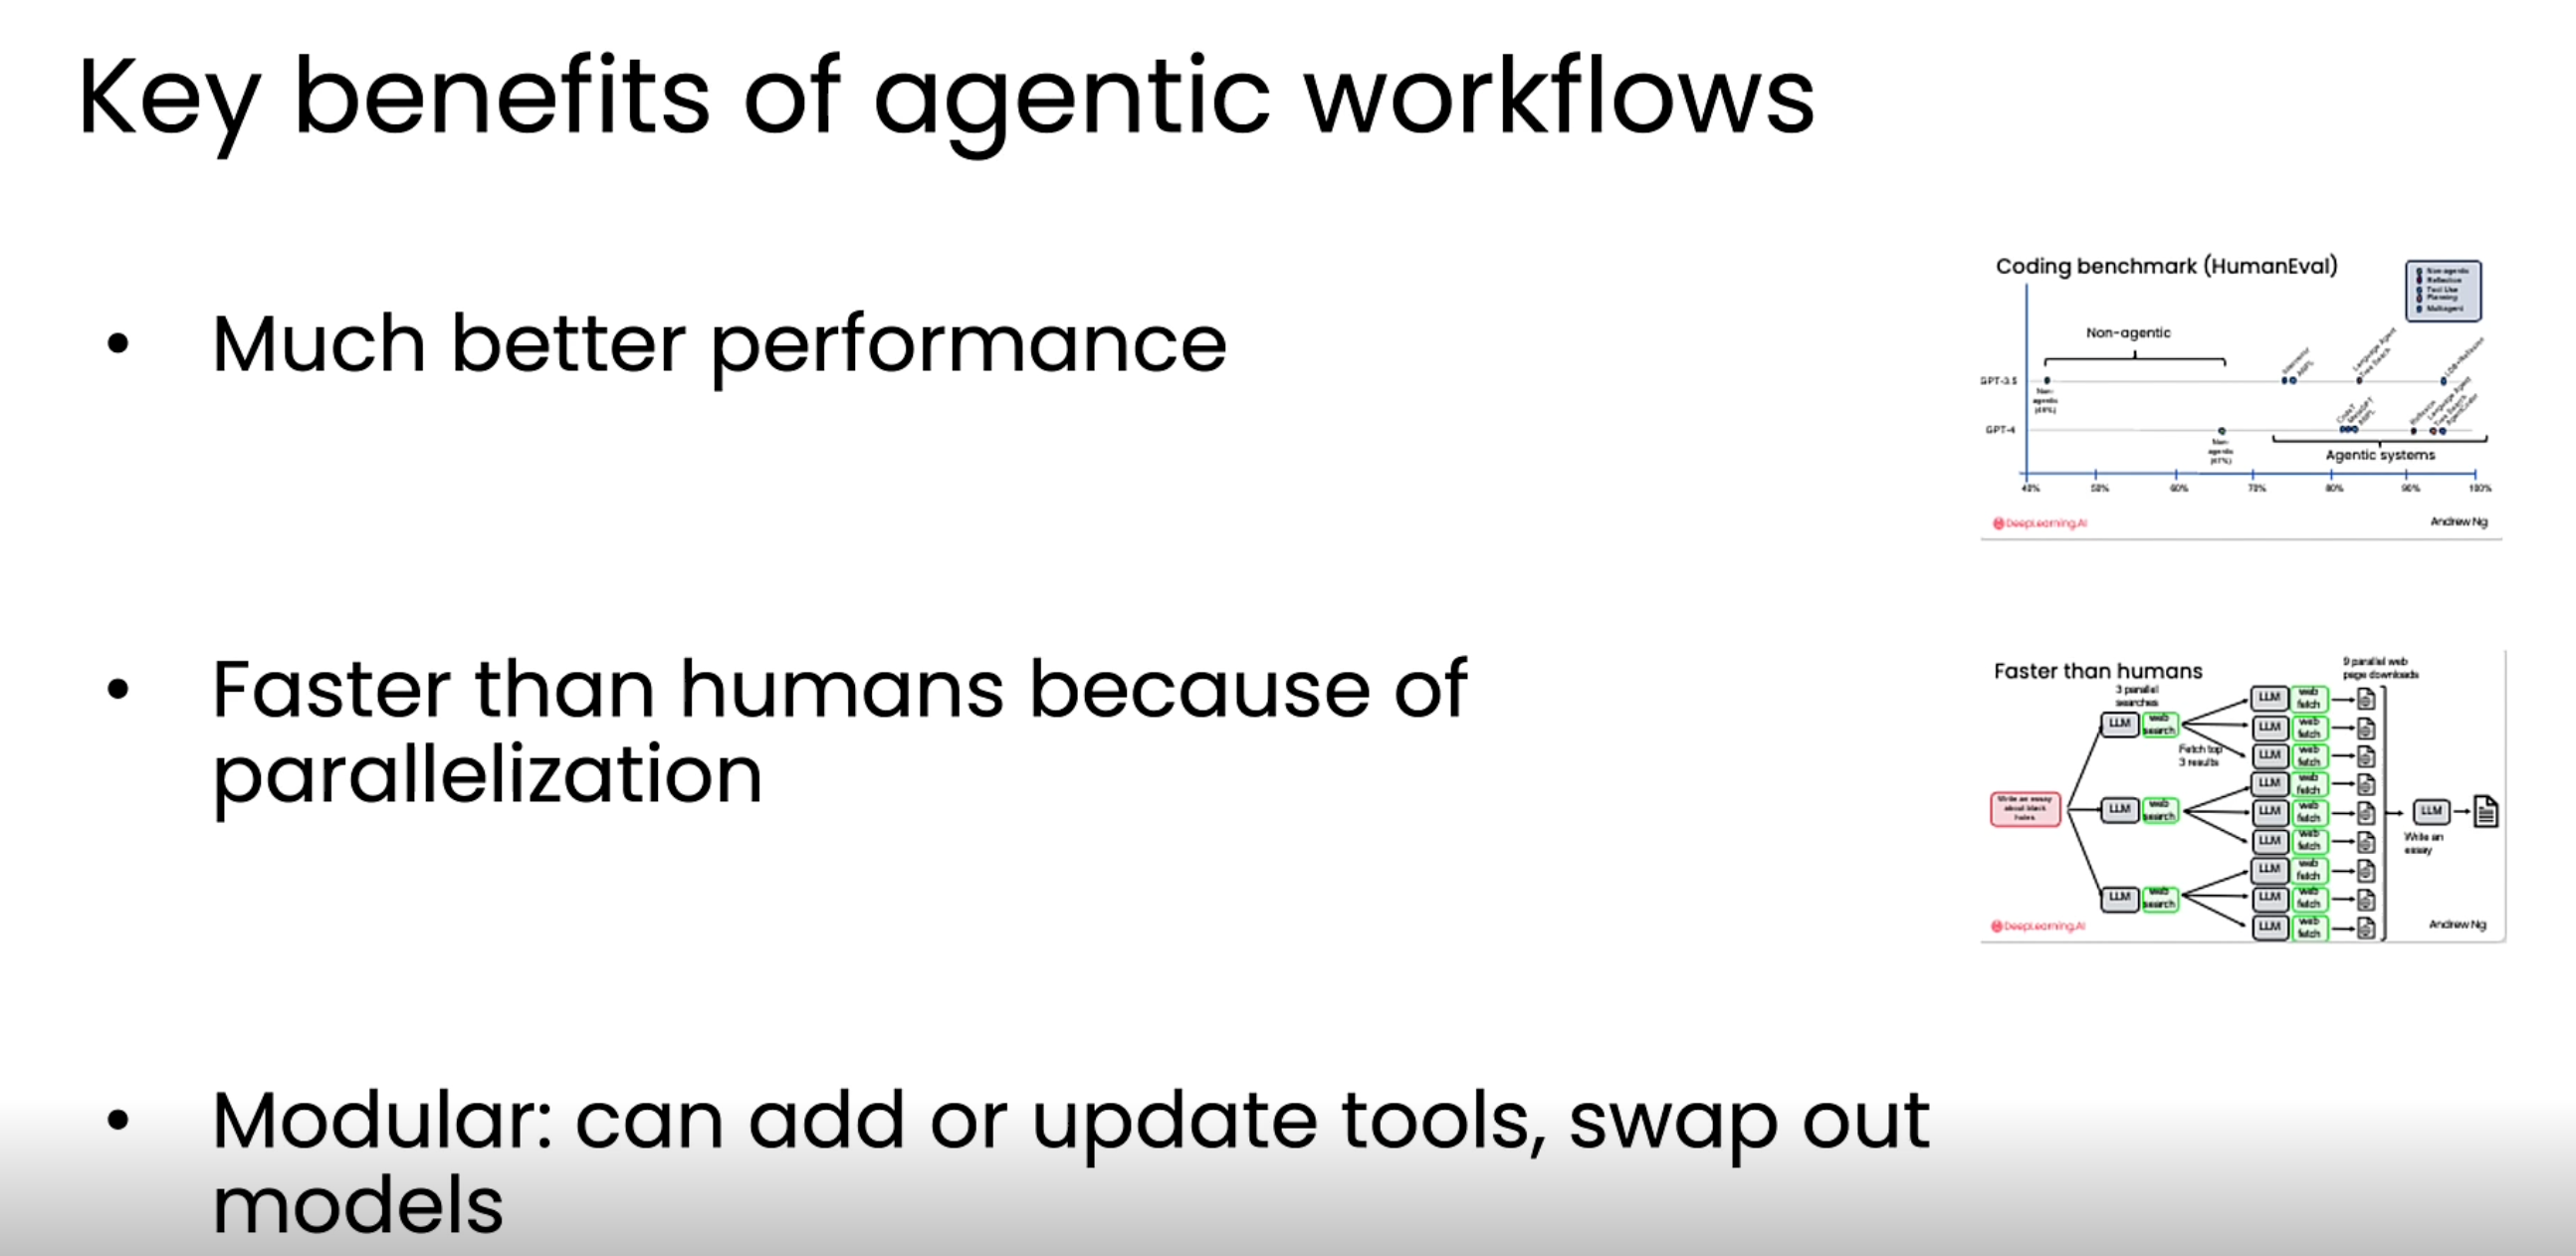
Agentic 工作流的核心优势(Key benefits of agentic workflows)

  • Much better performance — 性能显著更优(Coding benchmark HumanEval 对比中,Agentic Systems 明显优于 Non-agentic)
  • Faster than humans because of parallelization — 因可并行执行,处理速度比人类更快
  • Modular: can add or update tools, swap out models — 模块化设计:可新增/更新工具,或替换底层模型


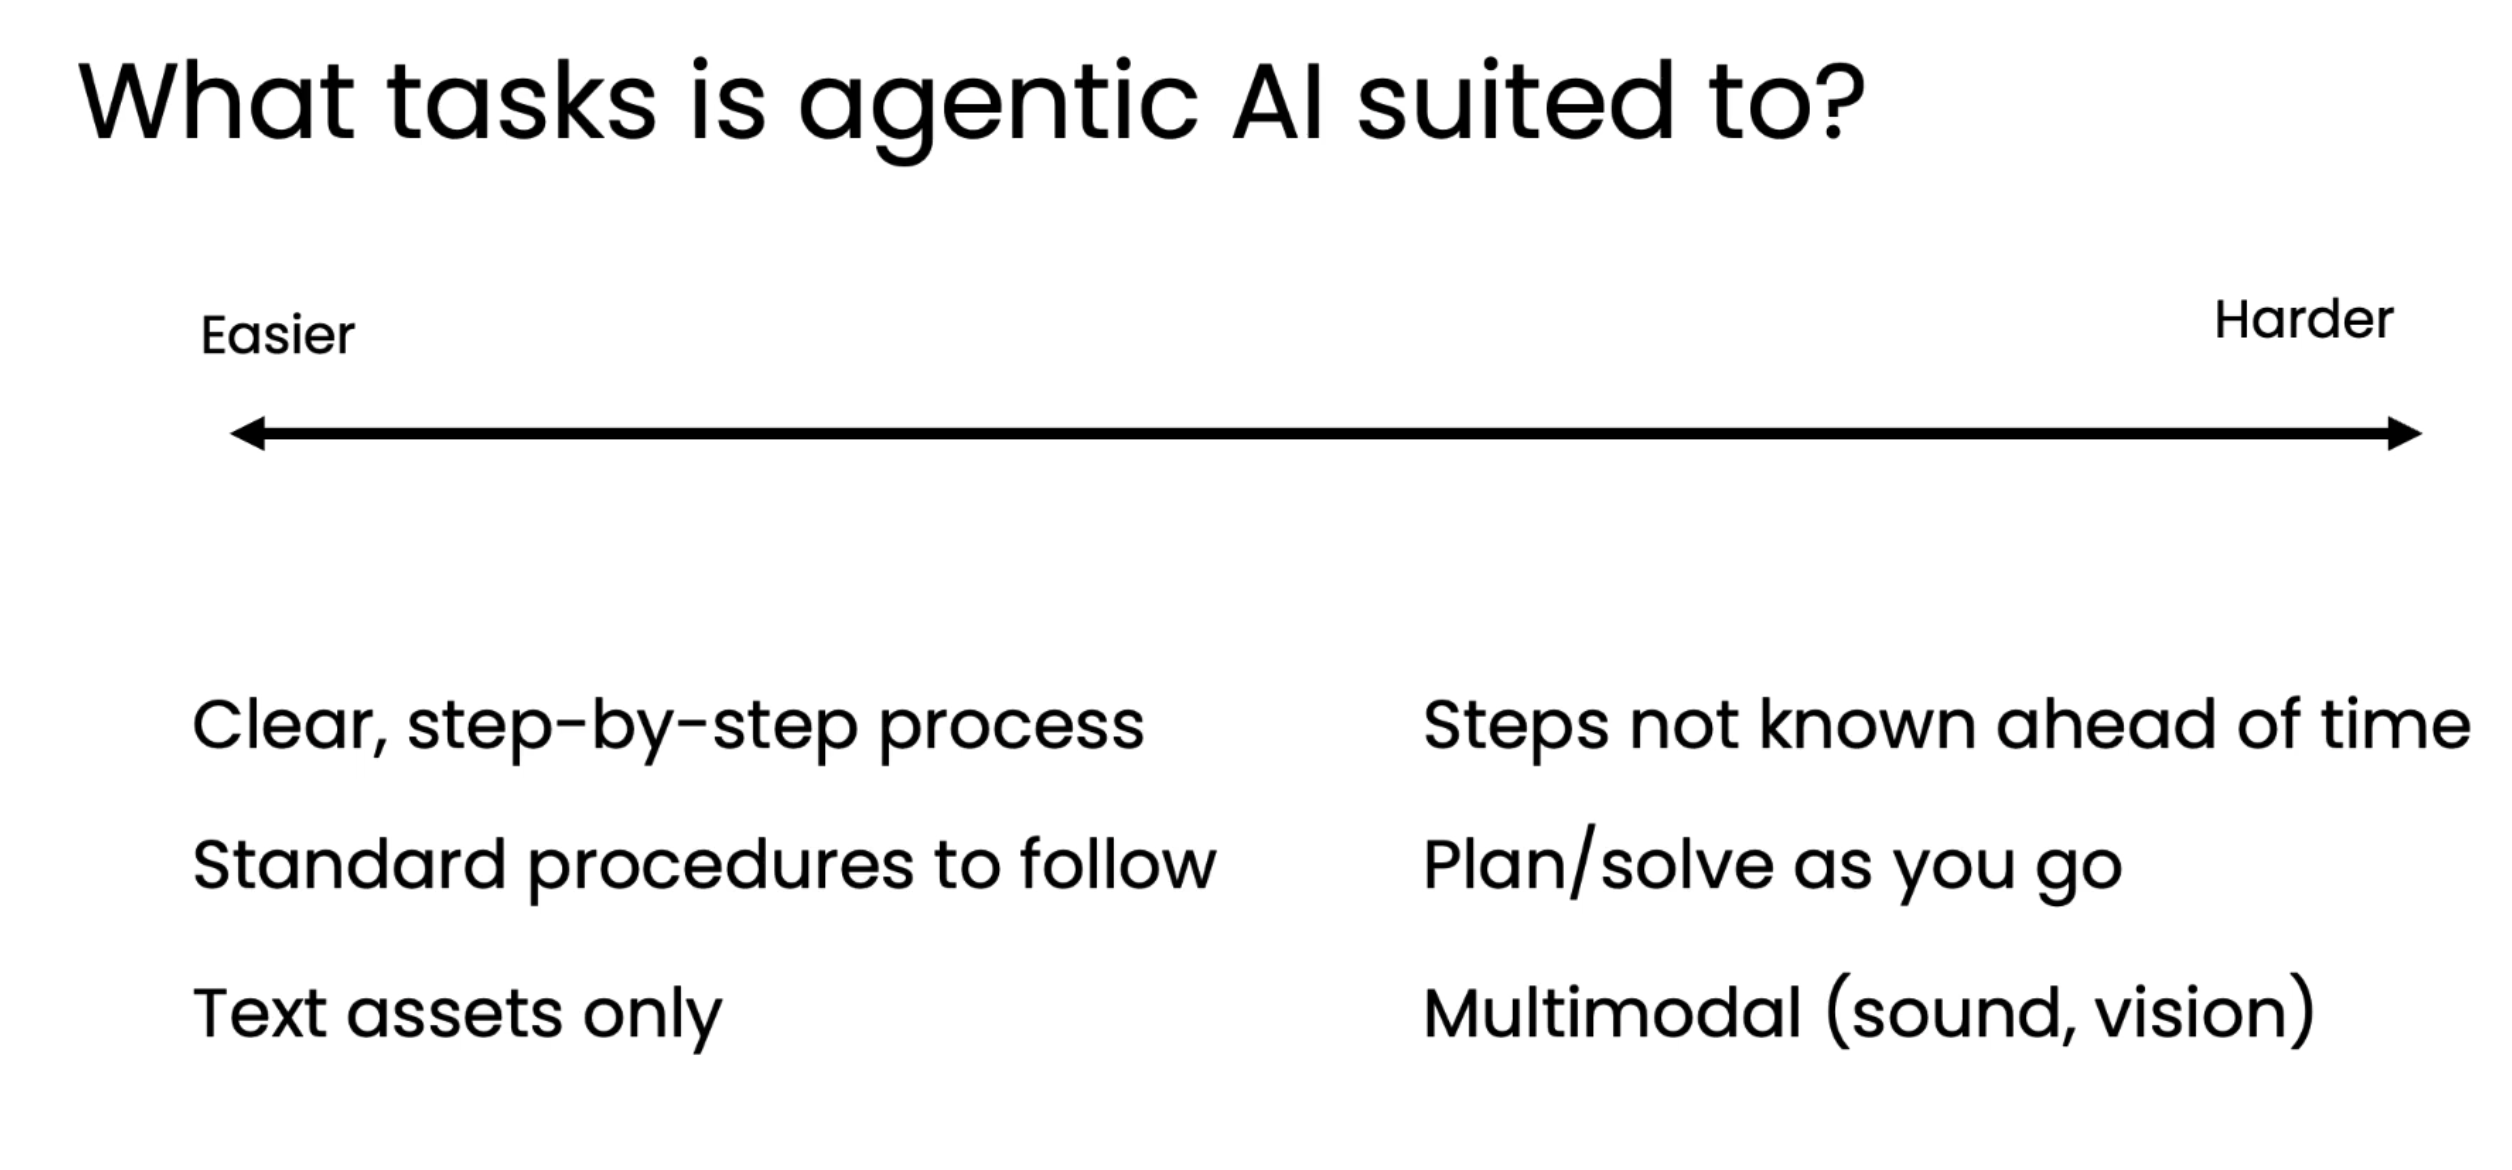
适用场景(What tasks is agentic AI suited to?)

按从易到难排列:

Easier(较简单) Harder(较复杂)
Clear, step-by-step process
清晰、逐步可执行的流程
Steps not known ahead of time
步骤无法预先确定
Standard procedures to follow
有标准流程可依循
Plan/solve as you go
需要边规划边求解
Text assets only
仅涉及文本资源
Multimodal (sound, vision)
多模态(声音、视觉等)


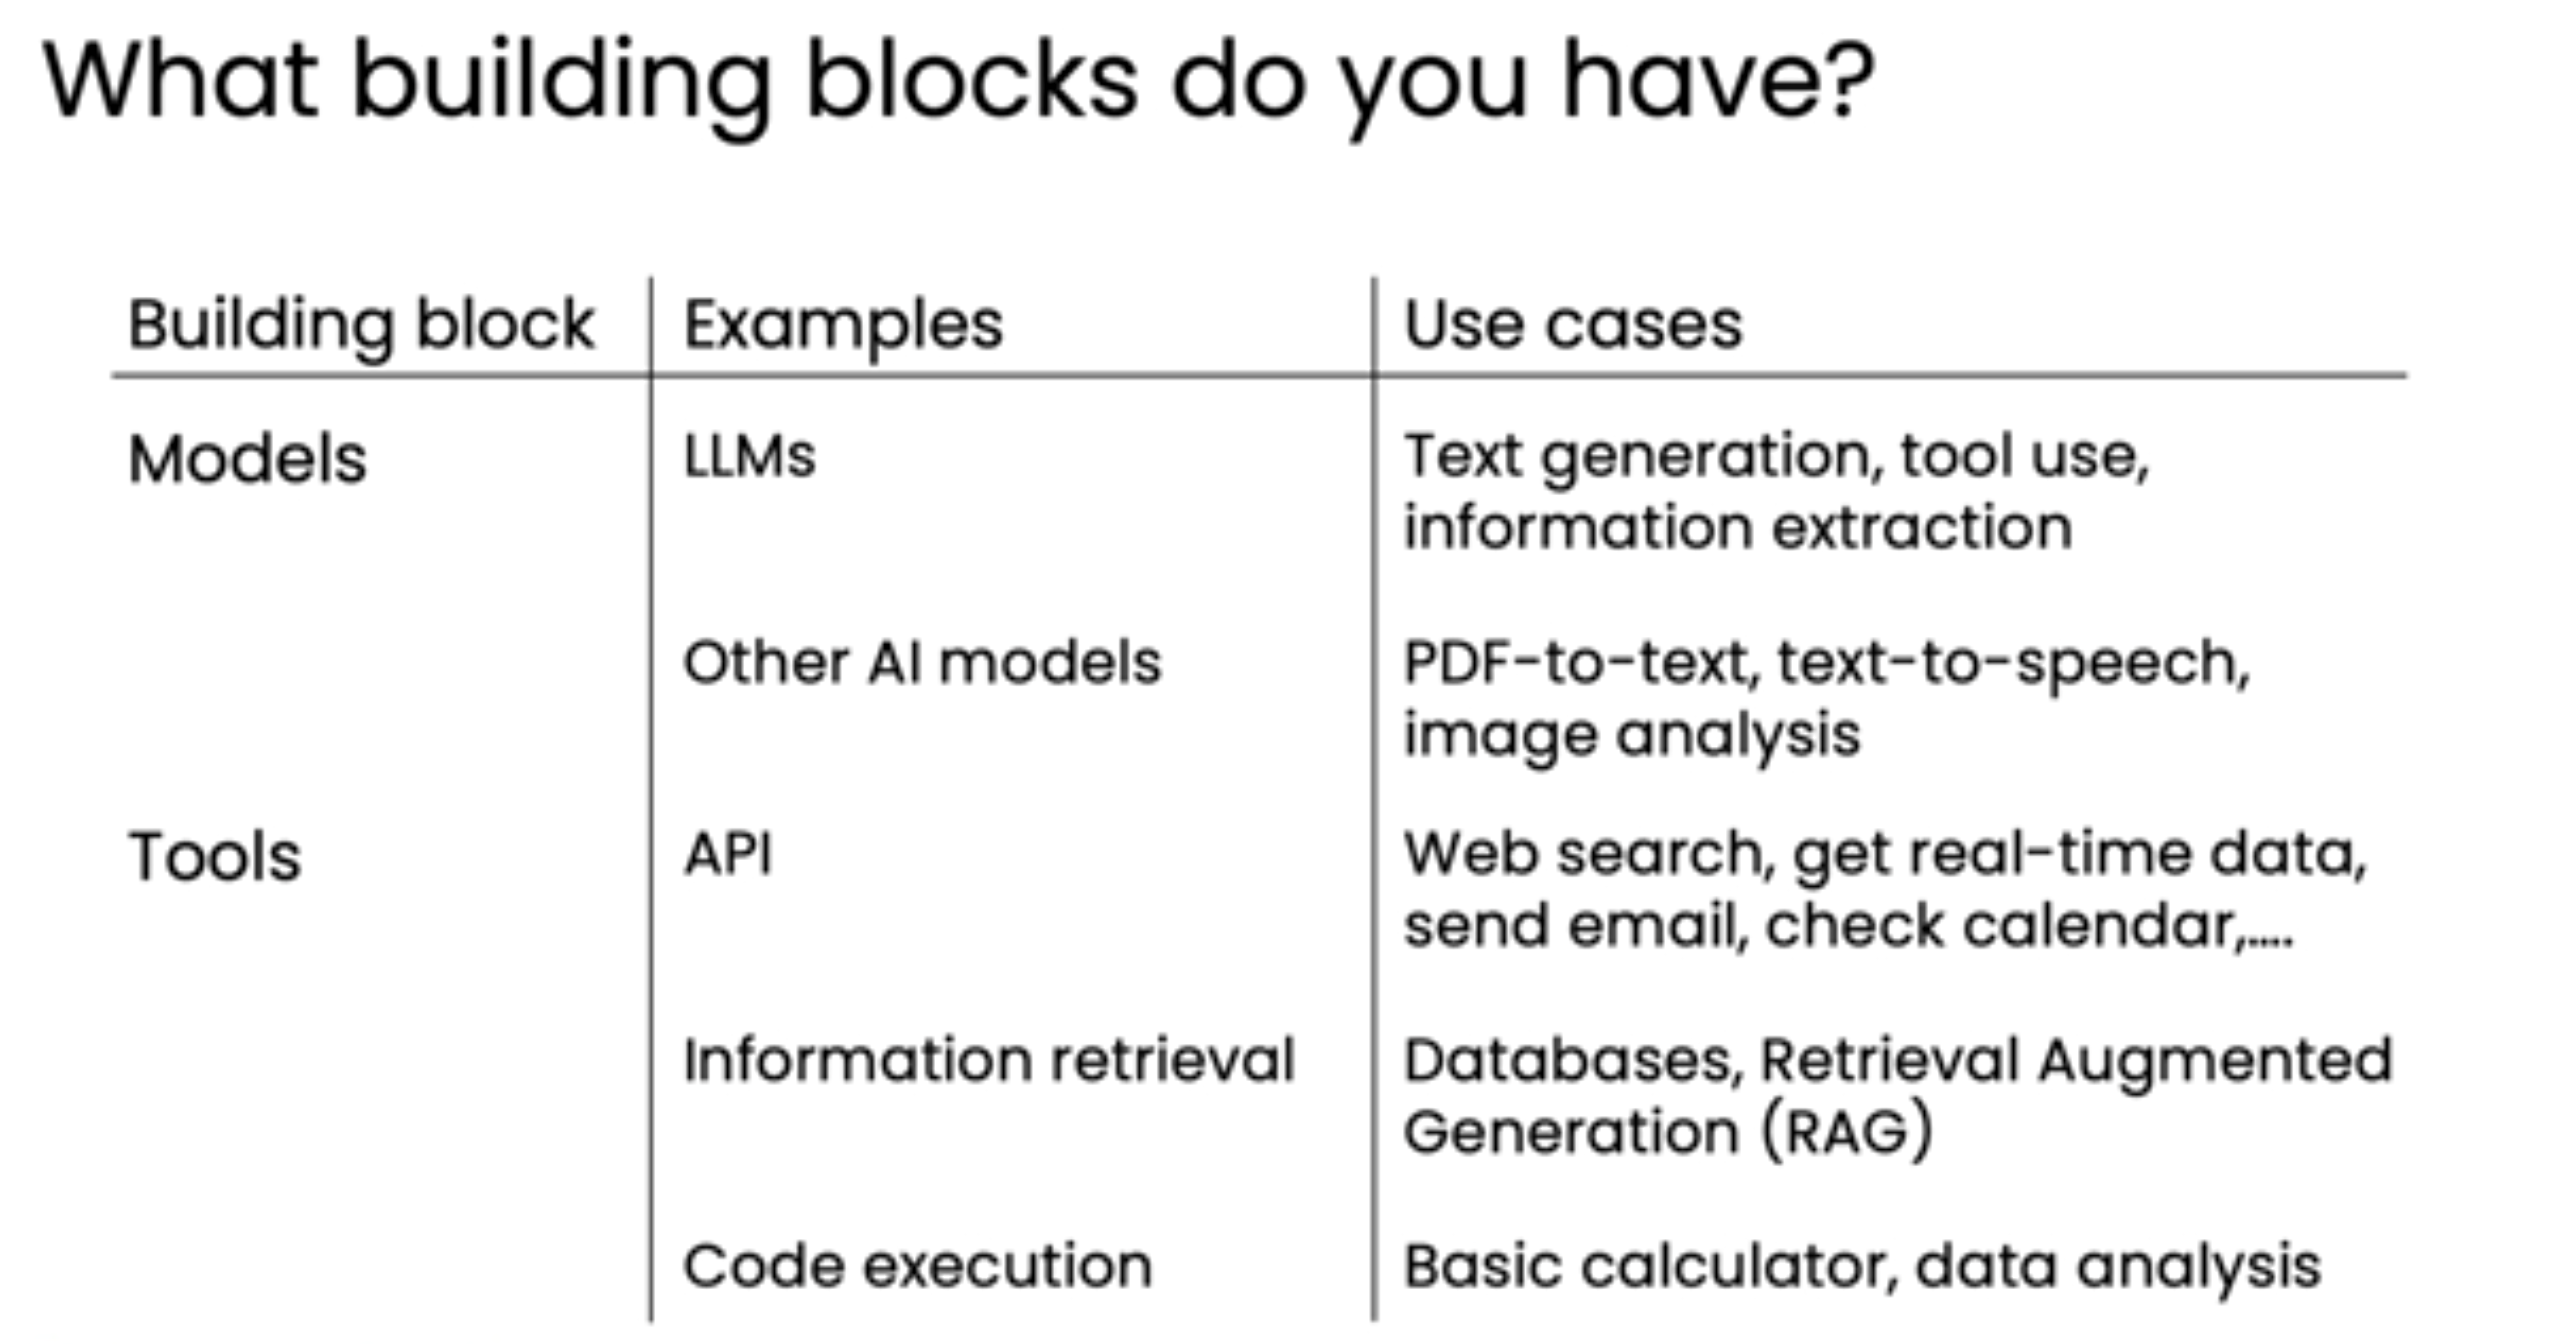
底层构建模块(What building blocks do you have?)

Building block(构建模块) Examples(示例) Use cases(用例)
Models(模型) LLMs
Other AI models
Text generation, tool use, information extraction
文本生成、工具使用、信息抽取
PDF-to-text, text-to-speech, image analysis
PDF 转文本、语音合成、图像分析
Tools(工具) API
Information retrieval
Code execution
Web search, get real-time data, send email, check calendar,…
网页搜索、实时数据获取、发邮件、查看日历…
Databases, Retrieval Augmented Generation (RAG)
数据库、检索增强生成(RAG)
Basic calculator, data analysis
基础计算、数据分析


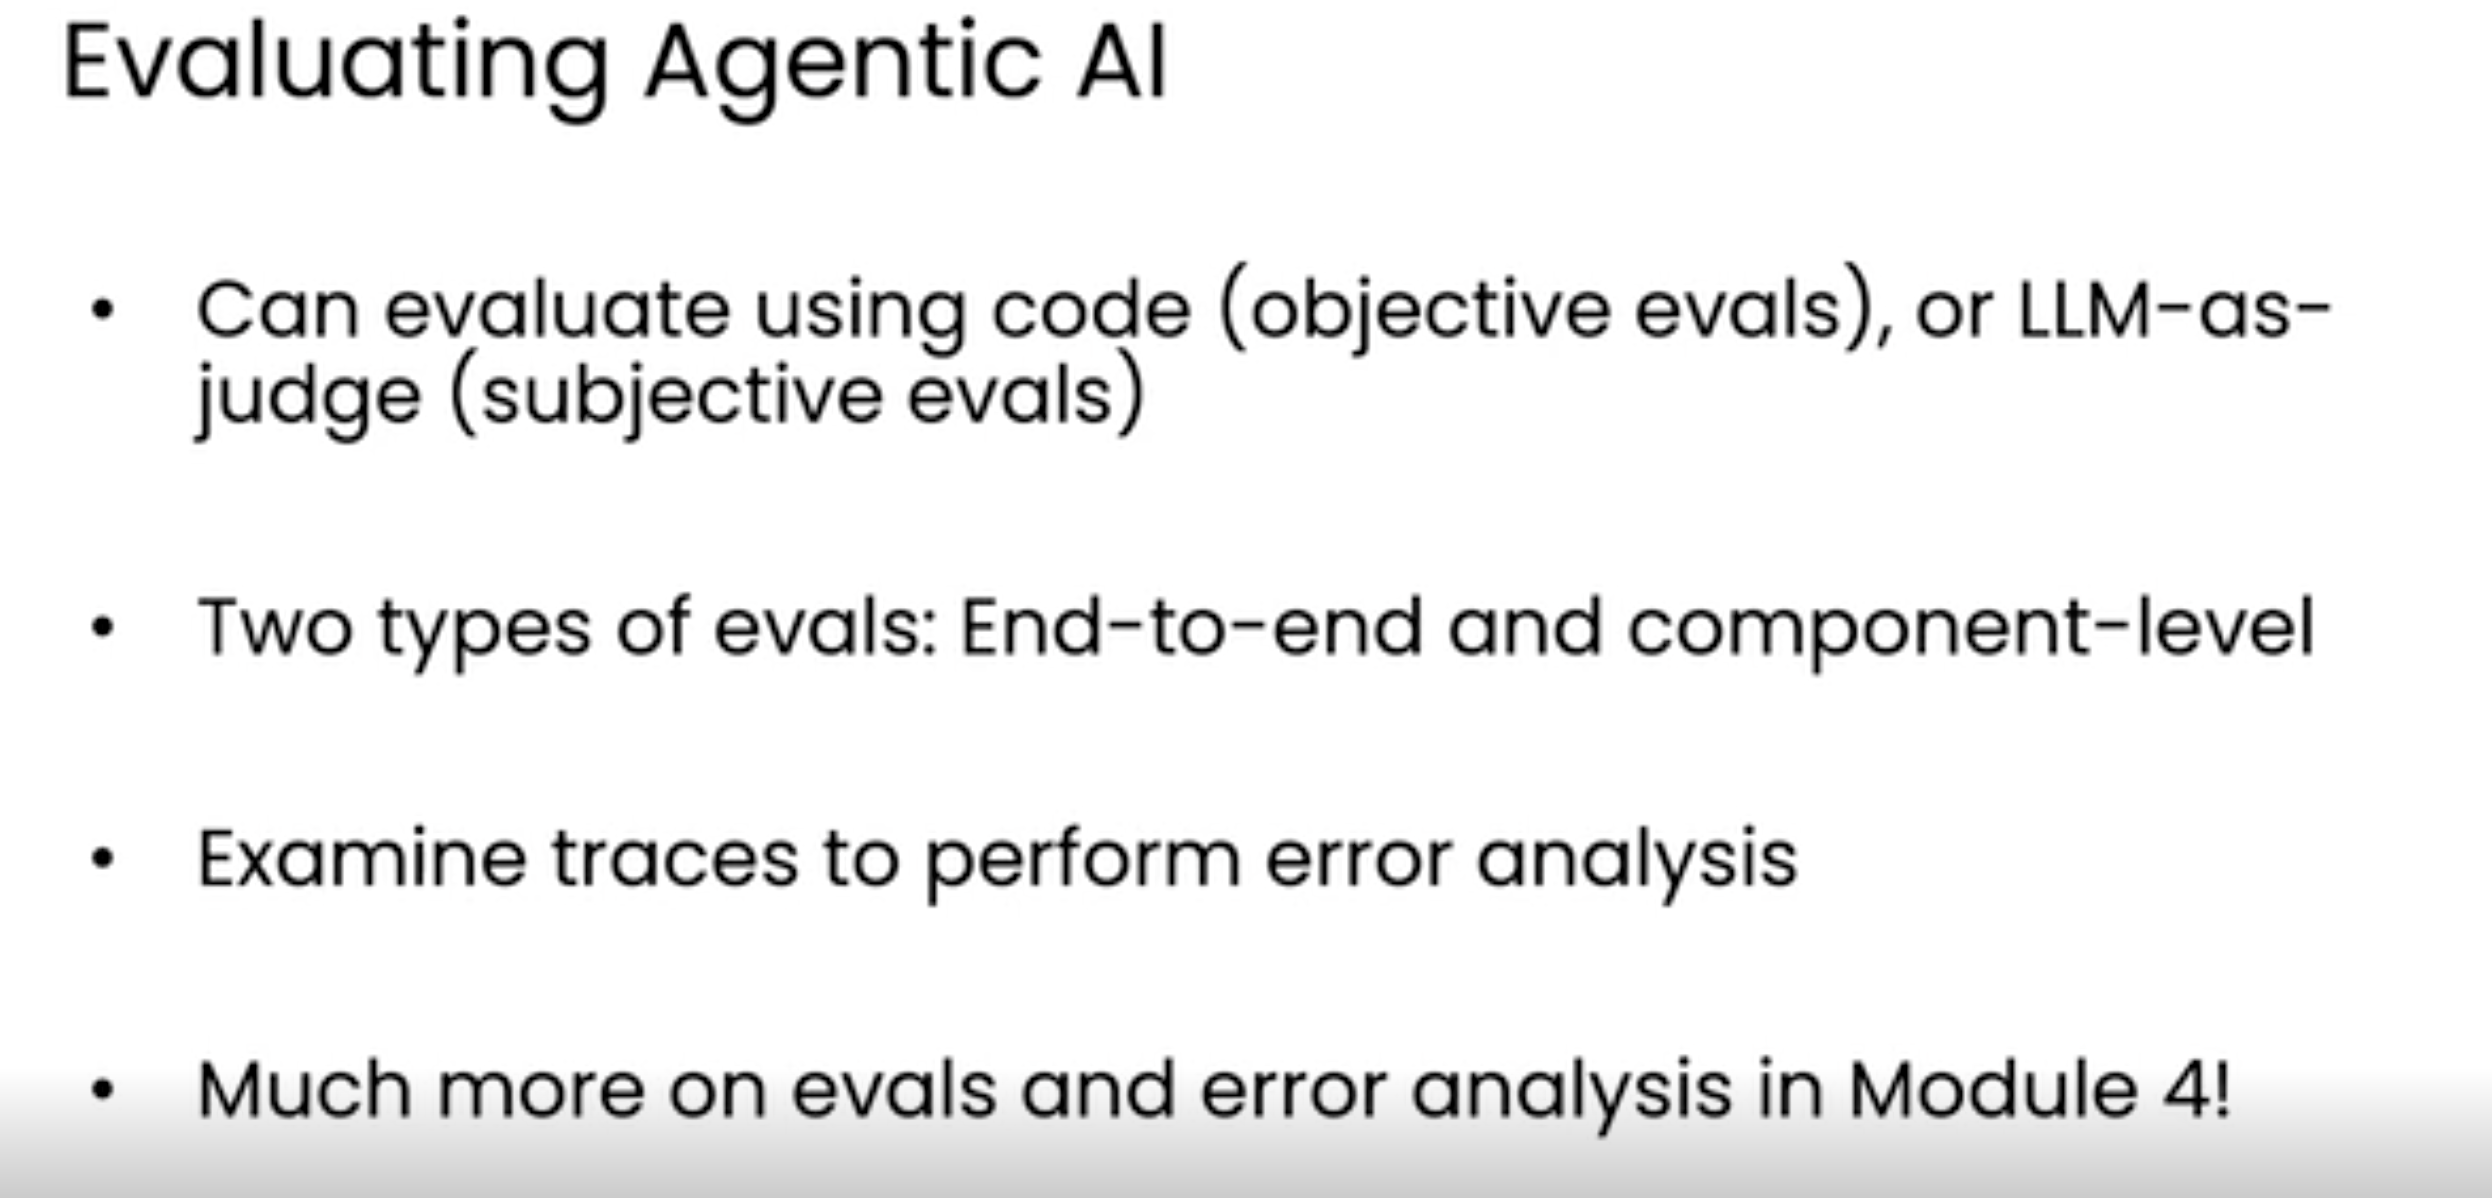
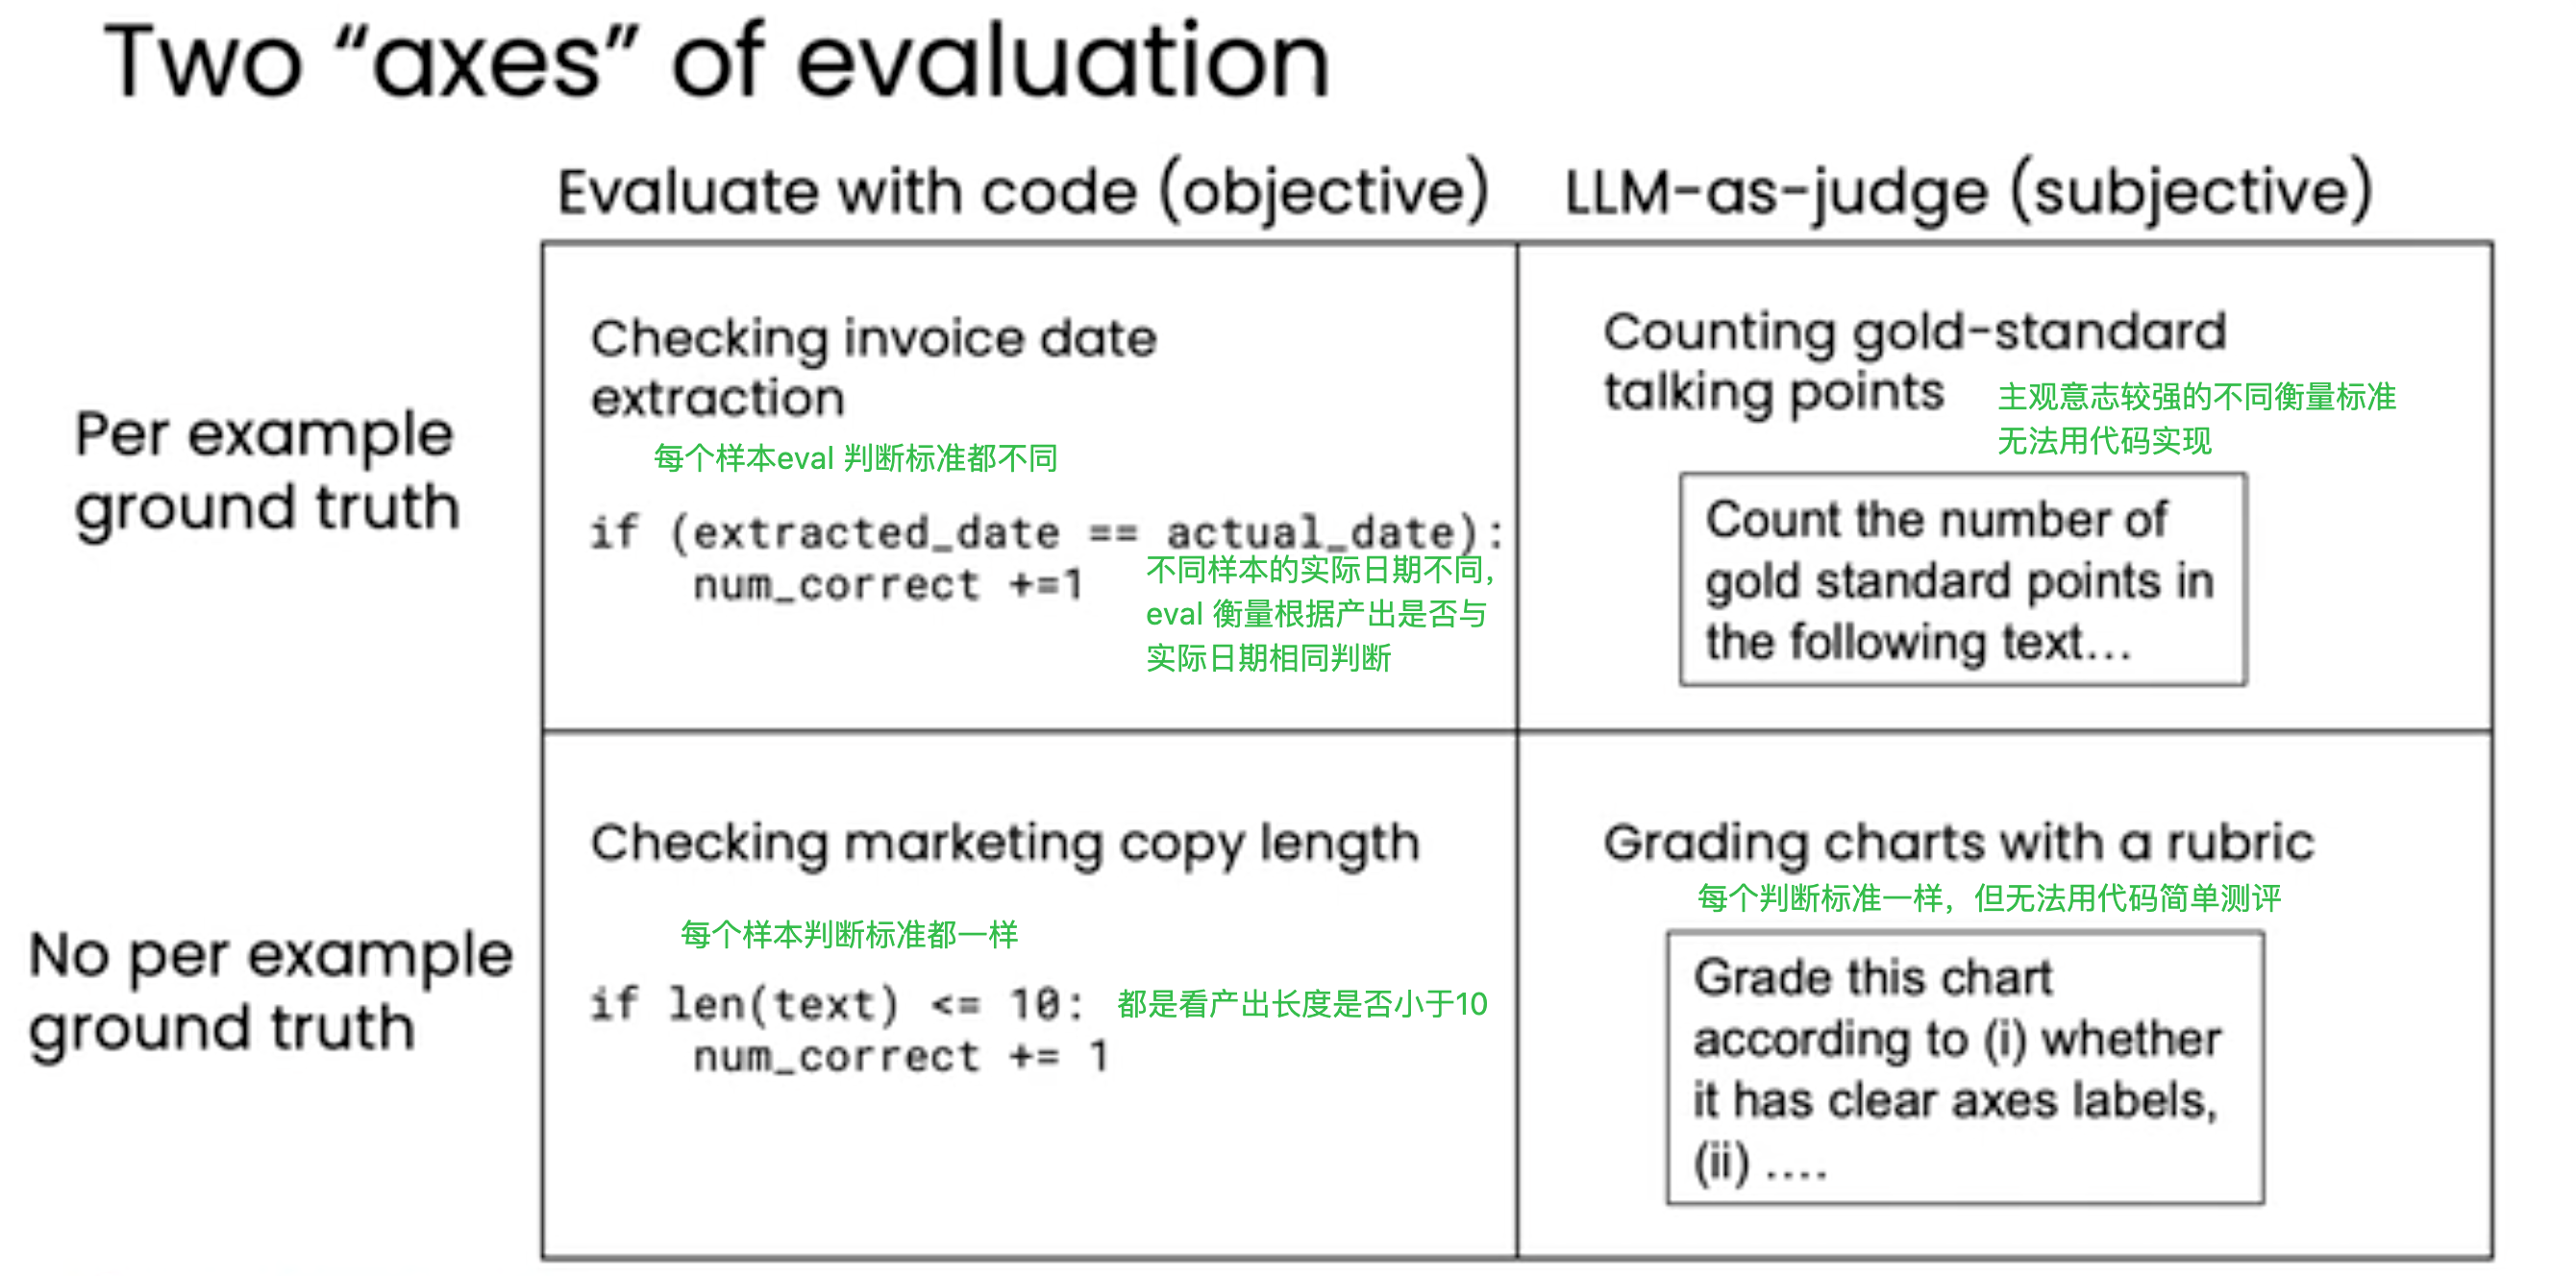
评估方法(Evaluating Agentic AI)

  • Can evaluate using code (objective evals), or LLM-as-judge (subjective evals)
    可通过代码进行客观评估(objective evals),或使用 LLM-as-judge 进行主观评估(subjective evals)
  • Two types of evals: End-to-end and component-level
    两类评估方式:端到端评估(End-to-end)与组件级别评估(component-level)
  • Examine traces to perform error analysis
    通过检查执行链路(traces)来做错误分析
  • Much more on evals and error analysis in Module 4!
    更详细的评估与错误分析内容见 Module 4


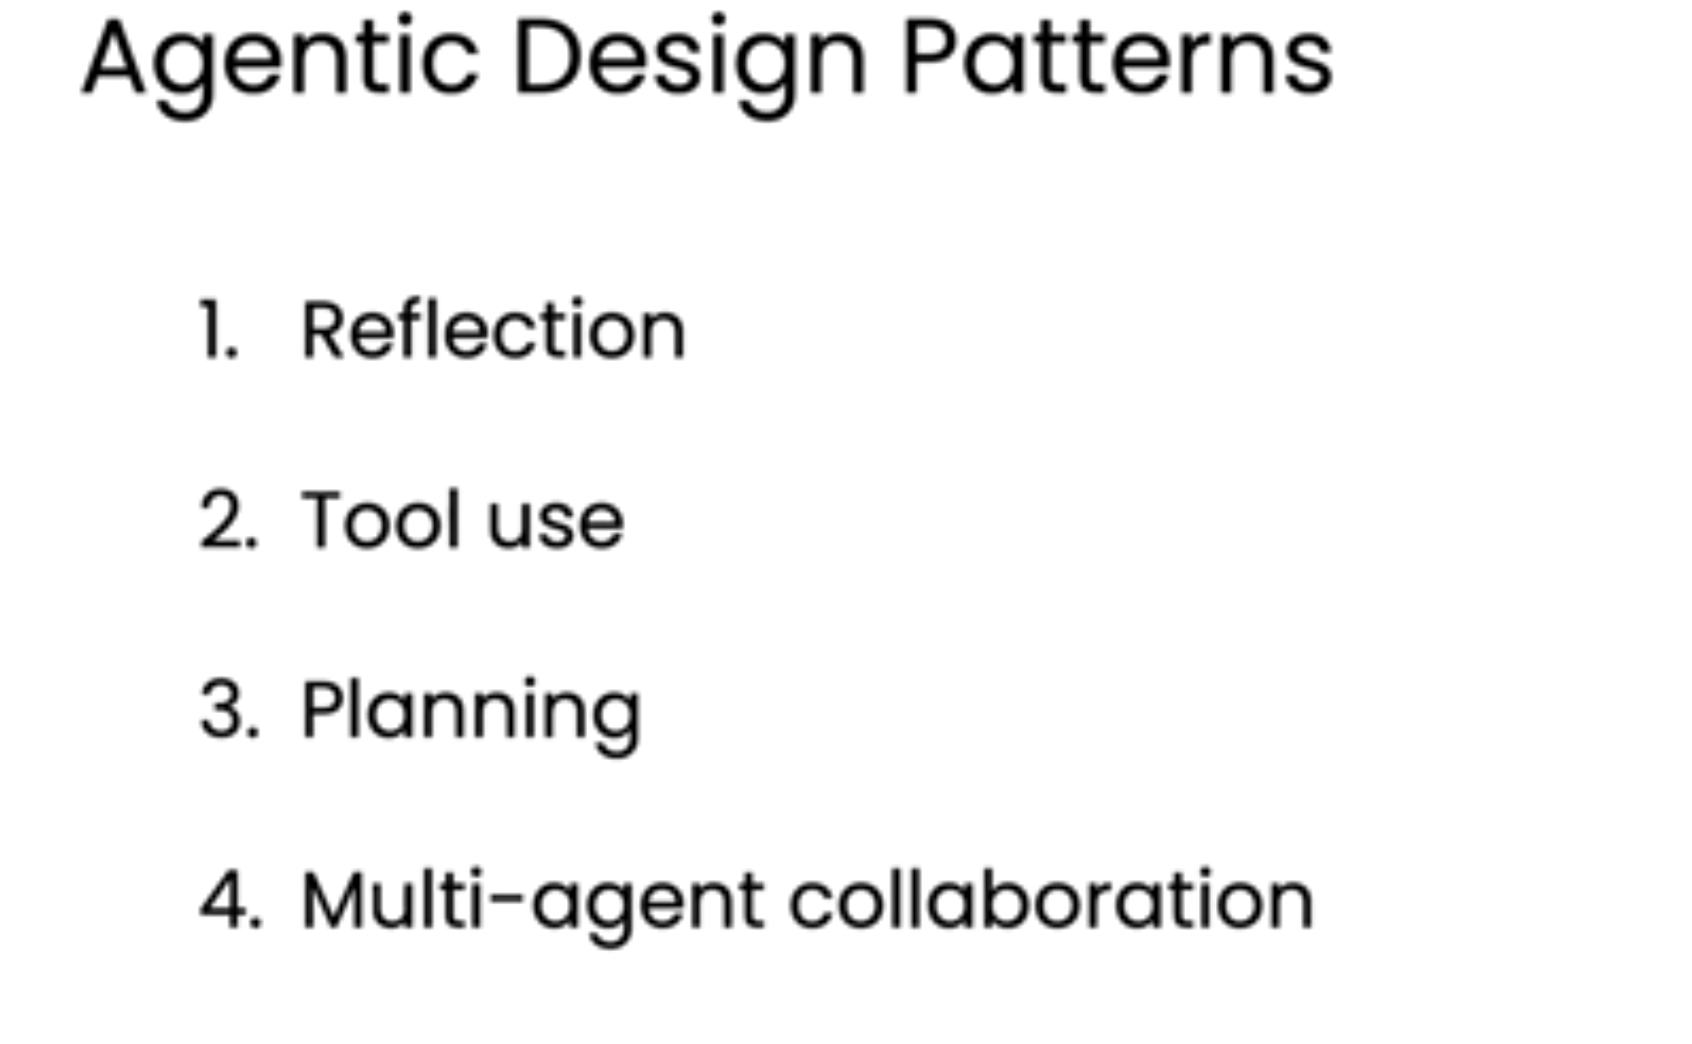
4 种 Agentic 设计模式(Agentic Design Patterns)

  1. Reflection:反思 — Agent 对自身输出进行审视和修正
  2. Tool use:工具使用 — 调用外部工具/函数扩展能力
  3. Planning:规划 — 将复杂任务拆解为有序步骤并逐步执行
  4. Multi-agent collaboration:多 Agent 协作 — 多个 Agent 协同工作,提升效果与速度

reflection

针对zero-shot prompting 的 LLM 模型,Agentic AI 可以通过reflection模式来改进自身输出。


实验1:输出-反馈-优化-产出
实验2:输出-反馈(with more 输出信息/对输出结果的校验分析)-优化-产出

Evaluating reflection(评估 Reflection)

  • Objective evals(客观评估)

    • Code-based evals are easier — 基于代码的评估更容易执行
    • Build a dataset of ground truth examples — 构建真实标注(ground truth)示例数据集
  • Subjective evals(主观评估)

    • Use LLM as a judge — 使用 LLM 作为评审者
    • Rubric-based grading is better — 基于评分规则(rubric)的打分方式效果更好

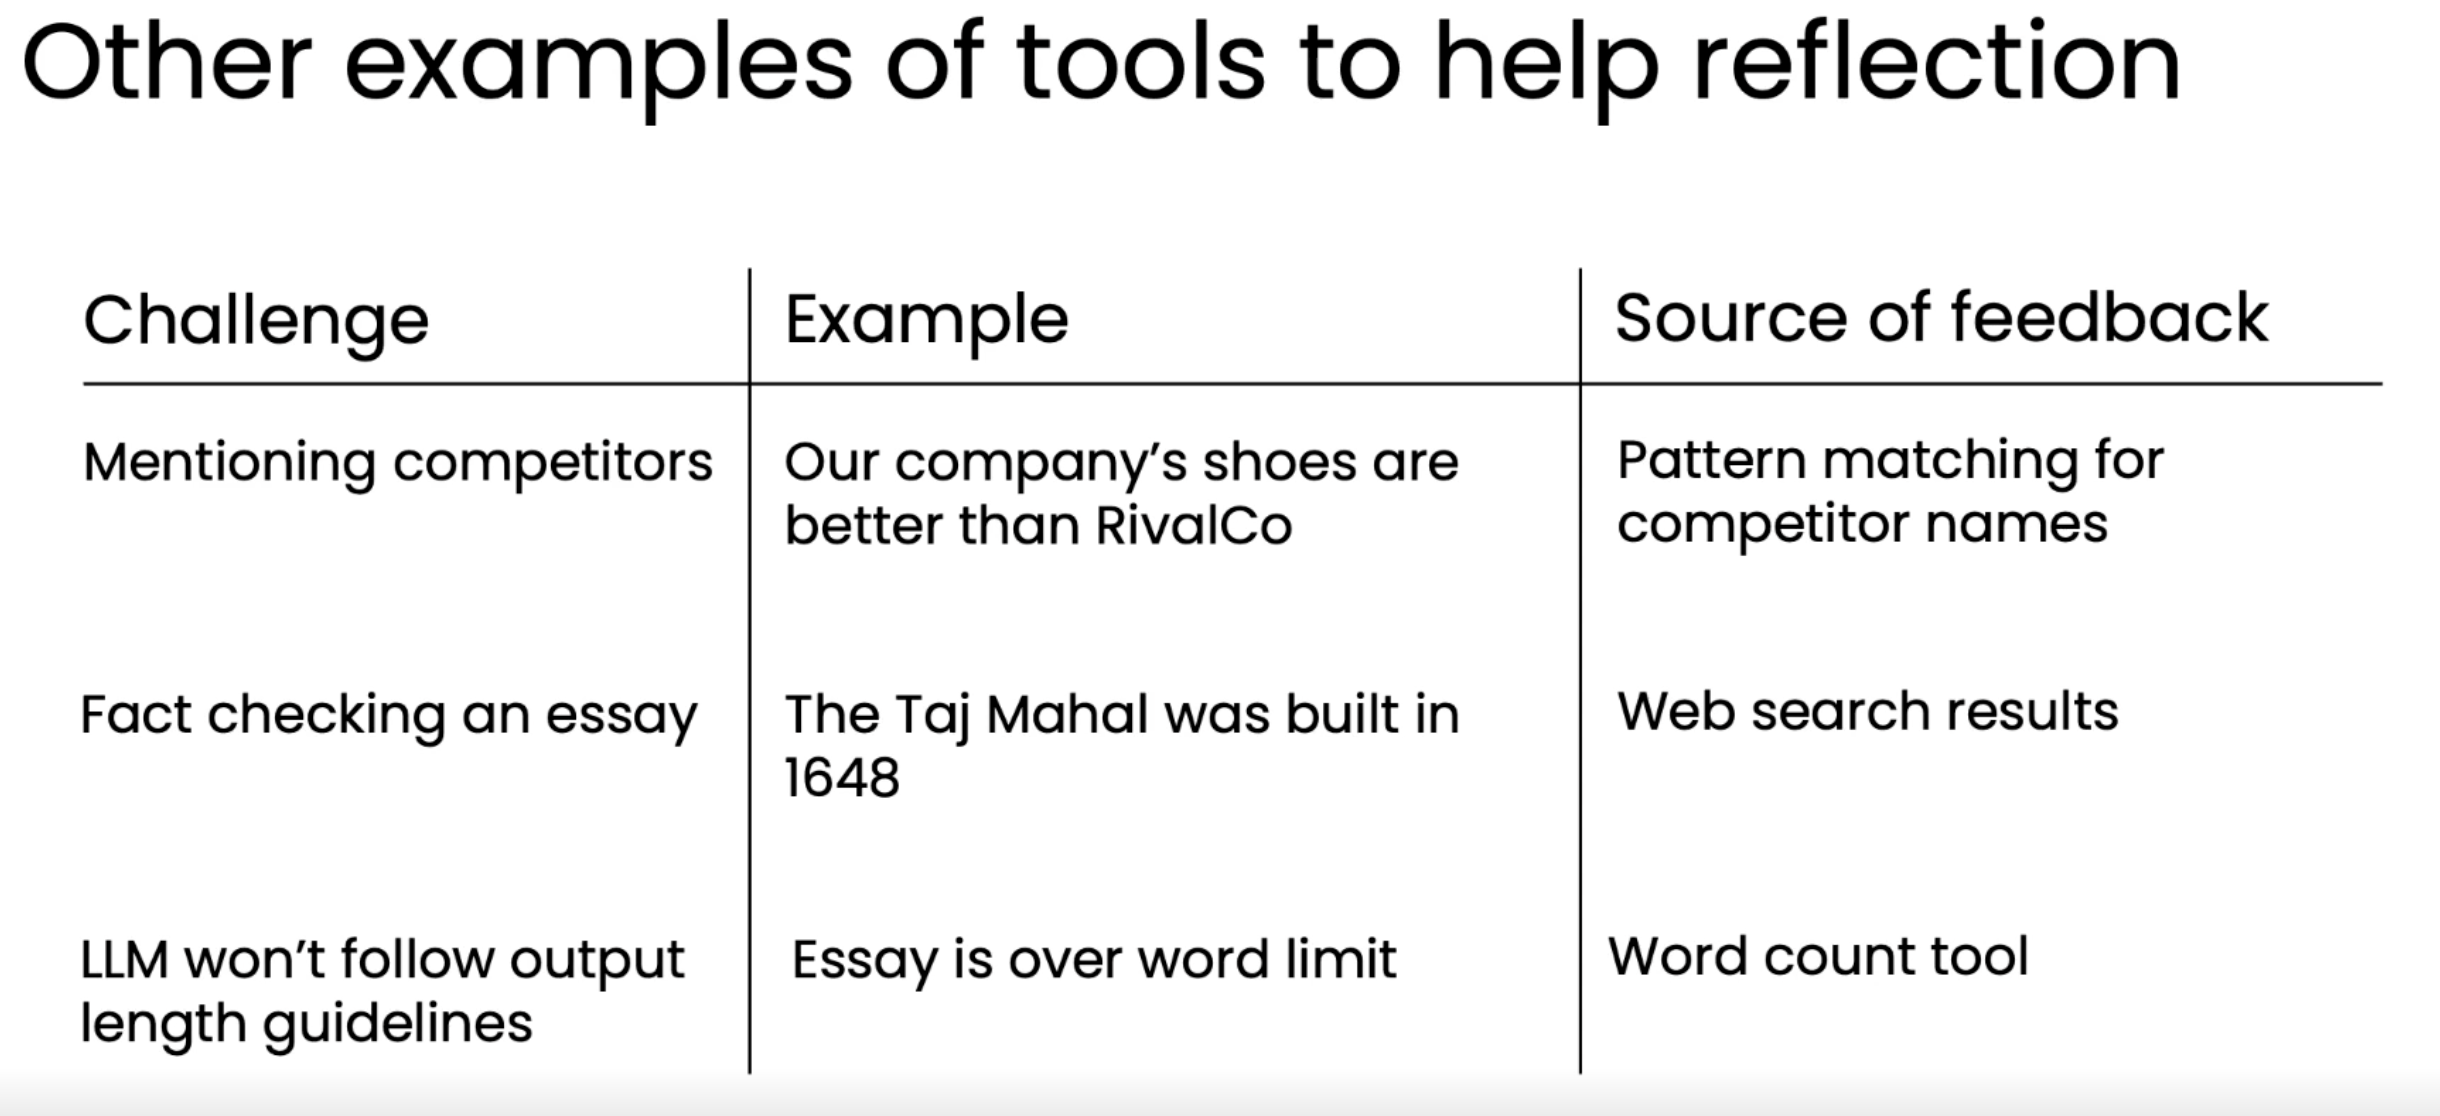
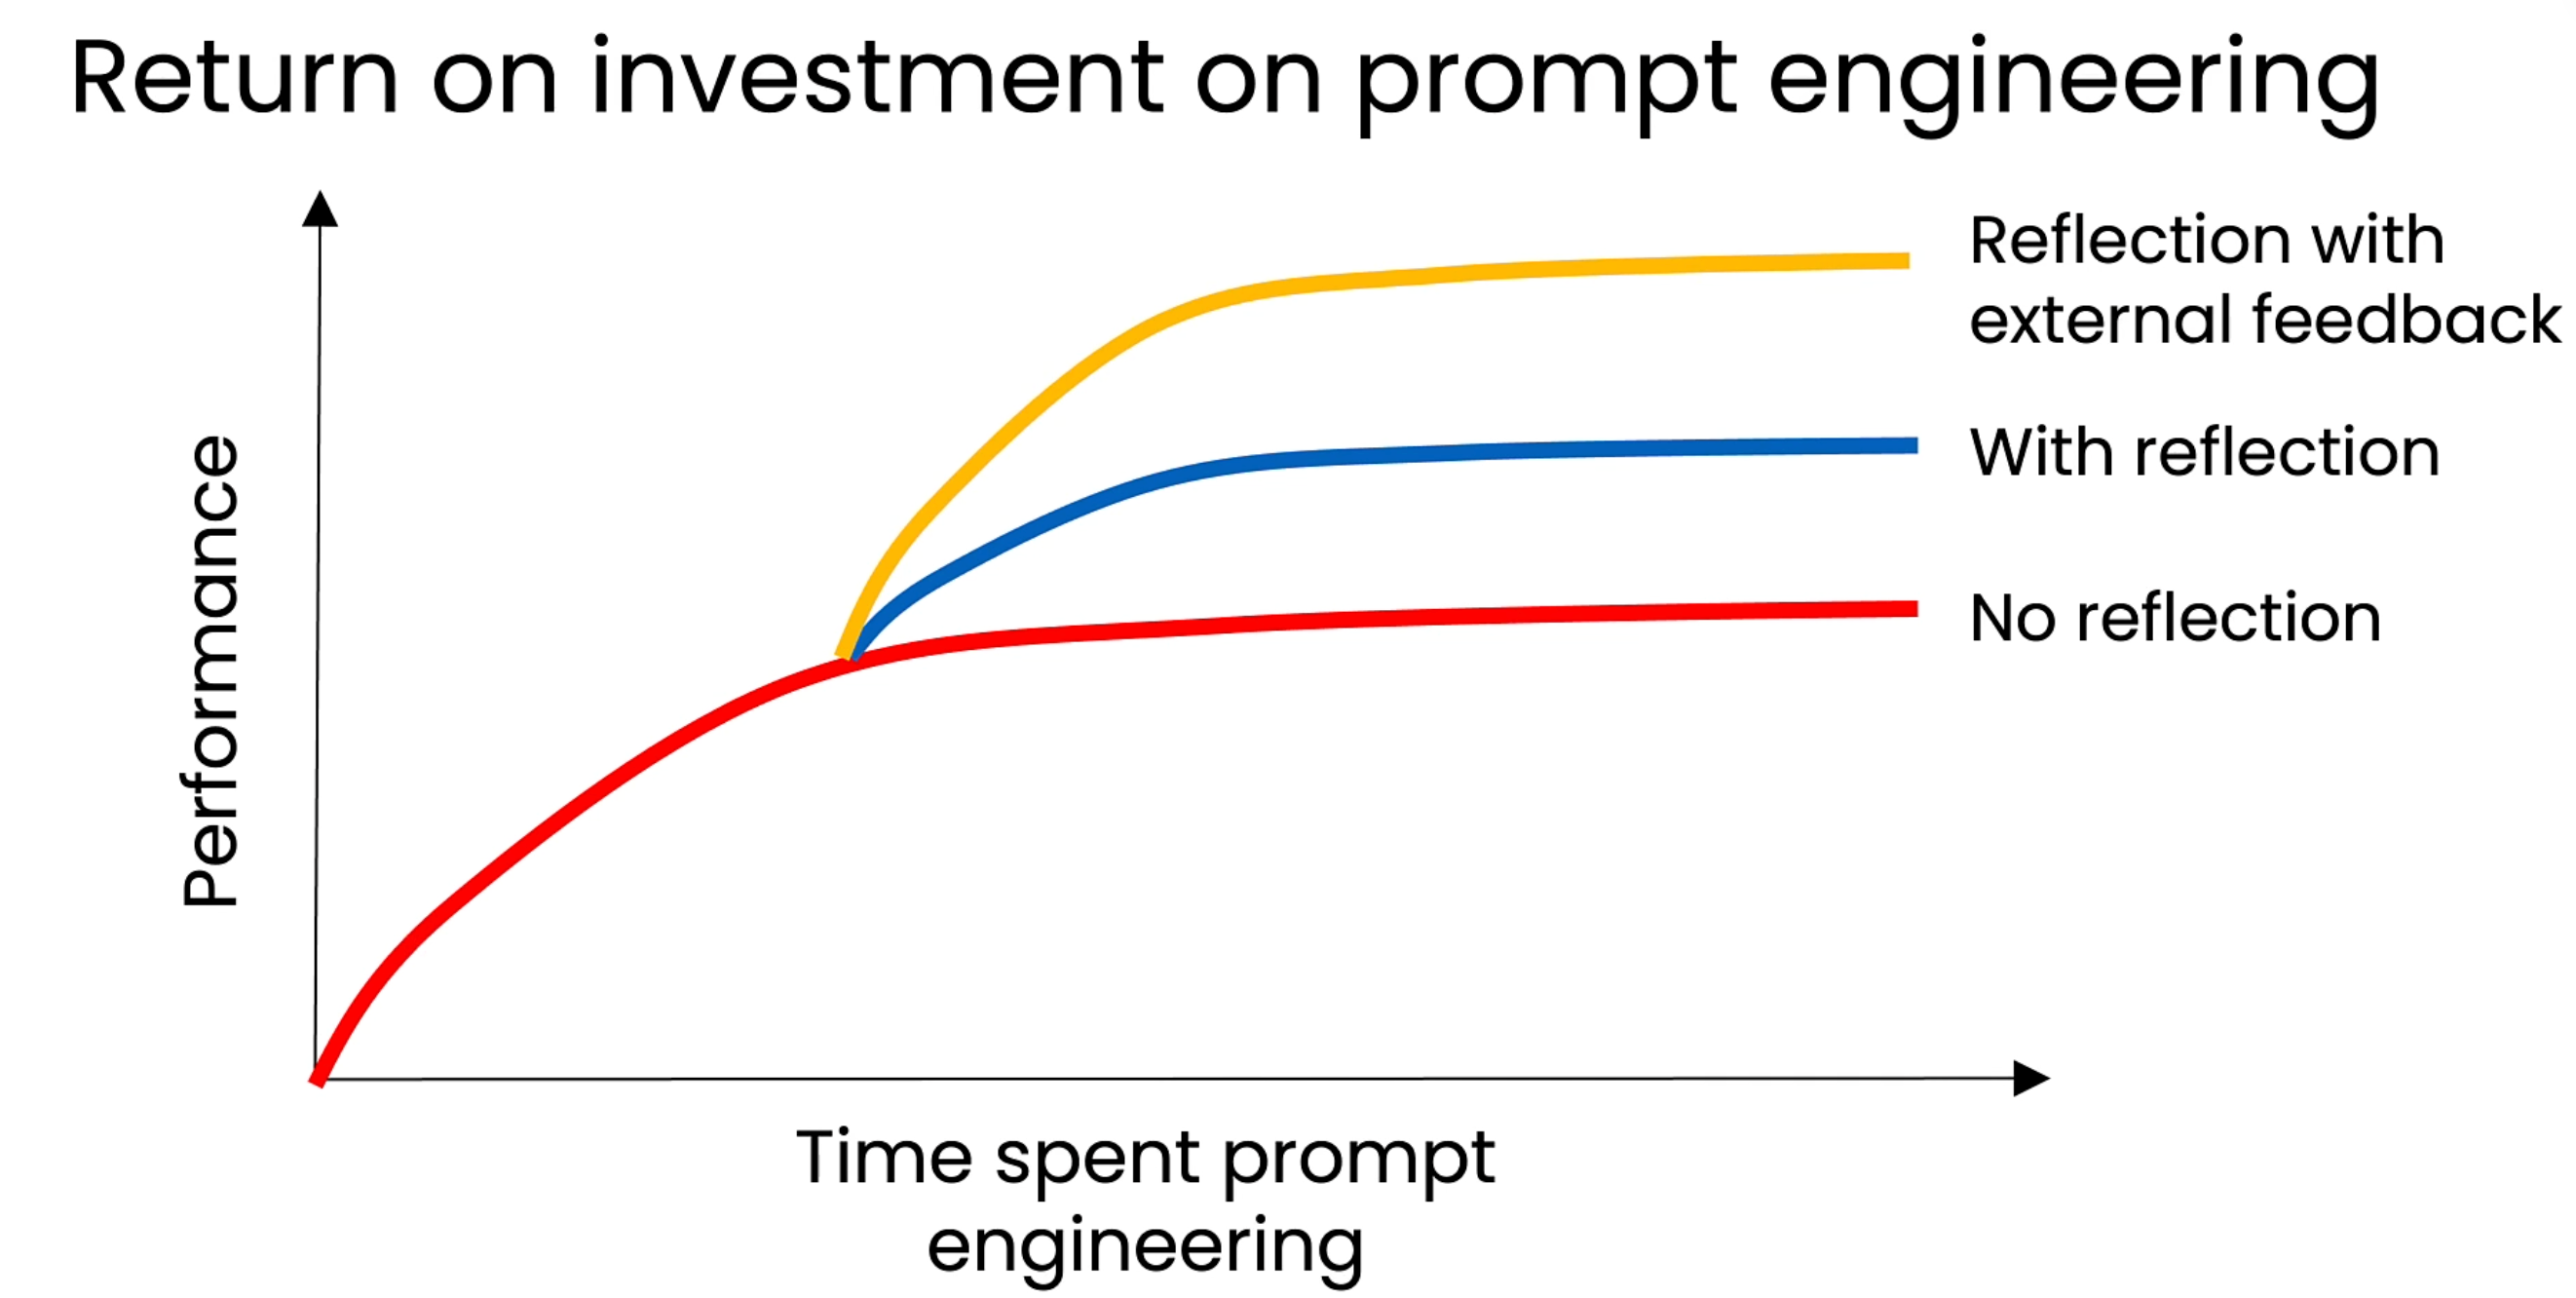
with external feedback

可以借助外部工具进行校验进一步改善reflection效果。

tool use (function calling)

实验1 简单调用 从一个工具到多个工具
实验2 function calling 当做tool用

planning

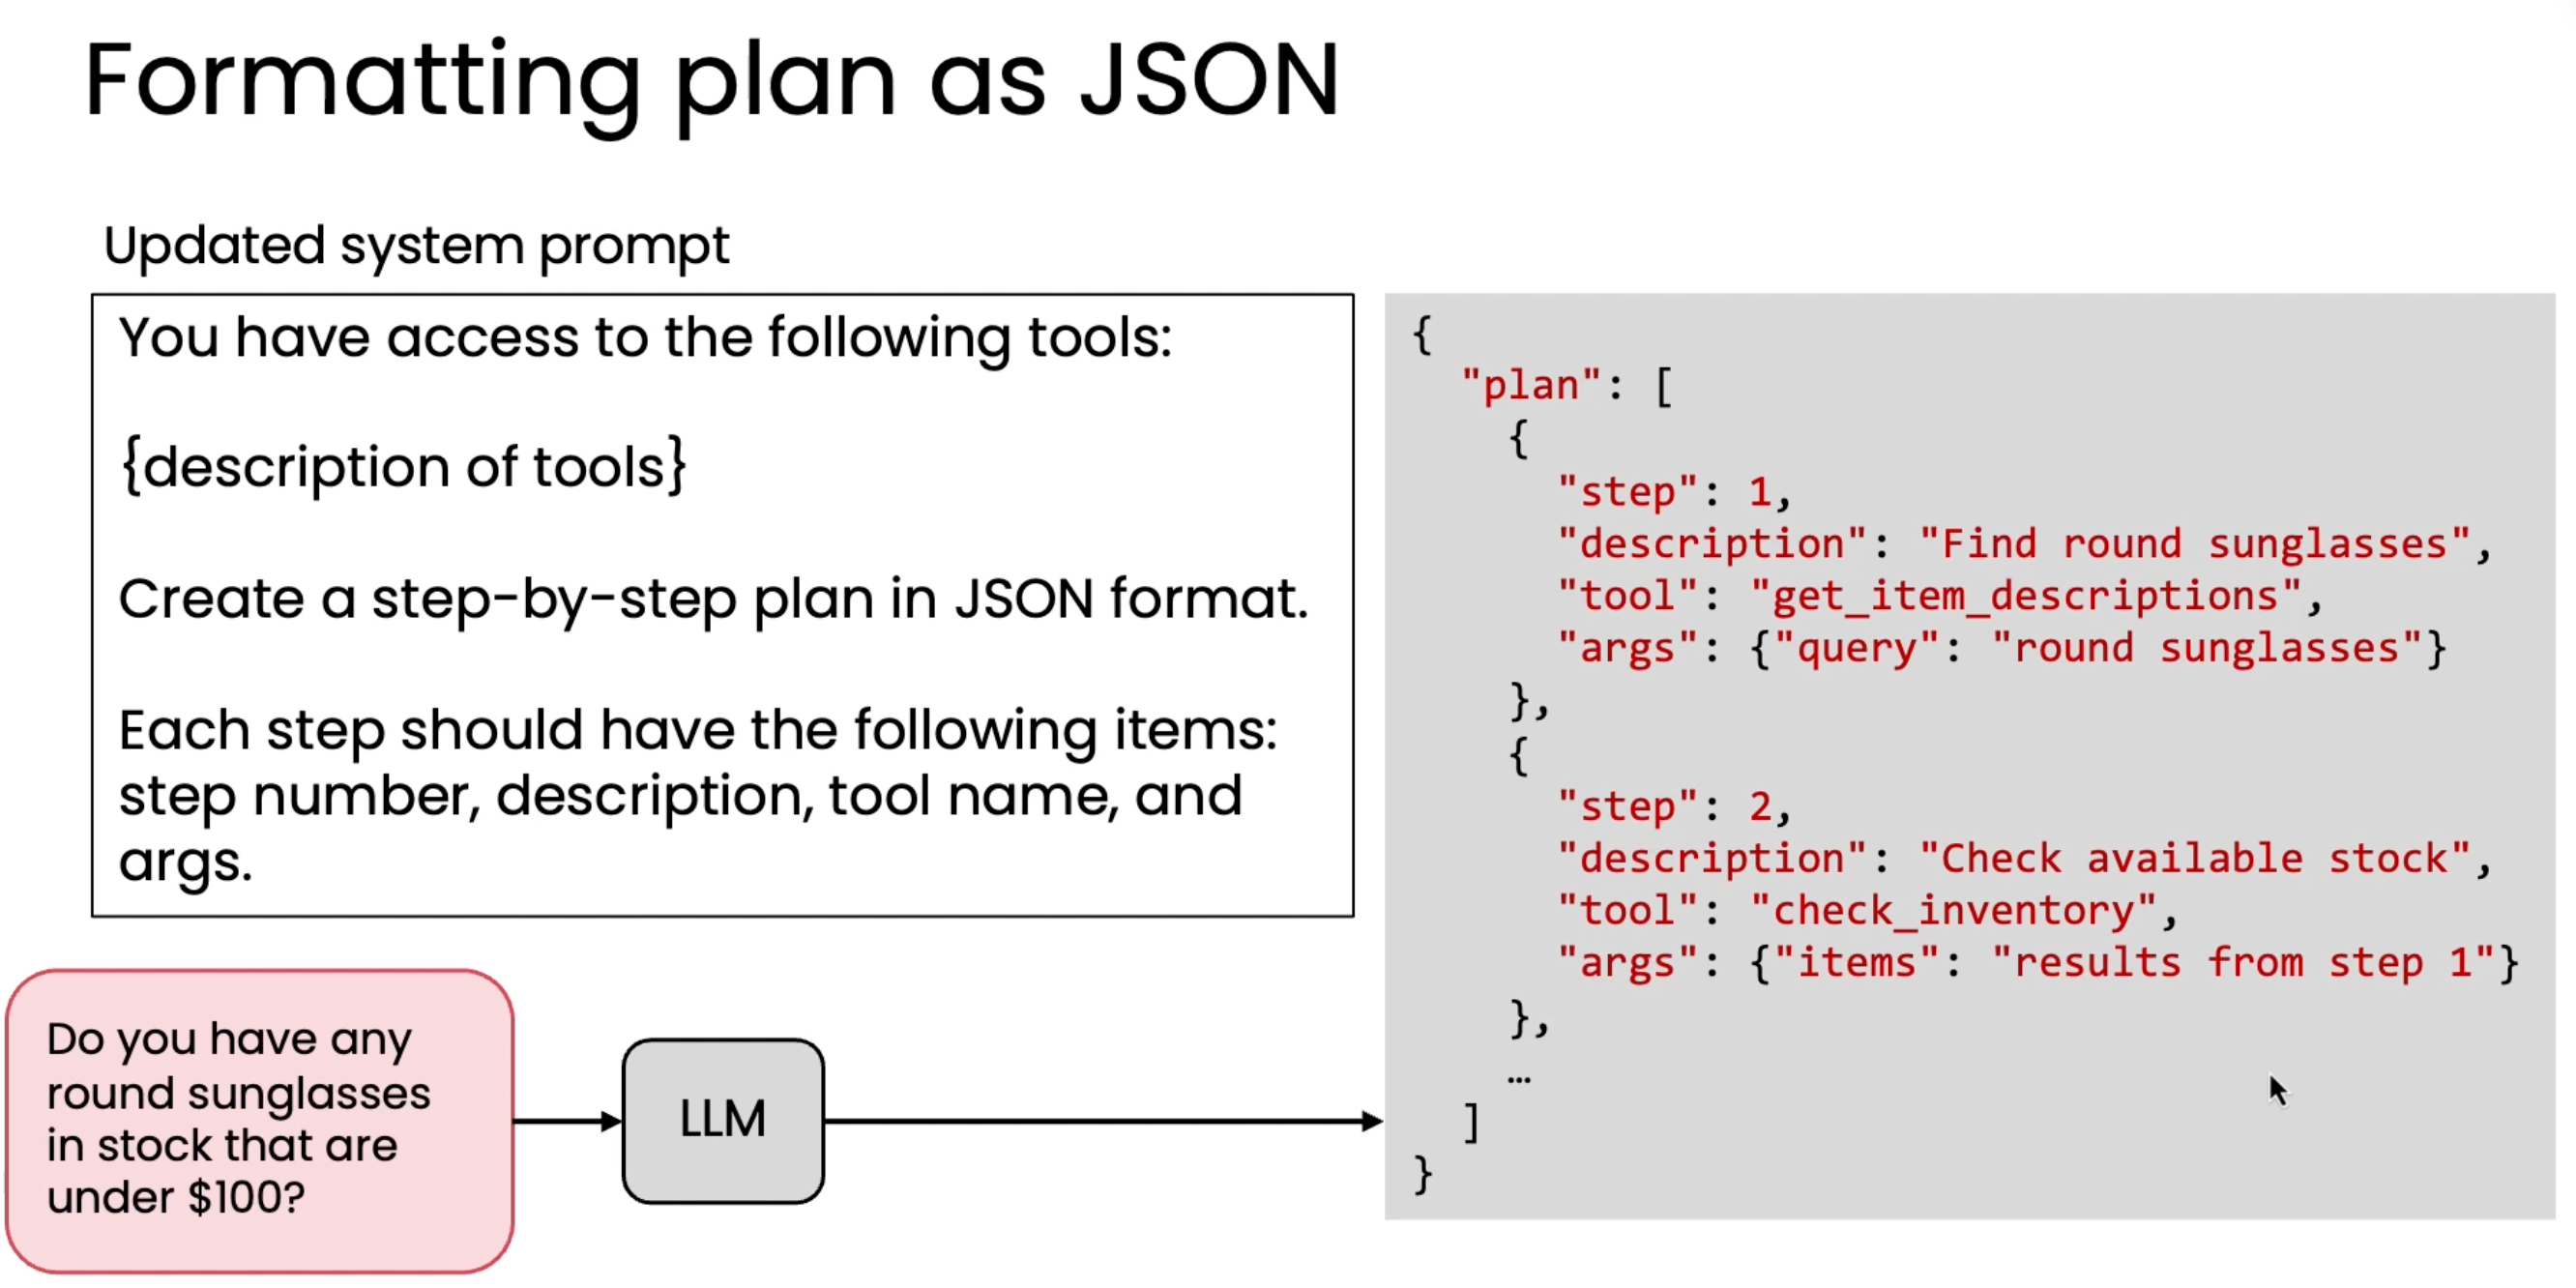
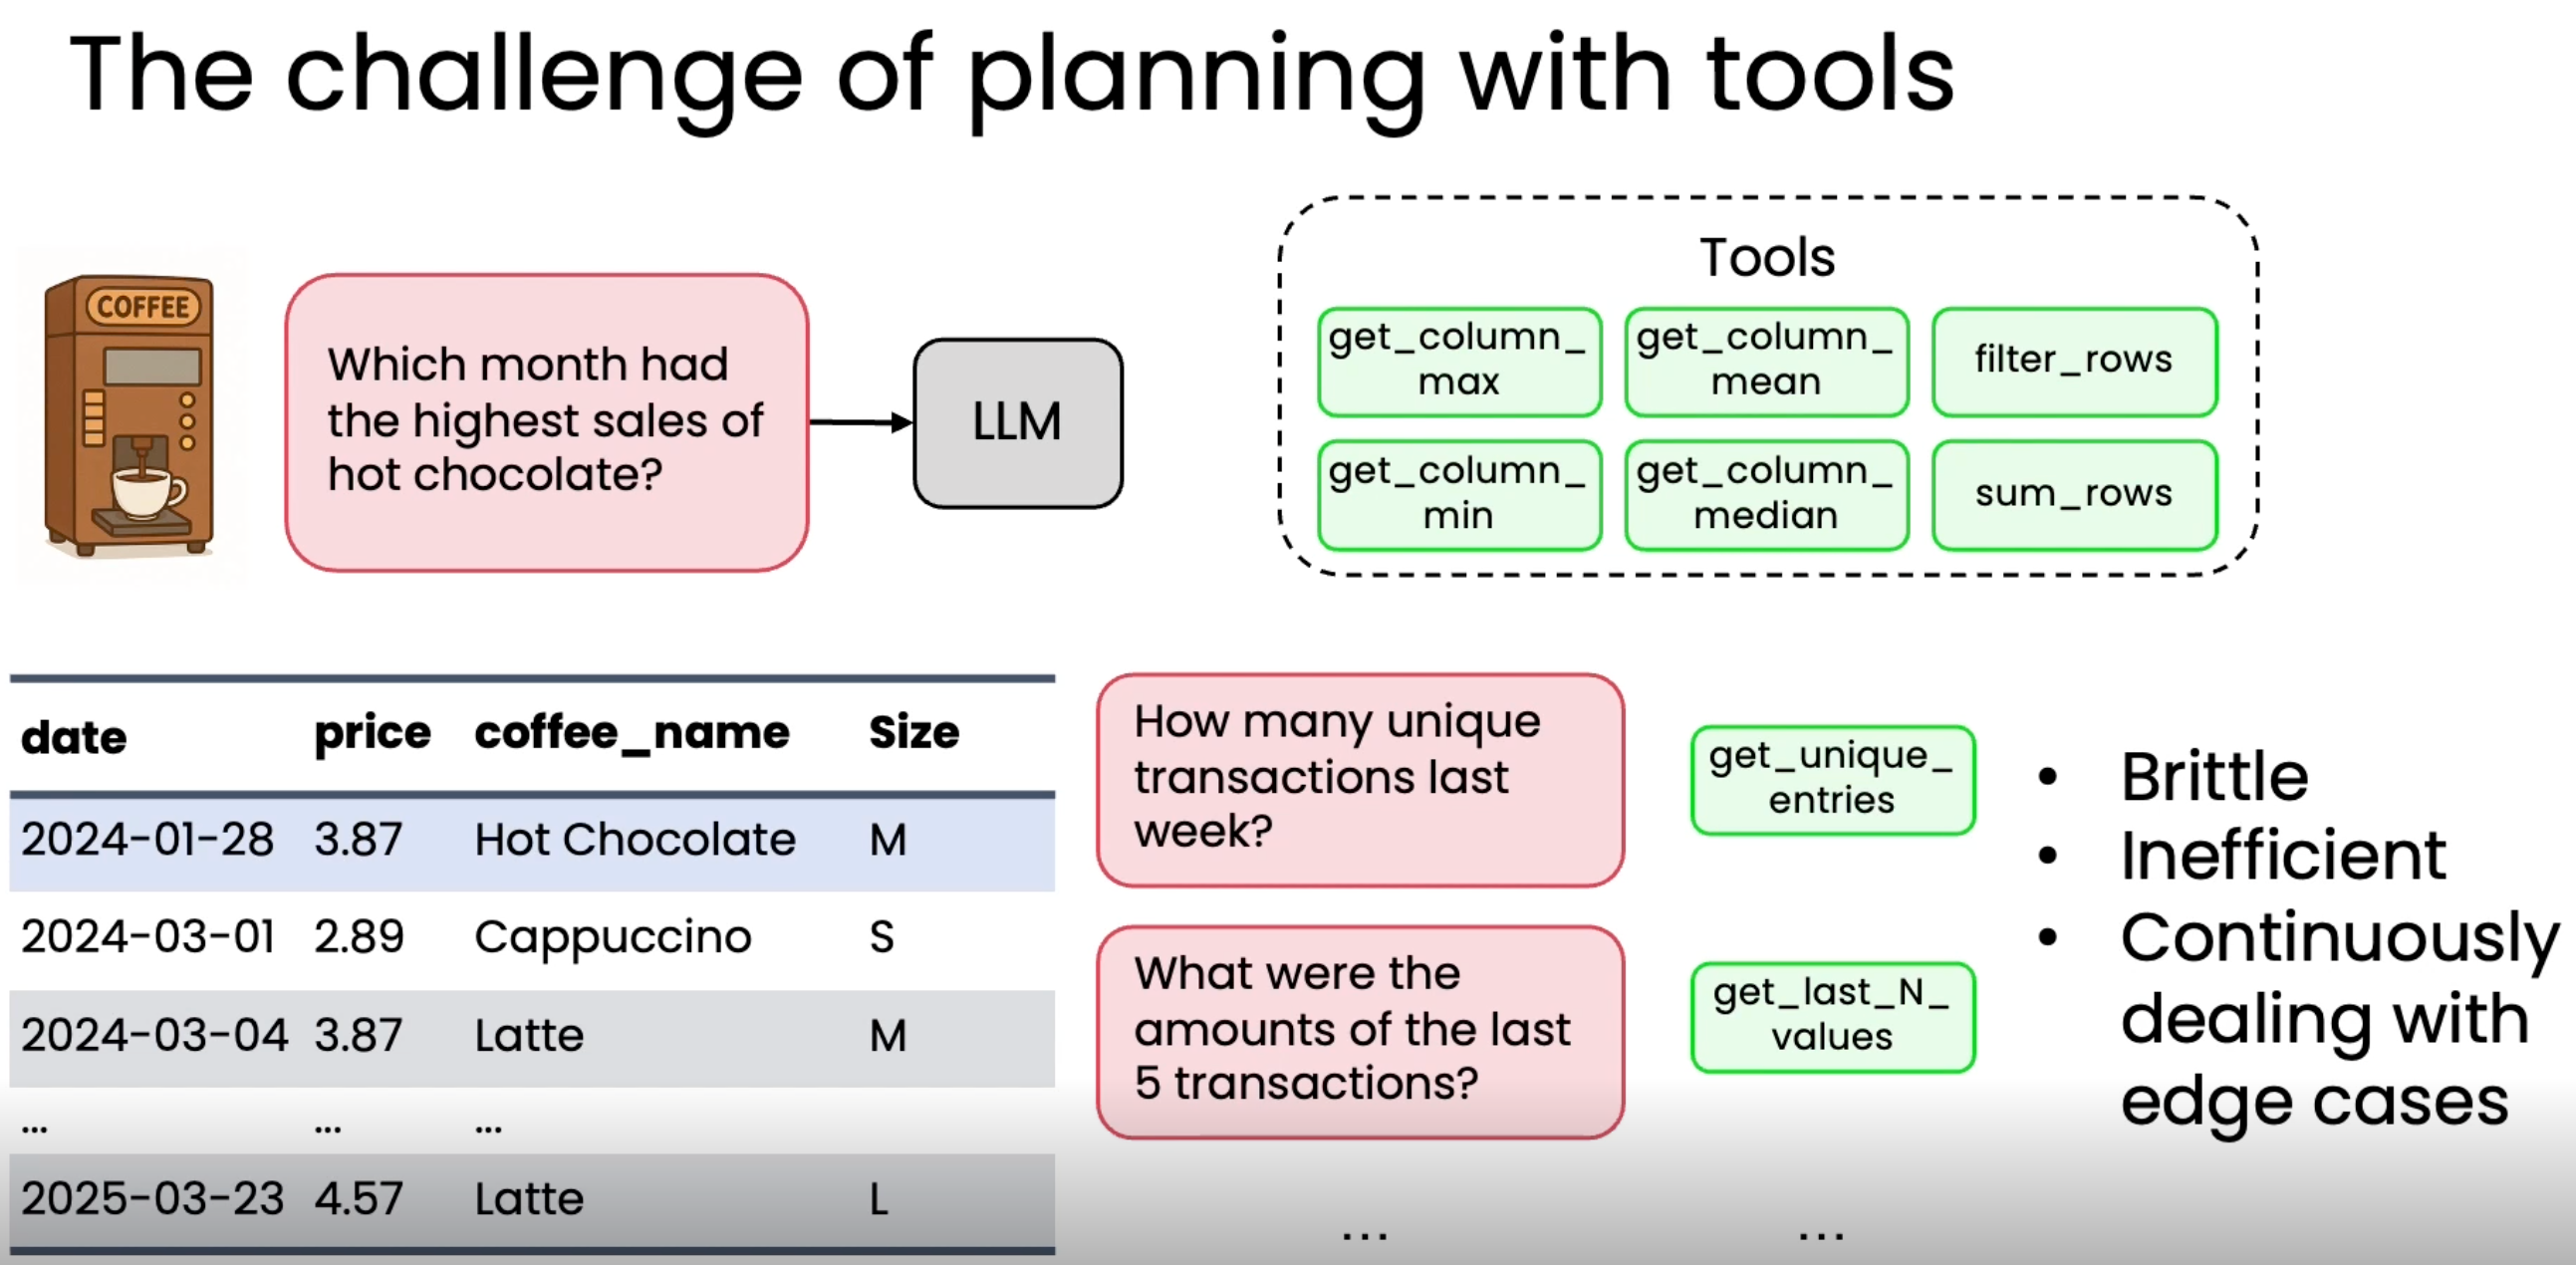
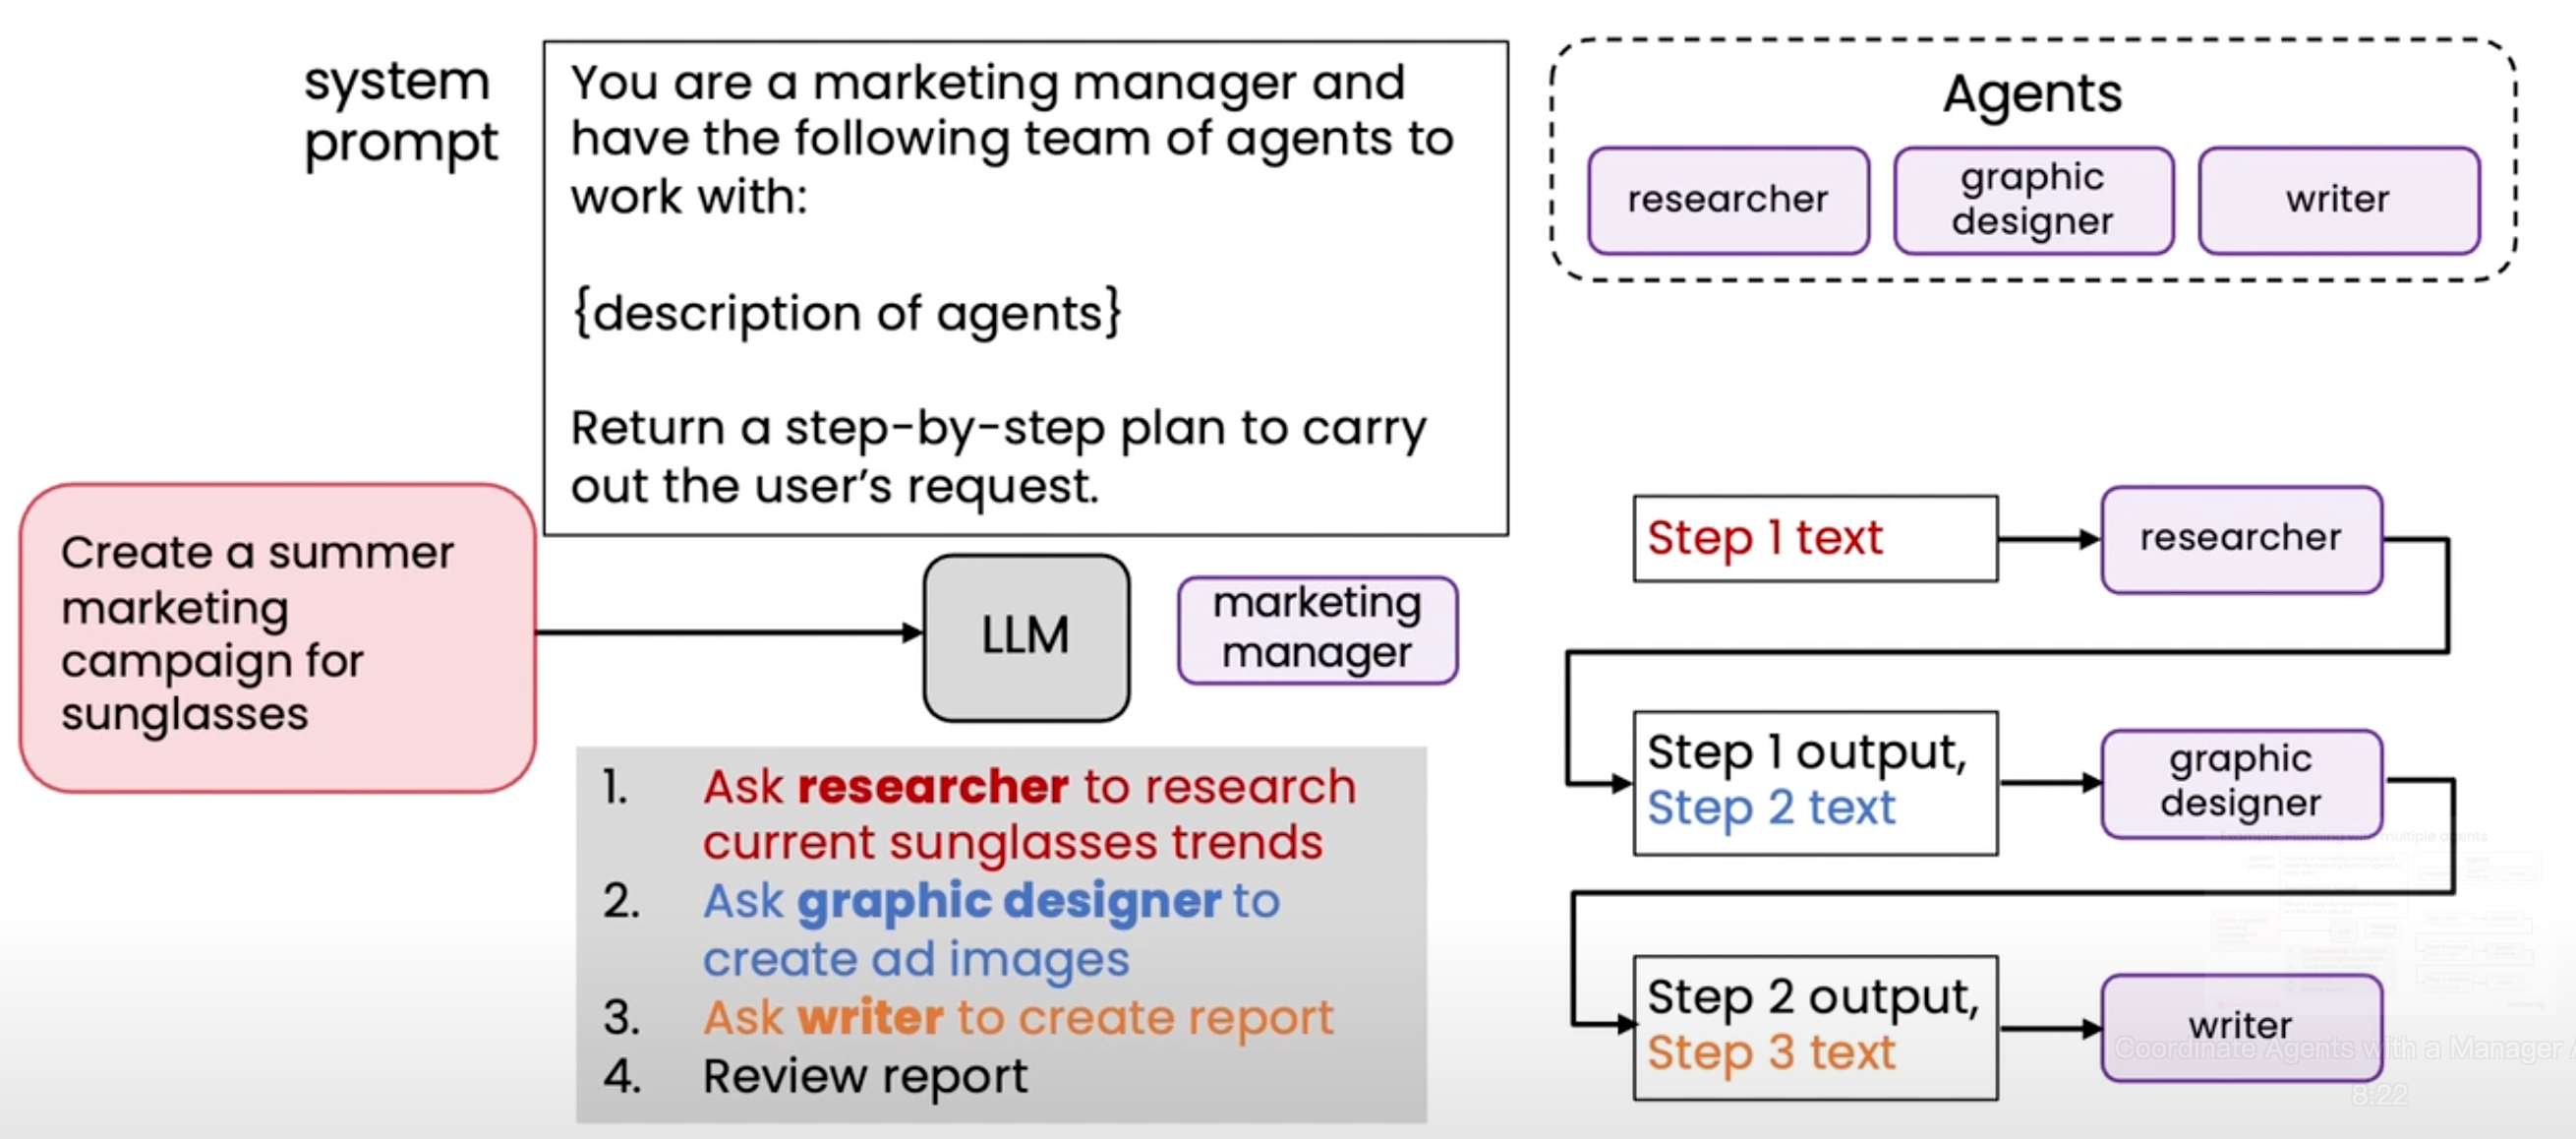
避免提前进行工作流硬编码,使整个流程更具有通用性,以及实现更高层次的任务处理,可以通过大模型根据用户问题,自行规划任务,所有操作被整理成一系列步骤,然后让大语言模型来执行这些任务
任务list 的表示形式可以为json, xml, markdown 等 语法格式,方便后续的解析和执行。

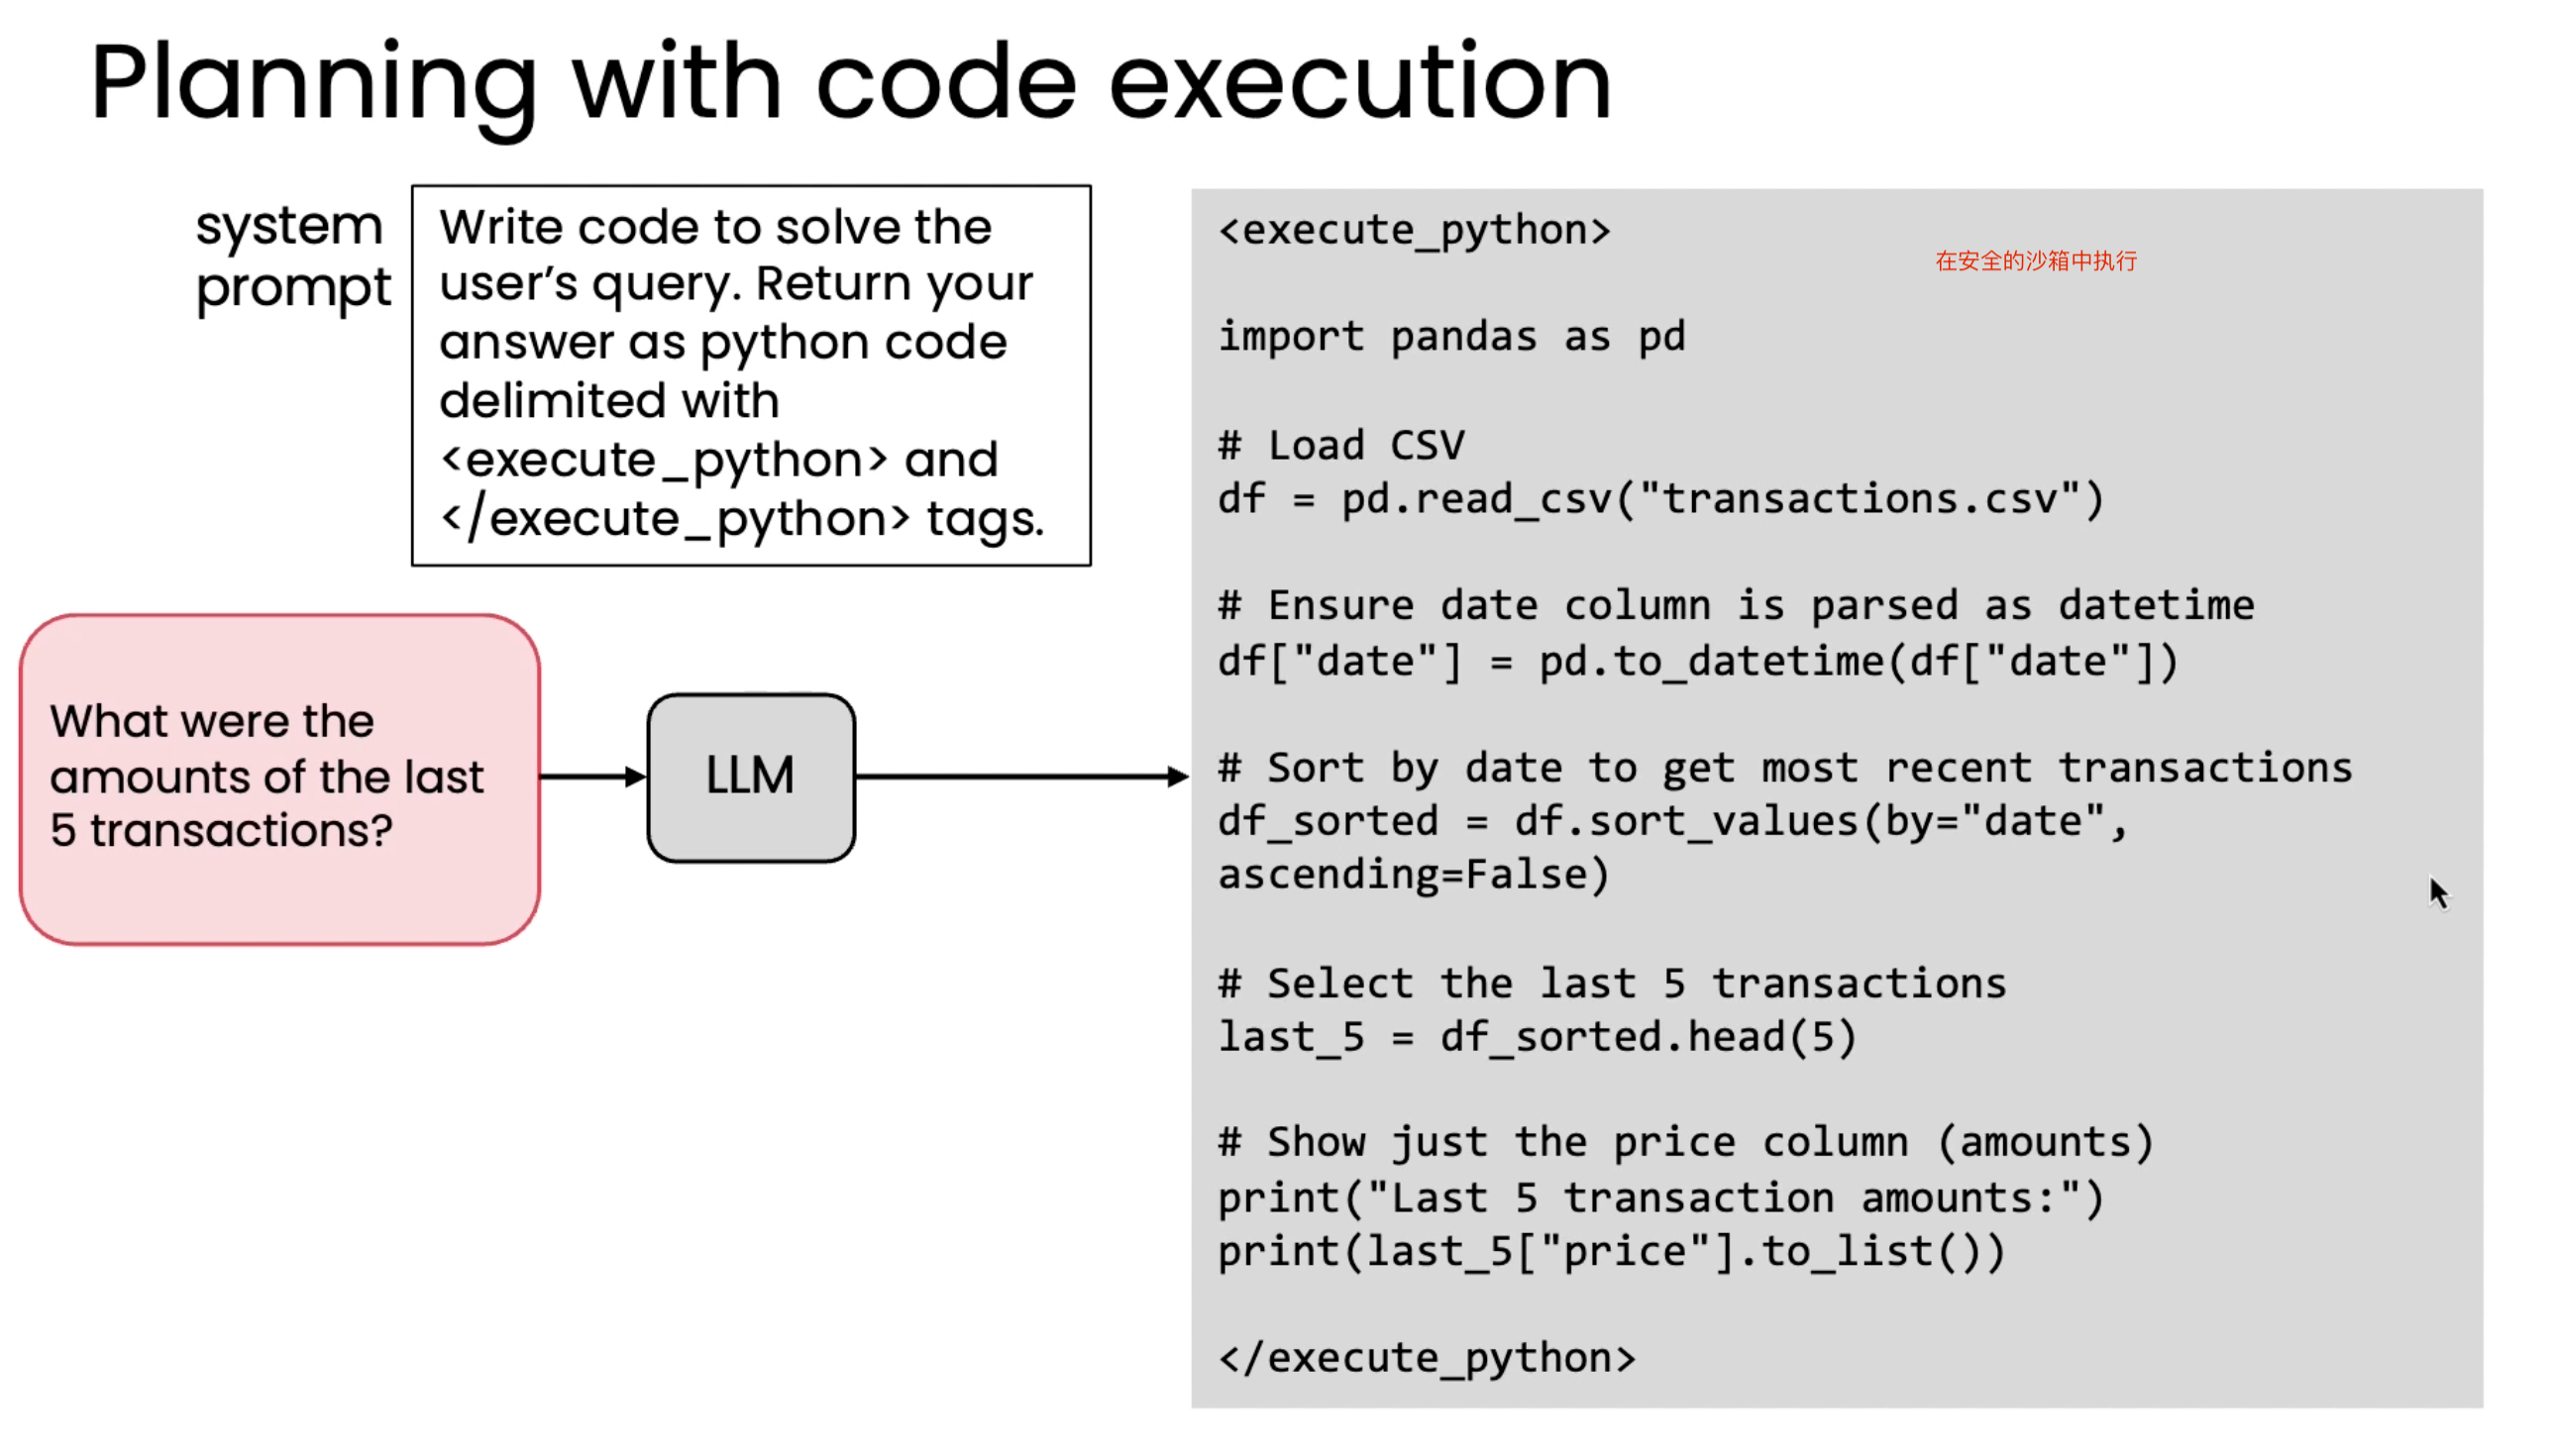
为避免因为planning 的多样性造成不同步骤都需要提供步骤使用的特定tool 工具,可以尝试让llm 自行进行代码编写和执行
从一个步骤调一个工具函数,转变成让llm 实现一个函数,函数中通过代码一步一步进行任务步骤实现

实验:规划任务-编写代码-执行任务

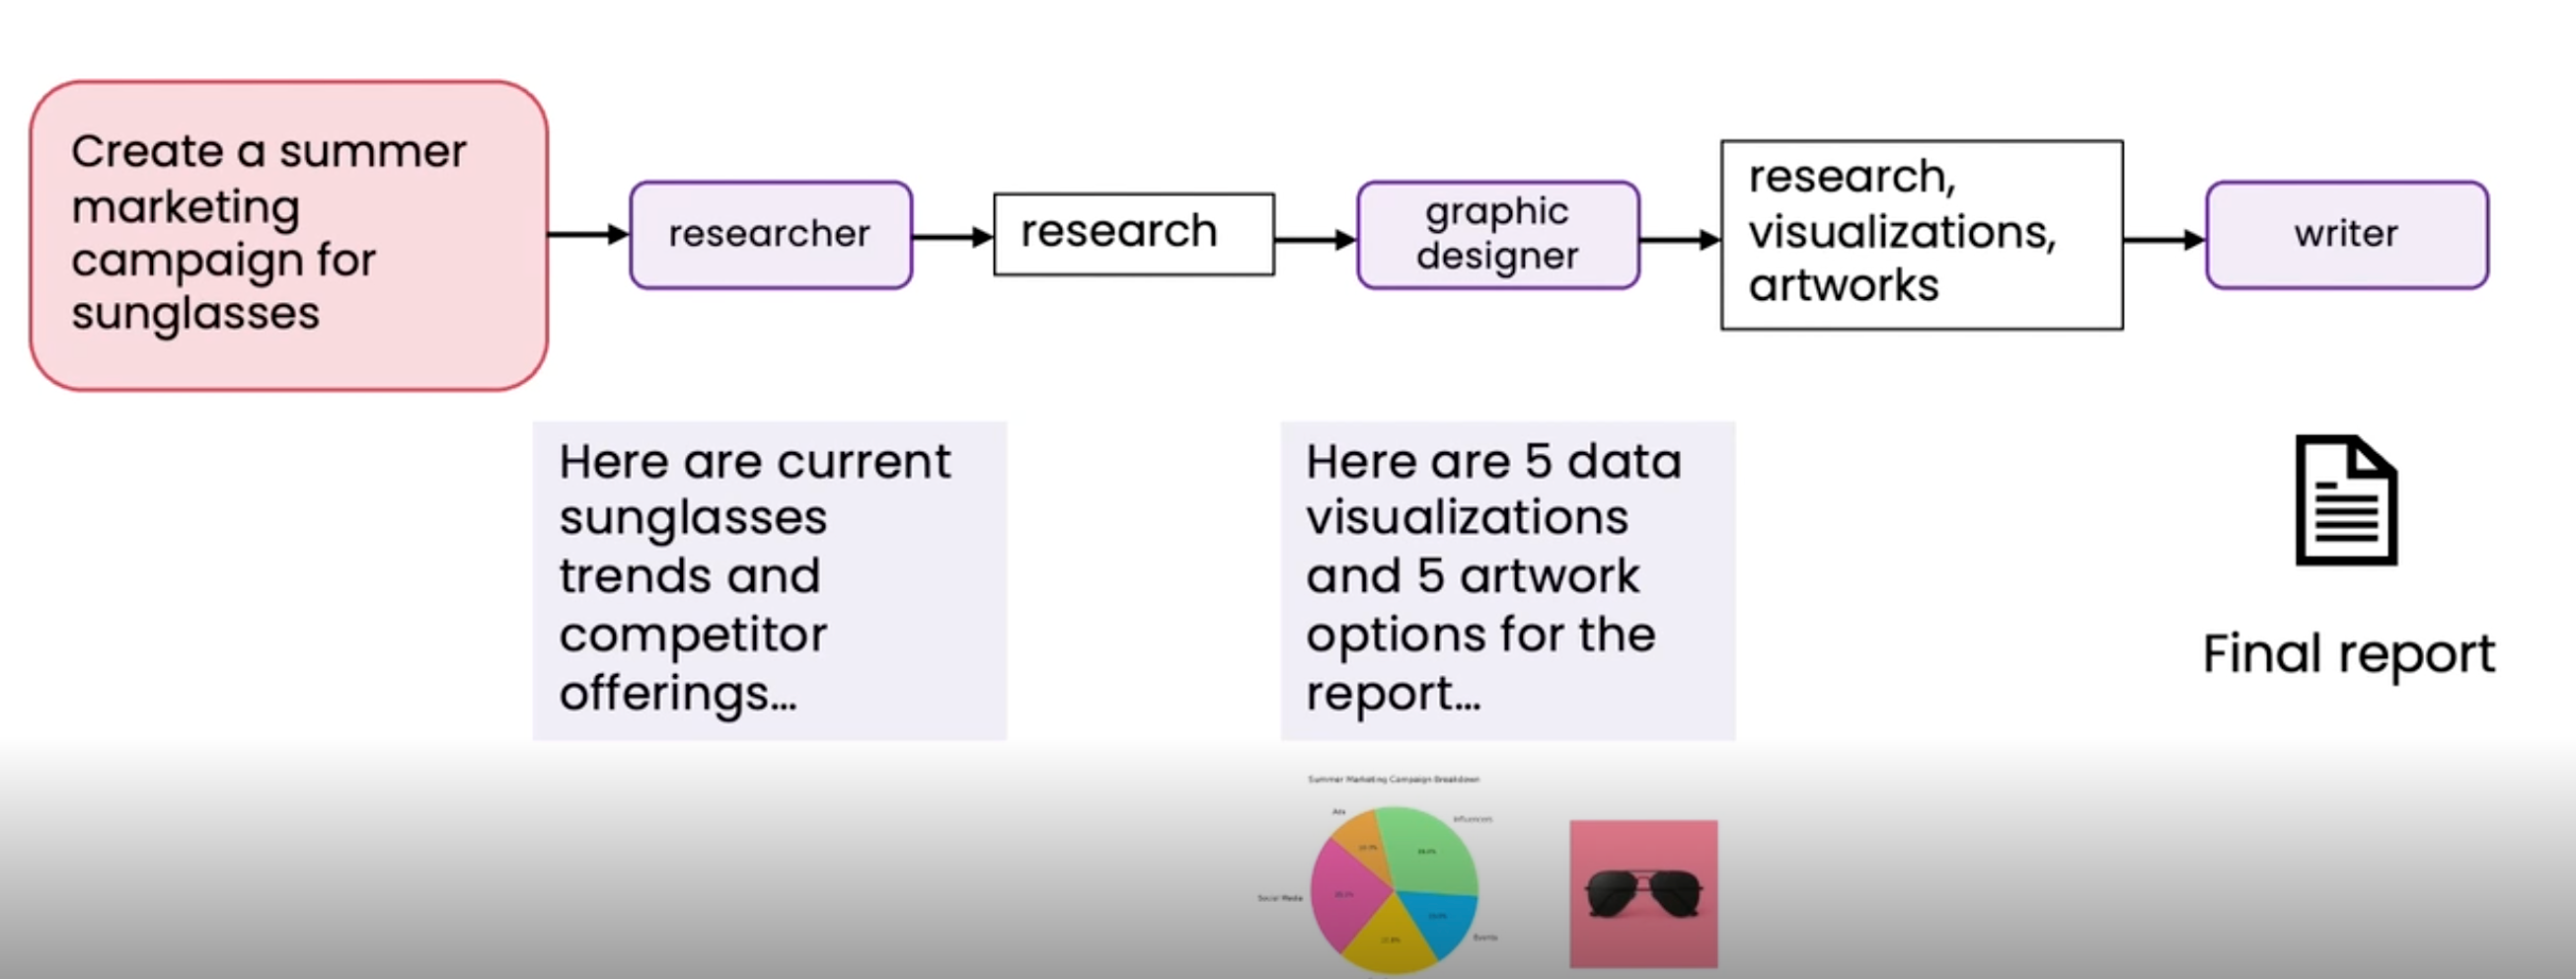
multi-agent collaboration

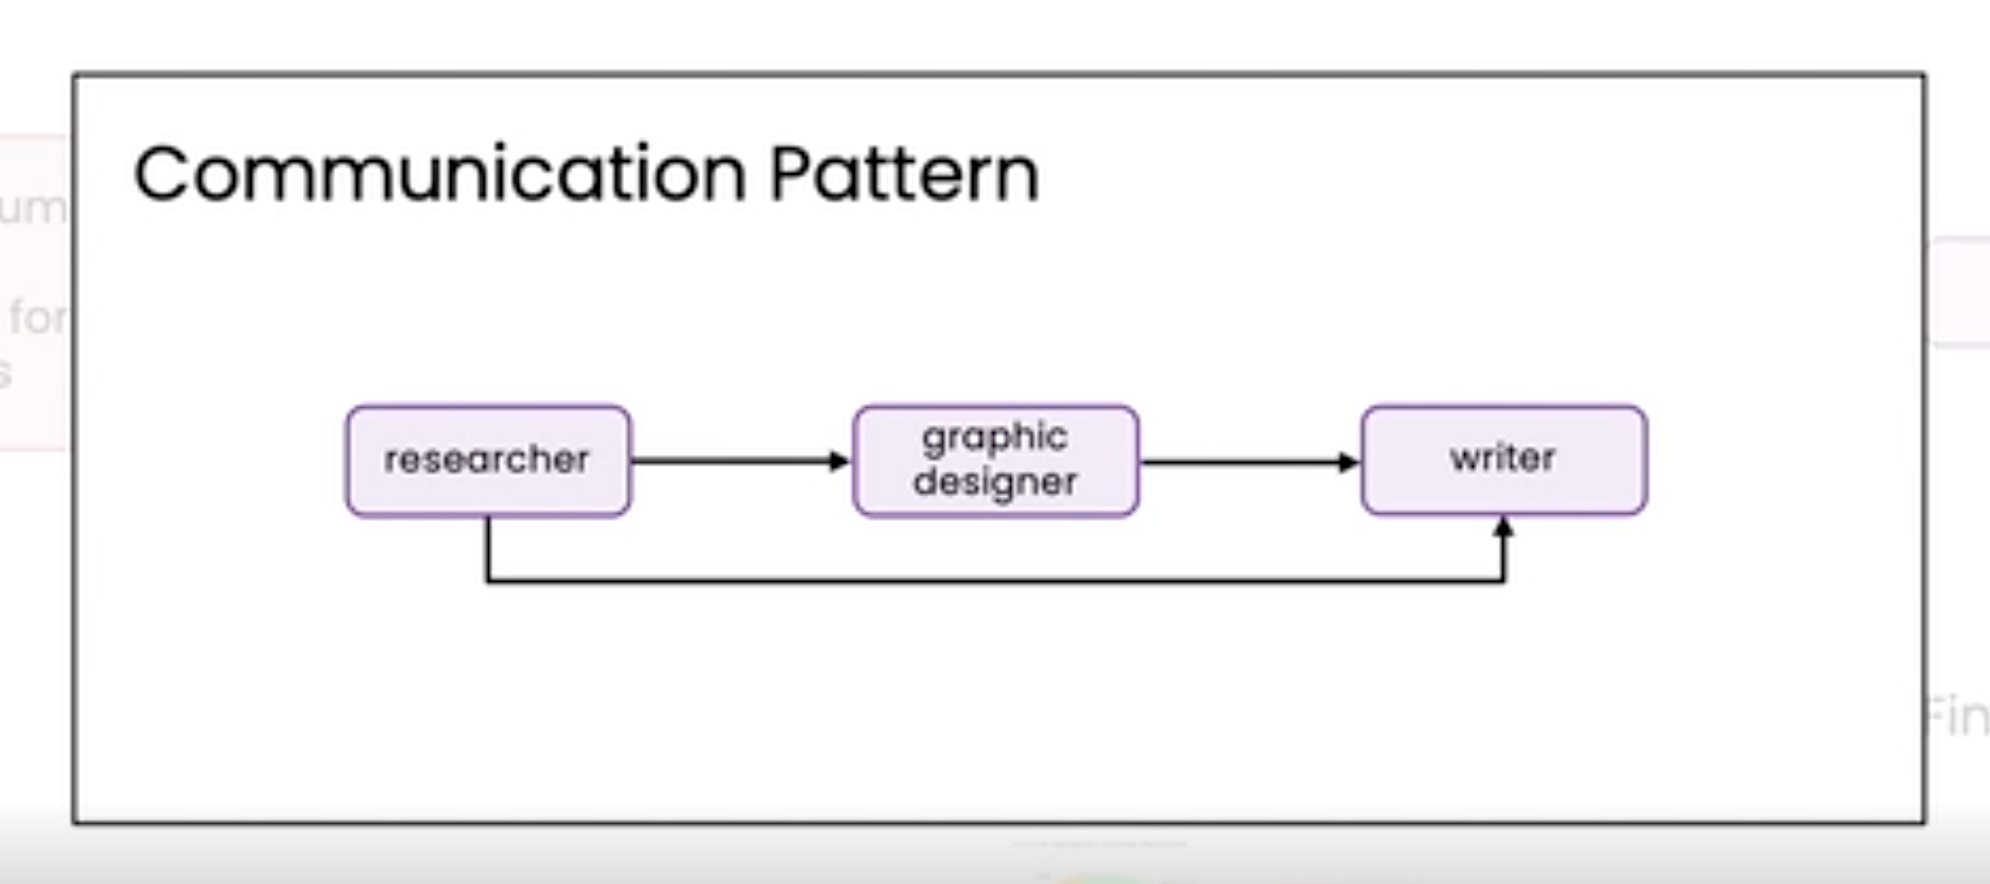
串行协作

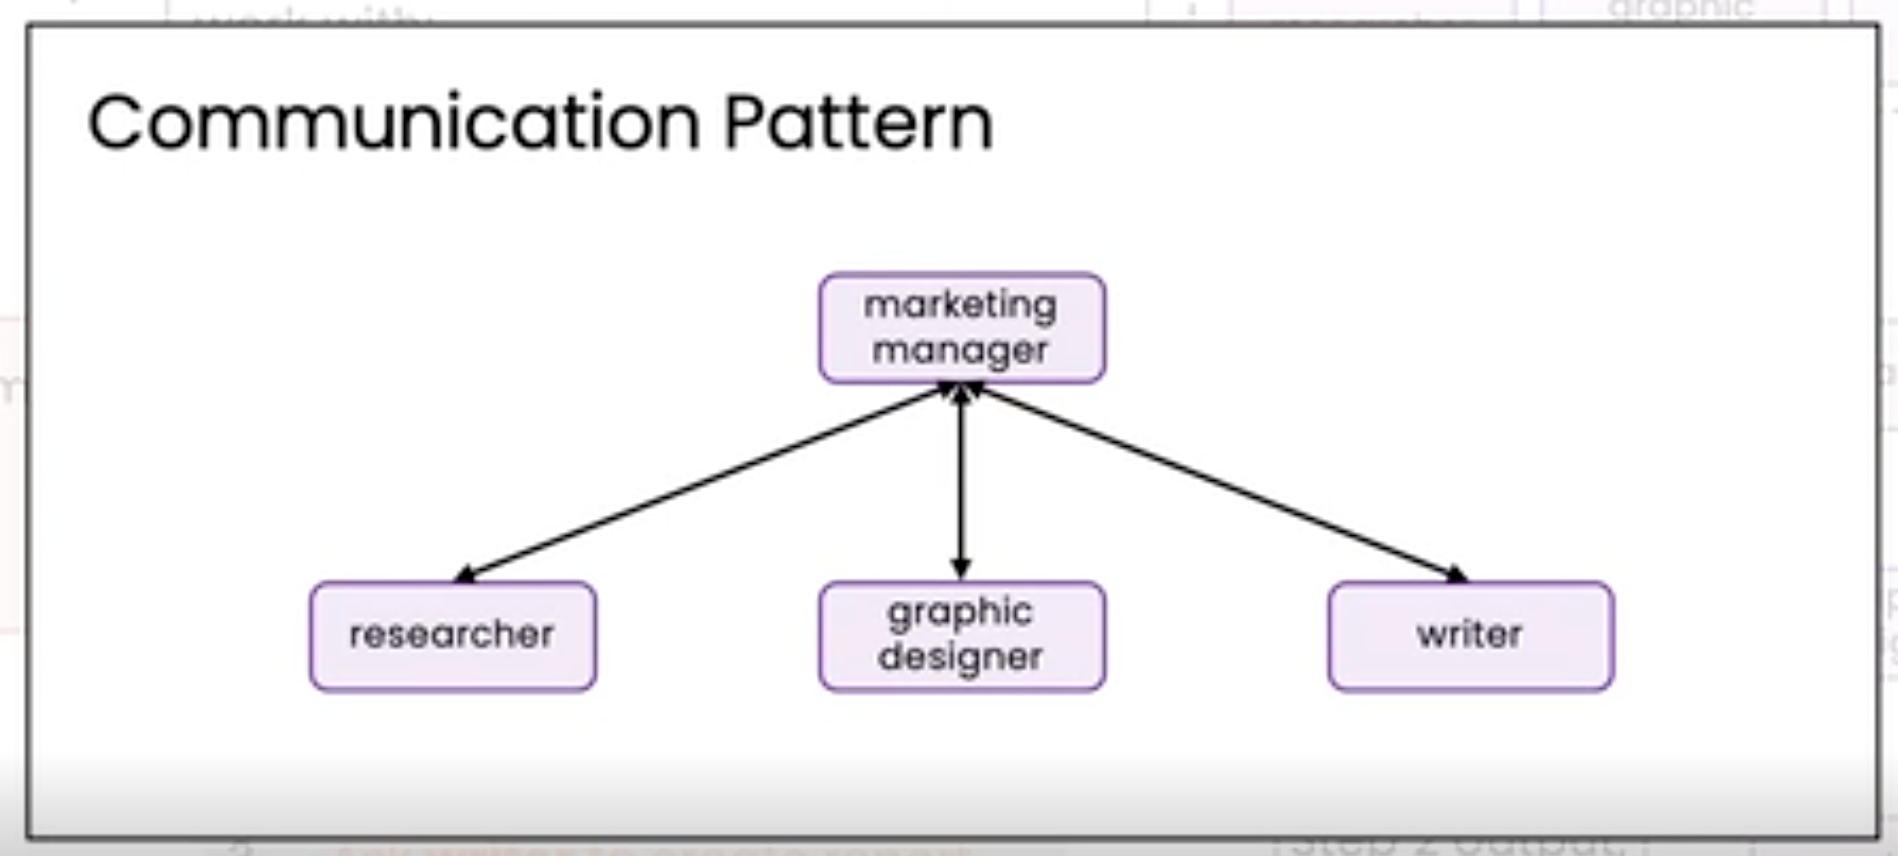
交给llm 自行规划调用

实验:多智能体串行通信模式

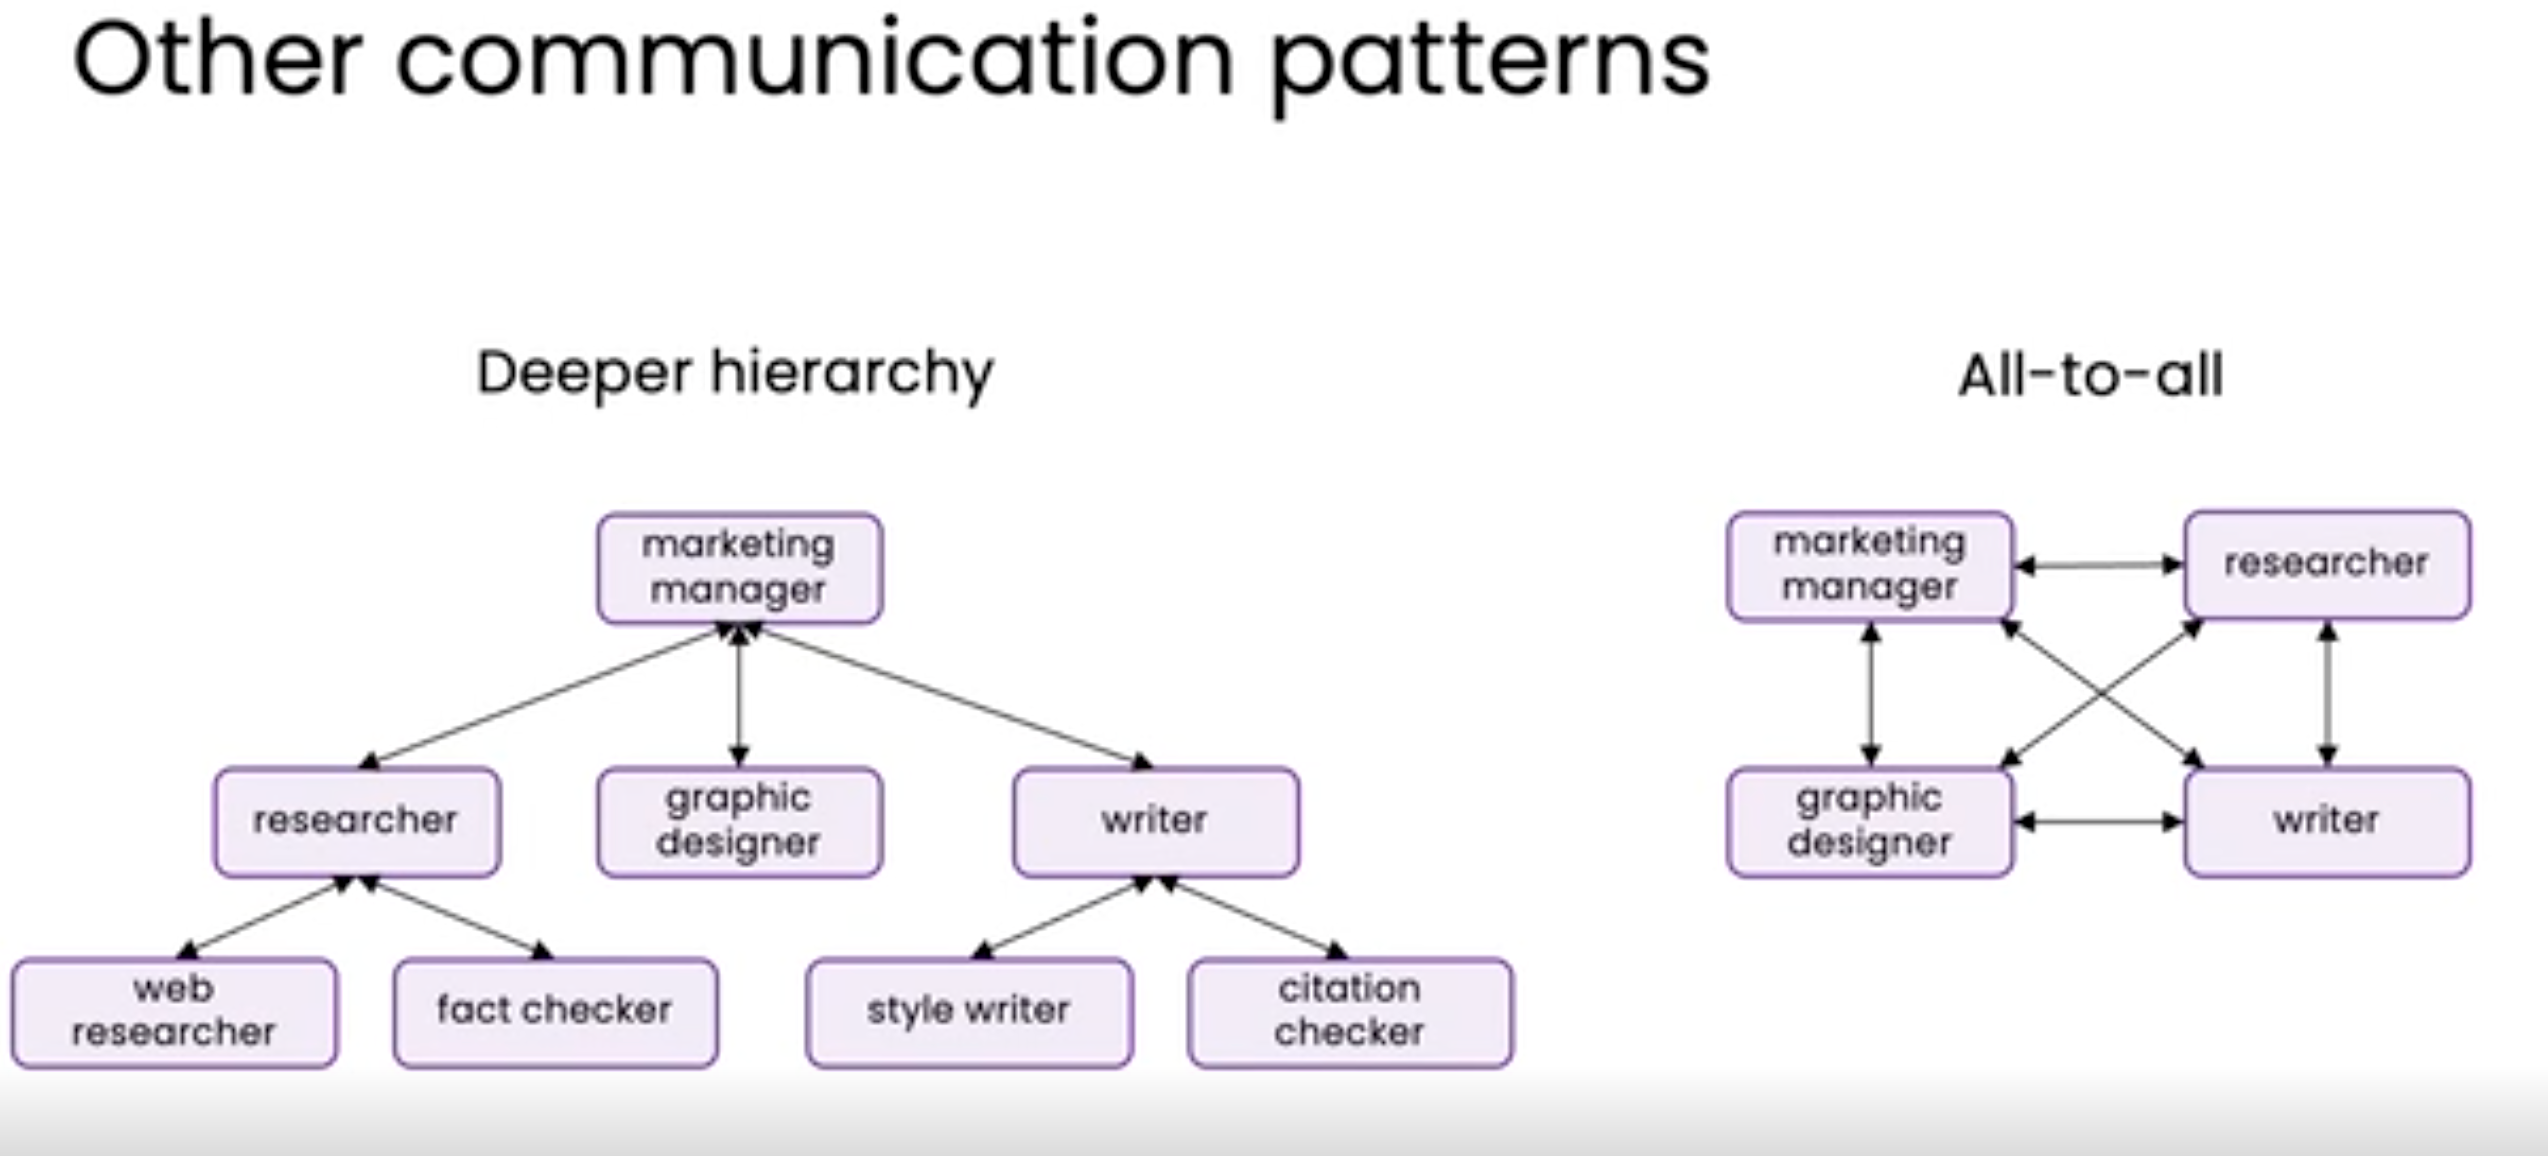
多智能体通信模式


Evaluating agnetic

Driving your development process with evals

• Build a system and look at outputs to discover where it is behaving in an unsatisfactory way E.g.incorrect due dates in invoice data extract
• Drive improvement by putting in place a small eval with ~20 examples to help you track progress
• Monitor as you make changes to workflow (e.g.new orompts, new algorithms) and see if the metric improves

Create an eval to measure performance

  1. Choose 3-5 gold standard discussion points for each topic
  2. Use LLM-as-a-judge to count how many topics were mentioned
  3. Get score for each prompt in eval set

Tips for designing end-to-end evals

• Quick and dirty is ok to start!
• As you find places where your evals fail to capture human judgement as to what system is better, use that as an opportunity to improve the metric
• Look for places where performance is worse than humans

Tips for error analysis

• Develop a habit of looking at traces
• Carry out error analysis to figure out what component performed poorly, leading to a poor final output
• Use error analysis output to decide where to focus efforts


Benefits of component-level evaluations

end to end evals is more expensive,so if the eval scope scales to smaller, use component-level evals is more efficient

• Can provide clearer signal for specific errors
• Avoid the noise in end-to-end system
• More efficient for focused team to optimize
• Work on smaller, more targeted problems faster

实验

Improving non-LLM component performance

E.g. web search, text retrieval for RAG, code execution, trained ML
model (for speech recognition, people detection, etc.)

• Tune hyperparameters of component
Web search: Number of results, date range
RAG: Change similarity threshold, chunk size
ML models: Detection threshold

• Replace the component
Try a different web search engine, RAG provider, etc.

Improving LLM component performance

• Improve your prompts
Add more explicit instructions.
Add one or more concrete example to the prompt (few-shot prompting)
• Try a new model
Try multiple LLMs and use evals to pick the best A
小模型对于回答简单事实性问题往往表现更好
大模型前沿的模型在遵循指令方面表现更好

• Split up the step
Decompose the task into smaller steps
• Fine-tune a model
Fine tune on your internal data to improve performance

Developing intuition for model intelligence

建立对模型智能模型的直觉
Play with models often
• Having a personal set of evals might be helpful
• Read other people’s prompts for ideas of how to best use models

use different models in your agentic workflows
• Which models work for which types of tasks?
• aisuite makes it easy to quickly swap out

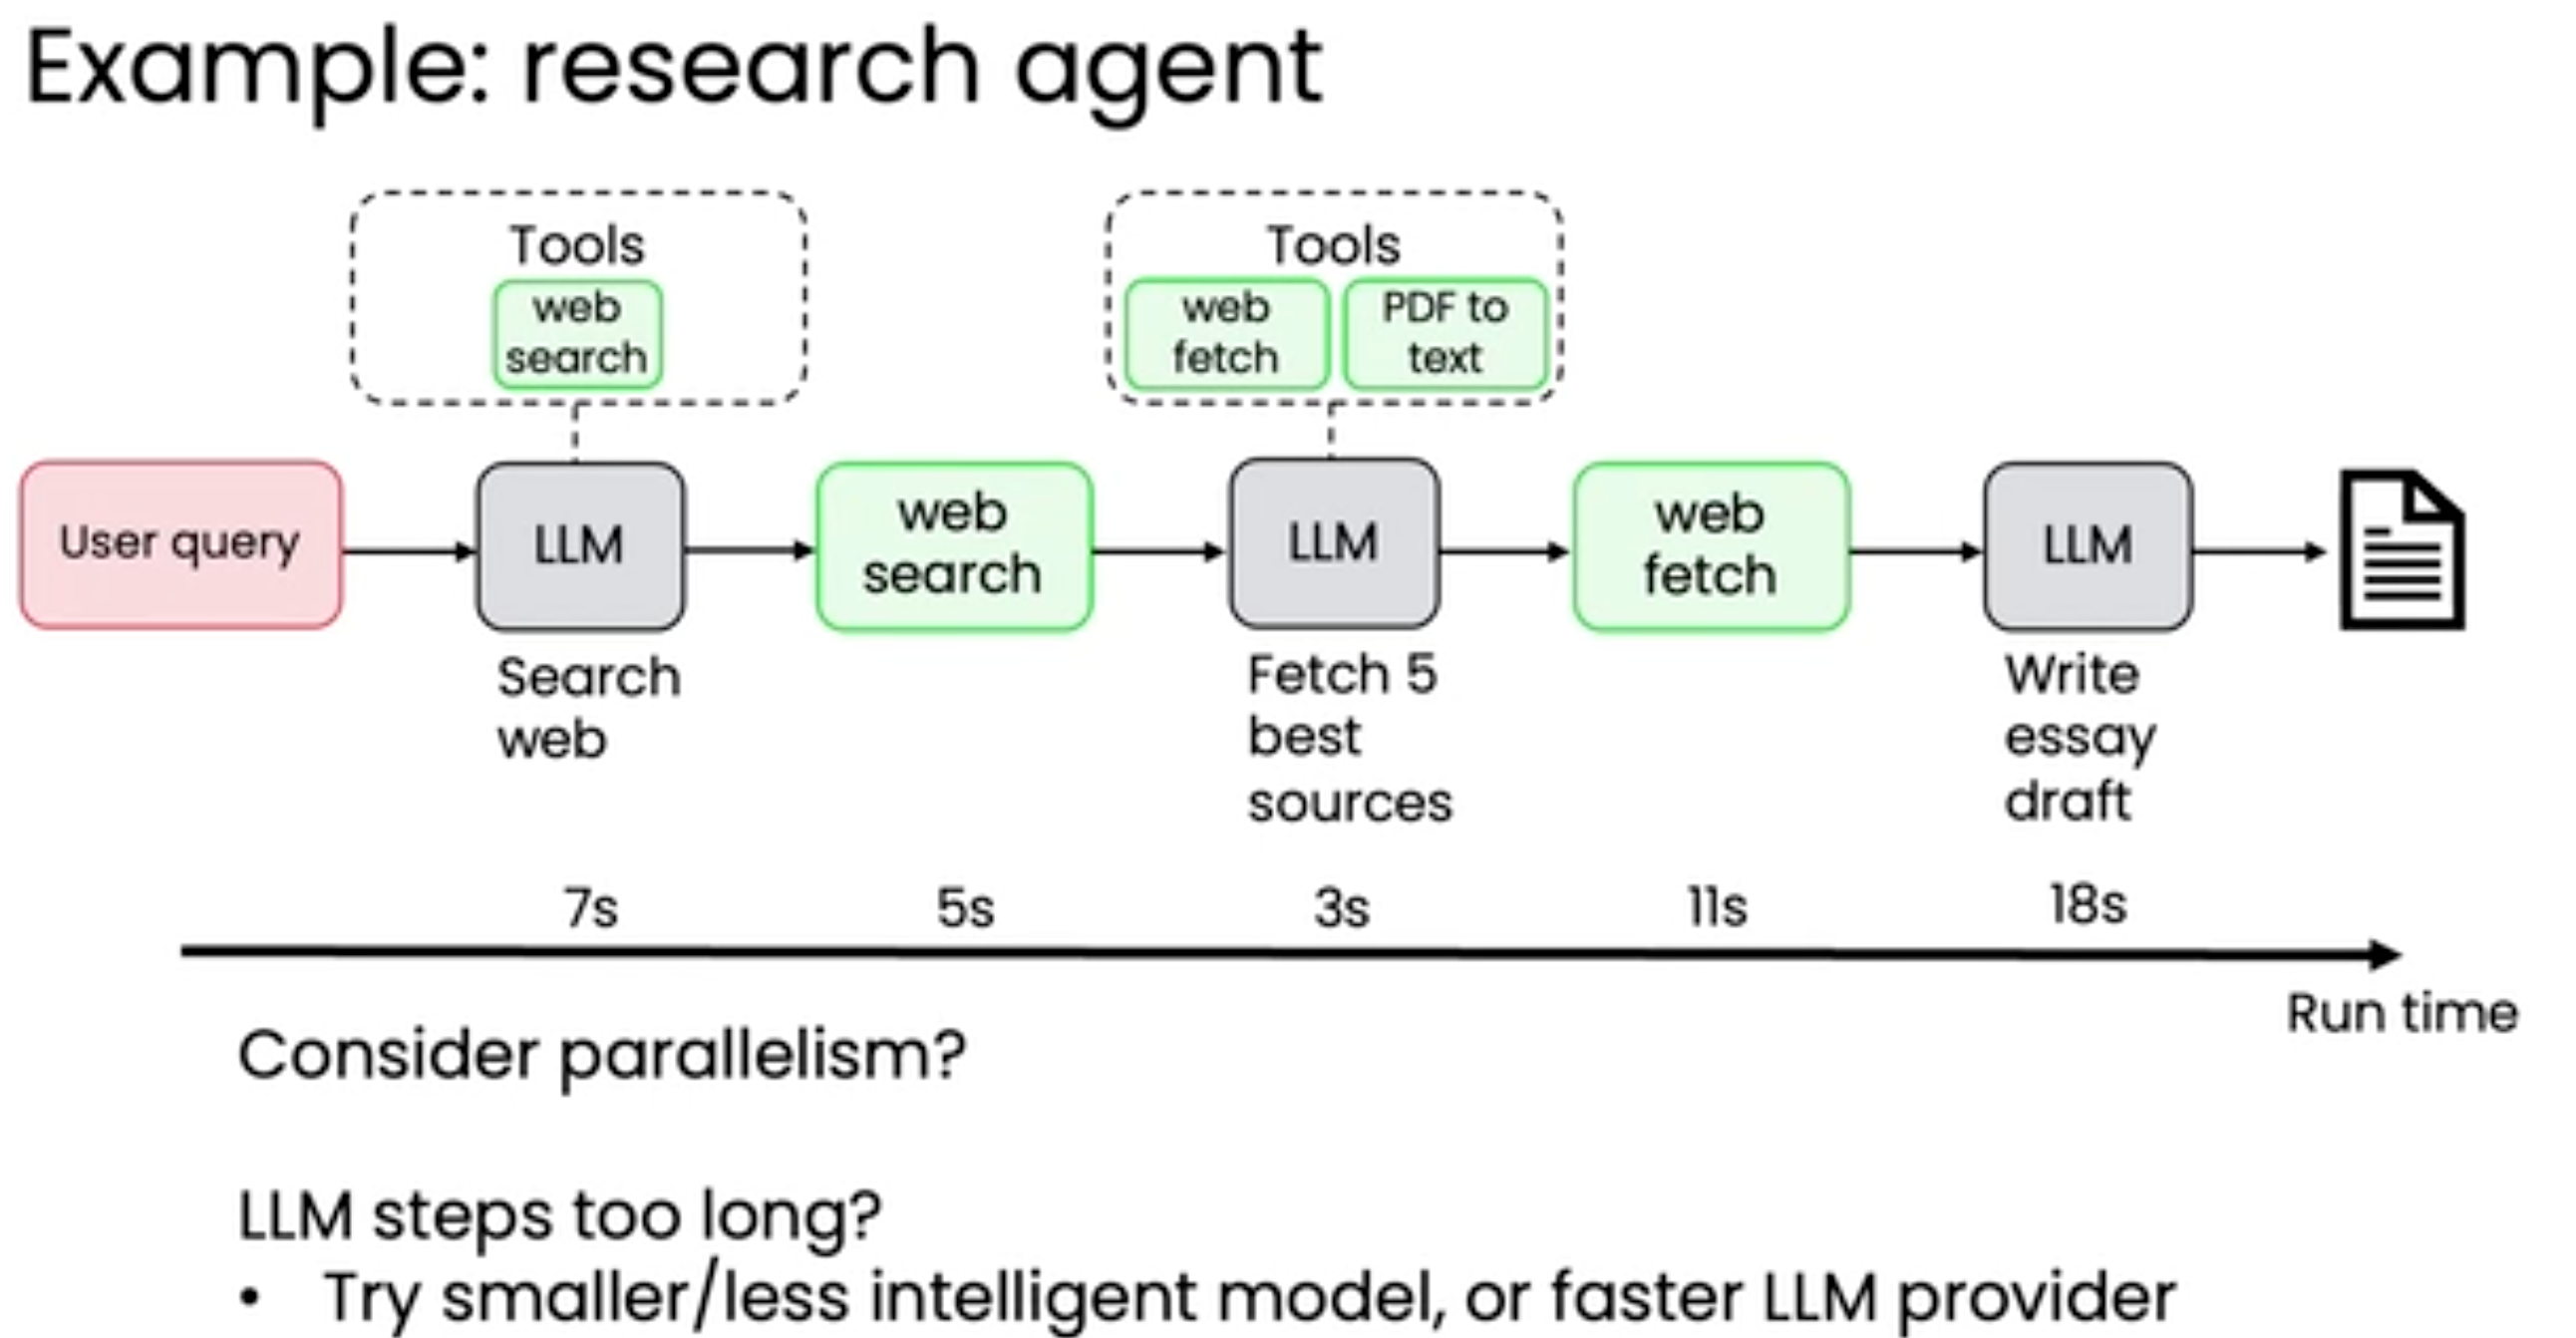
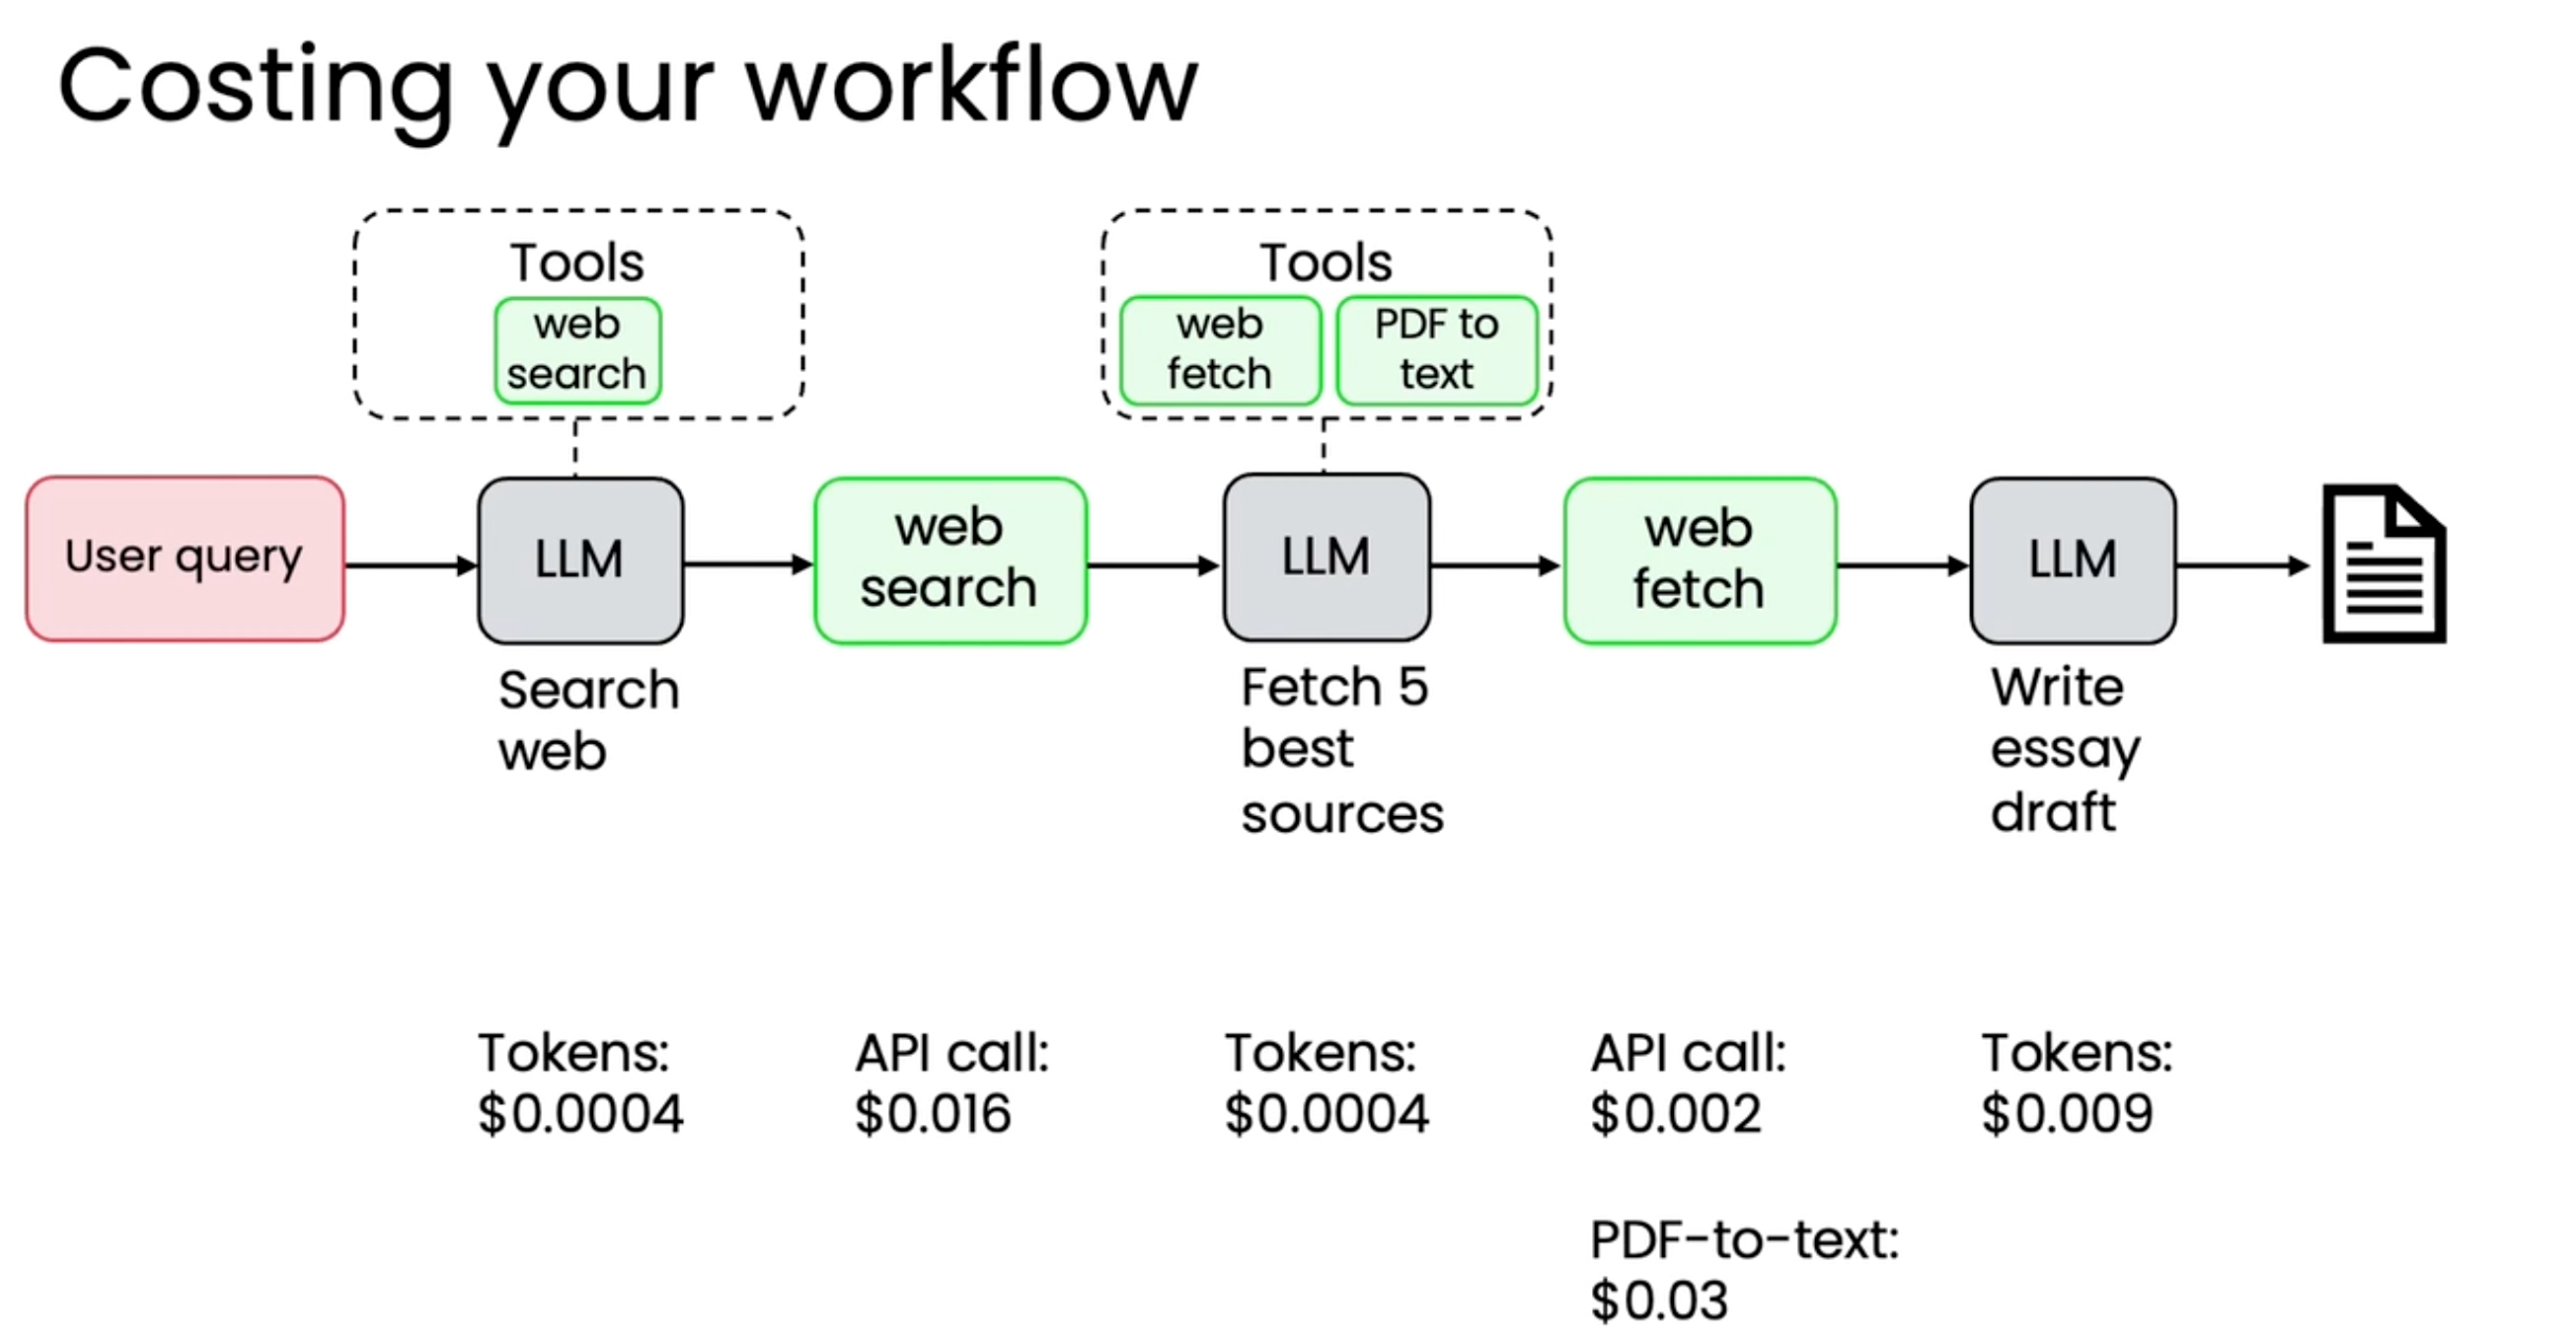
优化延迟和成本问题

通过分析监控workflow 上每个组件的延迟和成本数据 通常可以得到相应的解决方案

Costing your workflow
• LLM steps (pay per token)
• Any APl-calling tools (pay per API call)
• Compute steps (based on server capacity/cost)

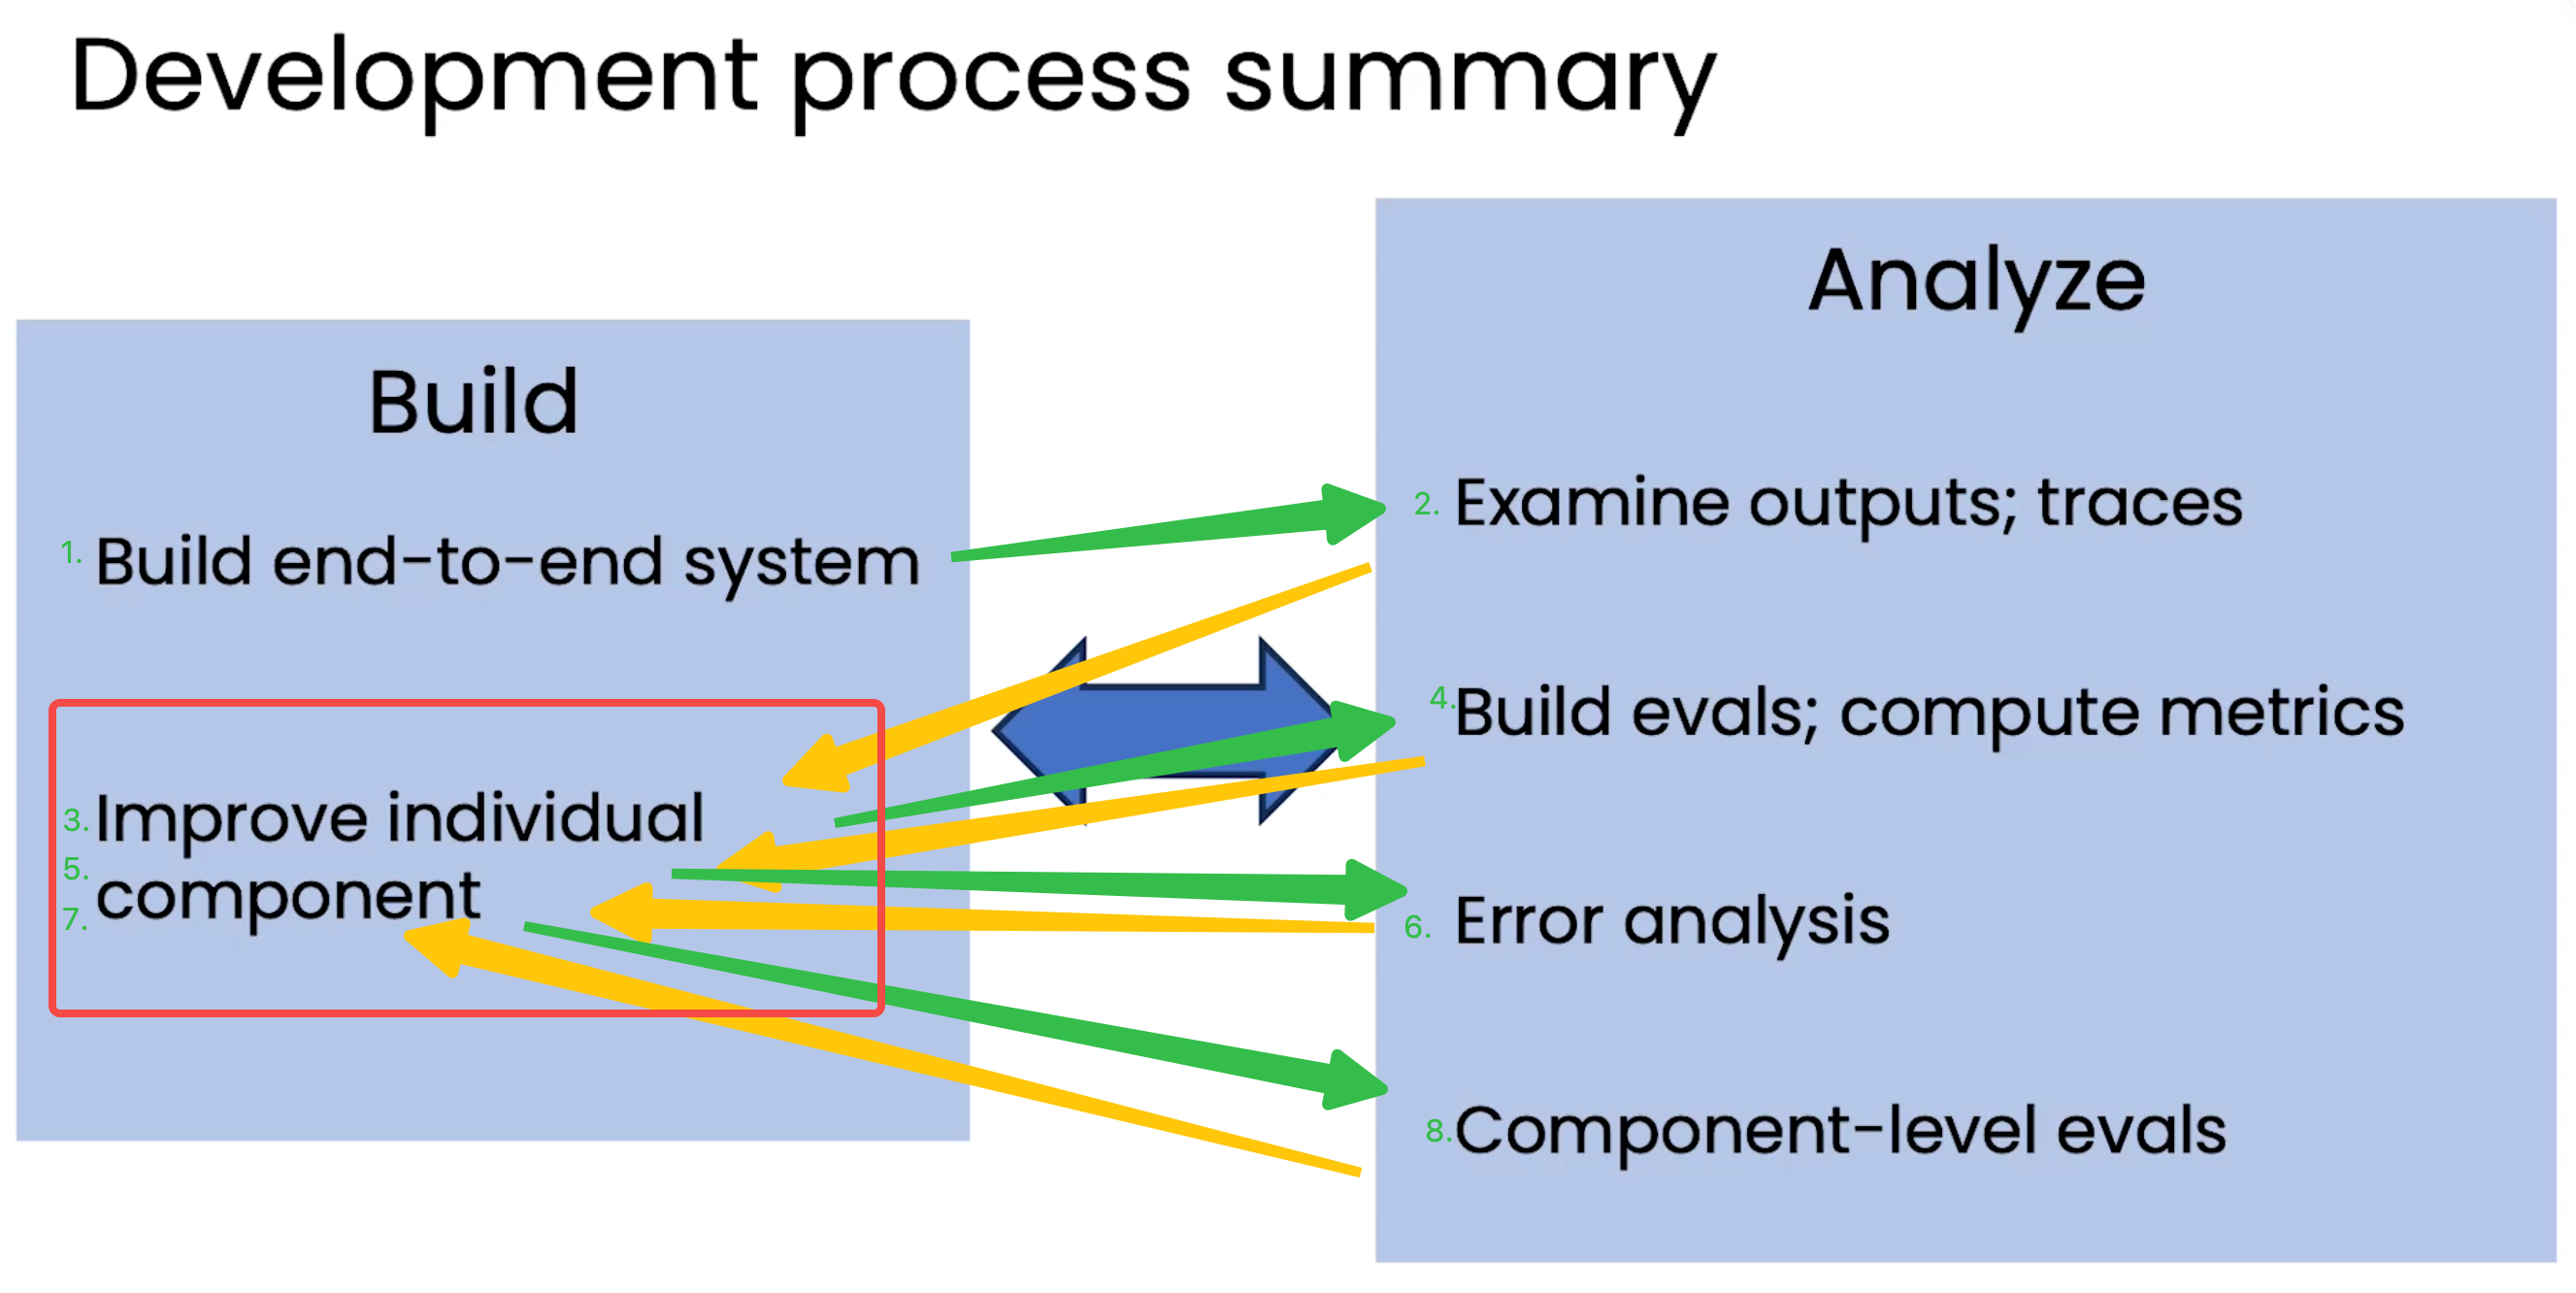
开发总流程

My Little World

CopilotKit 源码分析

发表于 2026-08-04

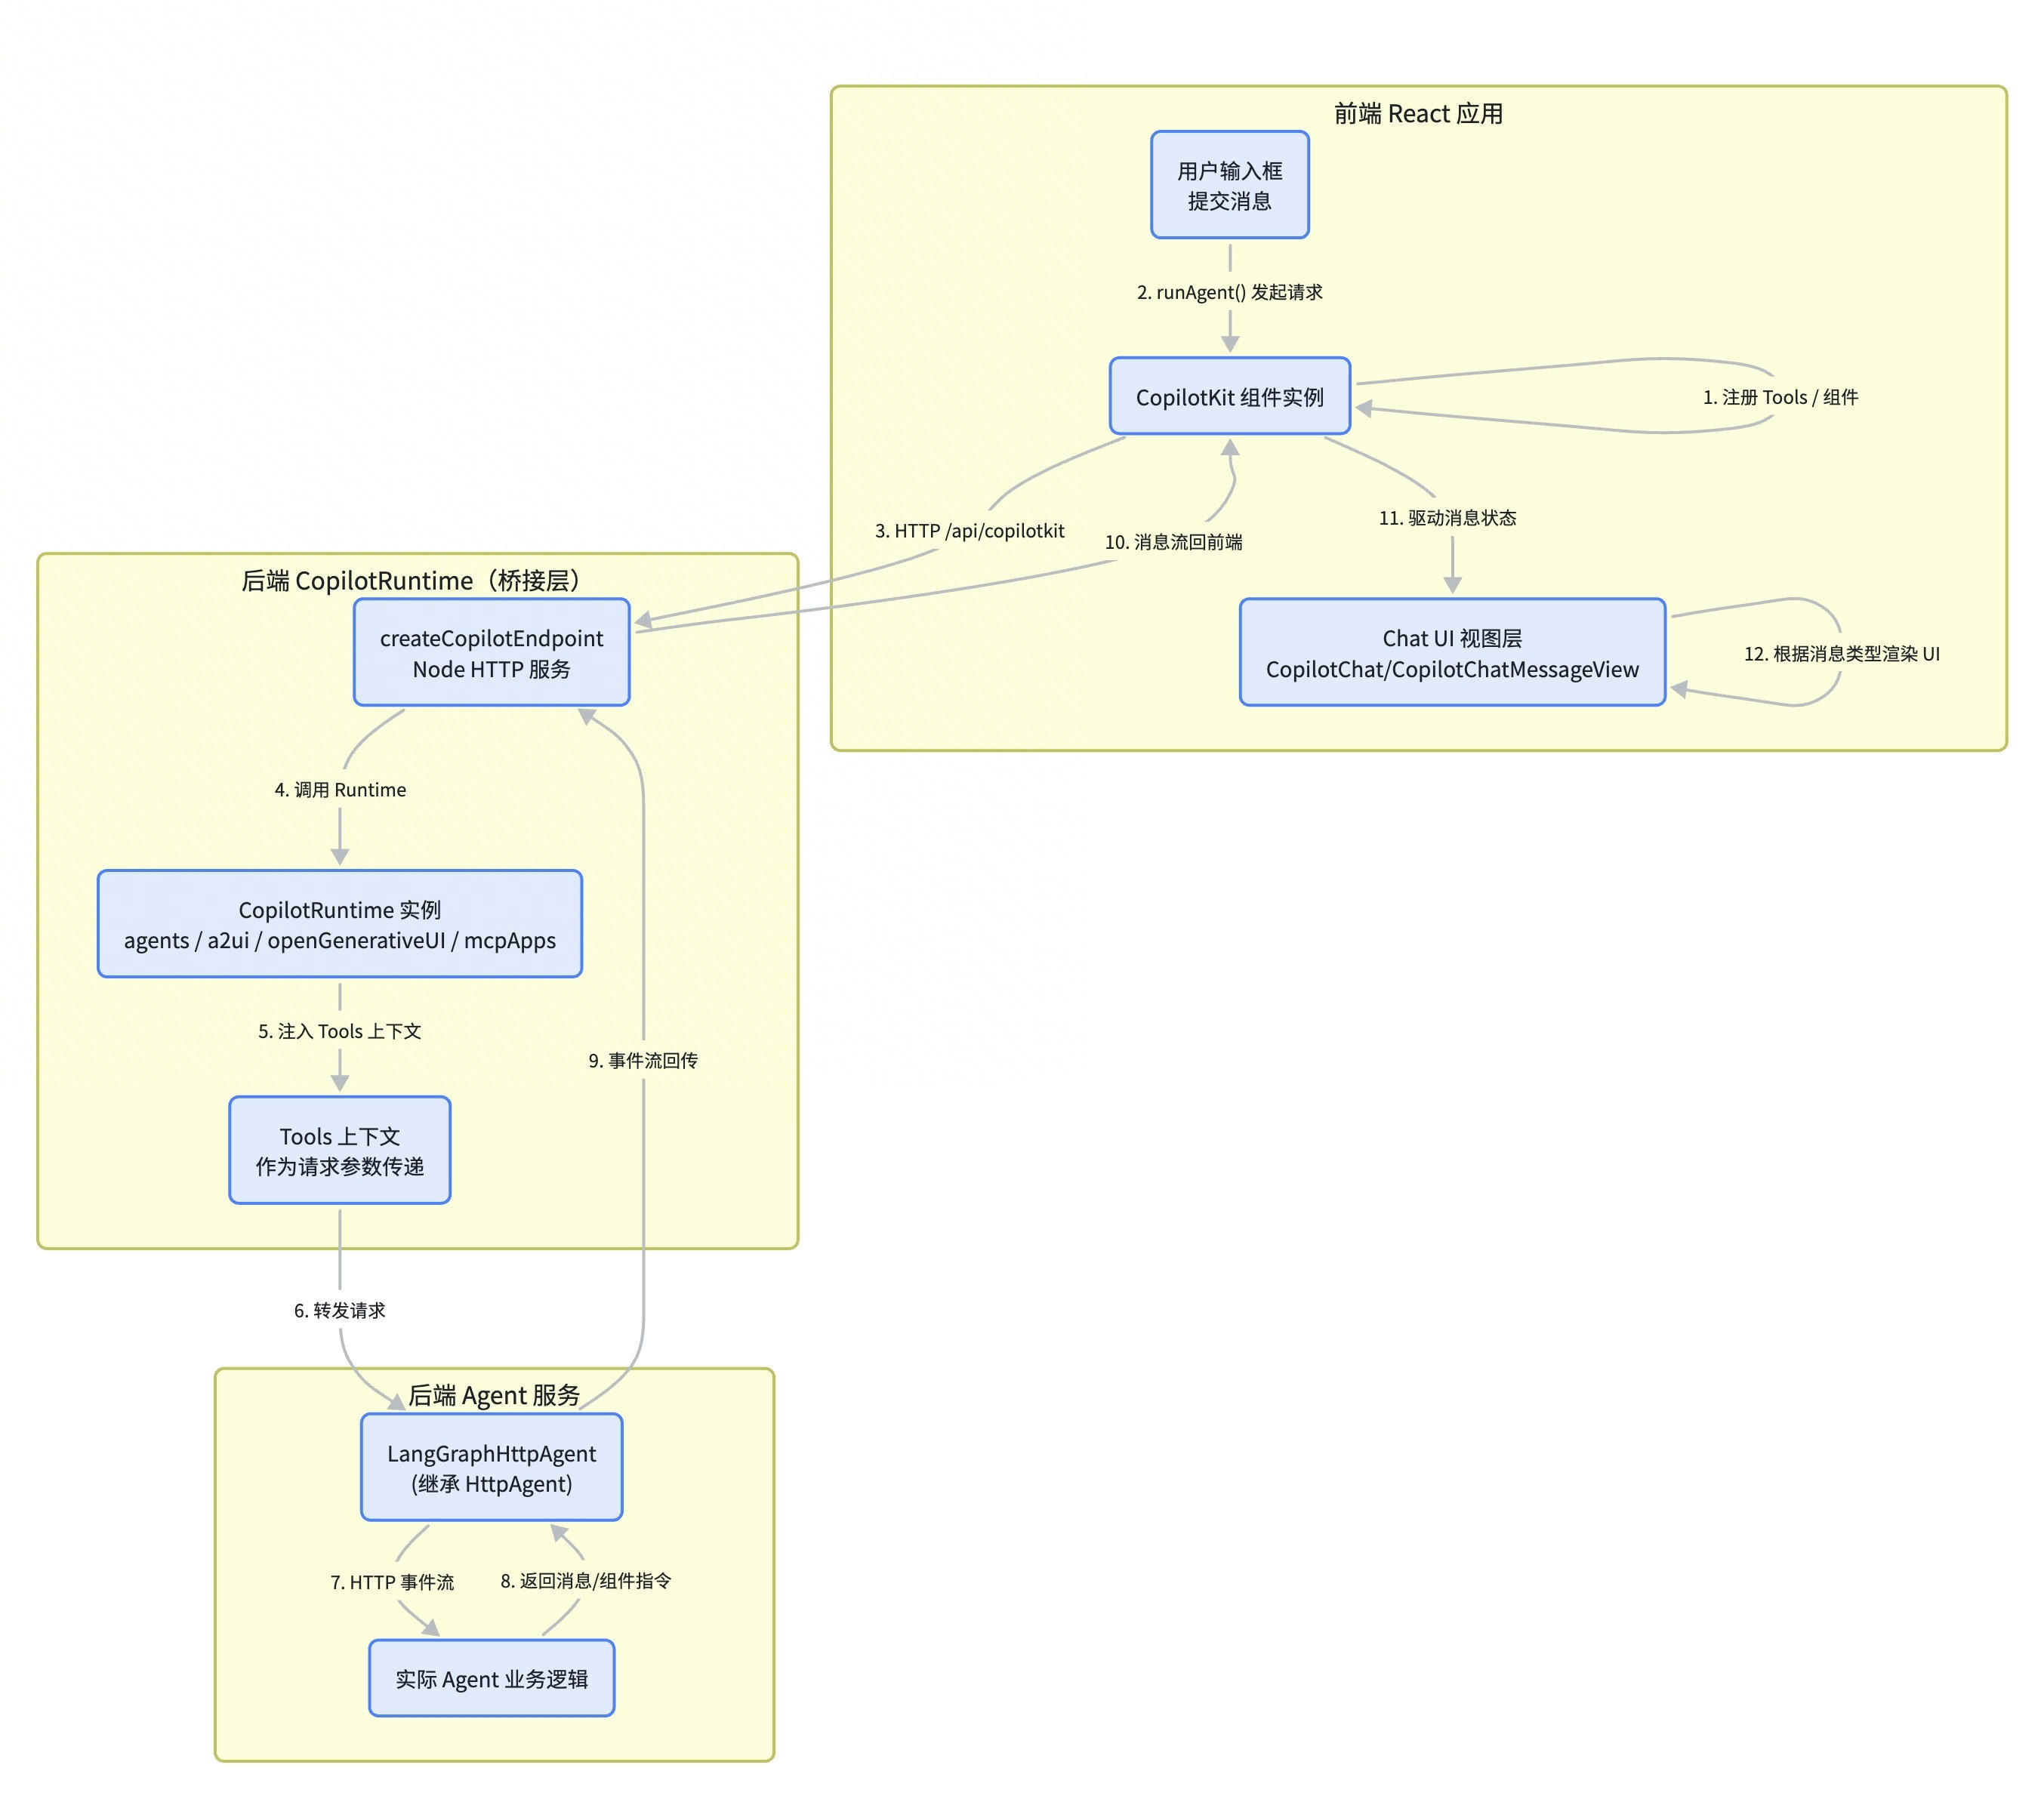
CopilotKit 整体架构总览

前端组件如何注册到后端agent服务中的

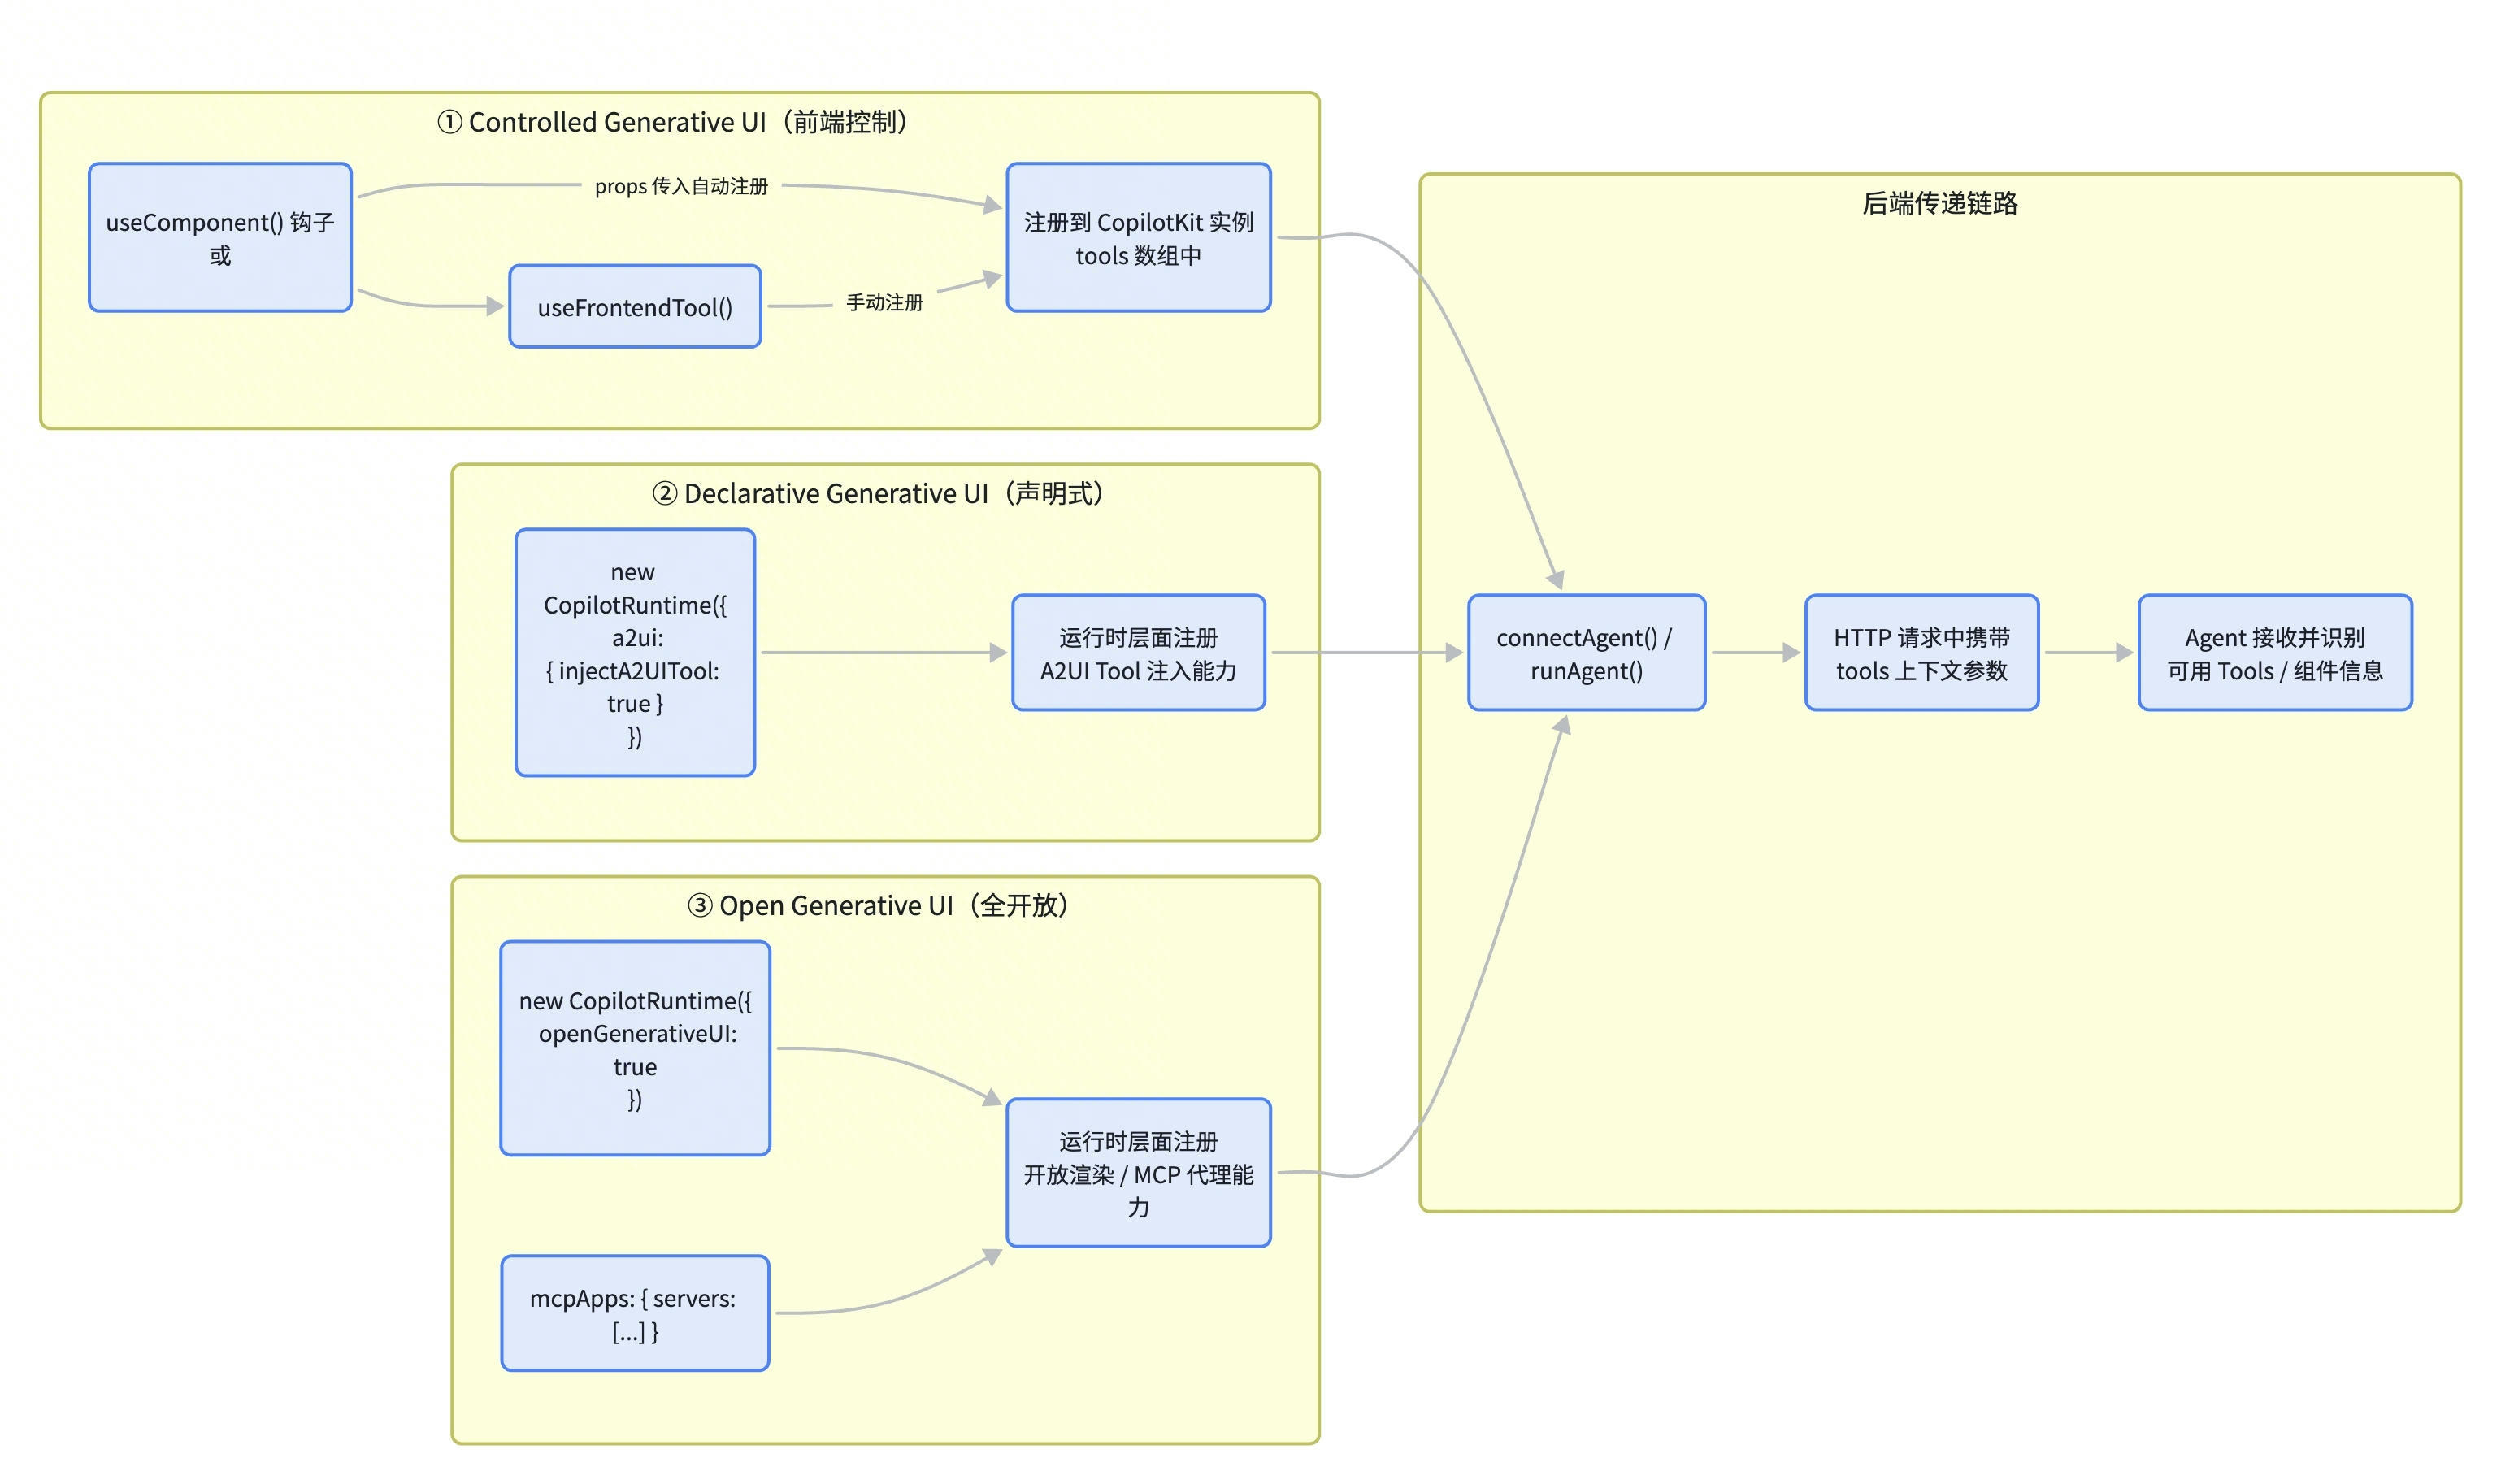
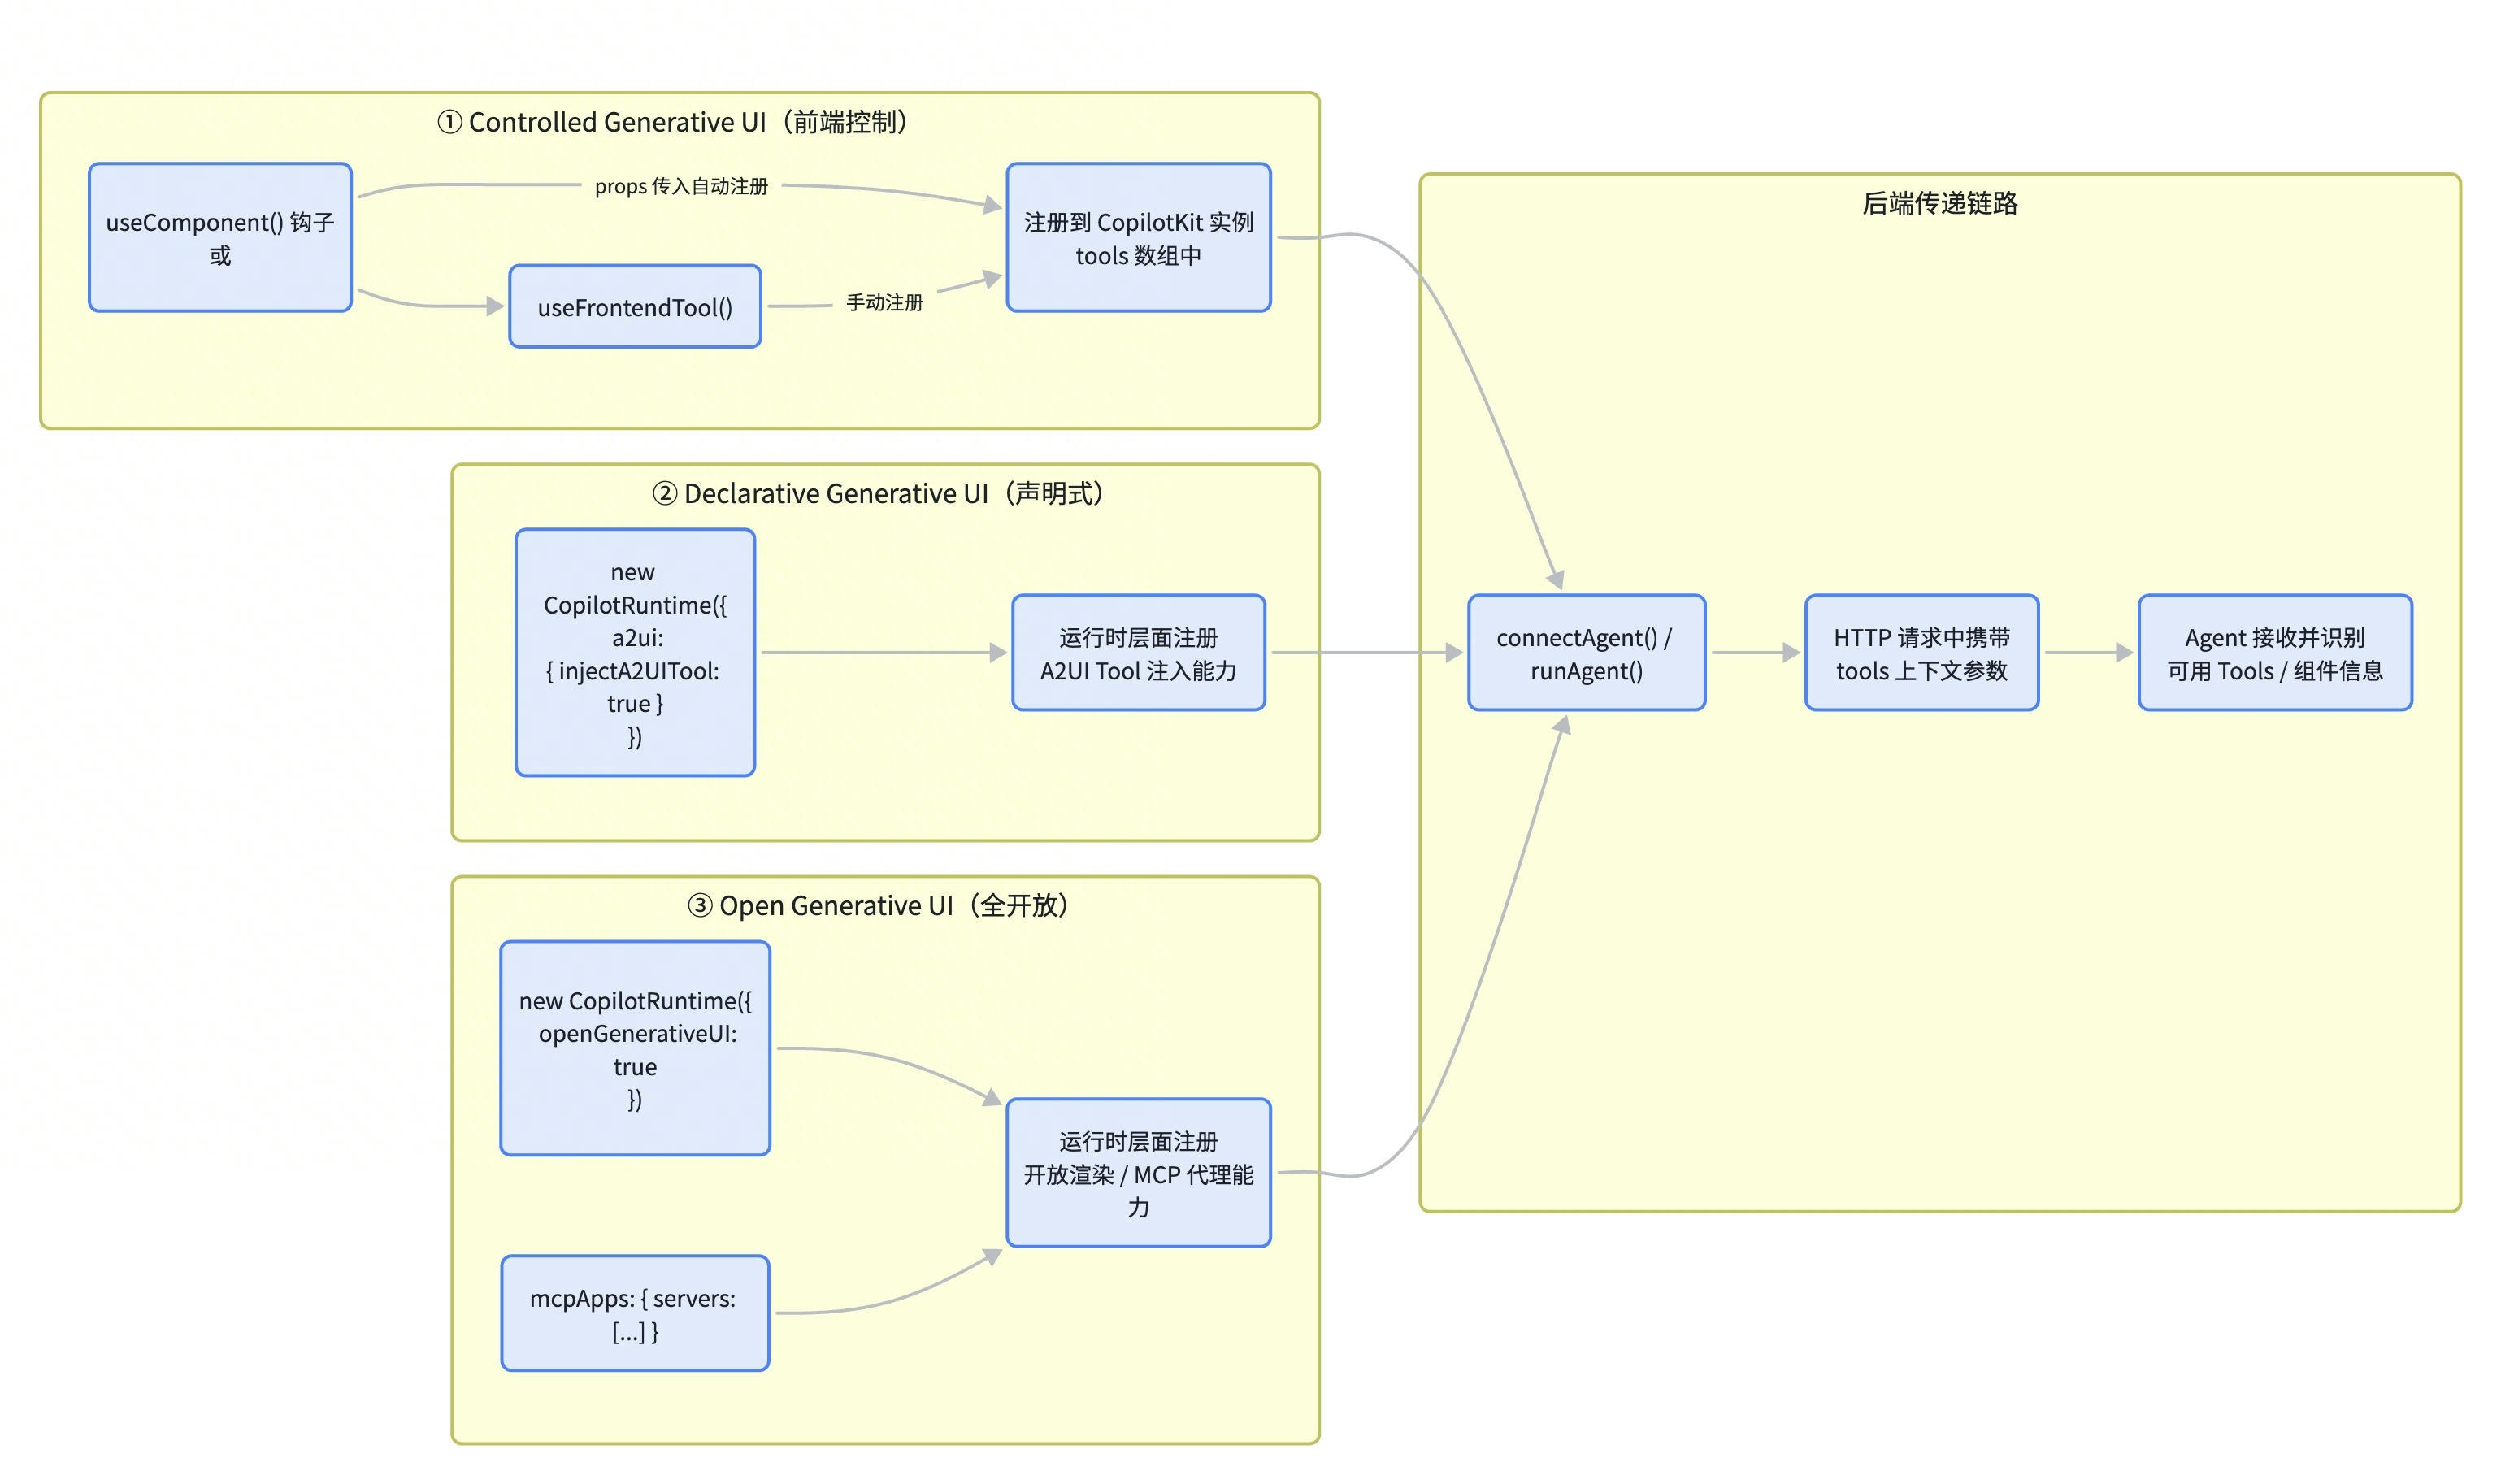
通过CopilotKit 生成式UI框架 了解到,根据开放程度可以分成3类组件

  1. controrolled Generative UI
  2. declarative Generative UI
  3. open Generative UI

其中第2和3类都是在CopilotRuntime 中注册的,注册后在后续发给agent的http请求中会以上下文的方式(其实也是参数)传递给agent

1
2
3
4
5
6
7
8
9
10
11
12
13
14
15
16
17
18
19
20
21
22
23
24
25
onst langGraphAgent = new LangGraphHttpAgent({ url: "http://localhost:8004" });

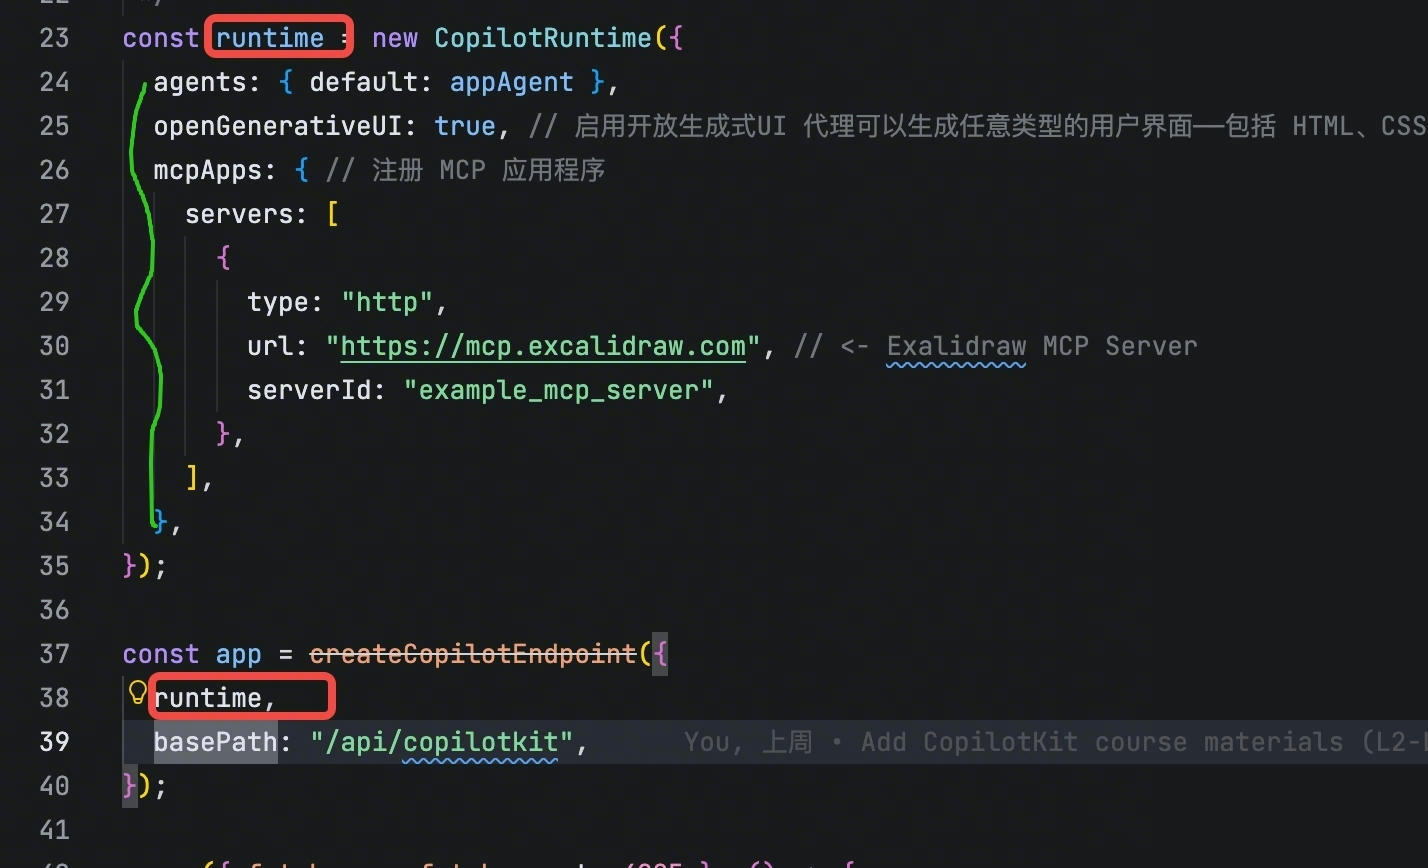
const runtime = new CopilotRuntime({
agents: { default: langGraphAgent },
a2ui: { injectA2UITool: true }, // 启用 declarative Generative UI
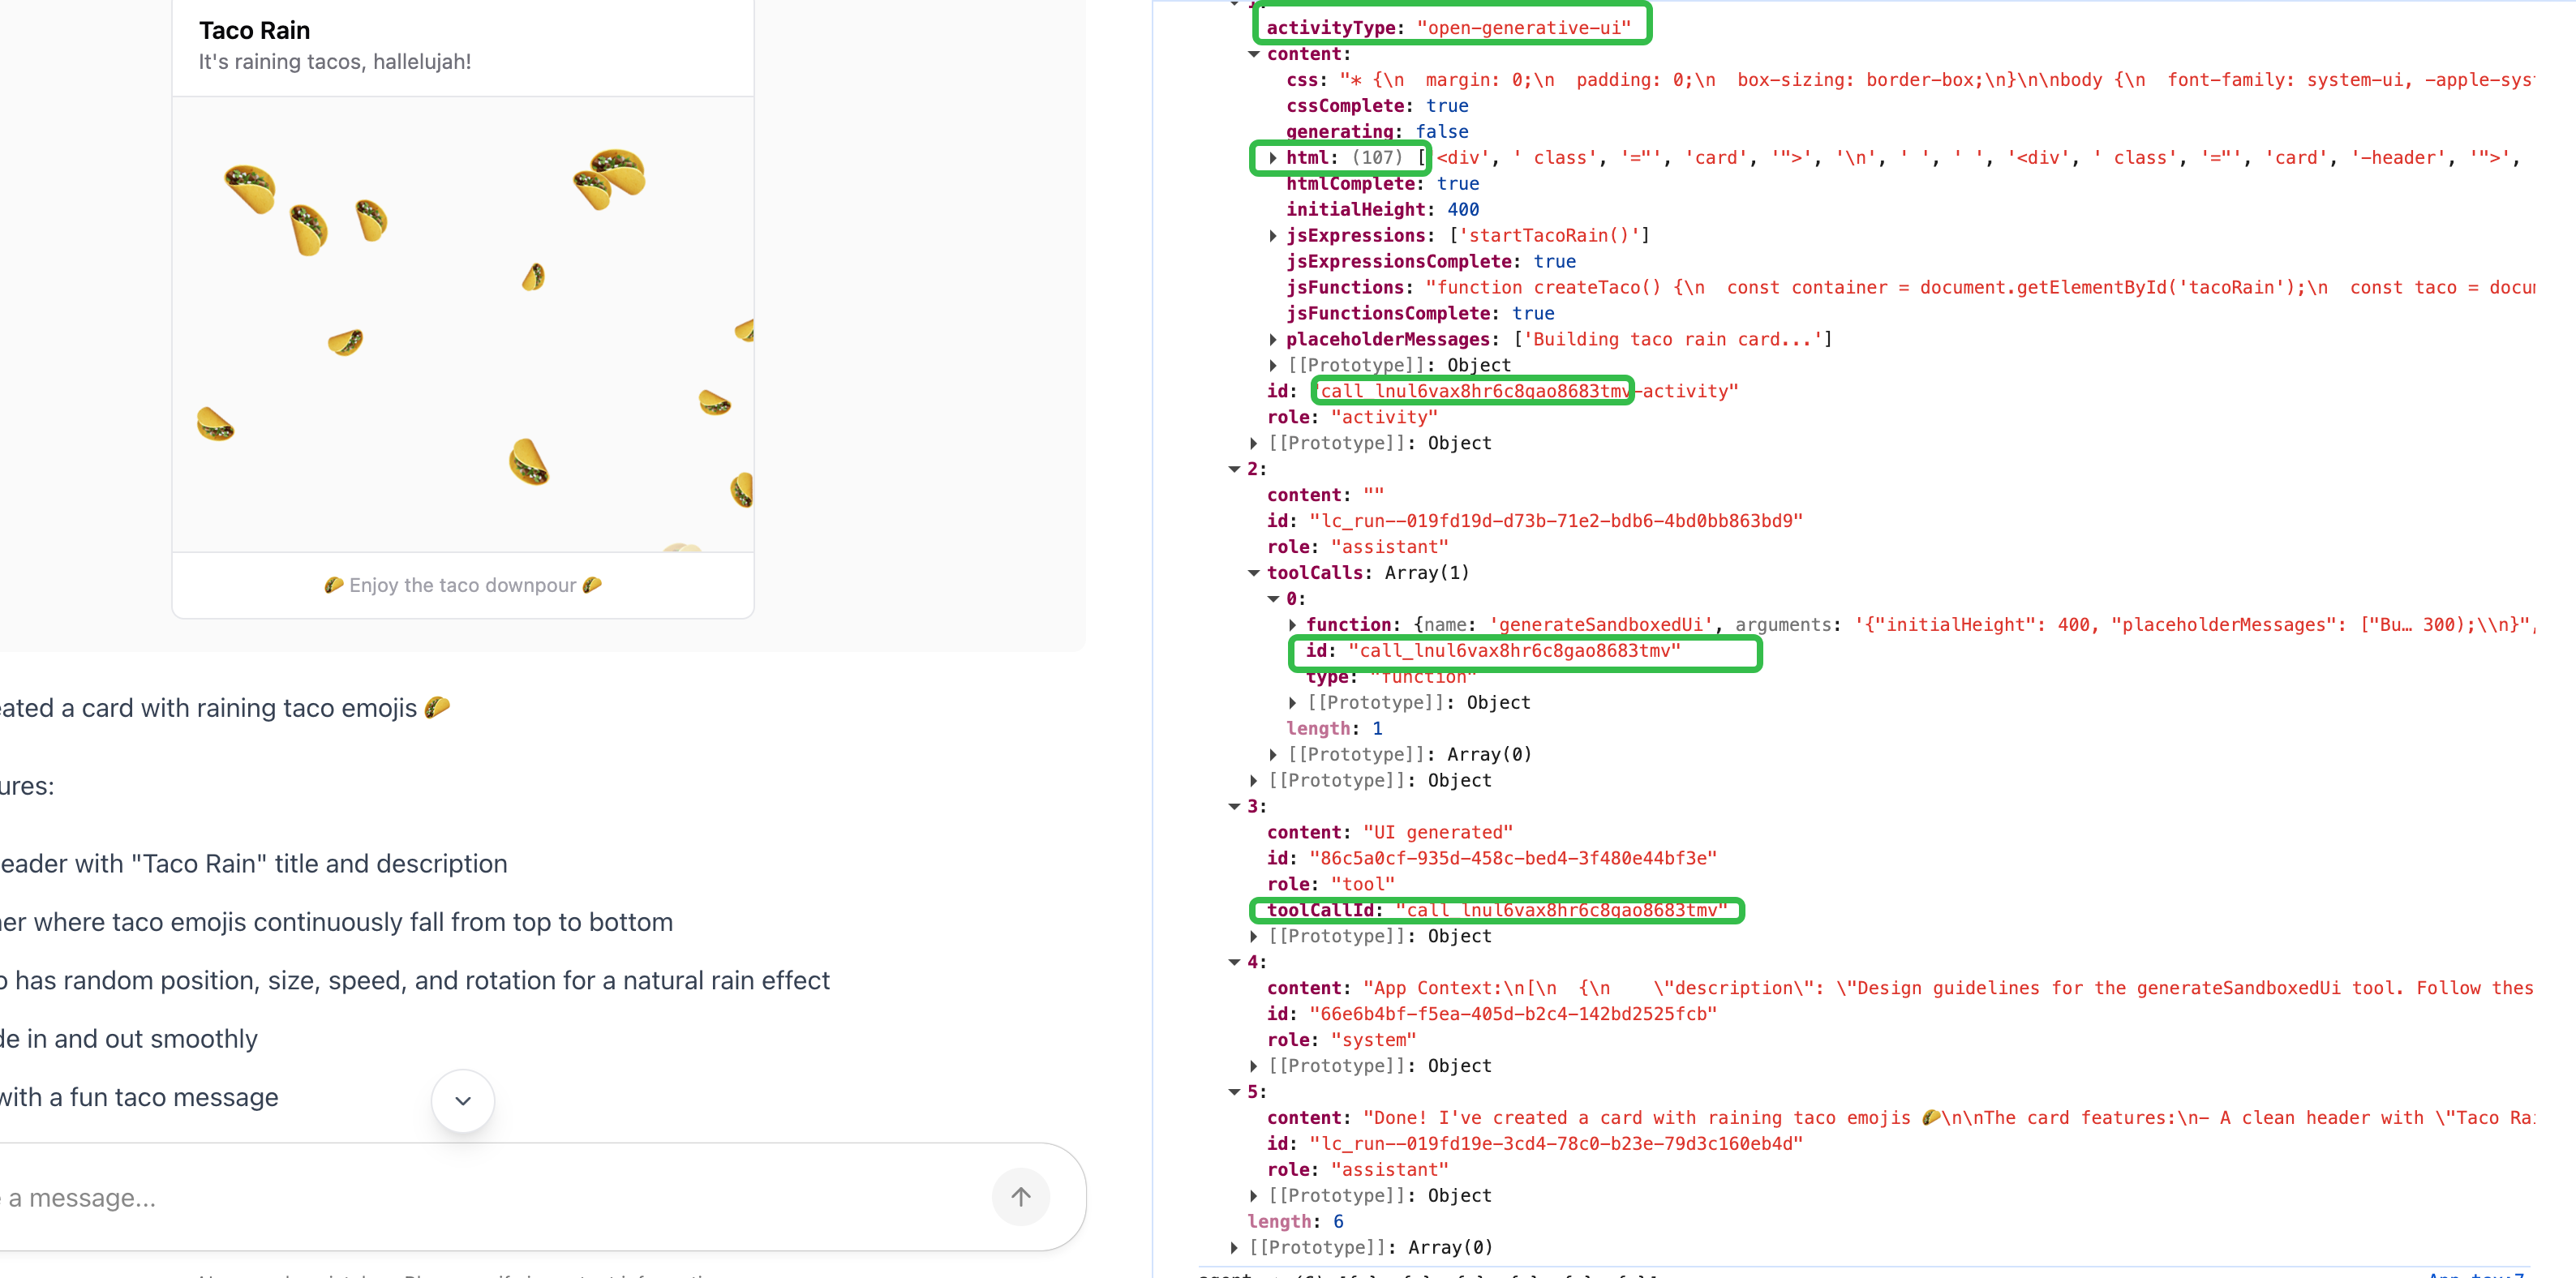
openGenerativeUI: true, // 启用 open Generative UI 代理可以生成任意类型的用户界面——包括 HTML、CSS、JavaScript 等代码,并可以直接在聊天界面中展示
mcpApps: { // 注册 MCP 应用程序
servers: [
{
type: "http",
url: "https://mcp.excalidraw.com", // <- Exalidraw MCP Server
serverId: "example_mcp_server",
},
],
},
});

const app = createCopilotEndpoint({
runtime,
basePath: "/api/copilotkit",
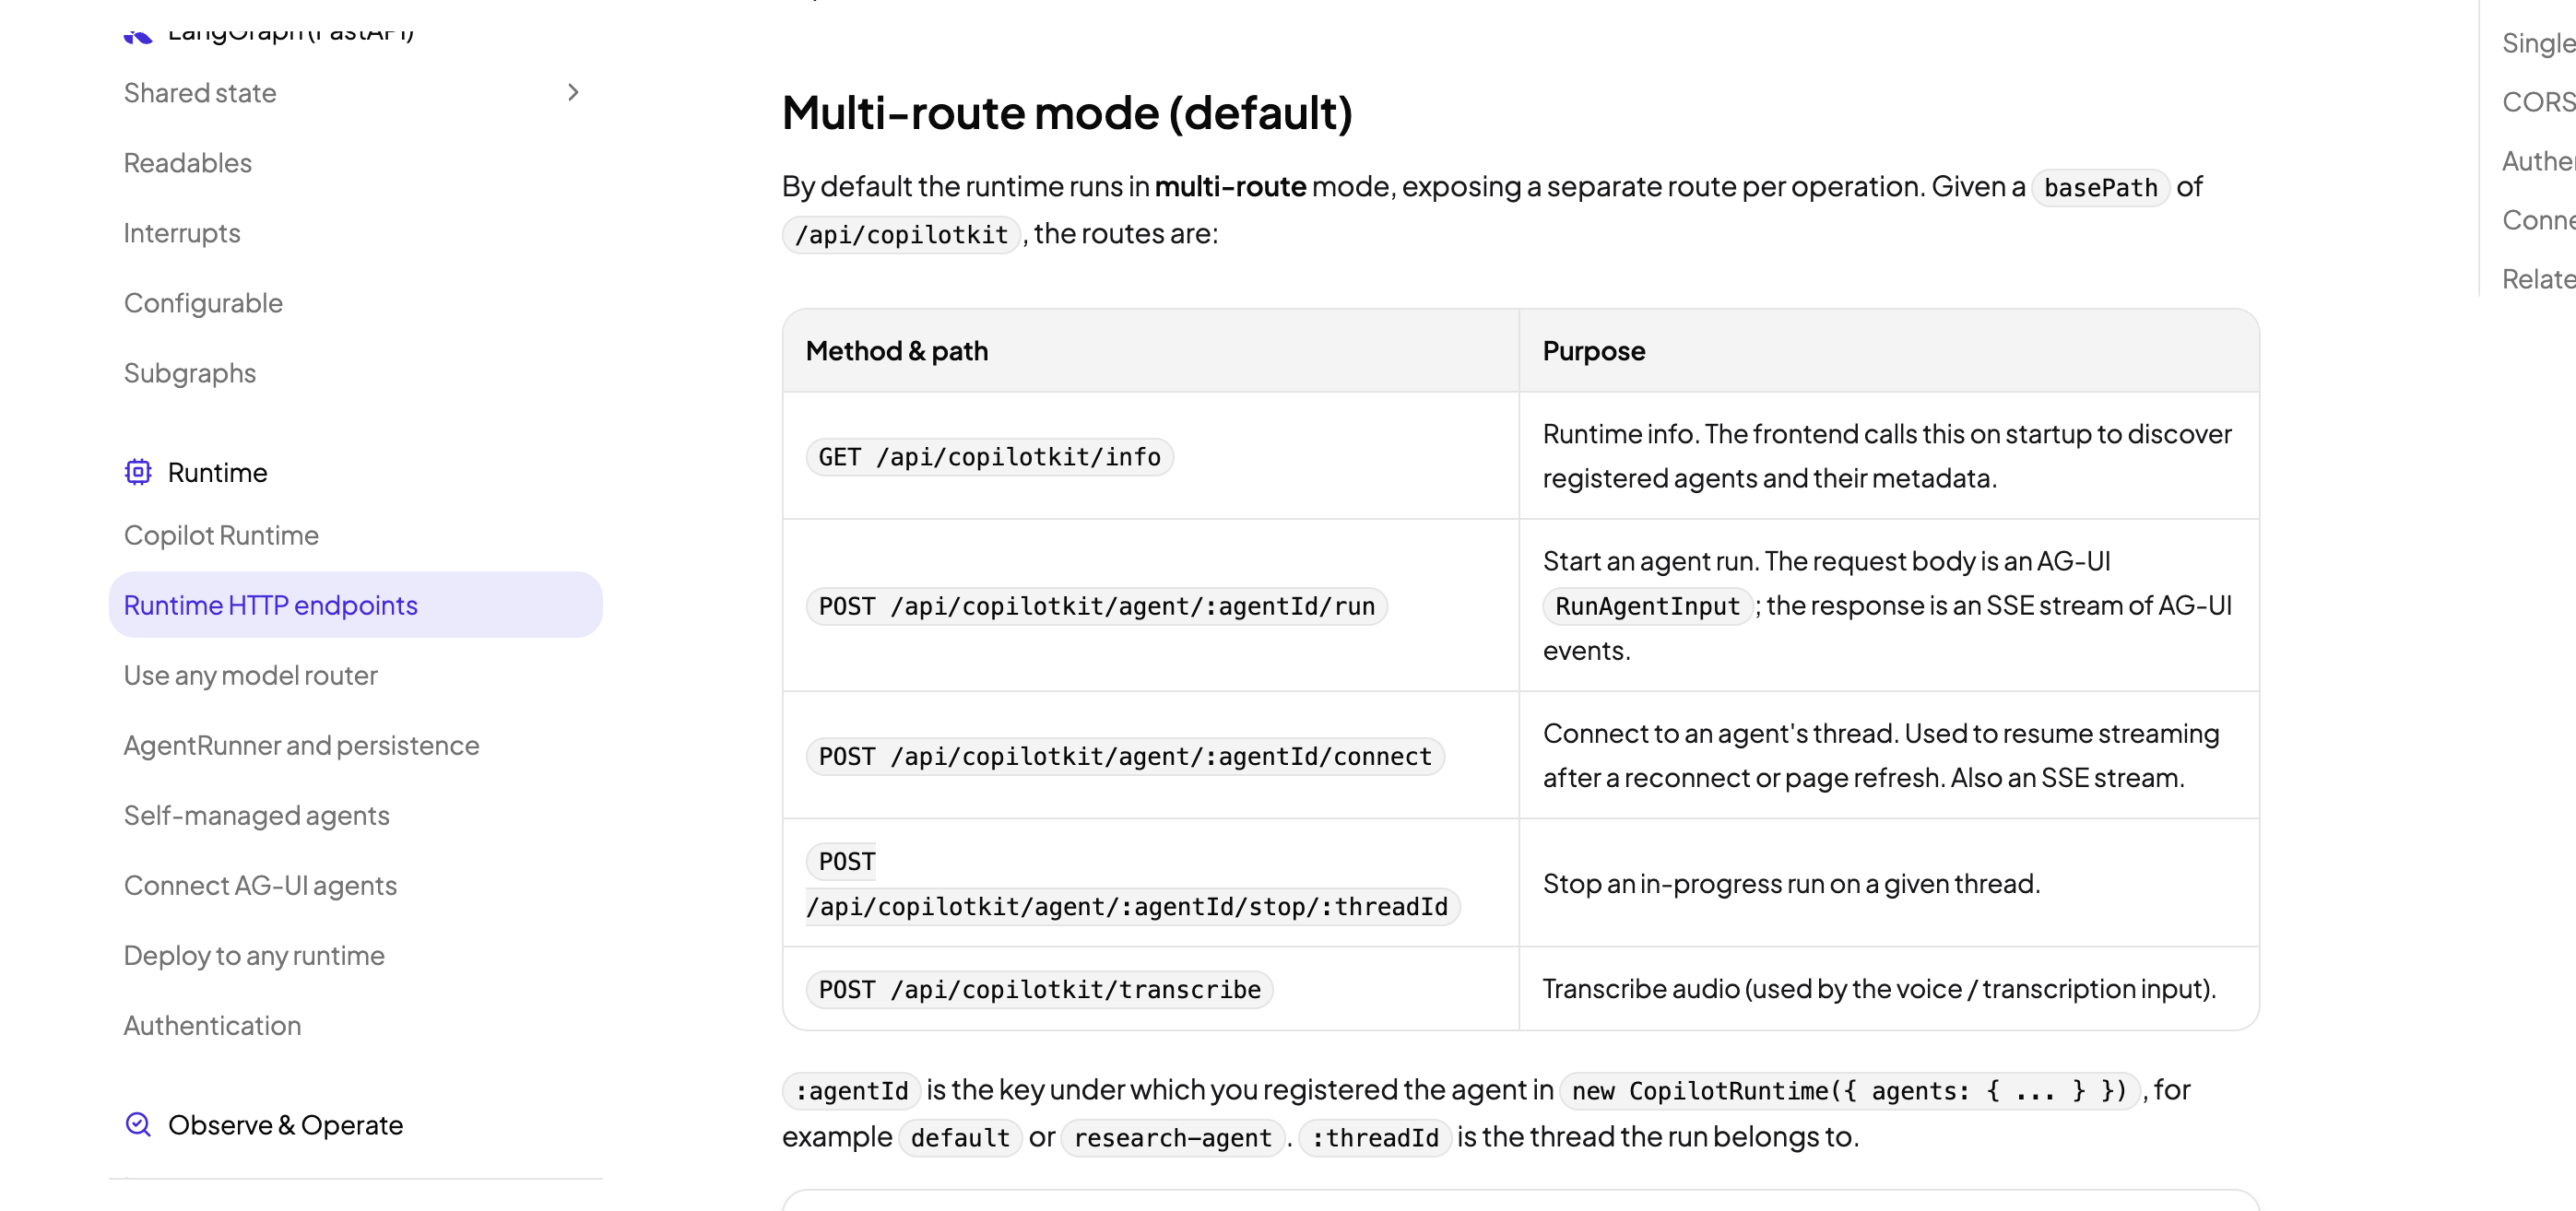
});

serve({ fetch: app.fetch, port: 4004 }, () => {
console.log("\u2713 CopilotKit API server running at http://localhost:4004");
});

三类组件注册流程总览


源码分析:
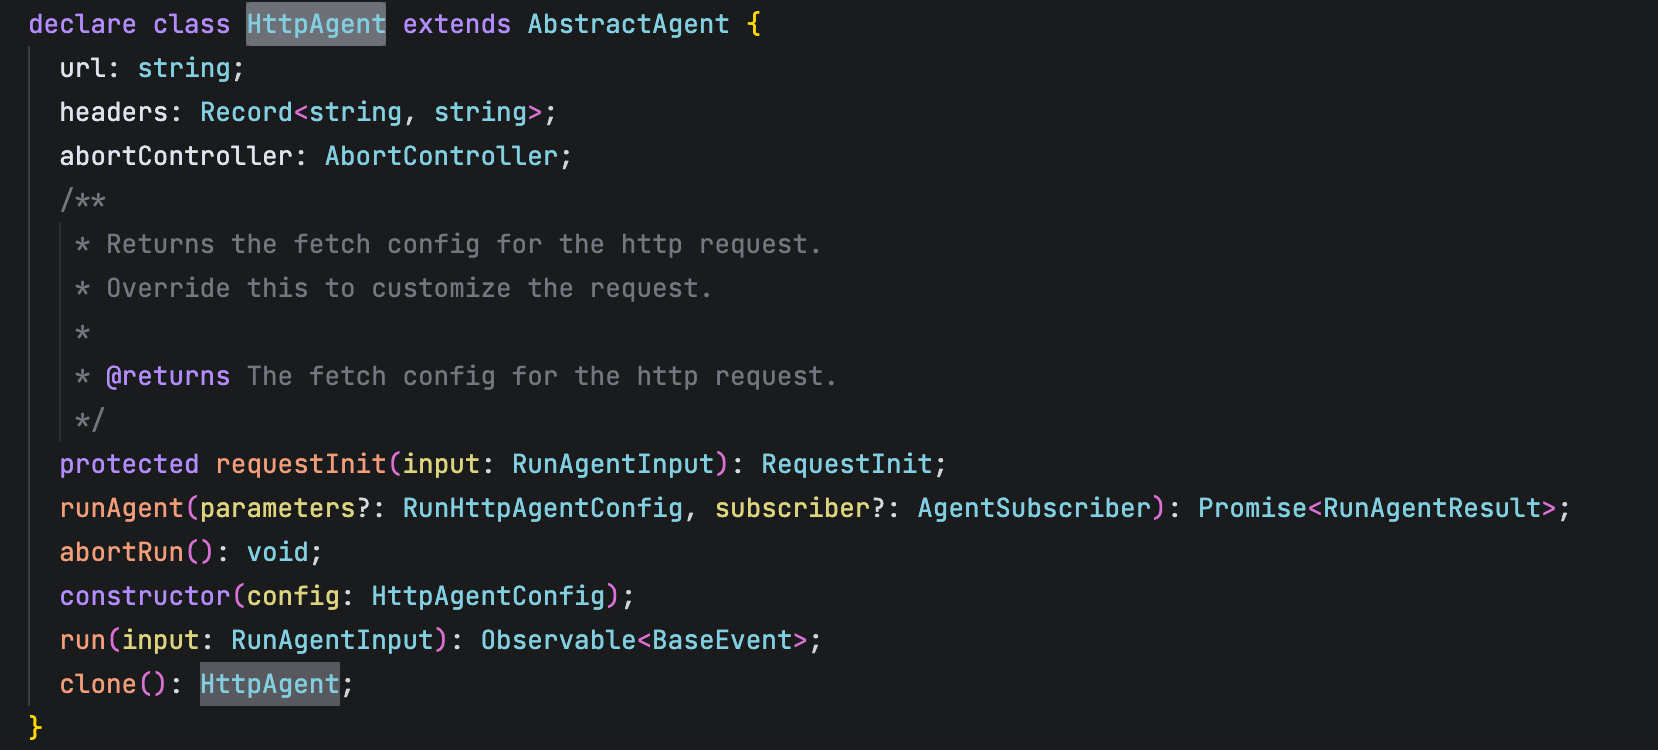
已知CopilotKit 是一个基于agui协议的框架,agui协议是基于http的上层协议
LangGraphHttpAgent 从httpAgent 中继承
本身的作用就是通过http协议与agent进行通信

The HttpAgent extends AbstractAgent to provide HTTP-based connectivity to remote AI agents. It handles the request/response cycle and transforms the HTTP event stream into standard Agent User Interaction Protocol events.

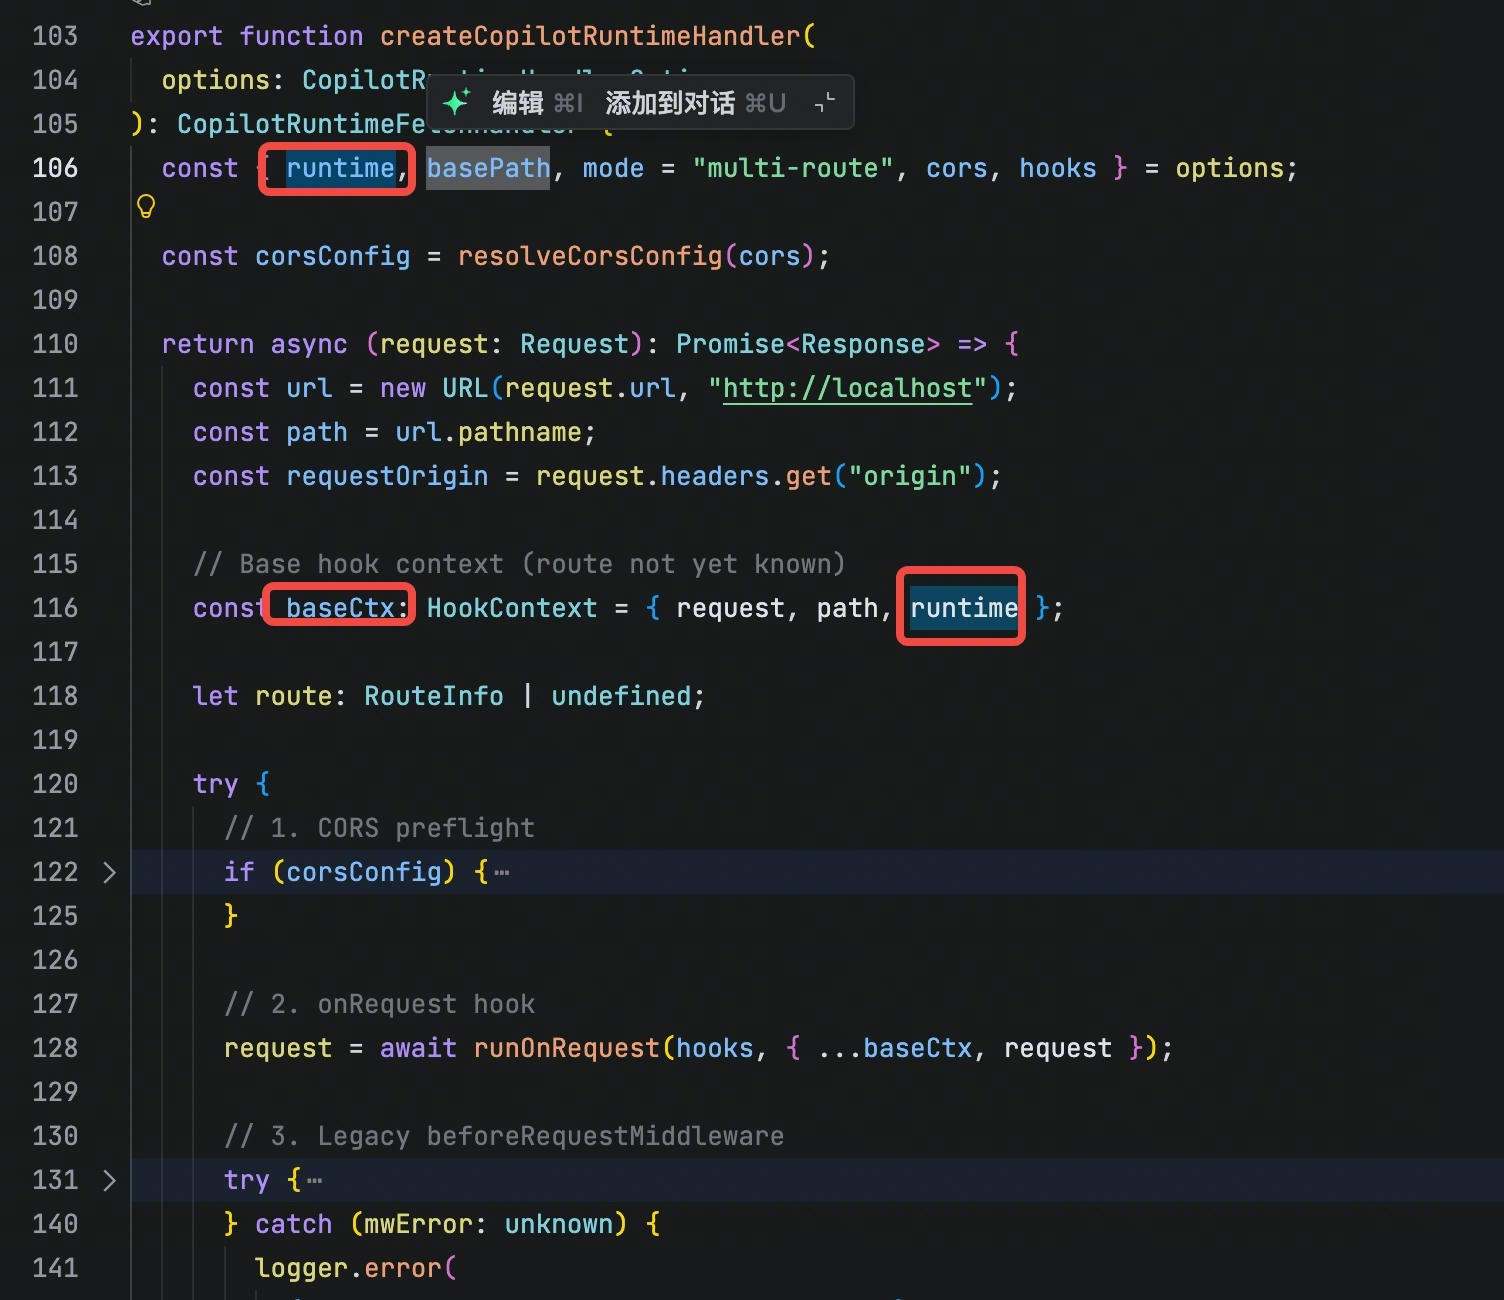
CopilotRuntime 是一个桥接器,用于前端和后端agent服务之间的通信,控制请求发送,信息处理等操作

createCopilotEndpoint 会创建一个node服务,利用CopilotRuntime实例,将tools 信息给到agent 并处理请求过程中的信息,返回给前端

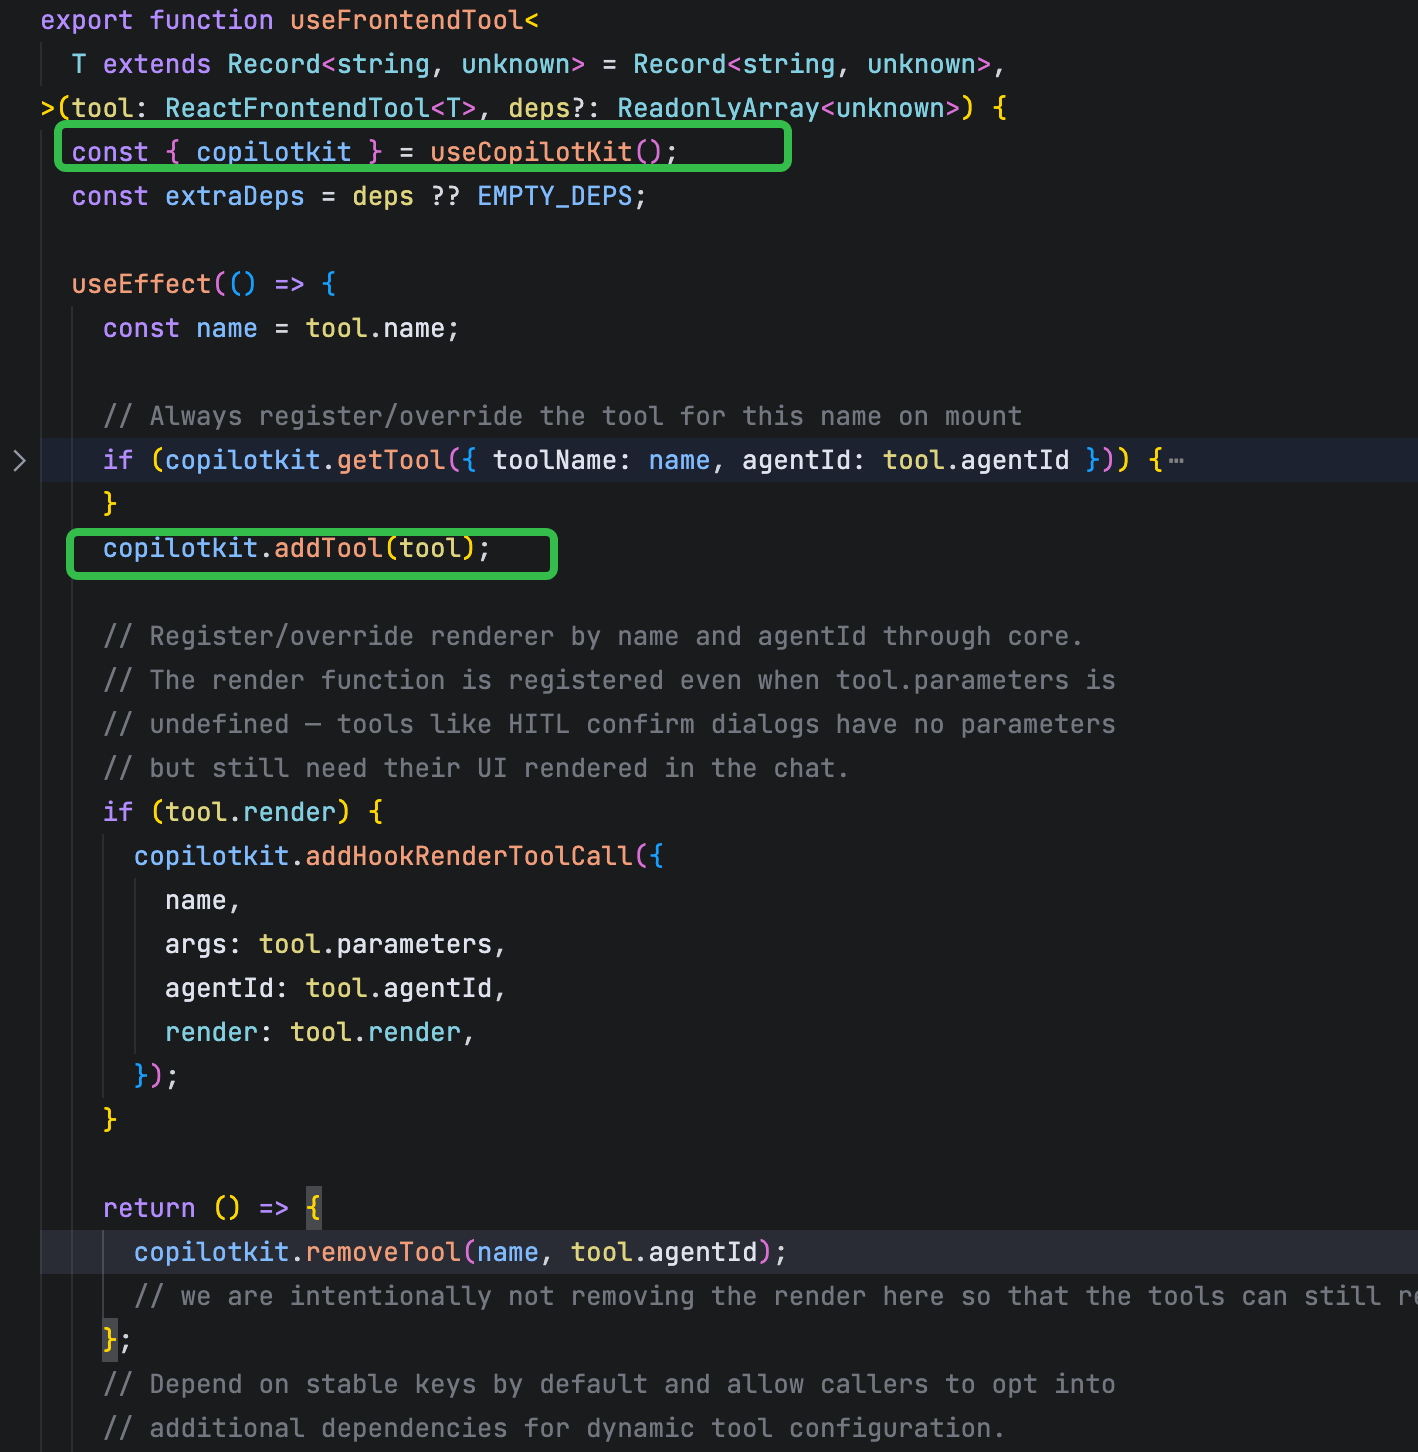
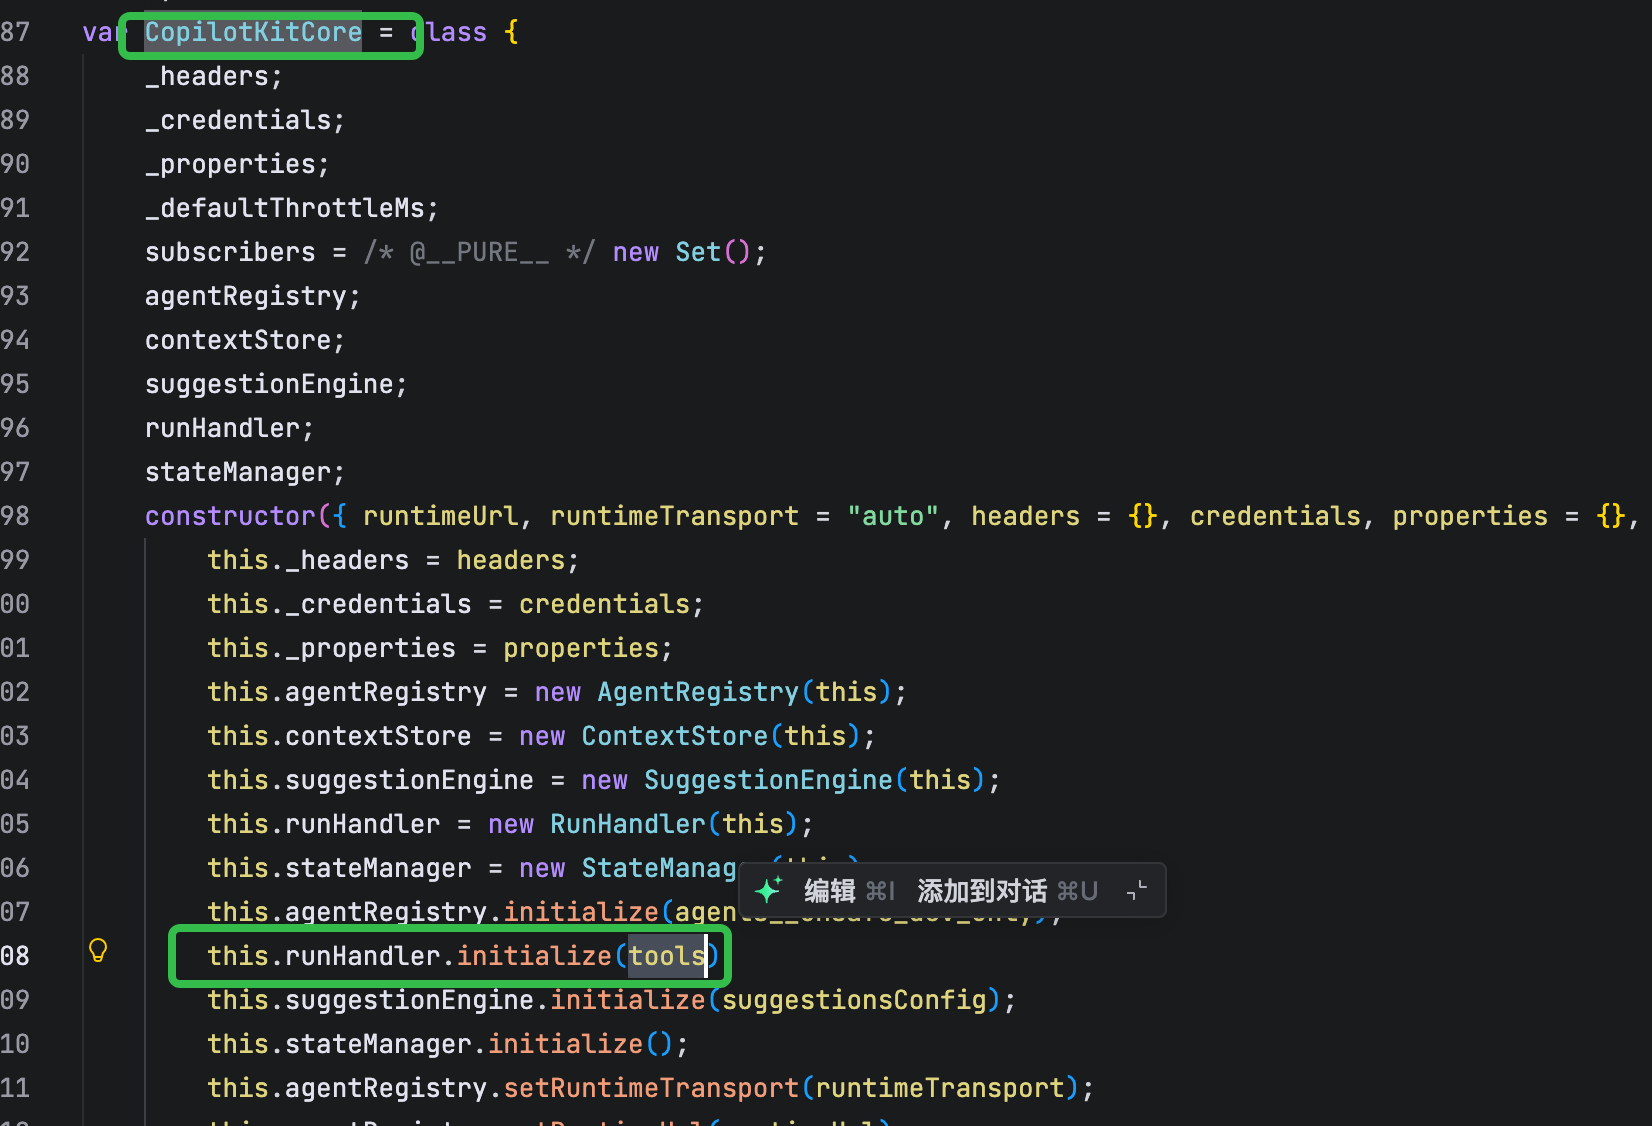
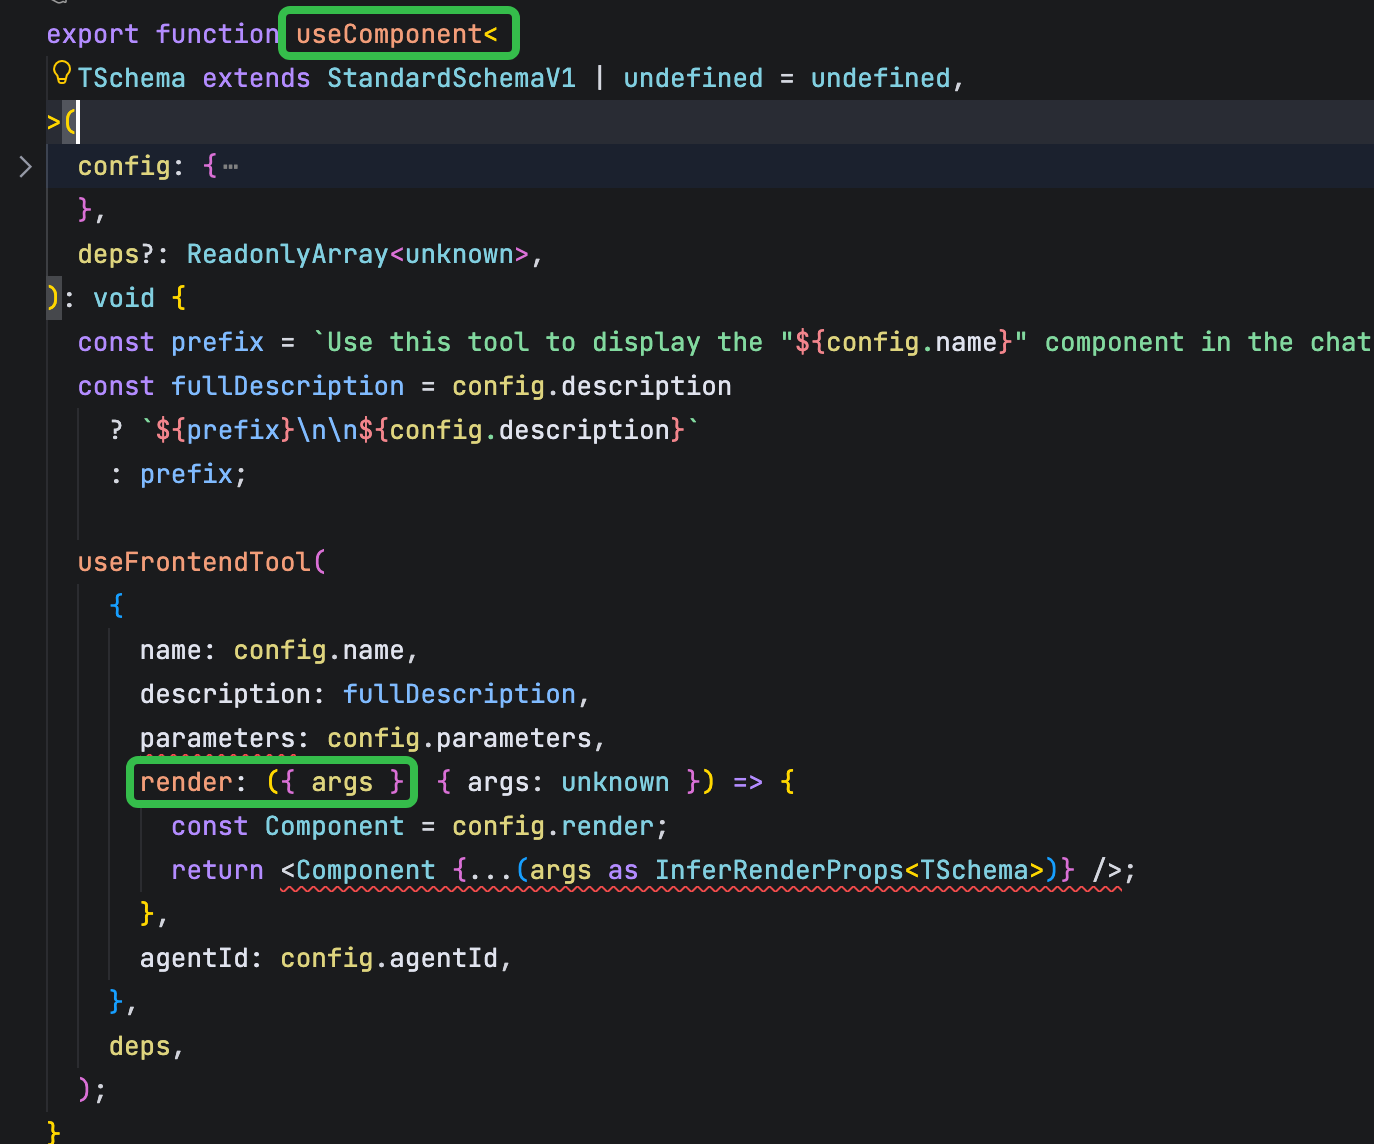
对于第1类 使用 useComponent 进行组件注册的过程会使用useFrontendTool 方法,将组件注册到copilotkit 实例的tools 中


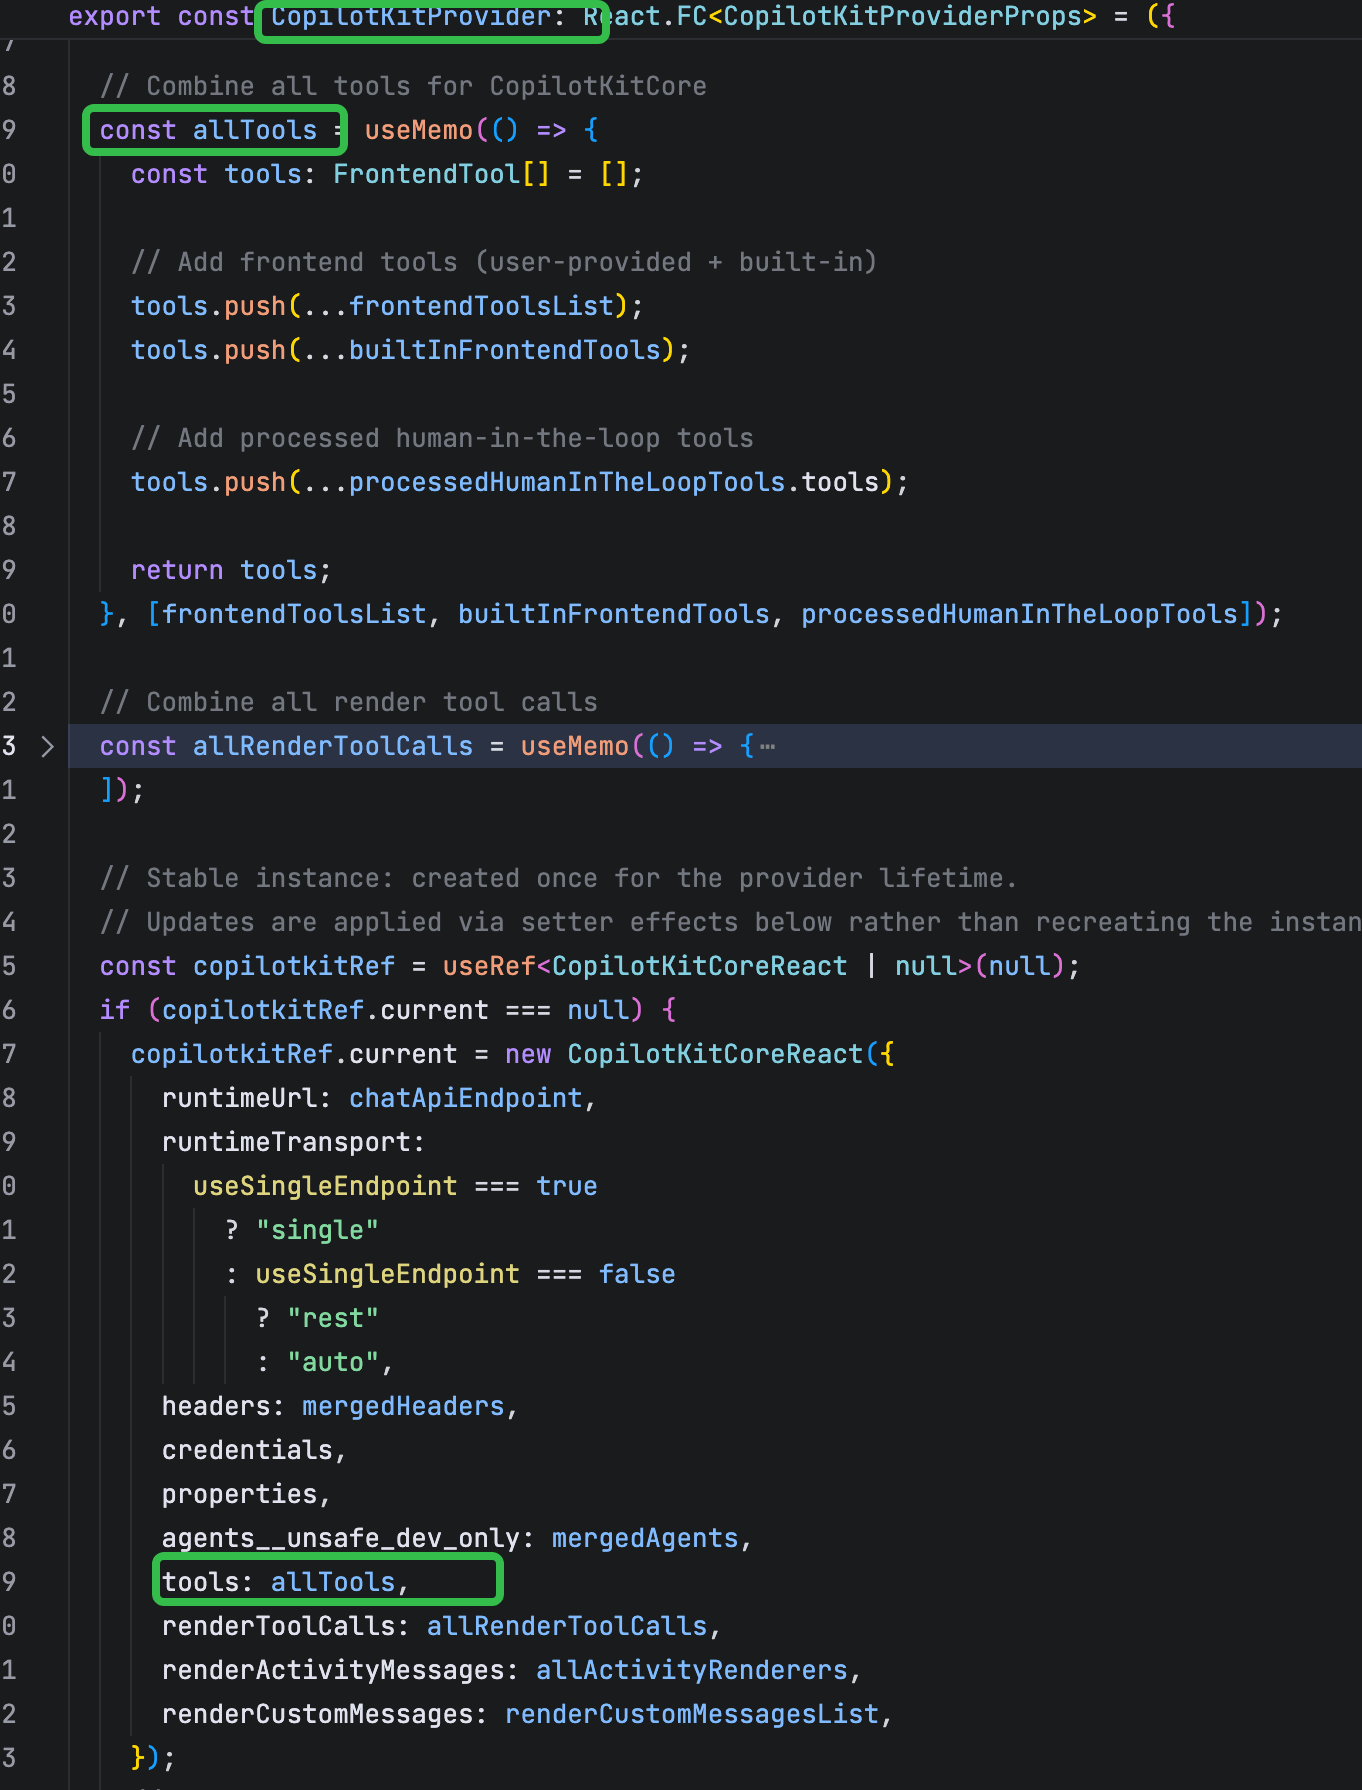
对于 使用 组件传入的tools 在实例化过程中会自动注册到copilotkit 实例的tools 中

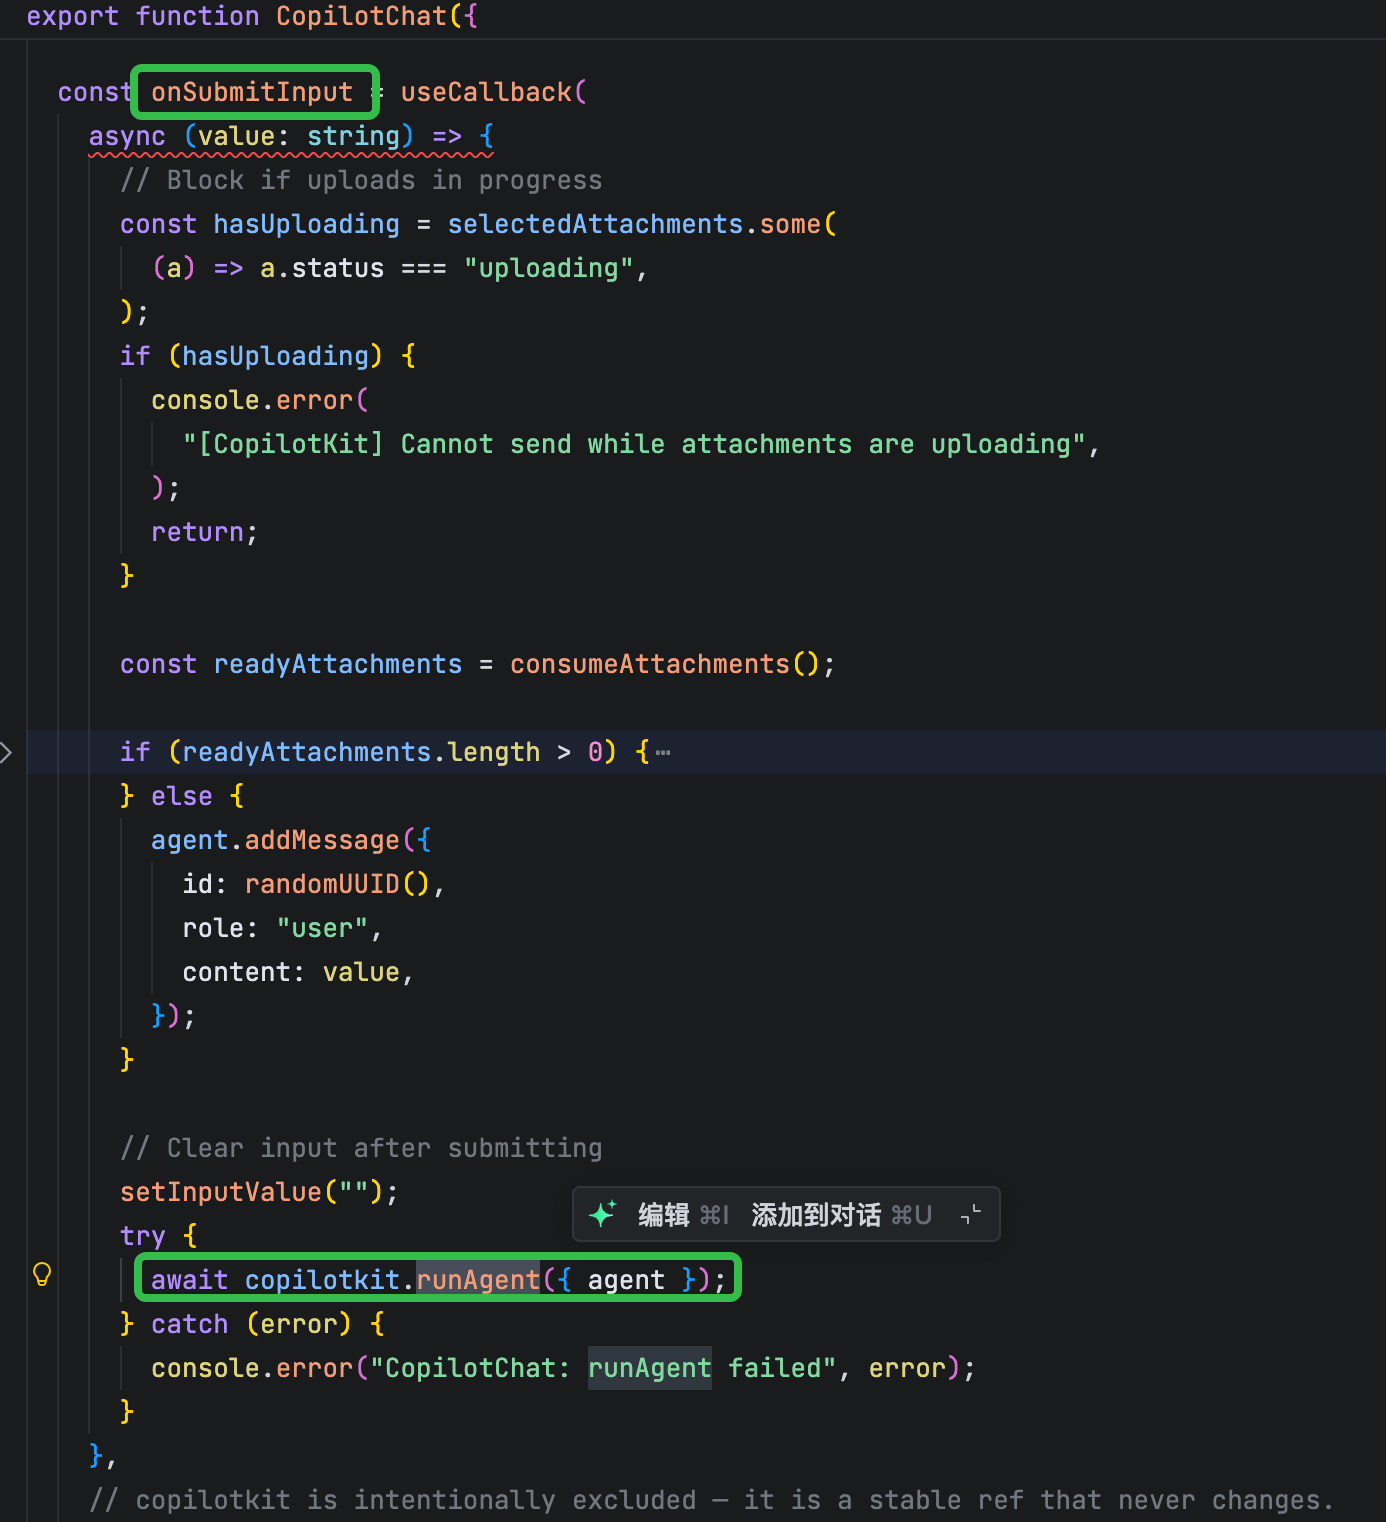
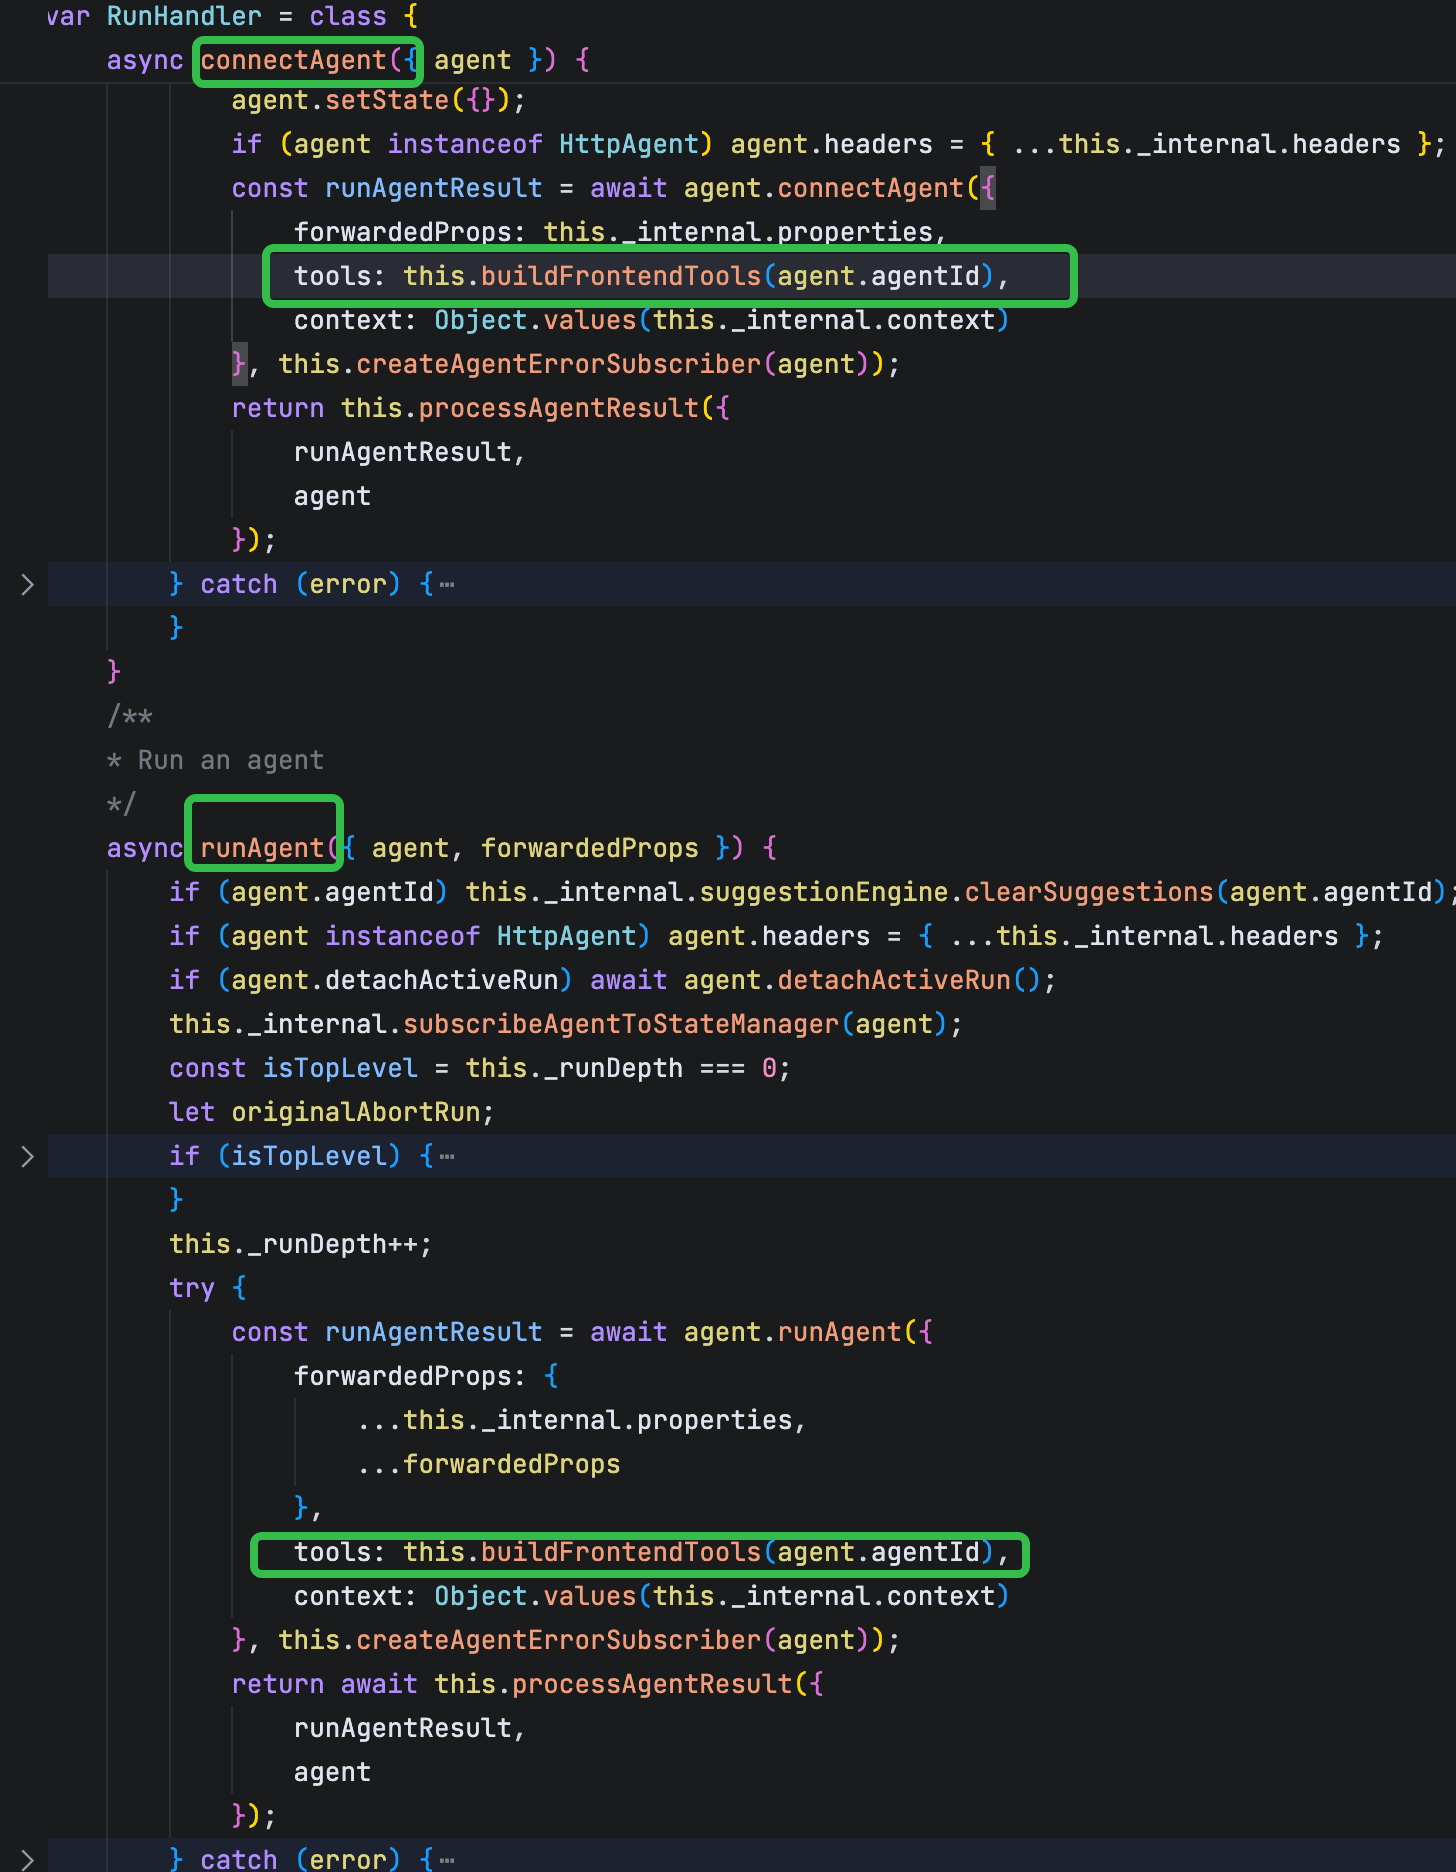
从输入框提交信息后会经过copiloykit 实例发起runAgent

在初始化创建的时候就会传入tools, 后续在connectAgent 和 runAgent 中都会将tools 信息传递给后端agent

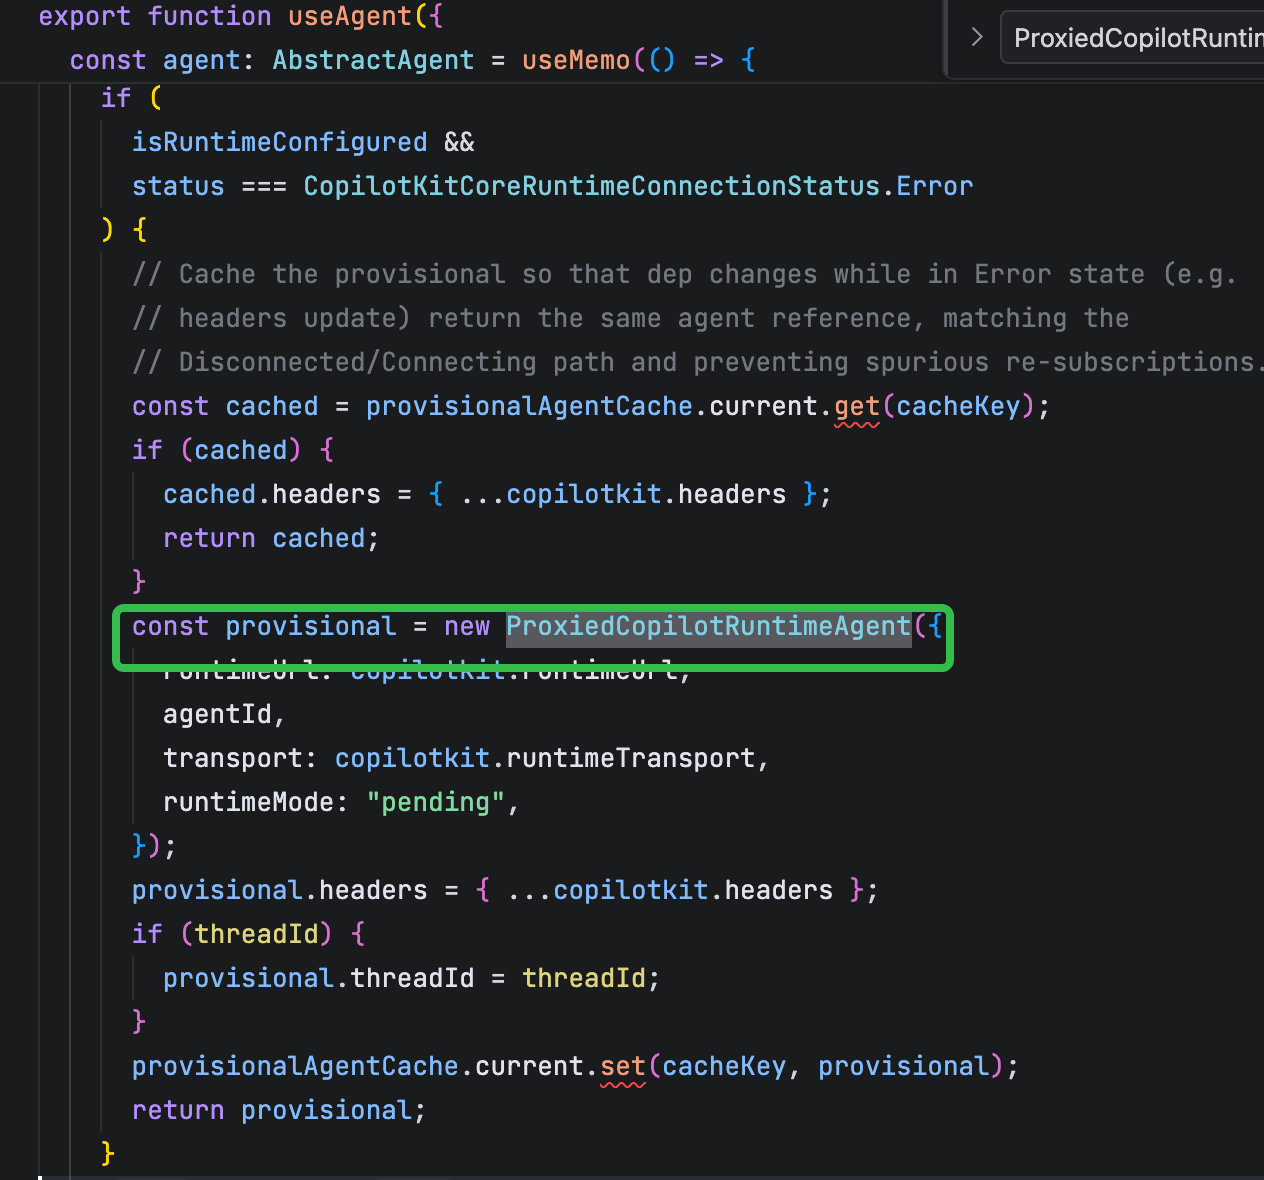
agent 本身是一个http-agent

1
2
3
4
5
var ProxiedCopilotRuntimeAgent = class ProxiedCopilotRuntimeAgent extends HttpAgent {
constructor(options) {
super(options);
}
}

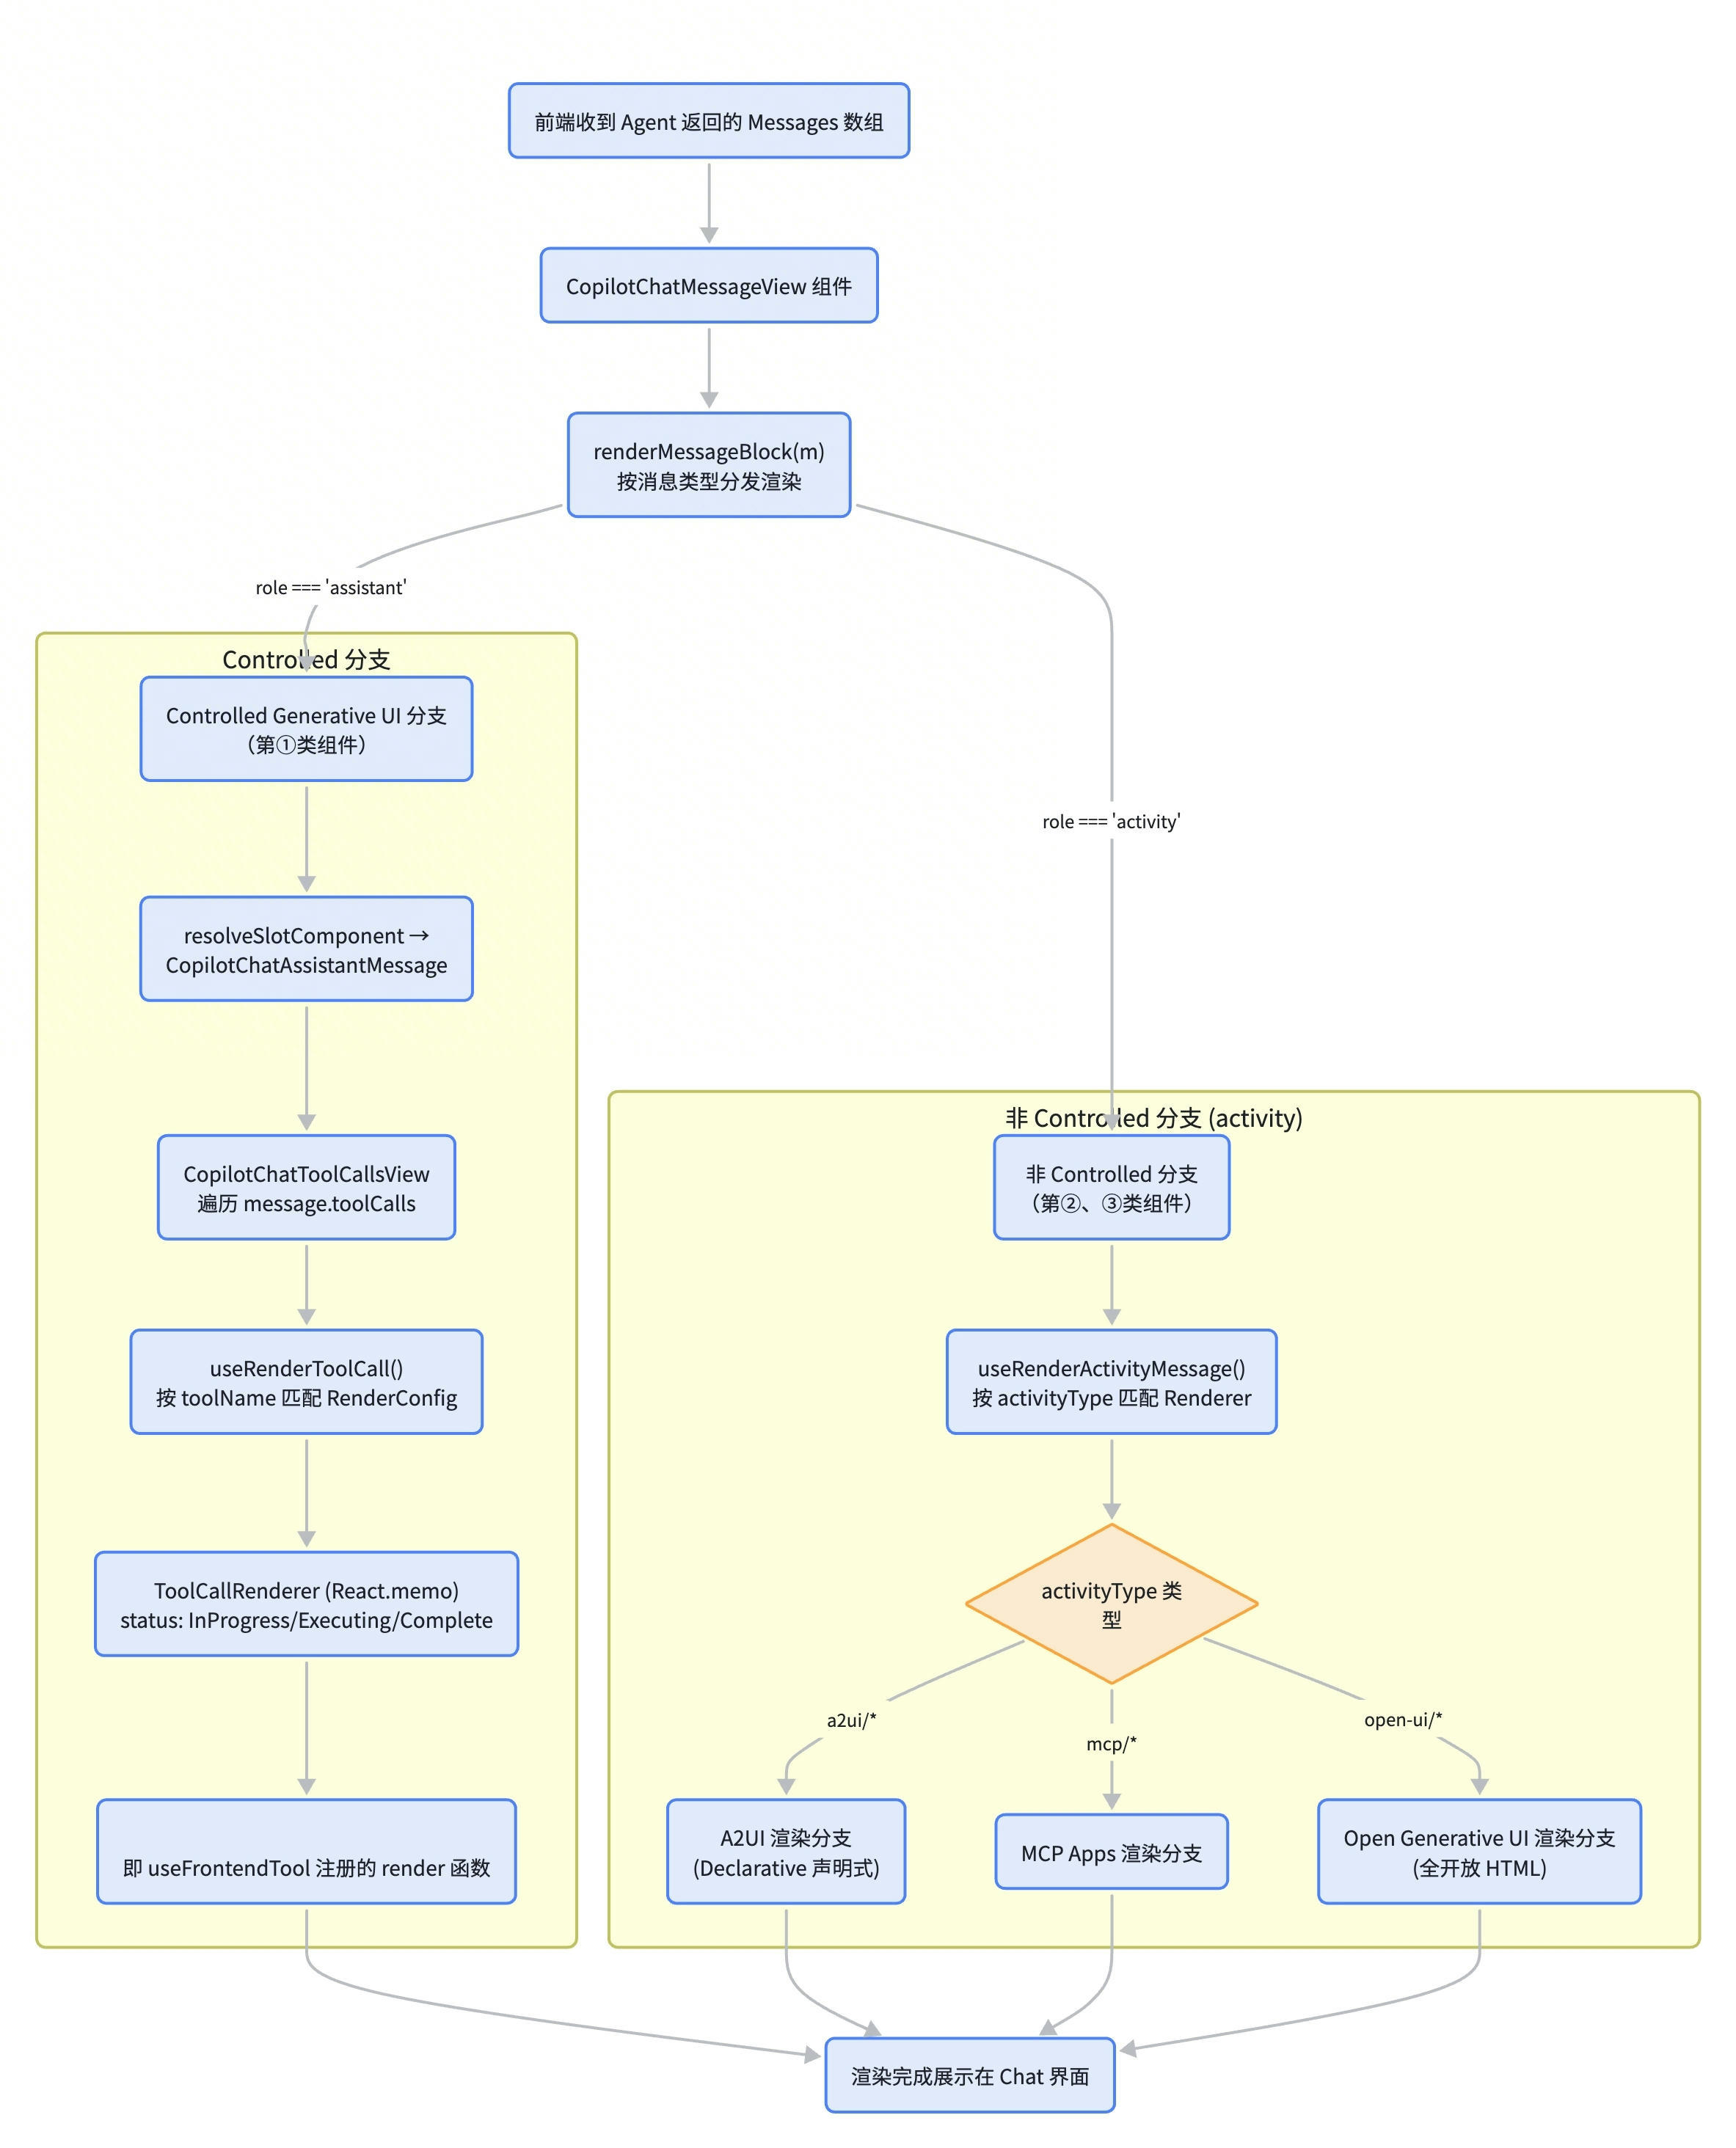
多样的UI界面是谁渲染的

UI 渲染总览流程

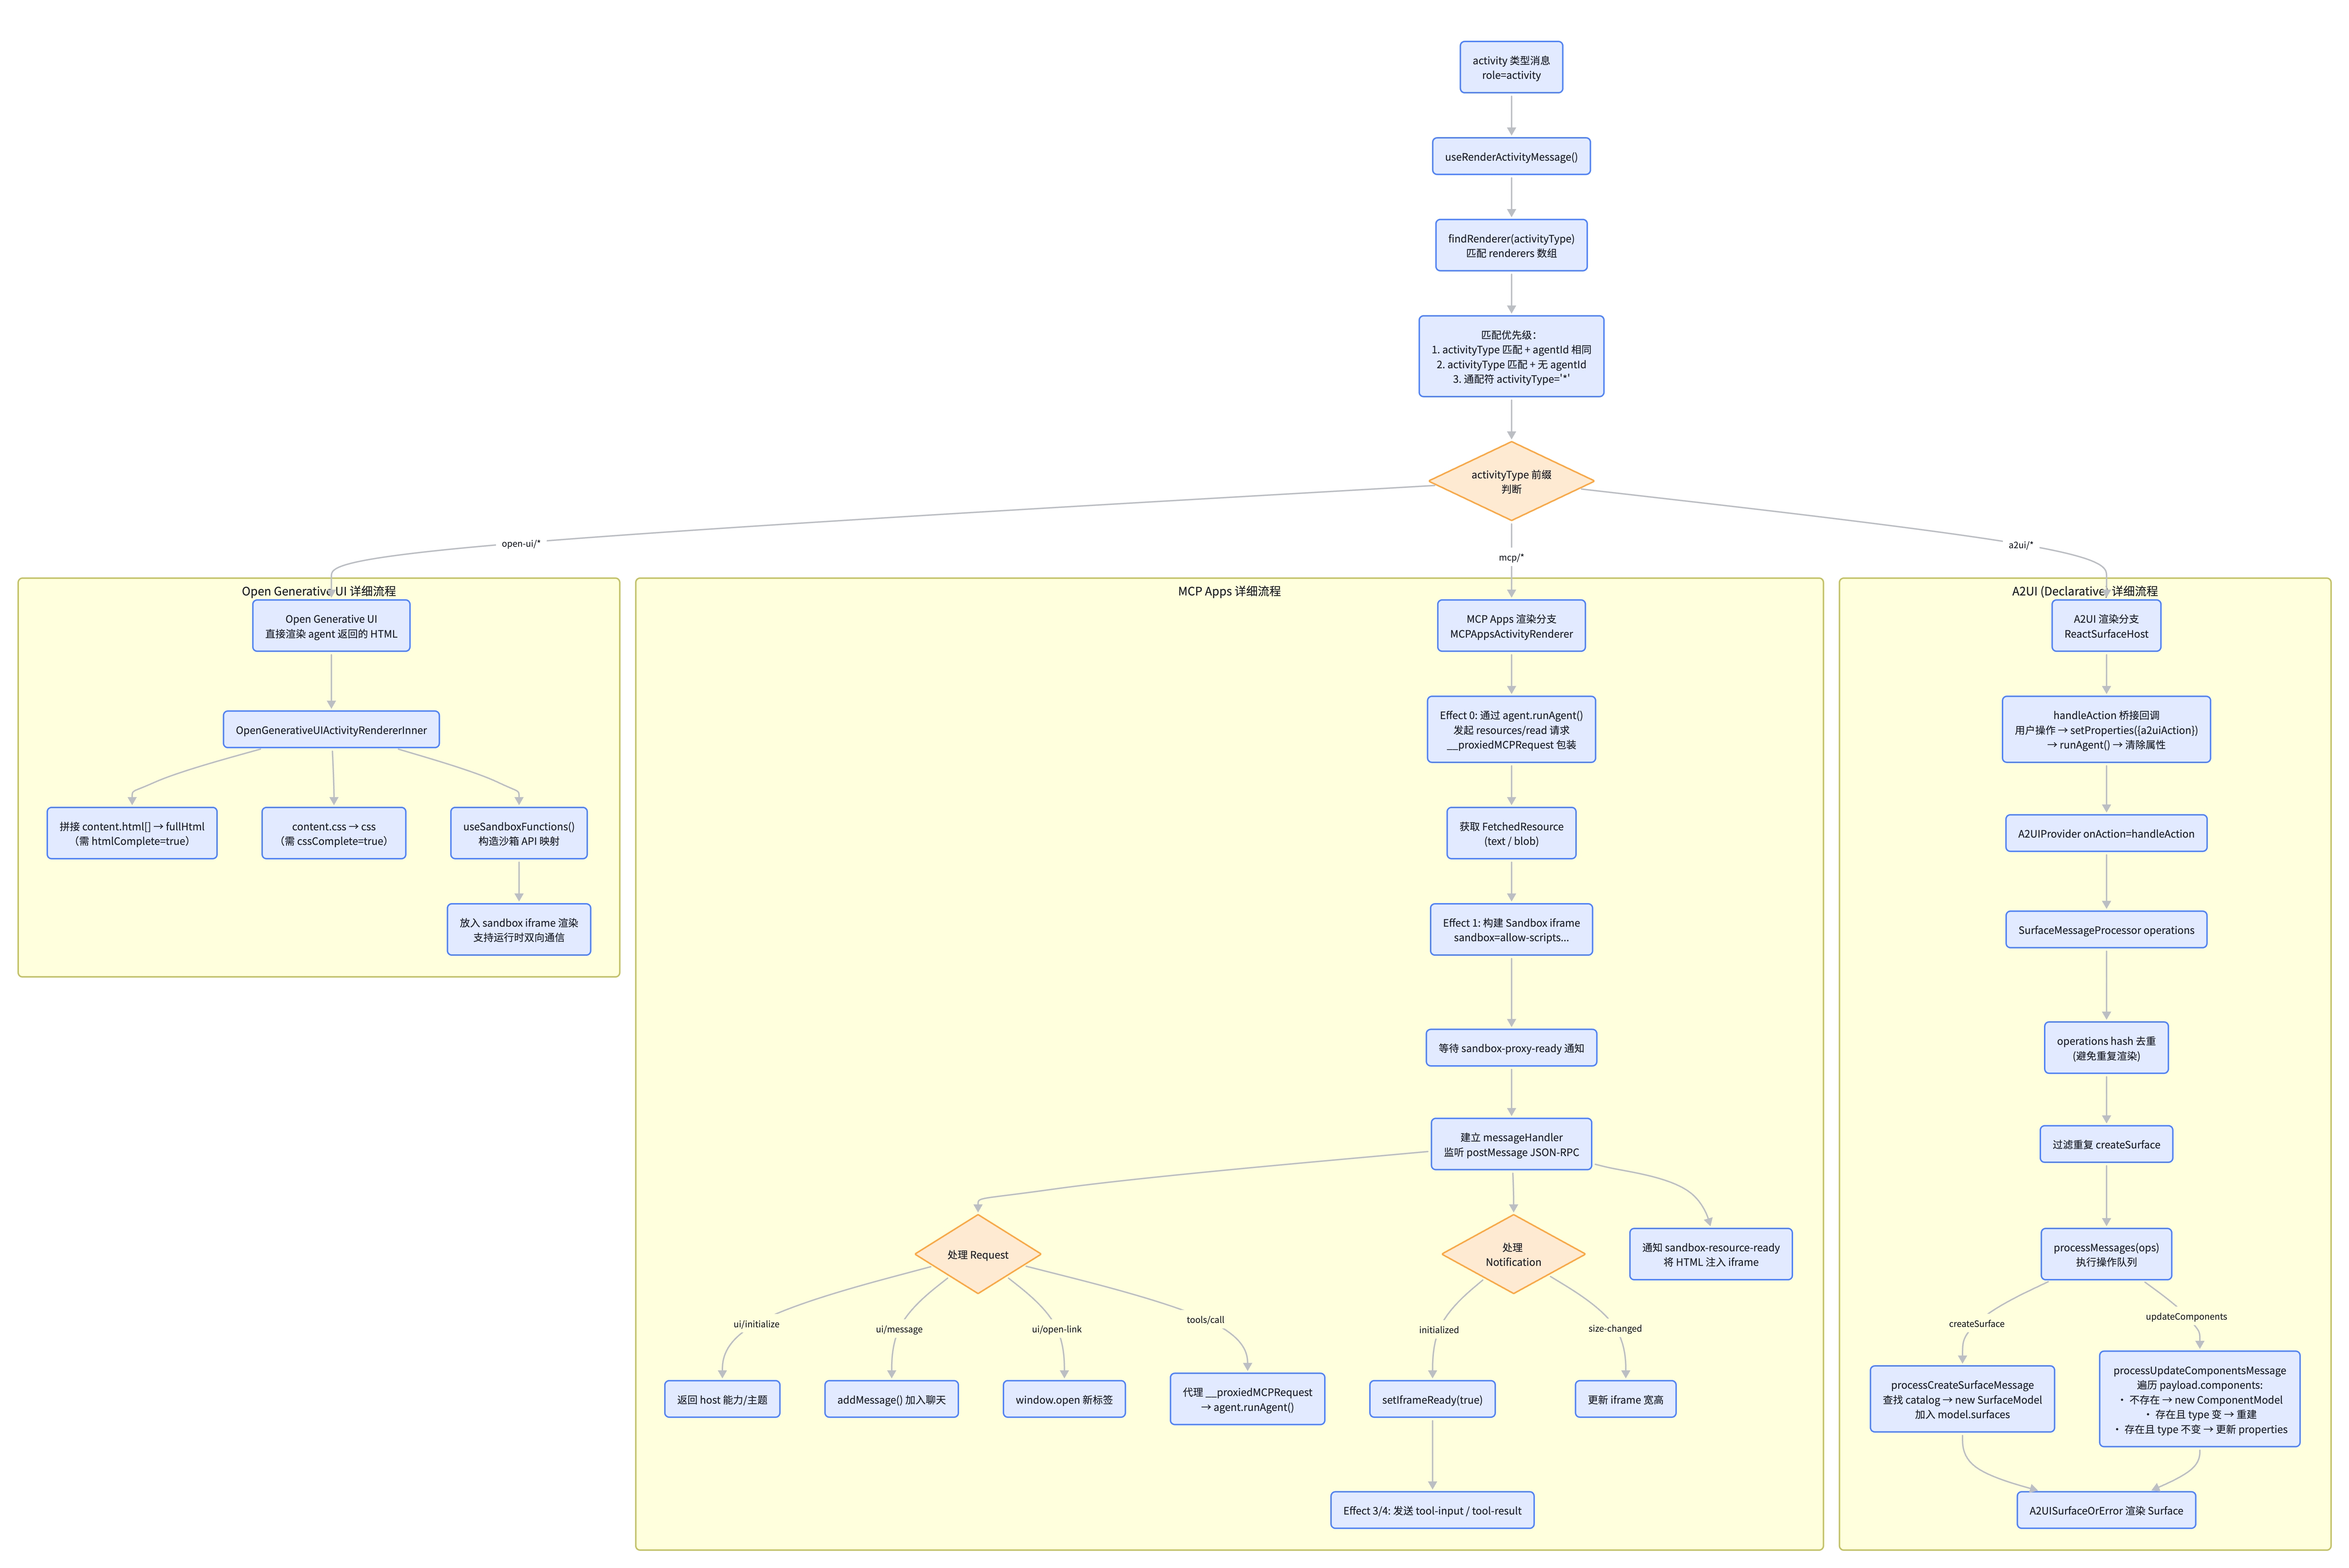
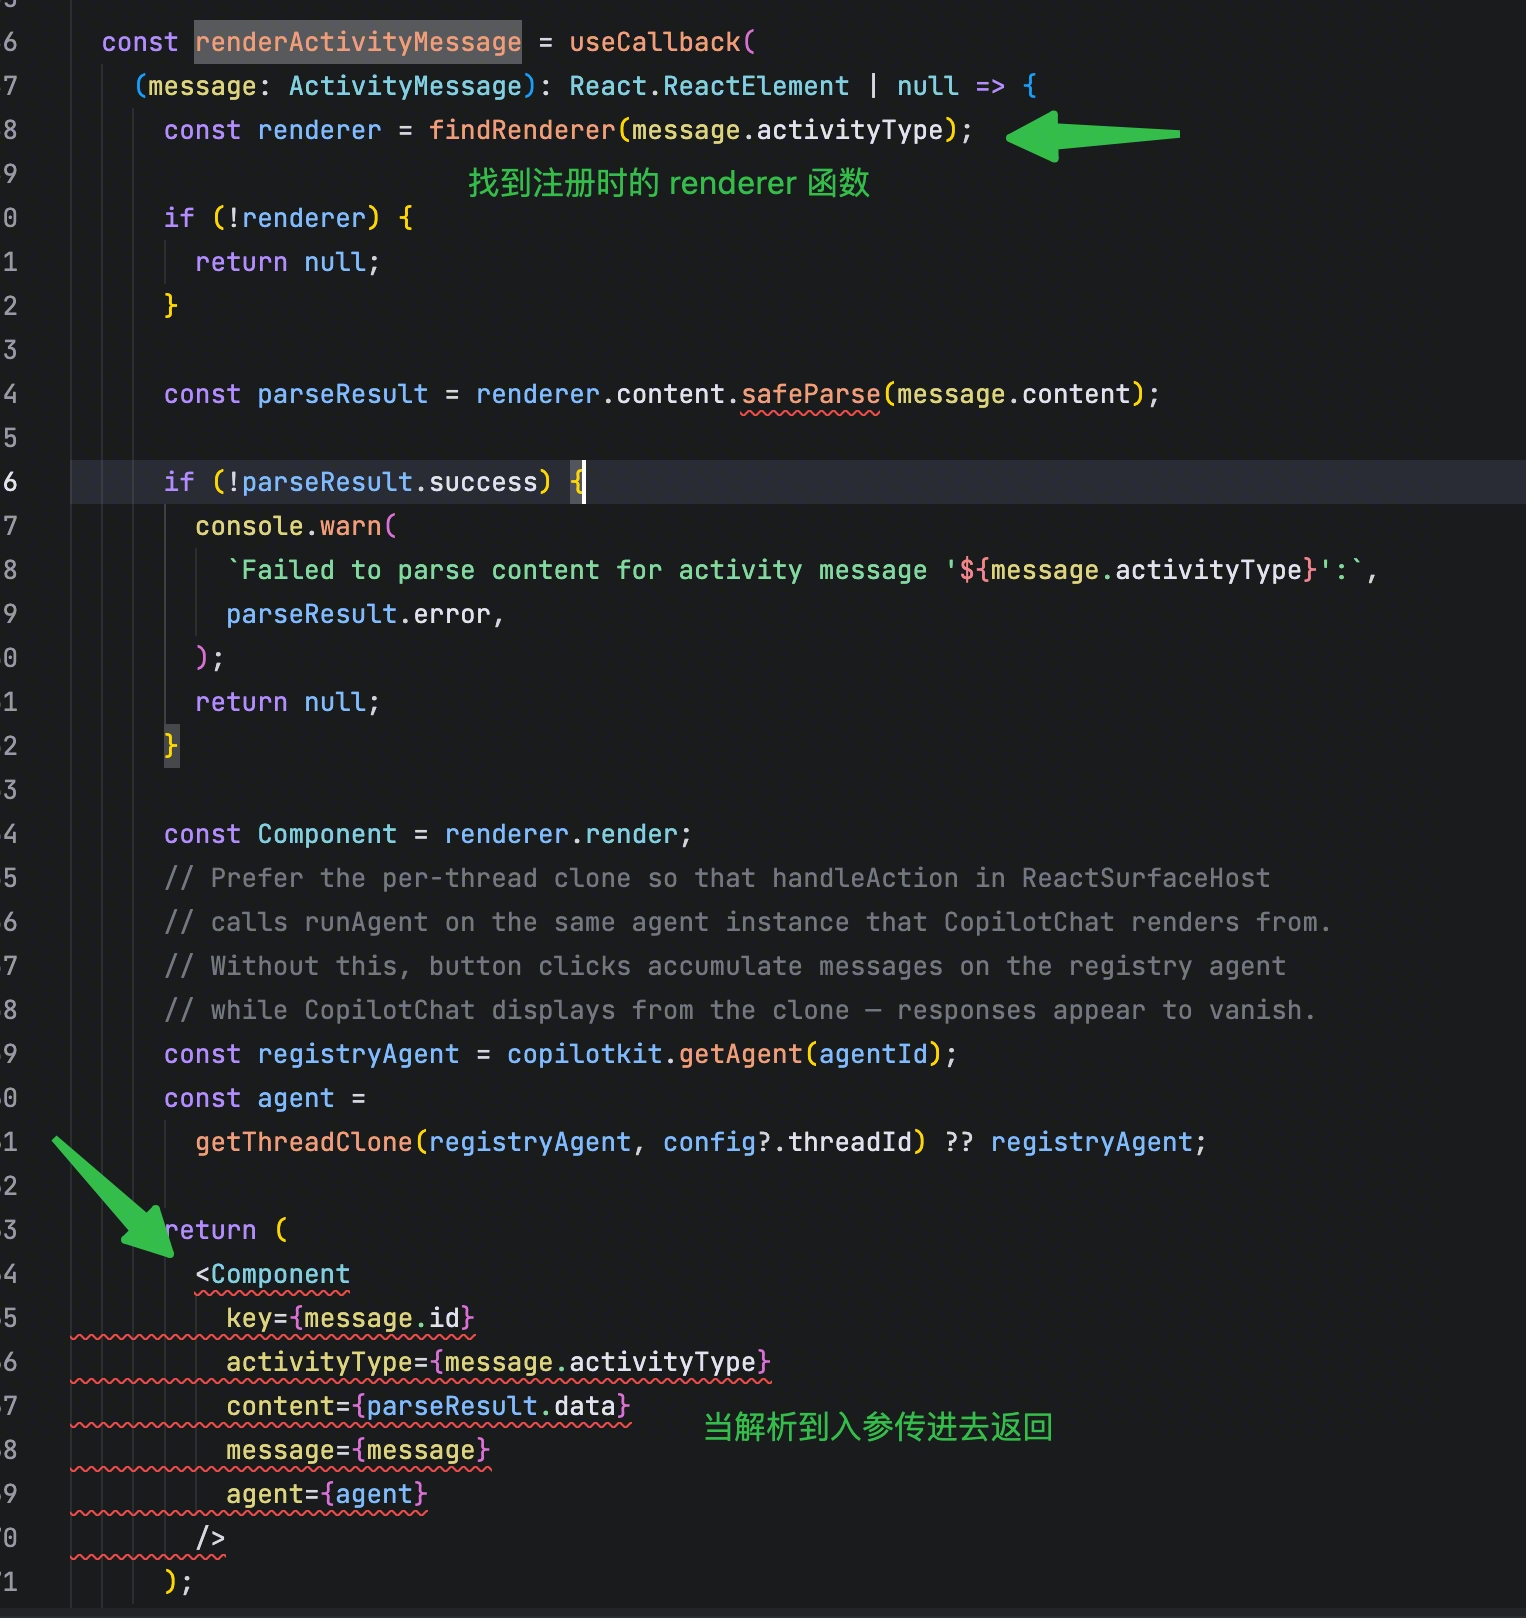
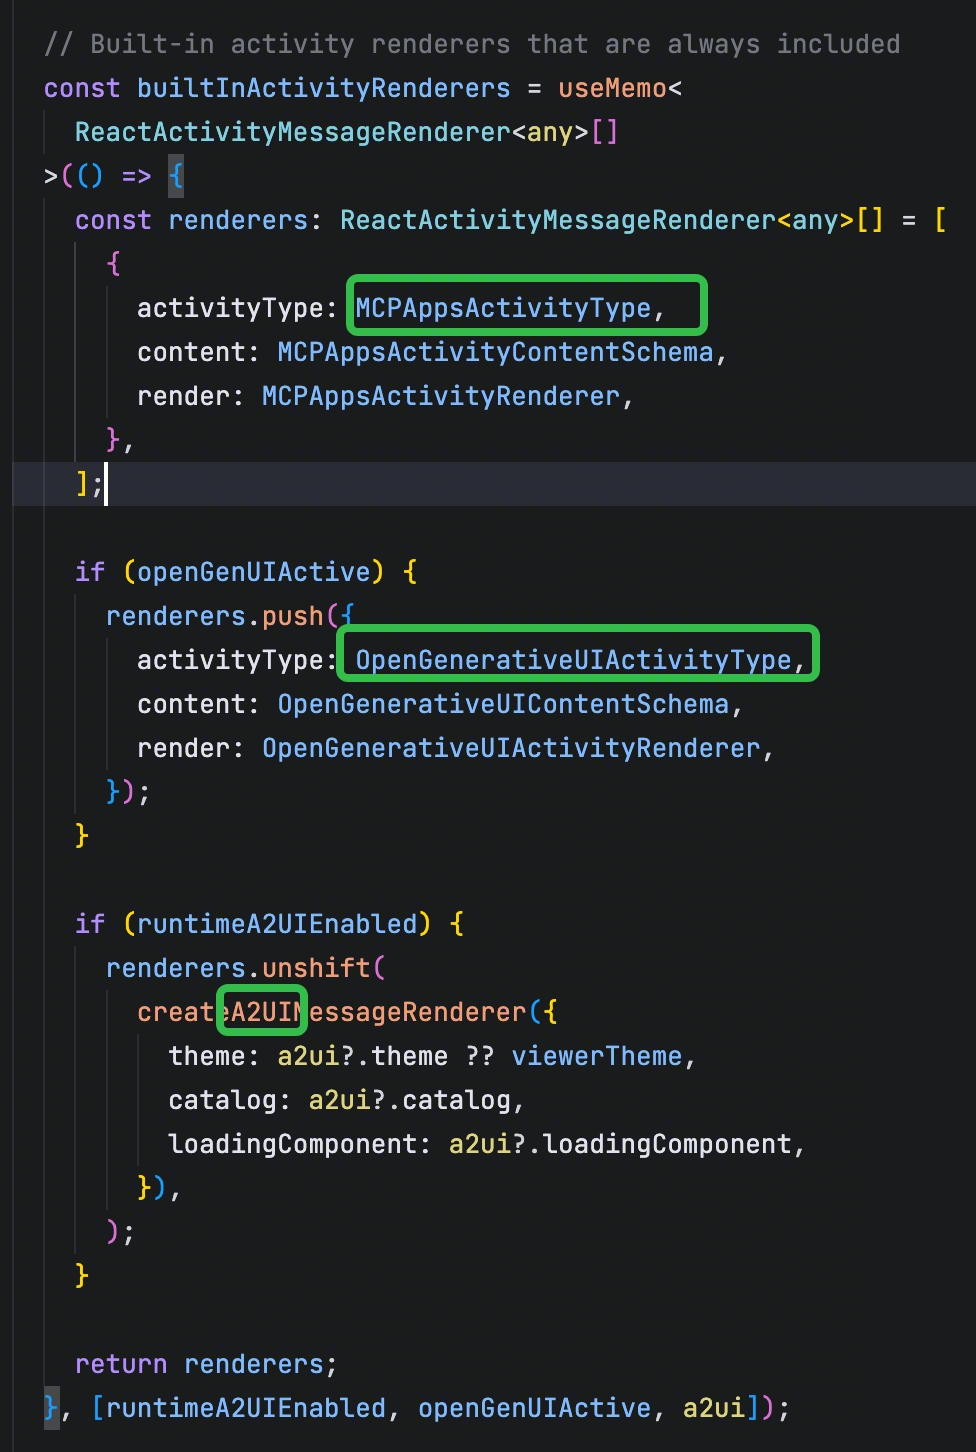
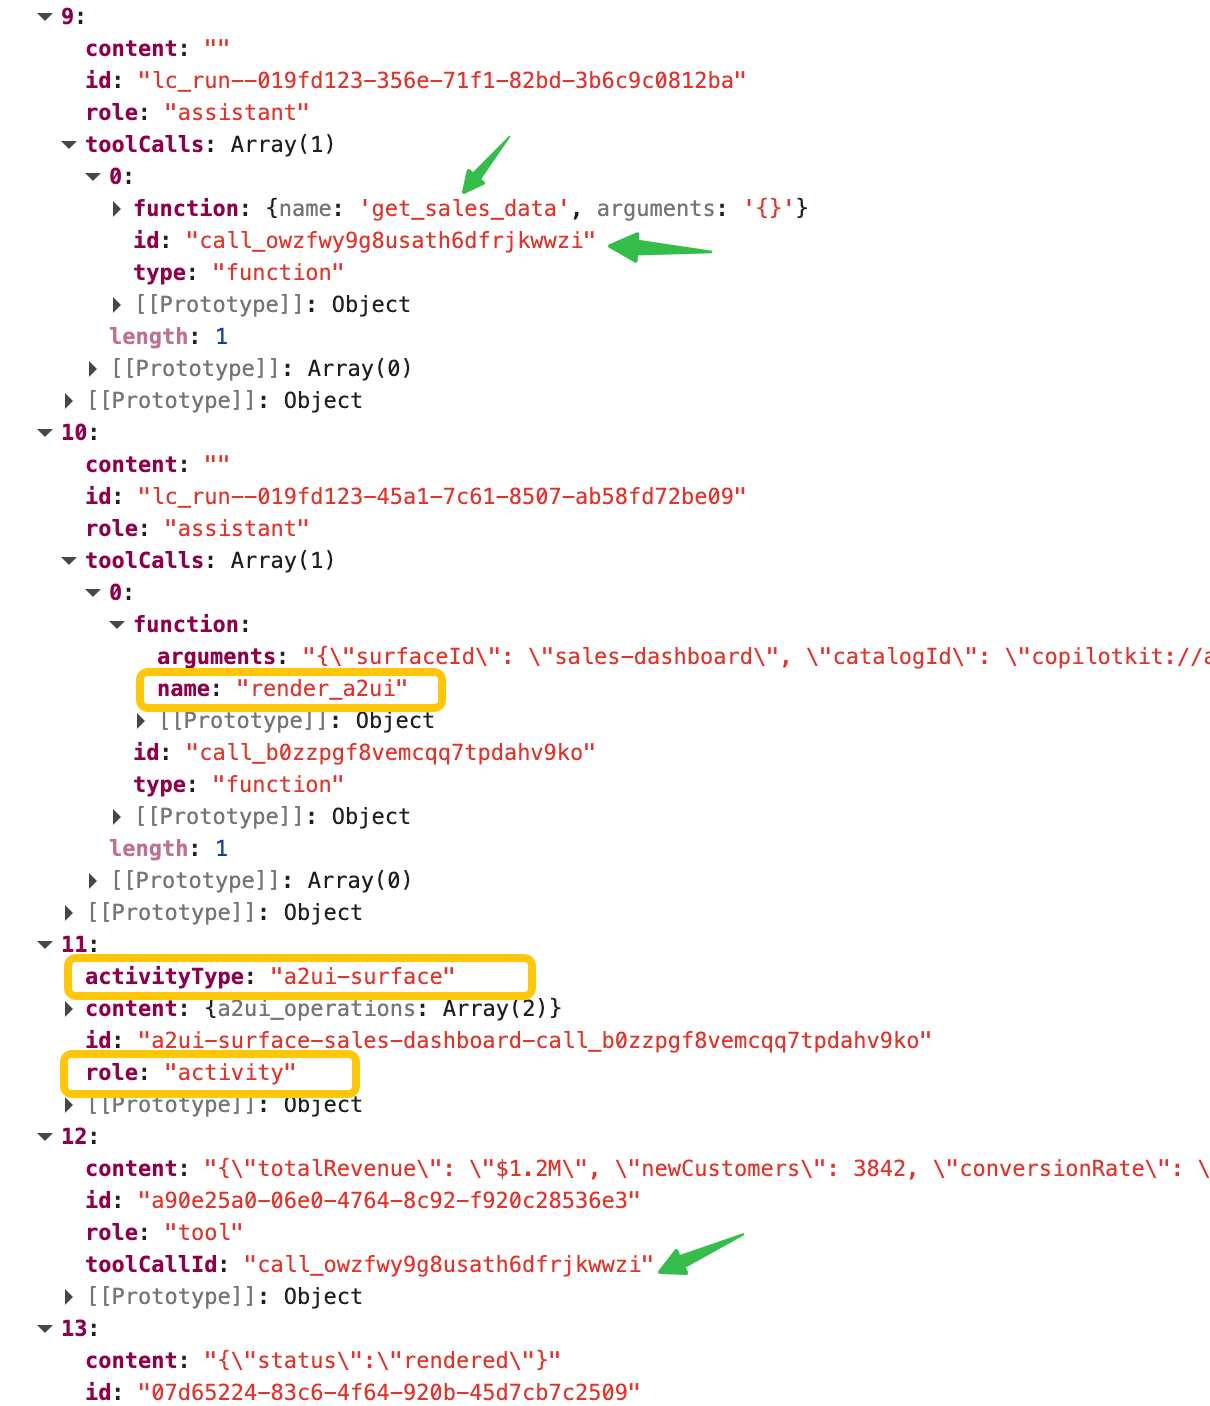
UI 的渲染依然通过前端组件渲染,只不过在渲染时会根据messages 中的返回信息决定使用组件的类型,选择不同的组件进行渲染。
因此, agent 会决定渲染的组件类型,前端组件只是根据组件类型进行渲染。

源码分析:

1
2
3
4
5
6
7
8
9
10
11
12
13
14
15
16
17
18
19
20
21
22
23
24
25
26
27
28
29
30
31
32
33
34
35
36
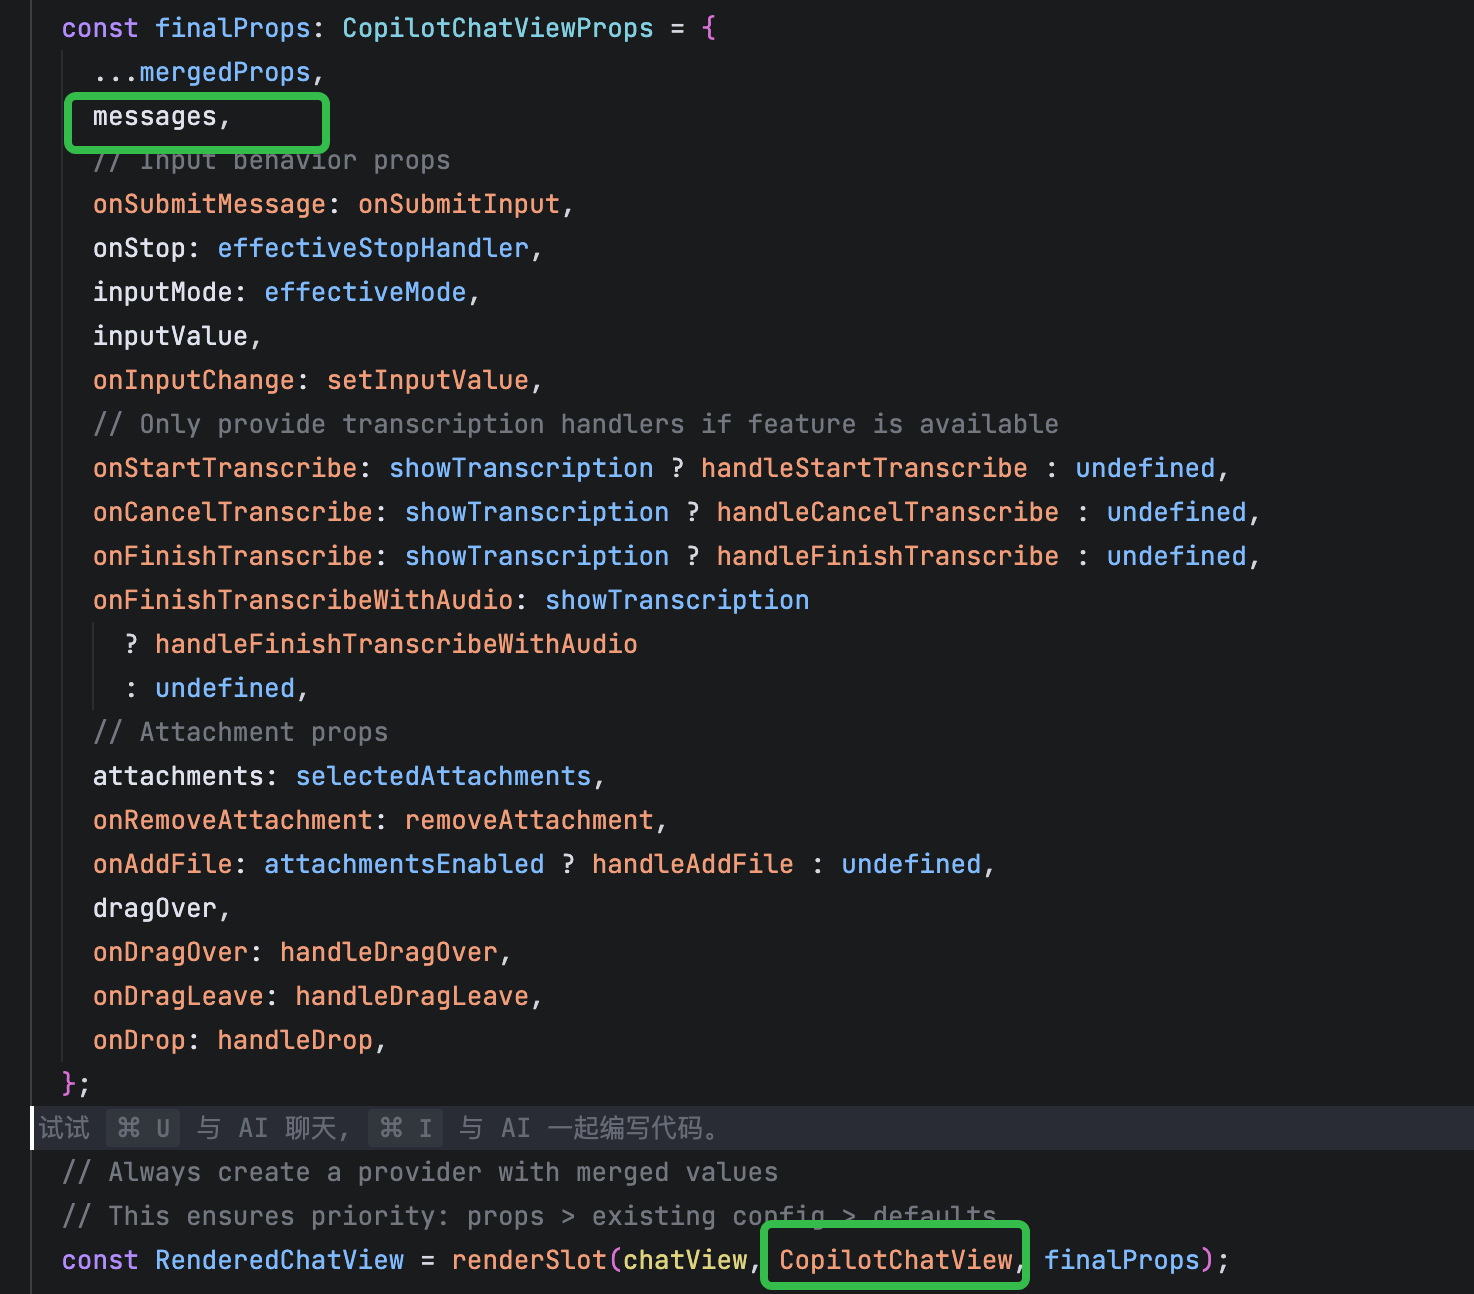
 const BoundMessageView = renderSlot(messageView, CopilotChatMessageView, {
messages,
isRunning,
});
...
if (children) {
return (
<div data-copilotkit style={{ display: "contents" }}>
{children({
messageView: BoundMessageView,
input: BoundInput,
scrollView: BoundScrollView,
suggestionView: BoundSuggestionView ?? <></>,
})}
</div>
);
}

------------------------------CopilotChatMessageView---------------------------------------------

// Build the flat element list only when we're not virtualizing (avoids
// creating 500 React elements that we'd immediately discard).
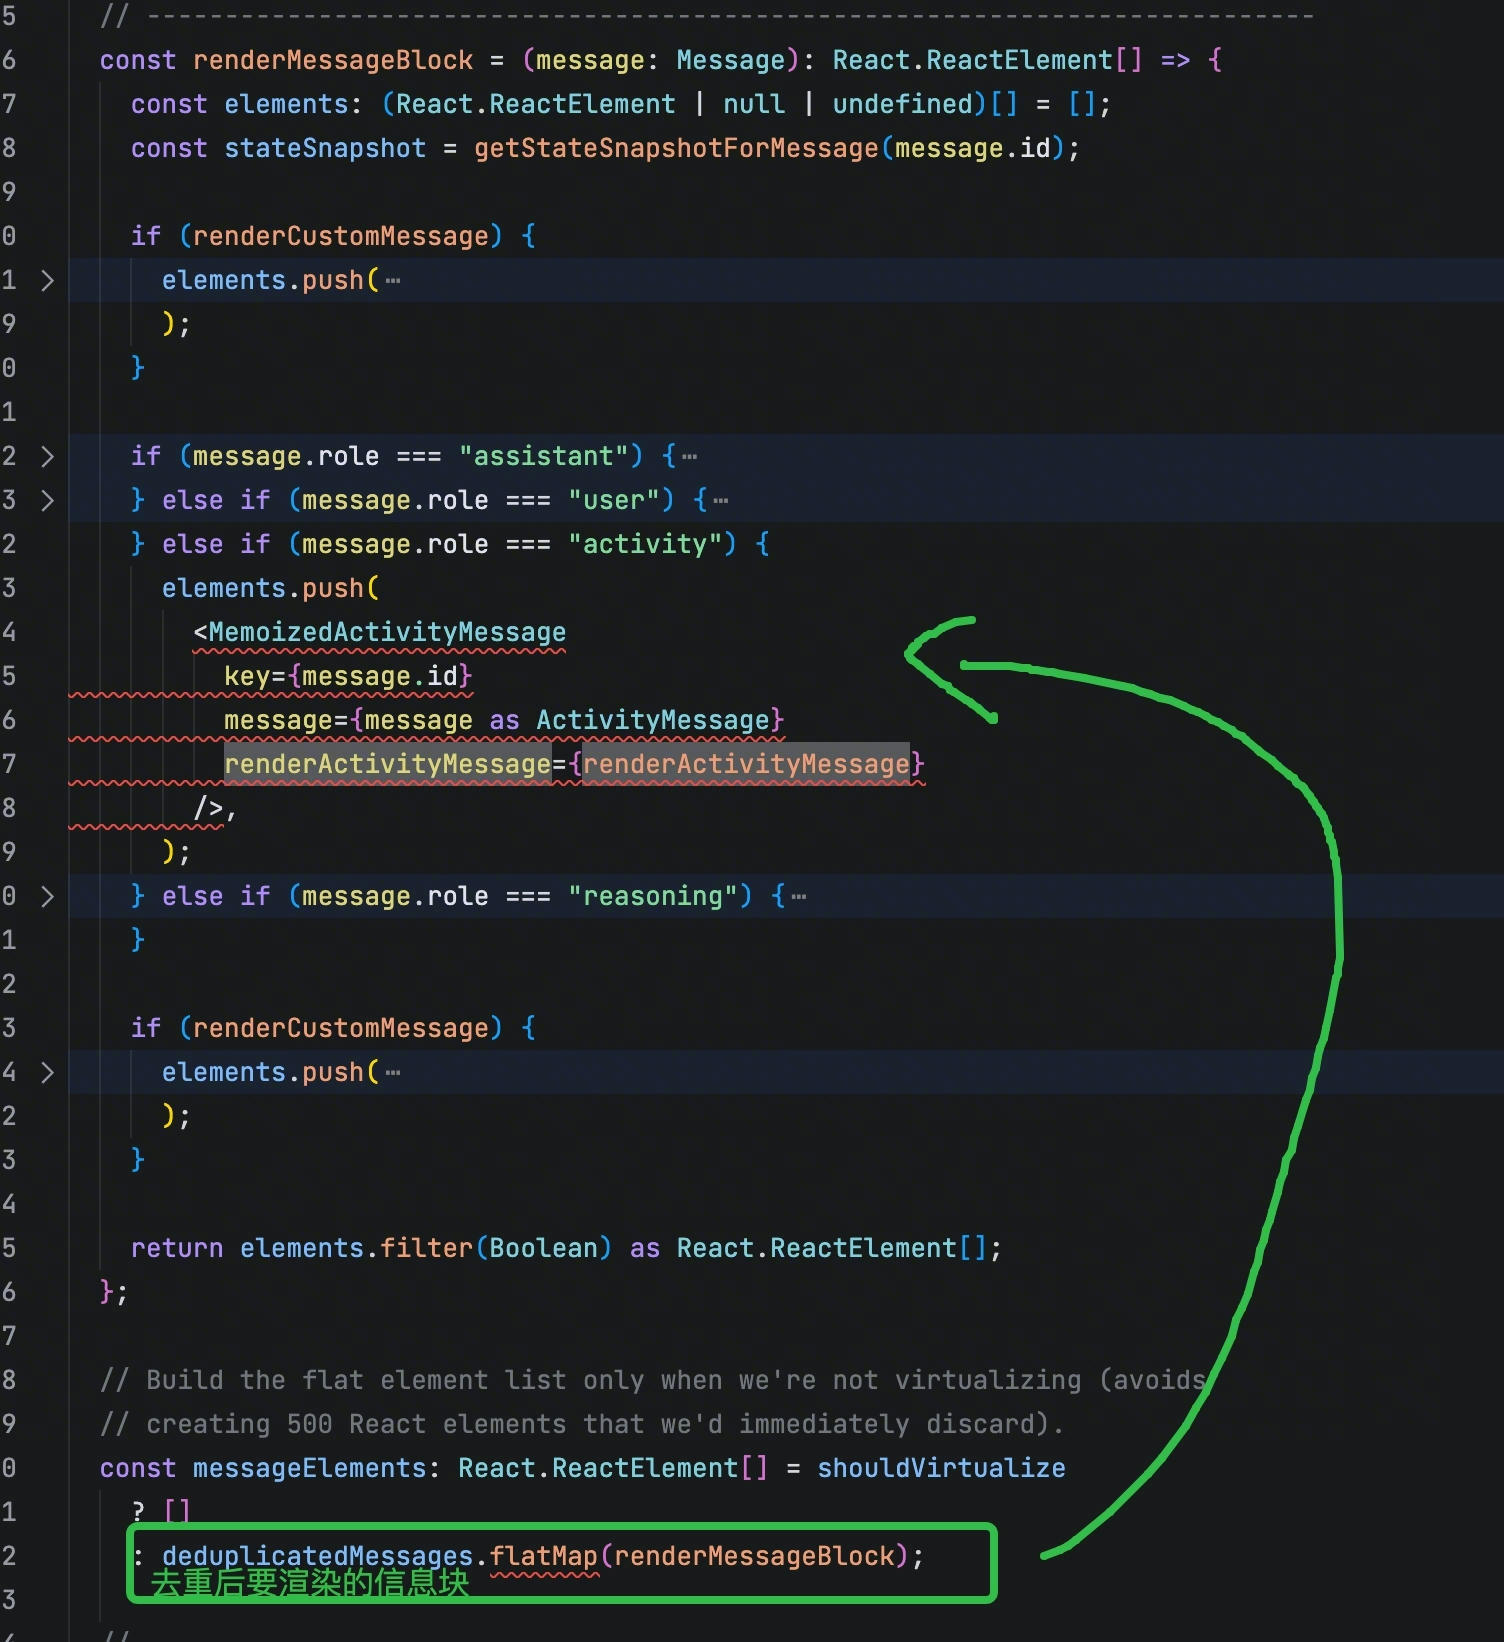
const messageElements: React.ReactElement[] = shouldVirtualize
? []
: deduplicatedMessages.flatMap(renderMessageBlock);

// ---------------------------------------------------------------------------
// children render prop (custom layout, always non-virtual)
// ---------------------------------------------------------------------------
if (children) {
return (
<div data-copilotkit style={{ display: "contents" }}>
{children({ messageElements, messages, isRunning, interruptElement })}
</div>
);
}

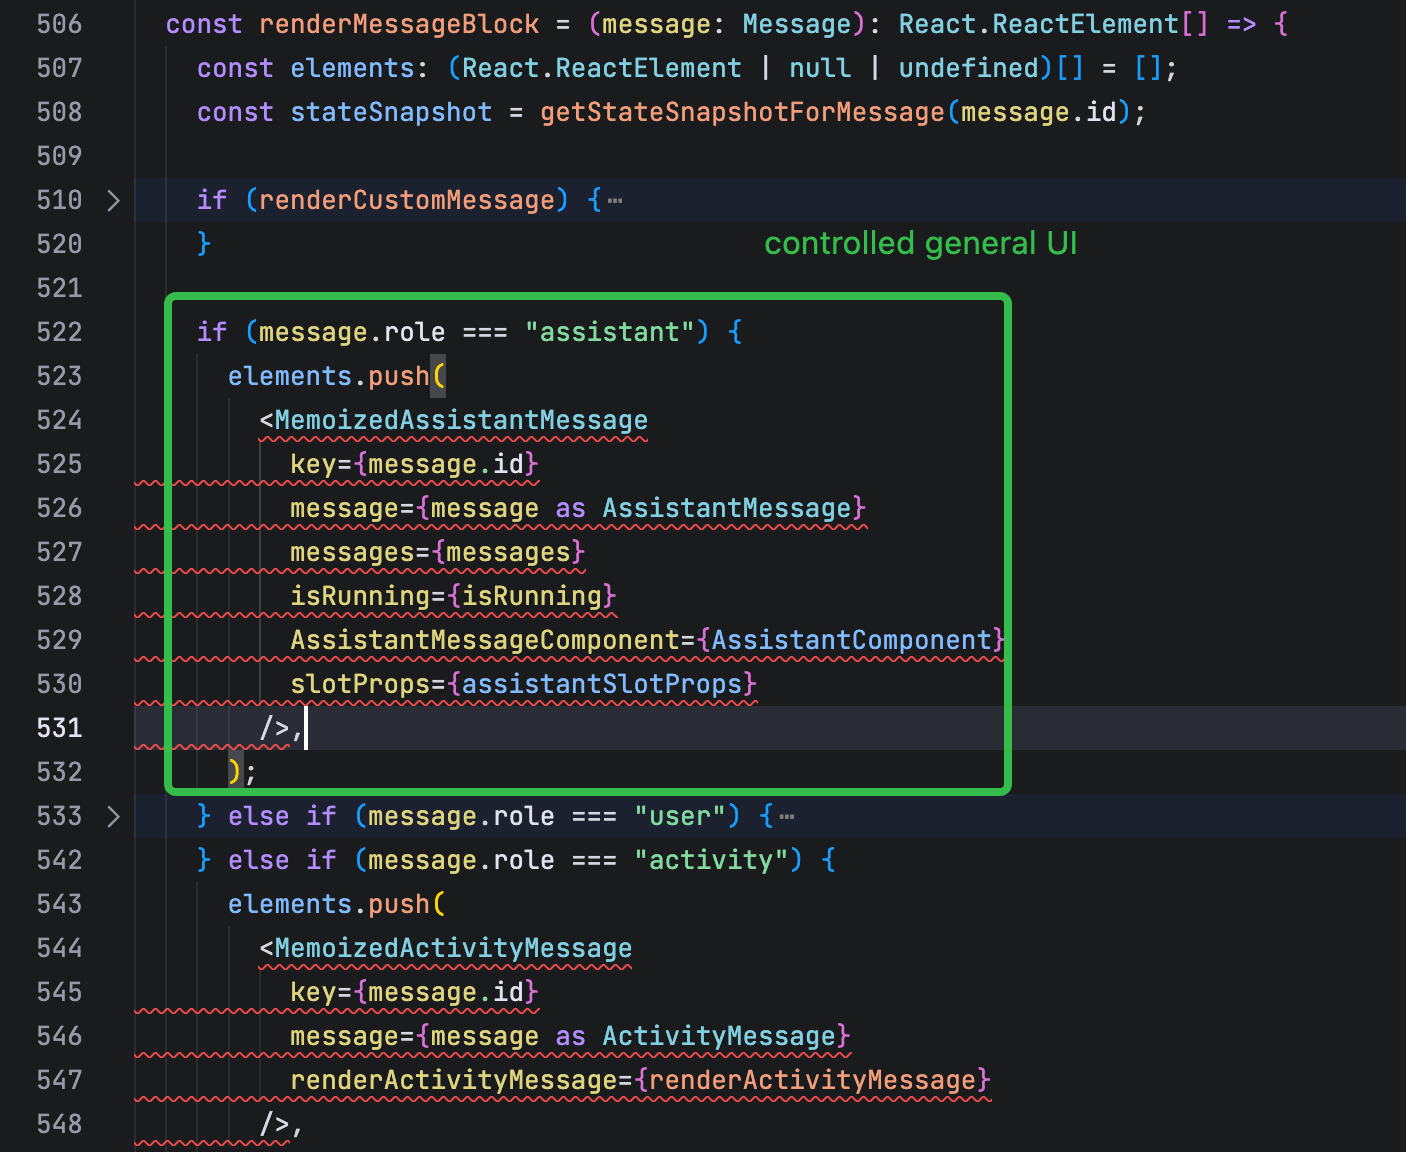
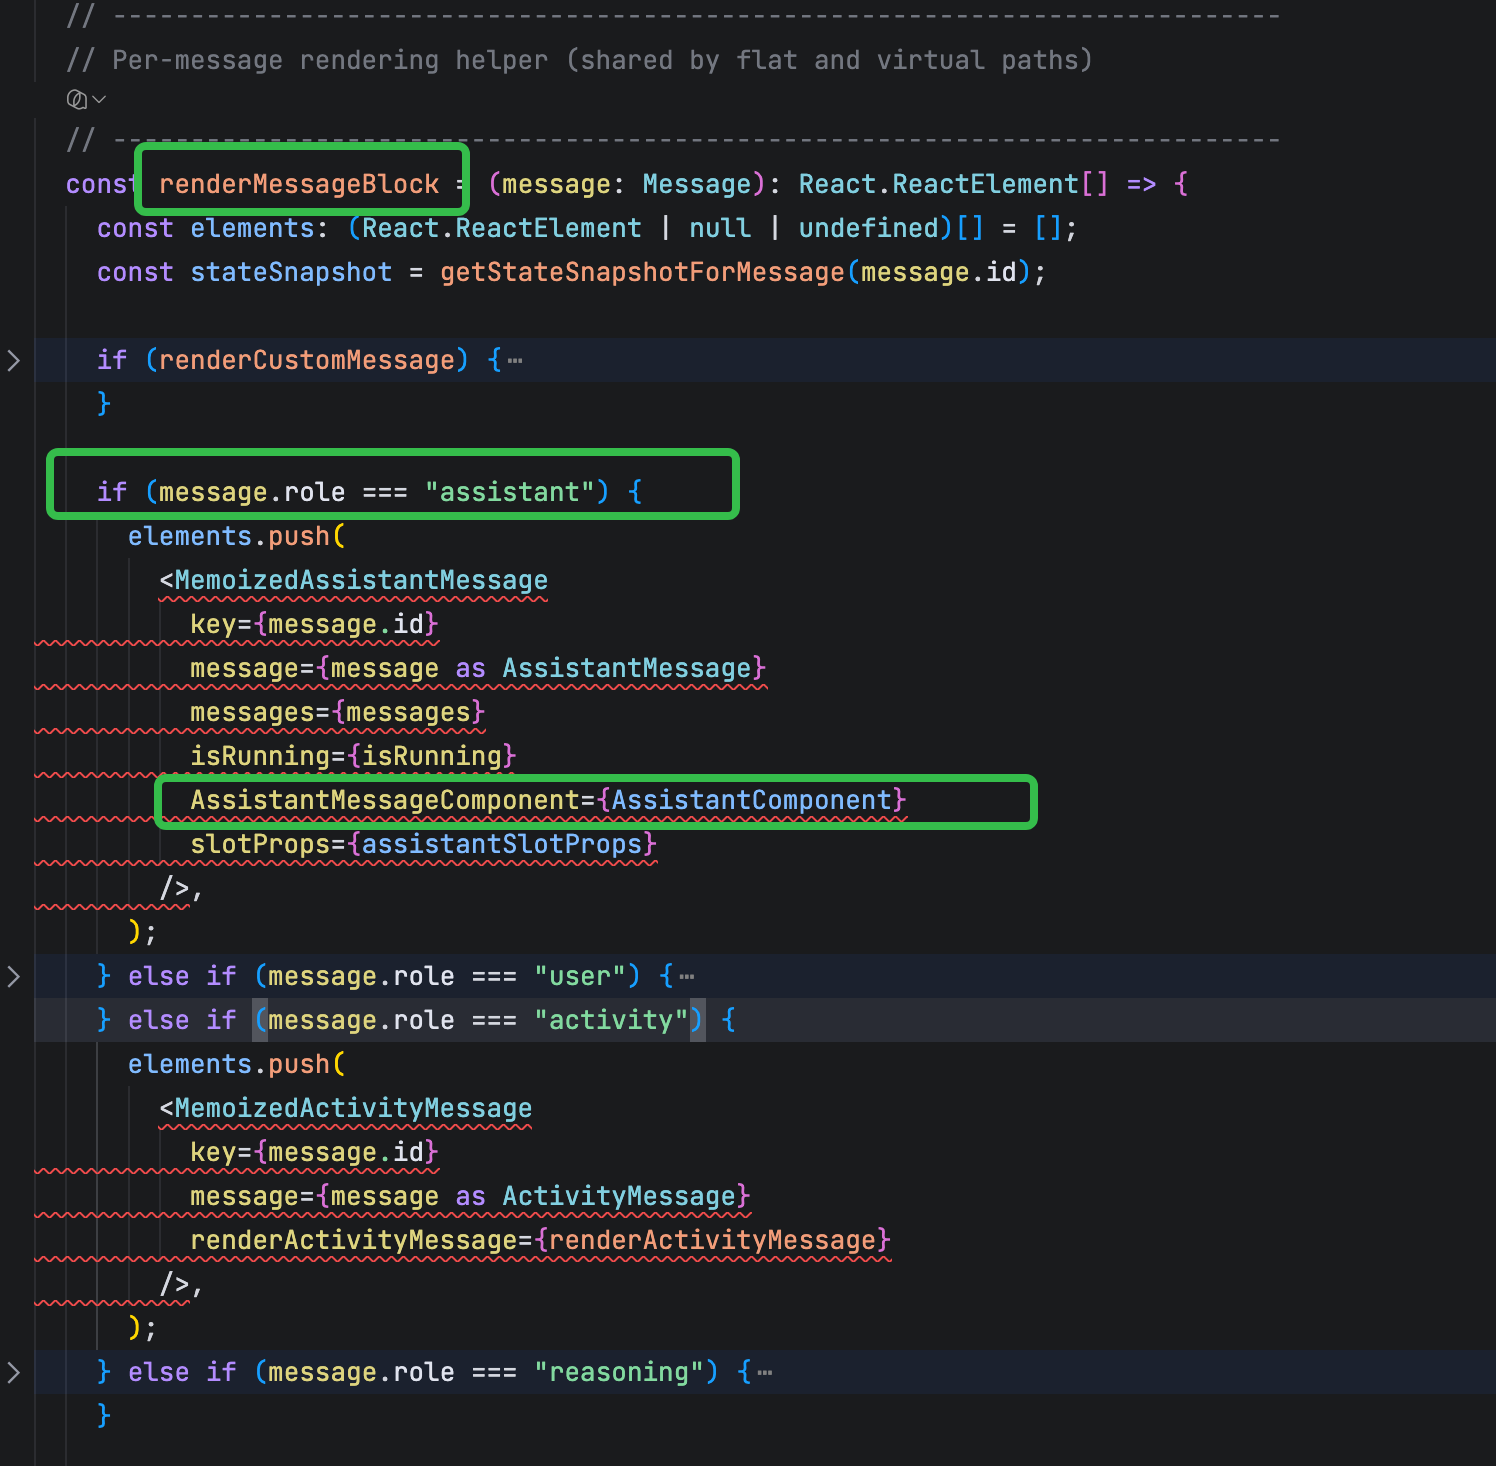
renderMessageBlock 是一个函数,用于根据消息的类型渲染不同的组件

controlled Generative UI 渲染逻辑

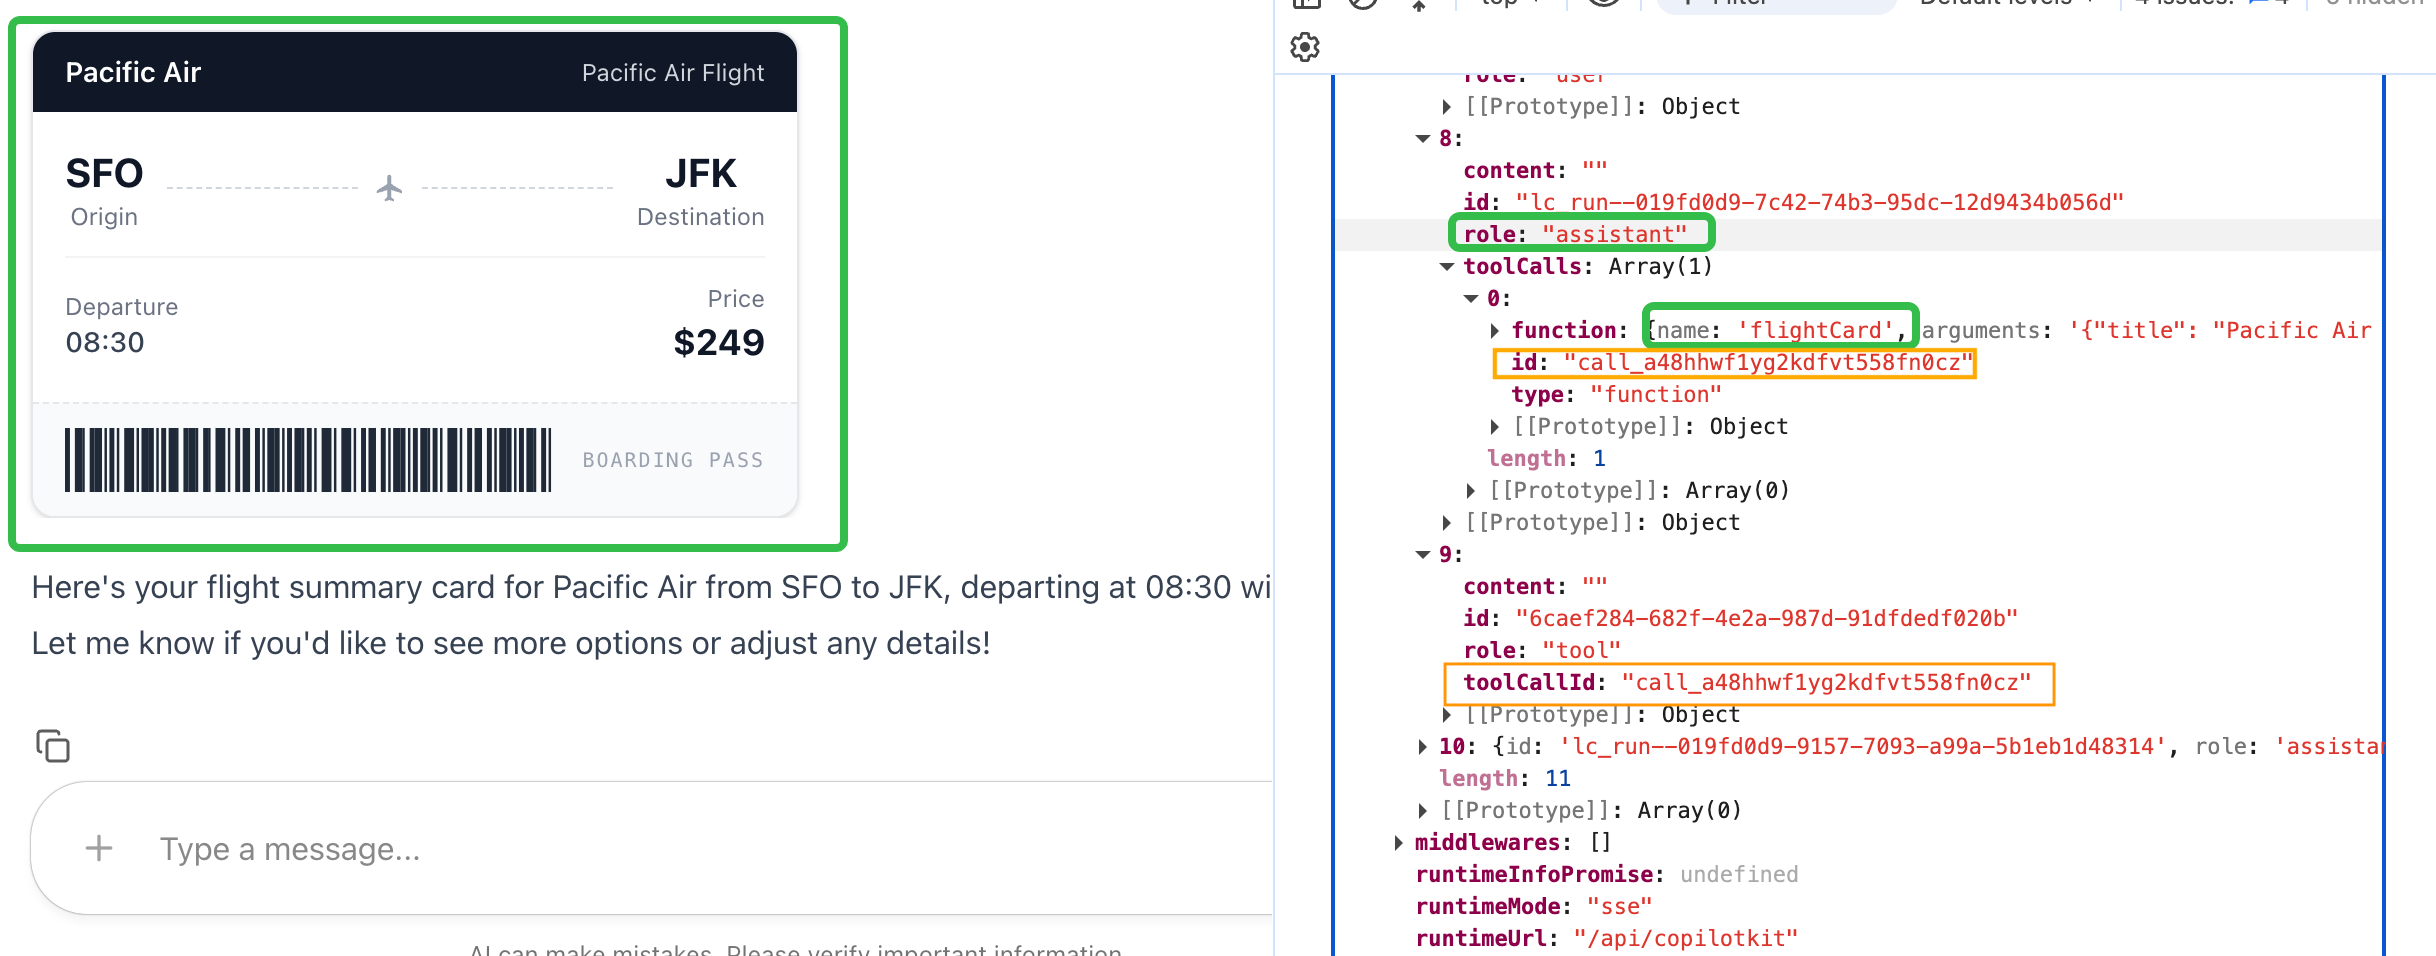
第一类渲染时走 role: “assistant”

1
2
3
4
5
6
7
8
9
10
11
12
13
14
15
16
17
18
19
20
21
22
23
24
25
26
27
28
29
30
31
32
33
34
35
36
37
38
39
40
41
42
43
44
45
46
const { Component: AssistantComponent, slotProps: assistantSlotProps } =
useMemo(
() => resolveSlotComponent(assistantMessage, CopilotChatAssistantMessage),
[assistantMessage],
);

-----------------------------CopilotChatAssistantMessage--------------------------

const boundToolCallsView = renderSlot(
toolCallsView,
CopilotChatToolCallsView,
{
message,
messages,
},
);

export function CopilotChatToolCallsView({
message,
messages = [],
}: CopilotChatToolCallsViewProps) {
const renderToolCall = useRenderToolCall();

if (!message.toolCalls || message.toolCalls.length === 0) {
return null;
}

return (
<>
{message.toolCalls.map((toolCall) => {
const toolMessage = messages.find(
(m) => m.role === "tool" && m.toolCallId === toolCall.id,
) as ToolMessage | undefined;

return (
<React.Fragment key={toolCall.id}>
{renderToolCall({
toolCall,
toolMessage,
})}
</React.Fragment>
);
})}
</>
);
}
1
2
3
4
5
6
7
8
9
10
11
12
13
14
15
16
17
18
19
20
21
22
23
24
25
26
27
28
29
30
31
32
33
34
35
36
37
38
39
40
41
42
const renderToolCall = useCallback(
({
toolCall,
toolMessage,
}: UseRenderToolCallProps): React.ReactElement | null => {
// Find the render config for this tool call by name
// For rendering, we show all tool calls regardless of agentId
// The agentId scoping only affects handler execution (in core)
// Priority order:
// 1. Exact match by name (prefer agent-specific if multiple exist)
// 2. Wildcard (*) renderer
const exactMatches = renderToolCalls.filter(
(rc) => rc.name === toolCall.function.name,
);

// If multiple renderers with same name exist, prefer the one matching our agentId
const renderConfig =
exactMatches.find((rc) => rc.agentId === agentId) ||
exactMatches.find((rc) => !rc.agentId) ||
exactMatches[0] ||
renderToolCalls.find((rc) => rc.name === "*");

if (!renderConfig) {
return null;
}

const RenderComponent = renderConfig.render;
const isExecuting = executingToolCallIds.has(toolCall.id);

// Use the memoized ToolCallRenderer component to prevent unnecessary re-renders
return (
<ToolCallRenderer
key={toolCall.id}
toolCall={toolCall}
toolMessage={toolMessage}
RenderComponent={RenderComponent}
isExecuting={isExecuting}
/>
);
},
[renderToolCalls, executingToolCallIds, agentId],
);
1
2
3
4
5
6
7
8
9
10
11
12
13
14
15
16
17
18
19
20
21
22
23
24
25
26
27
28
29
30
31
32
33
34
35
36
37
38
39
40
41
42
43
44
45
46
47
48
const ToolCallRenderer = React.memo(
function ToolCallRenderer({
toolCall,
toolMessage,
RenderComponent,
isExecuting,
}: ToolCallRendererProps) {
// Memoize args based on the arguments string to maintain stable reference
const args = useMemo(
() => partialJSONParse(toolCall.function.arguments),
[toolCall.function.arguments],
);

const toolName = toolCall.function.name;

// Render based on status to preserve discriminated union type inference
if (toolMessage) {
return (
<RenderComponent
name={toolName}
args={args}
status={ToolCallStatus.Complete}
result={toolMessage.content}
/>
);
} else if (isExecuting) {
return (
<RenderComponent
name={toolName}
args={args}
status={ToolCallStatus.Executing}
result={undefined}
/>
);
} else {
return (
<RenderComponent
name={toolName}
args={args}
status={ToolCallStatus.InProgress}
result={undefined}
/>
);
}
},
// Custom comparison function to prevent re-renders when tool call data hasn't changed
....
)

注意上面的RenderComponent

1
2
3
4
5
6
<RenderComponent
name={toolName}
args={args}
status={ToolCallStatus.Complete}
result={toolMessage.content}
/>

是经过useFrontendTool 注册的组件是的render

非controlled Generative UI 渲染逻辑

第二类和第三类的渲染逻辑 走 role: “activity” 的渲染逻辑

1
const { renderActivityMessage } = useRenderActivityMessage();

1
2
3
4
5
6
7
8
9
10
11
12
13
14
15
16
17
18
19
20
21
22
23
24
25
26
27
28
 ----------------------- useRenderActivityMessage --------------------------------

const { copilotkit } = useCopilotKit();
const config = useCopilotChatConfiguration();
const agentId = config?.agentId ?? DEFAULT_AGENT_ID;

const renderers = copilotkit.renderActivityMessages;

// Find the renderer for a given activity type
const findRenderer = useCallback(
(activityType: string): ReactActivityMessageRenderer<unknown> | null => {
if (!renderers.length) {
return null;
}

const matches = renderers.filter(
(renderer) => renderer.activityType === activityType,
);

return (
matches.find((candidate) => candidate.agentId === agentId) ??
matches.find((candidate) => candidate.agentId === undefined) ??
renderers.find((candidate) => candidate.activityType === "*") ??
null
);
},
[agentId, renderers],
);

注册时的处理第2类和第3类 的render

a2UI

dynamic schema UI 渲染messages

fixed schema UI 渲染messages

1
2
3
4
5
6
7
8
9
10
11
12
13
14
15
16
17
18
19
20
21
22
23
24
25
26
27
28
29
30
31
32
33
34
35
36
37
38
39
40
41
42
43
44
45
46
47
48
49
50
51
52
53
54
55
56
57
58
59
60
61
62
63
64
65
66
67
68
69
70
71
72
73
74
75
76
77
78
79
80
81
82
/**
* Renders a single A2UI surface using the React renderer.
* Wraps A2UIProvider + A2UIRenderer and bridges actions back to CopilotKit.
*/
function ReactSurfaceHost({
surfaceId,
operations,
theme,
agent,
copilotkit,
catalog,
}: ReactSurfaceHostProps) {
// Bridge: when the React renderer dispatches an action, forward to CopilotKit
const handleAction = useCallback(
async (message: A2UIClientEventMessage) => {
if (!agent) return;

const action = message.userAction as A2UIUserAction | undefined;

try {
copilotkit.setProperties({
...(copilotkit.properties ?? {}),
a2uiAction: message,
});

await copilotkit.runAgent({ agent });
} finally {
if (copilotkit.properties) {
const { a2uiAction, ...rest } = copilotkit.properties;
copilotkit.setProperties(rest);
}
}
},
[agent, copilotkit],
);

return (
<div className="cpk:flex cpk:w-full cpk:flex-none cpk:flex-col cpk:gap-4">
<A2UIProvider onAction={handleAction} theme={theme} catalog={catalog}>
<SurfaceMessageProcessor
surfaceId={surfaceId}
operations={operations}
/>
<A2UISurfaceOrError surfaceId={surfaceId} />
</A2UIProvider>
</div>
);
}

----------------------------SurfaceMessageProcessor---------------------------------------------

function SurfaceMessageProcessor({
surfaceId,
operations,
}: {
surfaceId: string;
operations: any[];
}) {
const { processMessages, getSurface } = useA2UIActions();
const lastHashRef = useRef<string>("");
useEffect(() => {
// Skip if operations haven't actually changed (deep compare via hash).
// ACTIVITY_DELTA + ACTIVITY_SNAPSHOT can trigger multiple renders with
// the same logical content but different object references.
const hash = JSON.stringify(operations);
if (hash === lastHashRef.current) return;
lastHashRef.current = hash;

// Filter out createSurface if the surface already exists — the
// MessageProcessor throws on duplicate createSurface, but content
// snapshots always include the full operation list.
const existing = getSurface(surfaceId);
const ops = existing
? operations.filter((op) => !op?.createSurface)
: operations;

// Error handling is done inside A2UIProvider.processMessages
processMessages(ops);
}, [processMessages, getSurface, surfaceId, operations]);

return null;
}

processMessages 通过执行不同的操作实现a2UI的渲染

1
2
3
4
5
6
7
8
9
10
11
12
13
14
15
16
17
18
19
20
21
22
23
24
25
26
27
28
29
30
31
32
33
34
35
36
37
38
39
40
41
42
43
44
45
46
47
48
49
processCreateSurfaceMessage(message) {
const payload = message.createSurface;
const { surfaceId, catalogId, theme, sendDataModel } = payload;
// Find catalog
const catalog = this.catalogs.find(c => c.id === catalogId);
if (!catalog) {
throw new A2uiStateError(`Catalog not found: ${catalogId}`);
}
if (this.model.getSurface(surfaceId)) {
throw new A2uiStateError(`Surface ${surfaceId} already exists.`);
}
const surface = new SurfaceModel(surfaceId, catalog, theme, sendDataModel ?? false);
this.model.addSurface(surface);
}

processUpdateComponentsMessage(message) {
const payload = message.updateComponents;
if (!payload.surfaceId)
return;
const surface = this.model.getSurface(payload.surfaceId);
if (!surface) {
throw new A2uiStateError(`Surface not found for message: ${payload.surfaceId}`);
}
for (const comp of payload.components) {
const { id, component, ...properties } = comp;
if (!id) {
throw new A2uiValidationError(`Component '${component}' is missing an 'id'.`);
}
const existing = surface.componentsModel.get(id);
if (existing) {
if (component && component !== existing.type) {
// Recreate component if type changes
surface.componentsModel.removeComponent(id);
const newComponent = new ComponentModel(id, component, properties);
surface.componentsModel.addComponent(newComponent);
}
else {
existing.properties = properties;
}
}
else {
if (!component) {
throw new A2uiValidationError(`Cannot create component ${id} without a type.`);
}
const newComponent = new ComponentModel(id, component, properties);
surface.componentsModel.addComponent(newComponent);
}
}
}

mcp 渲染逻辑

详见下面代码, 主要逻辑就是根据mcp配置通过 agent 发起请求获取到html 再通过通知方式将内容填到创建好的iframe中

1
2
3
4
5
6
7
8
9
10
11
12
13
14
15
16
17
18
19
20
21
22
23
24
25
26
27
28
29
30
31
32
33
34
35
36
37
38
39
40
41
42
43
44
45
46
47
48
49
50
51
52
53
54
55
56
57
58
59
60
61
62
63
64
65
66
67
68
69
70
71
72
73
74
75
76
77
78
79
80
81
82
83
84
85
86
87
88
89
90
91
92
93
94
95
96
97
98
99
100
101
102
103
104
105
106
107
108
109
110
111
112
113
114
115
116
117
118
119
120
121
122
123
124
125
126
127
128
129
130
131
132
133
134
135
136
137
138
139
140
141
142
143
144
145
146
147
148
149
150
151
152
153
154
155
156
157
158
159
160
161
162
163
164
165
166
167
168
169
170
171
172
173
174
175
176
177
178
179
180
181
182
183
184
185
186
187
188
189
190
191
192
193
194
195
196
197
198
199
200
201
202
203
204
205
206
207
208
209
210
211
212
213
214
215
216
217
218
219
220
221
222
223
224
225
226
227
228
229
230
231
232
233
234
235
236
237
238
239
240
241
242
243
244
245
246
247
248
249
250
251
252
253
254
255
256
257
258
259
260
261
262
263
264
265
266
267
268
269
270
271
272
273
274
275
276
277
278
279
280
281
282
283
284
285
286
287
288
289
290
291
292
293
294
295
296
297
298
299
300
301
302
303
304
305
306
307
308
309
310
311
312
313
314
315
316
317
318
319
320
321
322
323
324
325
326
327
328
329
330
331
332
333
334
335
336
337
338
339
340
341
342
343
344
345
346
347
348
349
350
351
352
353
354
355
356
357
358
359
360
361
362
363
364
365
366
367
368
369
370
371
372
373
374
375
376
377
378
379
380
381
382
383
384
385
386
387
388
389
390
391
392
393
394
395
396
397
398
399
400
401
402
403
404
405
406
407
408
409
410
411
412
413
414
415
416
417
418
419
420
421
422
423
424
425
426
427
428
429
430
431
432
433
434
435
436
437
438
439
440
441
442
443
444
445
446
447
448
449
450
451
452
453
454
455
456
457
458
459
460
461
462
463
464
465
466
467
468
469
470
471
472
473
474
475
476
477
478
479
480
481
482
483
484
485
486
487
488
489
490
491
492
493
494
495
496
497
498
499
500
501
502
503
504
505
506
507
508
509
510
511
512
513
514
515
516
517
518
519
520
521
522
523
524
525
526
527
528
529
530
531
532
533
534
535
536
537
538
539
/**
* MCP Apps Extension Activity Renderer
*
* Renders MCP Apps UI in a sandboxed iframe with full protocol support.
* Fetches resource content on-demand via proxied MCP requests.
*/
export const MCPAppsActivityRenderer: React.FC<MCPAppsActivityRendererProps> =
function MCPAppsActivityRenderer({ content, agent }) {
const containerRef = useRef<HTMLDivElement>(null);
const iframeRef = useRef<HTMLIFrameElement | null>(null);
const [iframeReady, setIframeReady] = useState(false);
const [error, setError] = useState<Error | null>(null);
const [isLoading, setIsLoading] = useState(true);
const [iframeSize, setIframeSize] = useState<{
width?: number;
height?: number;
}>({});
const [fetchedResource, setFetchedResource] =
useState<FetchedResource | null>(null);

// Use refs for values that shouldn't trigger re-renders but need latest values
const contentRef = useRef(content);
contentRef.current = content;

// Store agent in a ref for use in async handlers
const agentRef = useRef(agent);
agentRef.current = agent;

// Ref to track fetch state - survives StrictMode remounts
const fetchStateRef = useRef<{
inProgress: boolean;
promise: Promise<FetchedResource | null> | null;
resourceUri: string | null;
}>({ inProgress: false, promise: null, resourceUri: null });

// Callback to send a message to the iframe
const sendToIframe = useCallback((msg: JSONRPCMessage) => {
if (iframeRef.current?.contentWindow) {
console.log("[MCPAppsRenderer] Sending to iframe:", msg);
iframeRef.current.contentWindow.postMessage(msg, "*");
}
}, []);

// Callback to send a JSON-RPC response
const sendResponse = useCallback(
(id: string | number, result: unknown) => {
sendToIframe({
jsonrpc: "2.0",
id,
result,
});
},
[sendToIframe],
);

// Callback to send a JSON-RPC error response
const sendErrorResponse = useCallback(
(id: string | number, code: number, message: string) => {
sendToIframe({
jsonrpc: "2.0",
id,
error: { code, message },
});
},
[sendToIframe],
);

// Callback to send a notification
const sendNotification = useCallback(
(method: string, params?: Record<string, unknown>) => {
sendToIframe({
jsonrpc: "2.0",
method,
params: params || {},
});
},
[sendToIframe],
);

// Effect 0: Fetch the resource content on mount
// Uses ref-based deduplication to handle React StrictMode double-mounting
useEffect(() => {
const { resourceUri, serverHash, serverId } = content;

// Check if we already have a fetch in progress for this resource
// This handles StrictMode double-mounting - second mount reuses first mount's promise
if (
fetchStateRef.current.inProgress &&
fetchStateRef.current.resourceUri === resourceUri
) {
// Reuse the existing promise
fetchStateRef.current.promise
?.then((resource) => {
if (resource) {
setFetchedResource(resource);
setIsLoading(false);
}
})
.catch((err) => {
setError(err instanceof Error ? err : new Error(String(err)));
setIsLoading(false);
});
return;
}

if (!agent) {
setError(new Error("No agent available to fetch resource"));
setIsLoading(false);
return;
}

// Mark fetch as in progress
fetchStateRef.current.inProgress = true;
fetchStateRef.current.resourceUri = resourceUri;

// Create the fetch promise using the queue to serialize requests
const fetchPromise = (async (): Promise<FetchedResource | null> => {
try {
// Use queue to wait for agent to be idle and serialize requests
const runResult = await mcpAppsRequestQueue.enqueue(agent, () =>
agent.runAgent({
forwardedProps: {
__proxiedMCPRequest: {
serverHash,
serverId, // optional, takes precedence if provided
method: "resources/read",
params: { uri: resourceUri },
},
},
}),
);

// Extract resource from result
// The response format is: { contents: [{ uri, mimeType, text?, blob?, _meta? }] }
const resultData = runResult.result as
| { contents?: FetchedResource[] }
| undefined;
const resource = resultData?.contents?.[0];

if (!resource) {
throw new Error("No resource content in response");
}

return resource;
} catch (err) {
console.error("[MCPAppsRenderer] Failed to fetch resource:", err);
throw err;
} finally {
// Mark fetch as complete
fetchStateRef.current.inProgress = false;
}
})();

// Store the promise for potential reuse
fetchStateRef.current.promise = fetchPromise;

// Handle the result
fetchPromise
.then((resource) => {
if (resource) {
setFetchedResource(resource);
setIsLoading(false);
}
})
.catch((err) => {
setError(err instanceof Error ? err : new Error(String(err)));
setIsLoading(false);
});

// No cleanup needed - we want the fetch to complete even if StrictMode unmounts
}, [agent, content]);

// Effect 1: Setup sandbox proxy iframe and communication (after resource is fetched)
useEffect(() => {
// Wait for resource to be fetched
if (isLoading || !fetchedResource) {
return;
}

// Capture container reference at effect start (refs are cleared during unmount)
const container = containerRef.current;
if (!container) {
return;
}

let mounted = true;
let messageHandler: ((event: MessageEvent) => void) | null = null;
let initialListener: ((event: MessageEvent) => void) | null = null;
let createdIframe: HTMLIFrameElement | null = null;

const setup = async () => {
try {
// Create sandbox proxy iframe
const iframe = document.createElement("iframe");
createdIframe = iframe; // Track for cleanup
iframe.style.width = "100%";
iframe.style.height = "100px"; // Start small, will be resized by size-changed notification
iframe.style.border = "none";
iframe.style.backgroundColor = "transparent";
iframe.style.display = "block";
iframe.setAttribute(
"sandbox",
"allow-scripts allow-same-origin allow-forms",
);

// Wait for sandbox proxy to be ready
const sandboxReady = new Promise<void>((resolve) => {
initialListener = (event: MessageEvent) => {
if (event.source === iframe.contentWindow) {
if (
event.data?.method === "ui/notifications/sandbox-proxy-ready"
) {
if (initialListener) {
window.removeEventListener("message", initialListener);
initialListener = null;
}
resolve();
}
}
};
window.addEventListener("message", initialListener);
});

// Check mounted before adding to DOM (handles StrictMode double-mount)
if (!mounted) {
if (initialListener) {
window.removeEventListener("message", initialListener);
initialListener = null;
}
return;
}

// Build sandbox HTML with CSP domains from resource metadata
const cspDomains = fetchedResource._meta?.ui?.csp?.resourceDomains;
iframe.srcdoc = buildSandboxHTML(cspDomains);
iframeRef.current = iframe;
container.appendChild(iframe);

// Wait for sandbox proxy to signal ready
await sandboxReady;
if (!mounted) return;

console.log("[MCPAppsRenderer] Sandbox proxy ready");

// Setup message handler for JSON-RPC messages from the inner iframe
messageHandler = async (event: MessageEvent) => {
if (event.source !== iframe.contentWindow) return;

const msg = event.data as JSONRPCMessage;
if (!msg || typeof msg !== "object" || msg.jsonrpc !== "2.0")
return;

console.log("[MCPAppsRenderer] Received from iframe:", msg);

// Handle requests (need response)
if (isRequest(msg)) {
switch (msg.method) {
case "ui/initialize": {
// Respond with host capabilities
sendResponse(msg.id, {
protocolVersion: PROTOCOL_VERSION,
hostInfo: {
name: "CopilotKit MCP Apps Host",
version: "1.0.0",
},
hostCapabilities: {
openLinks: {},
logging: {},
},
hostContext: {
theme: "light",
platform: "web",
},
});
break;
}

case "ui/message": {
// Add message to CopilotKit chat
const currentAgent = agentRef.current;

if (!currentAgent) {
console.warn(
"[MCPAppsRenderer] ui/message: No agent available",
);
sendResponse(msg.id, { isError: false });
break;
}

try {
const params = msg.params as {
role?: string;
content?: Array<{ type: string; text?: string }>;
};

// Extract text content from the message
const textContent =
params.content
?.filter((c) => c.type === "text" && c.text)
.map((c) => c.text)
.join("\n") || "";

if (textContent) {
currentAgent.addMessage({
id: crypto.randomUUID(),
role: (params.role as "user" | "assistant") || "user",
content: textContent,
});
}
sendResponse(msg.id, { isError: false });
} catch (err) {
console.error("[MCPAppsRenderer] ui/message error:", err);
sendResponse(msg.id, { isError: true });
}
break;
}

case "ui/open-link": {
// Open URL in new tab
const url = msg.params?.url as string | undefined;
if (url) {
window.open(url, "_blank", "noopener,noreferrer");
sendResponse(msg.id, { isError: false });
} else {
sendErrorResponse(msg.id, -32602, "Missing url parameter");
}
break;
}

case "tools/call": {
// Proxy tool call to MCP server via agent.runAgent()
const { serverHash, serverId } = contentRef.current;
const currentAgent = agentRef.current;

if (!serverHash) {
sendErrorResponse(
msg.id,
-32603,
"No server hash available for proxying",
);
break;
}

if (!currentAgent) {
sendErrorResponse(
msg.id,
-32603,
"No agent available for proxying",
);
break;
}

try {
// Use queue to wait for agent to be idle and serialize requests
const runResult = await mcpAppsRequestQueue.enqueue(
currentAgent,
() =>
currentAgent.runAgent({
forwardedProps: {
__proxiedMCPRequest: {
serverHash,
serverId, // optional, takes precedence if provided
method: "tools/call",
params: msg.params,
},
},
}),
);

// The result from runAgent contains the MCP response
sendResponse(msg.id, runResult.result || {});
} catch (err) {
console.error("[MCPAppsRenderer] tools/call error:", err);
sendErrorResponse(msg.id, -32603, String(err));
}
break;
}

default:
sendErrorResponse(
msg.id,
-32601,
`Method not found: ${msg.method}`,
);
}
}

// Handle notifications (no response needed)
if (isNotification(msg)) {
switch (msg.method) {
case "ui/notifications/initialized": {
console.log("[MCPAppsRenderer] Inner iframe initialized");
if (mounted) {
setIframeReady(true);
}
break;
}

case "ui/notifications/size-changed": {
const { width, height } = msg.params || {};
console.log("[MCPAppsRenderer] Size change:", {
width,
height,
});
if (mounted) {
setIframeSize({
width: typeof width === "number" ? width : undefined,
height: typeof height === "number" ? height : undefined,
});
}
break;
}

case "notifications/message": {
// Logging notification from the app
console.log("[MCPAppsRenderer] App log:", msg.params);
break;
}
}
}
};

window.addEventListener("message", messageHandler);

// Extract HTML content from fetched resource
let html: string;
if (fetchedResource.text) {
html = fetchedResource.text;
} else if (fetchedResource.blob) {
html = atob(fetchedResource.blob);
} else {
throw new Error("Resource has no text or blob content");
}

// Send the resource content to the sandbox proxy
sendNotification("ui/notifications/sandbox-resource-ready", { html });
} catch (err) {
console.error("[MCPAppsRenderer] Setup error:", err);
if (mounted) {
setError(err instanceof Error ? err : new Error(String(err)));
}
}
};

setup();

return () => {
mounted = false;
// Clean up initial listener if still active
if (initialListener) {
window.removeEventListener("message", initialListener);
initialListener = null;
}
if (messageHandler) {
window.removeEventListener("message", messageHandler);
}
// Remove the iframe we created (using tracked reference, not DOM query)
// This works even if containerRef.current is null during unmount
if (createdIframe) {
createdIframe.remove();
createdIframe = null;
}
iframeRef.current = null;
};
}, [
isLoading,
fetchedResource,
sendNotification,
sendResponse,
sendErrorResponse,
]);

// Effect 2: Update iframe size when it changes
useEffect(() => {
if (iframeRef.current) {
if (iframeSize.width !== undefined) {
// Use minWidth with min() to allow expansion but cap at 100%
iframeRef.current.style.minWidth = `min(${iframeSize.width}px, 100%)`;
iframeRef.current.style.width = "100%";
}
if (iframeSize.height !== undefined) {
iframeRef.current.style.height = `${iframeSize.height}px`;
}
}
}, [iframeSize]);

// Effect 3: Send tool input when iframe ready
useEffect(() => {
if (iframeReady && content.toolInput) {
console.log("[MCPAppsRenderer] Sending tool input:", content.toolInput);
sendNotification("ui/notifications/tool-input", {
arguments: content.toolInput,
});
}
}, [iframeReady, content.toolInput, sendNotification]);

// Effect 4: Send tool result when iframe ready
useEffect(() => {
if (iframeReady && content.result) {
console.log("[MCPAppsRenderer] Sending tool result:", content.result);
sendNotification("ui/notifications/tool-result", content.result);
}
}, [iframeReady, content.result, sendNotification]);

// Determine border styling based on prefersBorder metadata from fetched resource
// true = show border/background, false = none, undefined = host decides (we default to none)
const prefersBorder = fetchedResource?._meta?.ui?.prefersBorder;
const borderStyle =
prefersBorder === true
? {
borderRadius: "8px",
backgroundColor: "#f9f9f9",
border: "1px solid #e0e0e0",
}
: {};

return (
<div
ref={containerRef}
style={{
width: "100%",
height: iframeSize.height ? `${iframeSize.height}px` : "auto",
minHeight: "100px",
overflow: "hidden",
position: "relative",
...borderStyle,
}}
>
{isLoading && (
<div style={{ padding: "1rem", color: "#666" }}>Loading...</div>
)}
{error && (
<div style={{ color: "red", padding: "1rem" }}>
Error: {error.message}
</div>
)}
</div>
);
};

open Generative UI 渲染逻辑

全开放式渲染逻辑过程直接从后端agent content 中获取html 再通过构建沙河环境,将html 渲染到iframe中

1
2
3
4
5
6
7
8
9
10
11
12
13
14
15
16
17
18
19
20
21
22
23
24

function OpenGenerativeUIActivityRendererInner({ content }: InnerProps) {
const initialHeight = content.initialHeight ?? 200;
const [autoHeight, setAutoHeight] = useState<number | null>(null);
const sandboxFunctions = useSandboxFunctions();

const localApi = useMemo(() => {
const api: Record<string, Function> = {};
for (const fn of sandboxFunctions) {
api[fn.name] = fn.handler;
}
return api;
}, [sandboxFunctions]);

// Join html chunks only when streaming is complete
const fullHtml =
content.htmlComplete && content.html?.length
? content.html.join("")
: undefined;
// CSS from the dedicated parameter (available once cssComplete)
const css = content.cssComplete ? content.css : undefined;

....
}

CopilotRuntime

本质是一个代理, 或者代理适配器(多个agent存在时),寻找后端agent 服务,并将前端请求转发给后端agent 服务

On the server, CopilotRuntime accepts a map of AG-UI AbstractAgent instances. A framework adapter, an HttpAgent pointing at a remote server, and a custom implementation all use the same request path:

  • The runtime resolves the target agent by ID.
  • It clones the agent for request isolation and supplies messages, state, and thread context.
  • AgentRunner executes the agent and receives AG-UI events.
  • The runtime encodes those events as SSE and streams them to the frontend proxy.
  • The backend framework can change without forcing a corresponding change to the frontend AG-UI contract.

官方文档

它是一个框架无关代理,所以也可以用在支持Fetch API的node 层 运行时中
Deploy to any runtime

AGUI 协议

abstractAgent

[AbstractAgent Api] (https://docs.ag-ui.com/sdk/js/client/abstract-agent)
AbstractAgent 源码

1
2
3
4
5
6
7
8
9
10
11
12
13
14
15
16
17
18
19
20
21
22
23
24
25
26
27
28
29
30
31
32
33
34
35
36
37
38
39
40
41
42
43
44
45
46
47
48
49
50
51
52
53
54
55
56
57
58
59
60
61
62
63
64
65
66
67
68
69
70
71
72
73
74
75
76
77
78
79
80
81
82
83
84
85
86
87
88
89
90
91
92
93
94
95
96
97
98
99
100
101
102
103
104
abstract run(input: RunAgentInput): Observable<BaseEvent>;

public async runAgent(
parameters?: RunAgentParameters,
subscriber?: AgentSubscriber,
): Promise<RunAgentResult> {
try {
this.isRunning = true;
this.agentId = this.agentId ?? uuidv4();
const input = this.prepareRunAgentInput(parameters);

this.debugLogger?.lifecycle("LIFECYCLE", "Run started:", {
agentId: this.agentId,
threadId: this.threadId,
});

let result: any = undefined;
const currentMessageIds = new Set(this.messages.map((message) => message.id));

const subscribers: AgentSubscriber[] = [
{
onRunFinishedEvent: (params) => {
if (params.outcome === "success") {
result = params.result;
}
},
},
...this.subscribers,
subscriber ?? {},
];

await this.onInitialize(input, subscribers);

// Per-run detachment signal + completion promise
this.activeRunDetach$ = new Subject<void>();
let resolveActiveRunCompletion: (() => void) | undefined;
this.activeRunCompletionPromise = new Promise<void>((resolve) => {
resolveActiveRunCompletion = resolve;
});

// 没有中间件的话直接运行run 有种中间件的话,会先运行中间件,初始值是agent本身,reduceRight 到最后是会执行agent.run(input) 方法

// pipe: rxjs api https://rxjs.dev/api/index/function/pipe

const pipeline = pipe(
() => {
// Build middleware chain using reduceRight so middlewares can intercept runs.
if (this.middlewares.length === 0) {
return this.run(input);
}

const chainedAgent = this.middlewares.reduceRight(
(nextAgent: AbstractAgent, middleware) =>
({
run: (i: RunAgentInput) => middleware.run(i, nextAgent),
get messages() {
return nextAgent.messages;
},
get state() {
return nextAgent.state;
},
}) as AbstractAgent,
this, // Original agent is the final 'next'
);

return chainedAgent.run(input);
},
transformChunks(this.debugLogger),
verifyEvents(this.debugLogger),
// Stop processing immediately when this run is detached
(source$) => source$.pipe(takeUntil(this.activeRunDetach$!)),
(source$) => this.apply(input, source$, subscribers),
(source$) => this.processApplyEvents(input, source$, subscribers),
catchError((error) => {
this.debugLogger?.lifecycle("LIFECYCLE", "Run errored:", {
agentId: this.agentId,
error: error instanceof Error ? error.message : String(error),
});
this.isRunning = false;
return this.onError(input, error, subscribers);
}),
finalize(() => {
this.debugLogger?.lifecycle("LIFECYCLE", "Run finished:", {
agentId: this.agentId,
threadId: this.threadId,
});
this.isRunning = false;
void this.onFinalize(input, subscribers);
resolveActiveRunCompletion?.();
resolveActiveRunCompletion = undefined;
this.activeRunCompletionPromise = undefined;
this.activeRunDetach$ = undefined;
}),
);

await lastValueFrom(pipeline(of(null)));
const newMessages = structuredClone_(this.messages).filter(
(message: Message) => !currentMessageIds.has(message.id),
);
return { result, newMessages };
} finally {
this.isRunning = false;
}
}

httpAgent

[HttpAgent Api] (https://docs.ag-ui.com/sdk/js/client/http-agent)

httpAgent 基于 abstractAgent 抽象类

HttpAgent 源码

httpAgent 会实现 run 函数,发起真正的http 请求

1
2
3
4
5
6
7
8
9
10
11
12
13
14
15
16
17
18
19
20
21
22
23

/**
* Returns the fetch config for the http request.
* Override this to customize the request.
*
* @returns The fetch config for the http request.
*/
protected requestInit(input: RunAgentInput): RequestInit {
return {
method: "POST",
headers: {
...this.headers,
"Content-Type": "application/json",
Accept: "text/event-stream",
},
body: JSON.stringify(input),
signal: this.abortController.signal,
};
}
run(input: RunAgentInput): Observable<BaseEvent> {
const httpEvents = runHttpRequest(() => this.fetch(this.url, this.requestInit(input)));
return transformHttpEventStream(httpEvents, this.debugLogger);
}

runHttpRequest

runHttpRequest 处理流数据 转成 HttpEventType 流

1
2
3
4
5
6
7
8
9
10
11
12
13
14
15
16
17
18
19
20
21
22
23
24
25
26
27
28
29
30
31
32
33
34
35
36
37
38
39
40
41
42
43
44
45
46
47
48
49
50
51
52
53
54
55
56
57
58
59
60
61
62
63
64
65
66
67
68
69
70
71
72
73
74
75
76
77

export enum HttpEventType {
HEADERS = "headers",
DATA = "data",
}

export const runHttpRequest = (
fetchResponse: () => Promise<Response>,
): Observable<HttpEvent> => {
// Defer the fetch so that it's executed when subscribed to
return defer(() => from(fetchResponse())).pipe(
switchMap((response) => {
if (!response.ok) {
const contentType = response.headers.get("content-type") || "";
// Read the (small) error body once, then error the stream
return from(response.text()).pipe(
mergeMap((text) => {
let payload: unknown = text;
if (contentType.includes("application/json")) {
try { payload = JSON.parse(text); } catch {/* keep raw text */}
}
const err: any = new Error(
`HTTP ${response.status}: ${typeof payload === "string" ? payload : JSON.stringify(payload)}`
);
err.status = response.status;
err.payload = payload;
return throwError(() => err);
})
);
}
// Emit headers event first
const headersEvent: HttpHeadersEvent = {
type: HttpEventType.HEADERS,
status: response.status,
headers: response.headers,
};

const reader = response.body?.getReader();
if (!reader) {
return throwError(() => new Error("Failed to getReader() from response"));
}

return new Observable<HttpEvent>((subscriber) => {
// Emit headers event first
subscriber.next(headersEvent);

(async () => {
try {
while (true) {
const { done, value } = await reader.read();
if (done) break;
// Emit data event instead of raw Uint8Array
const dataEvent: HttpDataEvent = {
type: HttpEventType.DATA,
data: value,
};
subscriber.next(dataEvent);
}
subscriber.complete();
} catch (error) {
subscriber.error(error);
}
})();

return () => {
reader.cancel().catch((error) => {
if ((error as DOMException)?.name === "AbortError") {
return;
}

throw error;
});
};
});
}),
);
};

transformHttpEventStream

1
2
3
4
5
6
7
8
9
10
11
12
13
14
15
16
17
18
19
20
21
22
23
24
25
26
27
28
29
30
31
export enum EventType {
TEXT_MESSAGE_START = "TEXT_MESSAGE_START",
TEXT_MESSAGE_CONTENT = "TEXT_MESSAGE_CONTENT",
TEXT_MESSAGE_END = "TEXT_MESSAGE_END",
TEXT_MESSAGE_CHUNK = "TEXT_MESSAGE_CHUNK",
TOOL_CALL_START = "TOOL_CALL_START",
TOOL_CALL_ARGS = "TOOL_CALL_ARGS",
TOOL_CALL_END = "TOOL_CALL_END",
TOOL_CALL_CHUNK = "TOOL_CALL_CHUNK",
TOOL_CALL_RESULT = "TOOL_CALL_RESULT",
THINKING_TEXT_MESSAGE_END = "THINKING_TEXT_MESSAGE_END",
STATE_SNAPSHOT = "STATE_SNAPSHOT",
STATE_DELTA = "STATE_DELTA",
MESSAGES_SNAPSHOT = "MESSAGES_SNAPSHOT",
ACTIVITY_SNAPSHOT = "ACTIVITY_SNAPSHOT",
ACTIVITY_DELTA = "ACTIVITY_DELTA",
RAW = "RAW",
CUSTOM = "CUSTOM",
RUN_STARTED = "RUN_STARTED",
RUN_FINISHED = "RUN_FINISHED",
RUN_ERROR = "RUN_ERROR",
STEP_STARTED = "STEP_STARTED",
STEP_FINISHED = "STEP_FINISHED",
REASONING_START = "REASONING_START",
REASONING_MESSAGE_START = "REASONING_MESSAGE_START",
REASONING_MESSAGE_CONTENT = "REASONING_MESSAGE_CONTENT",
REASONING_MESSAGE_END = "REASONING_MESSAGE_END",
REASONING_MESSAGE_CHUNK = "REASONING_MESSAGE_CHUNK",
REASONING_END = "REASONING_END",
REASONING_ENCRYPTED_VALUE = "REASONING_ENCRYPTED_VALUE",
}
1
2
3
4
5
6
7
8
9
10
11
12
13
14
15
16
17
18
19
20
21
22
23
24
25
26
27
28
29
30
31
32
33
34
35
36
37
38
39
40
41
42
43
44
45
46
47
48
49
50
51
52
53
54
55
56
57
/**
* Transforms HTTP events into BaseEvents using the appropriate format parser based on content type.
*/

export const transformHttpEventStream = (
source$: Observable<HttpEvent>,
debugLogger?: DebugLoggerInput,
): Observable<BaseEvent> => {

.....

// If we get headers and haven't initialized a parser yet, check content type
if (event.type === HttpEventType.HEADERS && !parserInitialized) {
parserInitialized = true;
const contentType = event.headers.get("content-type");

log?.lifecycle("HTTP", "Stream format detected:", {
contentType,
parser: contentType === proto.AGUI_MEDIA_TYPE ? "protobuf" : "sse",
});

// Choose parser based on content type
if (contentType === proto.AGUI_MEDIA_TYPE) {
// Use protocol buffer parser
parseProtoStream(bufferSubject).subscribe({
next: (event) => eventSubject.next(event),
error: (err) => eventSubject.error(err),
complete: () => eventSubject.complete(),
});
} else {
// Use SSE JSON parser for all other cases
parseSSEStream(bufferSubject, log).subscribe({
next: (json) => {
try {
const parsedEvent = EventSchemas.parse(json);
log?.event("HTTP", "Event validated:", parsedEvent, {
type: parsedEvent.type,
valid: true,
});
eventSubject.next(parsedEvent as BaseEvent);
} catch (err) {
log?.event("HTTP", "Event invalid:", { json, error: String(err) });
eventSubject.error(err);
}
},
error: (err) => {
....
return eventSubject.error(err);
},
complete: () => eventSubject.complete(),
});
}
} else if (!parserInitialized) {
eventSubject.error(new Error("No headers event received before data events"));
}

}

parseSSEStream

源码

1
2
3
4
5
6
7
8
9
10
11
12
13
14
15
16
17
18
19
20
21
22
23
24
25
26
27
28
29
30
31
32
33
34
35
36
37
38
39
40
41
42
43
44
45
46
47
48
49
50
51
52
53
54
55
56
57
58
59
60
61
62
63
/**
* Parses a stream of HTTP events into a stream of JSON objects using Server-Sent Events (SSE) format.
* Strictly follows the SSE standard where:
* - Events are separated by double newlines ('\n\n')
* - Only 'data:' prefixed lines are processed
* - Multi-line data events are supported and joined
* - Non-data fields (event, id, retry) are ignored
*/

next: (event: HttpEvent) => {
if (event.type === HttpEventType.HEADERS) {
return;
}

if (event.type === HttpEventType.DATA && event.data) {
// Decode chunk carefully to handle UTF-8
const text = decoder.decode(event.data, { stream: true });
buffer += text;

// Process complete events (separated by double newlines)
const events = buffer.split(/\n\n/);
// Keep the last potentially incomplete event in buffer
buffer = events.pop() || "";

for (const event of events) {
processSSEEvent(event);
}
}
},

/**
* Helper function to process an SSE event.
* Extracts and joins data lines, then parses the result as JSON.
*
* Follows the SSE spec by processing lines starting with 'data:',
* ignoring a single space if it is present after the colon.
*
* @param eventText The raw event text to process
*/
function processSSEEvent(eventText: string) {
const lines = eventText.split("\n");
const dataLines: string[] = [];

for (const line of lines) {
if (line.startsWith("data:")) {
// Remove 'data:' prefix, and optionally a single space afterwards
dataLines.push(line.slice(5).replace(/^ /, ""));
}
}

// Only process if we have data lines
if (dataLines.length > 0) {
try {
// Join multi-line data and parse JSON
const jsonStr = dataLines.join("\n");
const json = JSON.parse(jsonStr);
log?.event("SSE", "Event received:", json, { type: json.type });
jsonSubject.next(json);
} catch (err) {
jsonSubject.error(err);
}
}
}

parseProtoStream

源码

1
2
3
4
5
6
7
8
9
10
11
12
13
14
15
16
17
18
19
20
21
22
23
24
25
26
27
28
29
30
31
32
33
34
35
36
37
38
39
40
41
42
43
44
45
46
47
48
49
50
51
52
53
54
55
56
57
58
59
/**
* Parses a stream of HTTP events into a stream of BaseEvent objects using Protocol Buffer format.
* Each message is prefixed with a 4-byte length header (uint32 in big-endian format)
* followed by the protocol buffer encoded message.
*/

next: (event: HttpEvent) => {
if (event.type === HttpEventType.HEADERS) {
return;
}

if (event.type === HttpEventType.DATA && event.data) {
// Append the new data to our buffer
const newBuffer = new Uint8Array(buffer.length + event.data.length);
newBuffer.set(buffer, 0);
newBuffer.set(event.data, buffer.length);
buffer = newBuffer;

// Process as many complete messages as possible
processBuffer();
}
},

/**
* Process as many complete messages as possible from the buffer
*/
function processBuffer() {
// Keep processing while we have enough data for at least a header (4 bytes)
while (buffer.length >= 4) {
// Read message length from the first 4 bytes (big-endian uint32)
const view = new DataView(buffer.buffer, buffer.byteOffset, 4);
const messageLength = view.getUint32(0, false); // false = big-endian

// Check if we have the complete message (header + message body)
const totalLength = 4 + messageLength;
if (buffer.length < totalLength) {
// Not enough data yet, wait for more
break;
}

try {
// Extract the message (skipping the 4-byte header)
const message = buffer.slice(4, totalLength);

// Decode the protocol buffer message using the imported decode function
const event = proto.decode(message);

// Emit the parsed event
eventSubject.next(event);

// Remove the processed message from the buffer
buffer = buffer.slice(totalLength);
} catch (error: unknown) {
const errorMessage = error instanceof Error ? error.message : String(error);
eventSubject.error(new Error(`Failed to decode protocol buffer message: ${errorMessage}`));
return;
}
}
}

为什么默认 copilotKit 实例不同动作 可以发送不同http path 请求

从官网文档中可以看出,默认的 copilotKit 实例不同动作会基于 basePath 发送不同的http path 请求
实际请求时确实从寻找agent, 链接agent 服务,到向agent 提问 都发送不同的http path 请求

原因:
useAgent() 函数会返回一个 ProxiedCopilotRuntimeAgent 对象
ProxiedCopilotRuntimeAgent 从httpAgent继承,
ProxiedCopilotRuntimeAgent 这个类会重新生成run 的请求url, 重写 connect 方法过程会指定,

1
2
3
4
5
6
7
8
9
10
11
12
13
14
15
16
17
18
19
20
21
22
23
24
25
26
27
28
29
30
31
32
33
34
35
36
37
38
39
40
41
42
43
44
45
46
47
48
49
50
51
52
53
54
55
56
57
58
59
60
61
62
63
64
65
66
67
68
69
70
71
72
73
74
75
76
77
78
79
80
81
82
83
84
85
86
87
88
89
90
91
92
93
94
/**
* ProxiedCopilotRuntimeAgent 从httpAgent继承
*
*/


super({
...config,
url: runUrl,
});

/** run ********************/

public run(input: RunAgentInput): Observable<BaseEvent> {
if (
this.runtimeMode === "pending" ||
(this.transport === "auto" &&
this.runtimeMode !== RUNTIME_MODE_INTELLIGENCE)
) {
return defer(() => from(this.ensureRuntimeConfiguration())).pipe(
switchMap(() => this.run(input)),
);
}
if (this.runtimeMode === RUNTIME_MODE_INTELLIGENCE) {
return this.#runViaDelegate(input);
}
return this.#runViaHttp(input);
}

#runViaDelegate(input: RunAgentInput): Observable<BaseEvent> {
return defer(() => from(this.resolveDelegate())).pipe(
switchMap((delegate) => withAbortErrorHandling(delegate.run(input))),
);
}

#runViaHttp(input: RunAgentInput): Observable<BaseEvent> {
if (this.transport === "single") {
if (!this.singleEndpointUrl) {
throw new Error("Single endpoint transport requires a runtimeUrl");
}

const requestInit = this.createSingleRouteRequestInit(
input,
"agent/run",
{
agentId: this.routedAgentId(),
},
);
const httpEvents = runHttpRequest(() =>
this.fetch(this.singleEndpointUrl!, requestInit),
);
return withAbortErrorHandling(transformHttpEventStream(httpEvents));
}
/**
* POST /api/copilotkit/agent/:agentId/run
*/
return withAbortErrorHandling(super.run(input));
}


/**
*
* /api/copilotkit/info
*/


private async fetchRuntimeInfo(): Promise<RuntimeInfo> {
const headers: Record<string, string> = {
...this.headers,
};

if (this.transport === "auto") {
return this.fetchRuntimeInfoAutoDetect(headers);
}

let init: RequestInit;
let url: string;

if (this.transport === "single") {
if (!this.singleEndpointUrl) {
throw new Error("Single endpoint transport requires a runtimeUrl");
}
if (!headers["Content-Type"]) {
headers["Content-Type"] = "application/json";
}
url = this.runtimeUrl!;
init = { method: "POST", body: JSON.stringify({ method: "info" }) };
} else {
url = `${this.runtimeUrl}/info`;
init = {};
}
....

}


ProxiedCopilotRuntimeAgent 源码

My Little World

Anthropic

发表于 2026-07-30

基本使用

1
2
3
4
5
6
7
8
9
10
11
12
13
14
15
16
from anthropic import Anthropic
from helper import load_env
load_env()

client = Anthropic()
MODEL_NAME="claude-3-5-sonnet-20241022"

response = client.messages.create(
model=MODEL_NAME,
max_tokens=1000,
messages=[
{"role": "user", "content": "Write a haiku about Anthropic"}
]
)

print(response.content[0].text)

返回结果


content: 消息的内容,可以是文本、图片、文件等
model: 当前使用的模型名称
role: 消息的角色,user 或 assistant assistant 消息会被自动加入,我们一般不需要自己构造
stop_reason: 停止生成的原因,可以是max_tokens、max_seconds、stop_sequence等
input_tokens: 输入的token数
output_tokens: 输出的token数

参数

stop_sequence: 停止生成的序列,eg. \n 如果client.messages.create 有配置,当生成的内容包含 \n 时,会停止生成


max_tokens: 生成最大长度,如果client.messages.create 有配置,当生成的内容超过 max_tokens 时,会停止生成

temperature: 生成结果的多样性。取值 0~1 之间,越大越散,越小越收敛

messages: 对话历史,包含用户和助手的消息,eg. [{“role”: “user”, “content”: “Write a haiku about Anthropic”}]

1
2
3
4
5
6
7
8
9
10
11
12
13
14
15
16
17
18
19
20
21
22
23
24
25
26
27
28
29
30
31
32
33
34
35
// 手动制造多轮对话(历史问答) 或者 Prefilling the Assistant Response (预填充助手回复)
messages=[
{"role": "user", "content": "Hello! Only speak to me in Spanish"},
{"role": "assistant", "content": "Hola!"},
{"role": "user", "content": "How are you?"}
]
// chat bot 通过循环每次自动将历史问答加入到messages 中,实现多轮对话
print("Simple Chatbot (type 'quit' to exit)")
# Store conversation history
messages = []
while True:
# Get user input
user_input = input("You: ")
# Check for quit command
if user_input.lower() == 'quit':
print("Goodbye!")
break
# Add user message to history
messages.append({"role": "user", "content": user_input})
try:
# Get response from Claude
response = client.messages.create(
model=MODEL_NAME,
max_tokens=200,
messages=messages
)
# Extract and print Claude's response
asst_message = response.content[0].text
print("Assistant:", asst_message)

# Add assistant response to history
messages.append({"role": "assistant", "content": asst_message})

except Exception as e:
print(f"An error occurred: {e}")

多模态输入

messages 数组中 content 上面都是简单的文本,通过进行类型区分和扩展,可以进行多模态输入
此时content可以传入一个列表,每个元素是一个字典,包含type 和 相应type 的数据字段

1
2
3
4
5
6
7
8
9
10
11
12
13
14
15
16
17
18
messages = [
{
"role": "user",
"content": [{
"type": "image", // 图片做输入 图片内容块
"source": {
"type": "base64", // 图片以base64 编码 输入
"media_type": "image/png", // 图片类型
"data": base64_string // 图片base64 字符串
},
},
{
"type": "text", // 文本做输入 文本内容块
"text": """How many to-go containers of each type
are in this image?"""
}]
}
]

通过对图片进行输入,可以实现对图片进行识别和信息提取

1
2
3
4
5
6
7
8
9
10
11
12
13
14
15
16
17
18
19
20
21
22
23
24
25
26
27
28
29
30
31
32
33
34
35
36
37
38
39
40
41
42
43
44
45
46
47
48
49
50
51
52
53
54
55
56
57
58
59
60
61
62
63
64
65
66
67
68
69
70
71
72
73
74
75
76
77
78
79
80
import base64
import mimetypes

# 从图片路径创建图片内容块
def create_image_message(image_path):
# Open the image file in "read binary" mode
with open(image_path, "rb") as image_file:
# Read the contents of the image as a bytes object
binary_data = image_file.read()
# Encode the binary data using Base64 encoding
base64_encoded_data = base64.b64encode(binary_data)
# Decode base64_encoded_data from bytes to a string
base64_string = base64_encoded_data.decode('utf-8')
# Get the MIME type of the image based on its file extension
mime_type, _ = mimetypes.guess_type(image_path)
# Create the image block
image_block = {
"type": "image",
"source": {
"type": "base64",
"media_type": mime_type,
"data": base64_string
}
}


return image_block

# 创建messages
messages = [
{
"role": "user",
"content": [
create_image_message("./images/invoice.png"),
{"type": "text", "text": """
Generate a JSON object representing the contents # 提取图片中的信息,生成一个JSON对象
of this invoice. It should include all dates,
dollar amounts, and addresses.
Only respond with the JSON itself.
"""
}
]
}
]

response = client.messages.create(
model=MODEL_NAME,
max_tokens=2048,
messages=messages
)
print(response.content[0].text)

=====>
```json
{
"invoice": {
"invoice_number": "INV-2024-0042",
"invoice_date": "March 17, 2025",
"due_date": "April 16, 2025",
"vendor": {
"company_name": "ACME CORPORATION",
"address": {
"street": "123 Business Avenue",
"city": "Silicon Valley",
"state": "CA",
"zip": "94025"
},
"email": "accounts@acmecorp.com"
},
"bill_to": {
"address": {
"street": "789 Market Street, Suite 500",
"city": "Los Angeles",
"state": "CA",
"zip": "90015"
}
},
...
}
}

流式输出

使用client.messages.stream 方法可以实现流式输出

1
2
3
4
5
6
7
with client.messages.stream(
max_tokens=1024,
messages=[{"role": "user", "content": "write a poem"}],
model=MODEL_NAME,
) as stream:
for text in stream.text_stream:
print(text, end="", flush=True)

提示词

关键步骤

  1. 设置角色,背景,功能概述
  2. 制作模版
  3. 添加思考过程
  4. 阐述结果要求和注意事项
  5. 添加示例,包含尽可能多的场景,覆盖不同的输入情况

可以分步声明载组合起来

1
2
3
4
5
6
7
8
9
10
11
12
13
14
15
16
17
18
19
20
21
22
23
24
25
26
27
28
29
30
31
32
33
34
35
36
37
38
39
final_prompt = f"""
{setting_the_role}
{instruction_pt1}
{instruction_pt2}
{instruction_pt3}
"""

import re
def get_review_sentiment(review):
#Insert the context into the prompt
prompt = final_prompt.replace("{{CUSTOMER_REVIEW}}", review)
# Send a request to Claude
response = client.messages.create(
model=MODEL_NAME,
max_tokens=2000,
messages=[
{"role": "user", "content": prompt}
]
)
output = response.content[0].text
print("ENTIRE MODEL OUTPUT: ")
print(output)

sentiment = re.search(r'<json>(.*?)</json>', output, re.DOTALL) // 从模型输出中提取json

if sentiment:
print("FINAL JSON OUTPUT: ")
print(sentiment.group(1).strip())
else:
print("No sentiment analysis in the response.")

review1 = """
I am in love with my Acme phone. It's incredible.
It's a little expensive, but so worth it imo.
If you can afford it, it's worth it!
I love the colors too!
"""

get_review_sentiment(review1)


prompt cache

通过在content block 中添加 cache_control 字段,可以控制是否使用缓存

当开启缓存时,当前content block 将被缓存,并在下次请求中作为缓存命中,从而节省计算资源。

开启缓存时写入要比普通token提问,要贵一些,但是在后续提问中会大幅提升响应速度

Cache write tokens are 25% more expensive than base input tokens
Cache read tokens are 90% cheaper than base input tokens
Regular input and output tokens are priced at standard rates

1
2
3
4
5
6
7
8
9
10
11
12
13
14
15
16
17
18
19
20
21
22
23
24
25
26
27
messages=[
# ...long conversation so far
{
"role": "user",
"content": [
{
"type": "text",
"text": "Hello, can you tell me more about the solar system",
"cache_control": {"type": "ephemeral"}
}
]
},
{
"role": "assistant",
"content": "Certainly! The solar system is the collection of celestial bodies that orbit our Sun. It consists of eight planets, numerous moons, asteroids, comets, and other objects. The planets, in order from closest to farthest from the Sun, are: Mercury, Venus, Earth, Mars, Jupiter, Saturn, Uranus, and Neptune. Each planet has its own unique characteristics and features. Is there a specific aspect of the solar system you'd like to know more about?"
},
{
"role": "user",
"content": [
{
"type": "text",
"text": "Tell me more about Mars.",
"cache_control": {"type": "ephemeral"}
}
]
}
]

通过在多轮对话中一般会在每次提问时添加缓存设置,这样提问时就是写入缓存的过程,后续再提问时如果命中就是读缓存的过程,提高响应速度
缓存有ttl, 一般5分钟,如果缓存命中,则重新设置缓存时间
这样如果下一轮提问能命中当前提问的缓存,就可以直接从缓存中读取,快速获取到上一次的提问历史,进行速度提升,每一轮都这样就可以提升整体多轮会话速度

tool

tool schema 定义

1
2
3
4
5
6
7
8
9
10
11
12
13
14
15
16
17
18
19
{
"name": "get_user",
"description": "Looks up a user by email, phone, or username.",
"input_schema": {
"type": "object",
"properties": {
"key": {
"type": "string",
"enum": ["email", "phone", "username"],
"description": "The attribute to search for a user by (email, phone, or username)."
},
"value": {
"type": "string",
"description": "The value to match for the specified attribute."
}
},
"required": ["key", "value"]
}
}

实际调用

1
2
3
4
5
6
7
8
9
10
11
12
13
14
15
16
17
18
19
20
21
22
23
24
25
26
27
28
29
30
31
32
33
34
35
36
37
38
39
40
41
42
43
44
45
46
47
48
49
50
51
52
53
54
55
56
57
58
59
60
61
62
63
64
65
66
def process_tool_call(tool_name, tool_input):
if tool_name == "get_user":
return db.get_user(tool_input["key"], tool_input["value"])
elif tool_name == "get_order_by_id":
return db.get_order_by_id(tool_input["order_id"])
elif tool_name == "get_customer_orders":
return db.get_customer_orders(tool_input["customer_id"])
elif tool_name == "cancel_order":
return db.cancel_order(tool_input["order_id"])

def simple_chat():
system_prompt = """ xxxxxx """
user_message = input("\nUser: ")
messages = [{"role": "user", "content": user_message}]
while True:
if user_message == "quit":
break
#If the last message is from the assistant,
# get another input from the user
if messages[-1].get("role") == "assistant":
user_message = input("\nUser: ")
messages.append({"role": "user", "content": user_message})

#Send a request to Claude
response = client.messages.create(
model=MODEL_NAME,
system=system_prompt,
max_tokens=4096,
tools=tools,
messages=messages
)
# Update messages to include Claude's response
messages.append(
{"role": "assistant", "content": response.content}
)

#If Claude stops because it wants to use a tool:
if response.stop_reason == "tool_use":
#Naive approach assumes only 1 tool is called at a time
tool_use = response.content[-1]
tool_name = tool_use.name
tool_input = tool_use.input
print(f"=====Claude wants to use the {tool_name} tool=====")


#Actually run the underlying tool functionality on our db
tool_result = process_tool_call(tool_name, tool_input)

#Add our tool_result message:
messages.append(
{
"role": "user",
"content": [
{
"type": "tool_result",
"tool_use_id": tool_use.id,
"content": str(tool_result),
}
],
},
)
else:
#If Claude does NOT want to use a tool,
#just print out the text reponse
model_reply = extract_reply(response.content[0].text)
print("\nAcme Co Support: " + f"{model_reply}" )
123…29
YooHannah

YooHannah

287 日志
1 分类
24 标签
RSS
© 2026 YooHannah
由 Hexo 强力驱动
主题 - NexT.Pisces