My Little World

learn and share


  • 首页

  • 分类

  • 标签

  • 归档

  • 关于
My Little World

对象构造和继承

发表于 2017-08-19

对象特性

对象的属性在定义时,都带有一些特征值,js通过这些特征值定义他们的行为
这些特征值描述对象属性的各种特征,成为对象属性的特性
特性是内部值,放在两对方括号中访问
特性分为数据属性和访问器属性
数据属性:Configurable、Enumerable、Writable、Value
访问器属性:Configurable、Enumerable、Get、Set
定义某个属性的特性:Object.defineProperty(对象名,对象属性名,{特性1:值,特性2:值…})
定义多个属性特性:Object.defineProperties(对象名,{属性1:{特性1:值,特性2:值…},属性2:{特性1:值….}})
读取属性:Object.getOwnPropertyDescriptor(对象名,属性名) 返回一个对象

构造对象

工厂模式

1
2
3
4
5
6
7
8
9
10
11
12
13
14
15
function createobj(name,age){
var o=new Object();
o.name = name;
o.age = age;
o.sayName = function(){
console.log(this.name)
};
return o;
}
var person1 = createobj('gray',25);
var person2 = createobj('black',26);
person1.sayName()//gray
person2.sayName()//black
console.log(typeof person1)//object
console.log(person1 instanceof createobj) //false

缺点:无法识别对象类型

寄生构造函数

定义样子同工厂模式,只不过创建实例时用new 操作符
将包装函数叫做 构造函数
实例与构造函数及其原型没有关系

1
2
3
4
5
6
7
8
9
10
11
12
13
function createobj(name,age){  //构造函数
var o=new Object();
o.name = name;
o.age = age;
o.sayName = function(){
console.log(this.name)
};
return o;
}
var person1 = new createobj('gray',25);
person1.sayName()//gray
console.log(person1 instanceof createobj) //false
console.log(person1 instanceof Object) //true

应用:为无法修改构造函数的对象添加方法

1
2
3
4
5
6
7
8
9
10
11
//给数组增加特殊方法
function specialArray(){
var values = new Array();
values.push.apply(values,arguments);
values.toPiedString = function(str){ //特殊方法
return this.join(str);
};
return values;
}
var colors = new specialArray('red','blue');
console.log(colors.toPiedString('|'));//"red|blue"

构造函数

1
2
3
4
5
6
7
8
9
10
11
12
13
14
15
16
17
18
19
20
21
22
23
24
function createobj(name,age){
this.name = name;
this.age = age;
this.sayName = function(){
console.log(this.name)
};
}
var person1 = new createobj('gray',25);
person1.sayName(); //gray

console.log(person1 instanceof createobj)//true
console.log(person1 instanceof Object)//true

console.log(window.name)//''
var person2 = createobj('black',26);
console.log(person2) //undefined
console.log(window.name) //black
console.log(person1.sayName == window.sayName)//false

var person3 = new createobj('orange',25);
console.log(person1.sayName == person3.sayName)//false

console.log(person1.constructor == createobj)//true
console.log(person3.constructor == person1.constructor)//true

1、构造函数的实例均指向构造函数。例:person1、person3的constructor均指向createobj)
2、不使用new 关键字调用构造函数,构造函数的方法和属性会挂到window上面。例:person2
3、定义在构造函数上的方法,创建不同实例后,不同实例各自拥有自己的该方法,不同实例之间构造函数方法不相等,不共享

使用构造函数创建对象,如果相让对象方法在不同实例实现共享,则在定义方法时,采用引用函数的方法

1
2
3
4
5
6
7
8
9
10
11
function createobj(name,age){
this.name = name;
this.age = age;
this.sayName = sayName;
}
function sayName(){
console.log(this.name)
}
var person1 = new createobj('gray',25);
var person3 = new createobj('orange',25);
console.log(person1.sayName == person3.sayName)//true

缺点:若对象需要定义多个方法则需要创建多个全局函数供构造函数引用,失去封装性

原型模式

在对象的prototype中定义的属性和方法,可以在所有实例中共享
定义方法一

1
2
3
4
5
6
7
8
9
10
11
12
13
14
15
16
17
18
19
20
21
22
23
24
25
26
27
28
29
30
31
32
33
34
35
36
function createobj(name,age){}
createobj.prototype.name = 'black';
createobj.prototype.age = 26;
createobj.prototype.sayName = function(){
console.log(this.name)
}
var person1 = new createobj();
var person2 = new createobj();
person1.sayName();//black
person2.sayName();//black
console.log(person1.sayName == person2.sayName)//true

console.log(person1.constructor == createobj)//true
console.log(person2.constructor == person1.constructor)//true


console.log(person1.age) //26 来自原型
person1.age = 27; //相当于创建了一个实例属性
console.log(person1.age) //27 来自实例属性
console.log(person2.age) //26 来自原型
delete person1.age; //删除实例属性
console.log(person1.age) //26 来自原型
delete person1.age; //不能删除原型属性
console.log(person1.age) //26
console.log(person2.age) //26

console.log(person1 == createobj.prototype)//false
console.log(person1.prototype == createobj.prototype)//false
console.log(createobj.prototype.isPrototypeOf(person1))//true
console.log(person1.prototype) //undefined
console.log(Object.getPrototypeOf(person1));//createobj.prototype

console.log(person1.hasOwnProperty('name'));//false
console.log('name' in person1);//true
console.log(Object.keys(createobj.prototype));//["name", "age", "sayName"]
console.log(Object.getOwnPropertyNames(createobj.prototype));//["constructor", "name", "age", "sayName"]

obj1
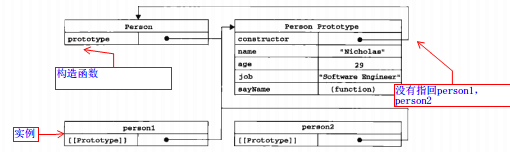
1、实例的内部指针[[Prototype]] 会指向构造函数的原型对象,它是不能直接访问的
2、构造函数的prototype也会指向构造函数的原型对象,但他是构造函数的一个属性,可以直接访问
3、Object.getPrototypeOf(实例名); 返回实例的原型对象 .即[[Prototype]]指向的对象
4、实例名.hasOwnProperty(属性名字符串) ; 只检查实例的实例属性中是否有该属性,没有的话,返回false,可用于检查该属性在实例属性中,还是在原型属性中
5、在获取属性值时,实例属性中有该属性就取该实例属性的值,没有则用原型属性值,原型属性也没有的话则返回undefined
6、实例属性可用delete删除,实例无法更改原型属性的值
7、属性名字符串 in 实例名; 检查实例和原型所有属性中是否有该属性,有的话就返回true;for-in循环可枚举的属性,包括实例属性和原型属性
8、Object.keys(对象名);返回对象可枚举属性的字符串数组
9、Object.getOwnPropertyNames(对象名);返回所有对象的实例属性,无论它是否枚举

定义方法二

1
2
3
4
5
6
7
8
9
10
11
12
13
14
15
16
17
function createobj(){}
createobj.prototype={
name:'seven',
sayName:function(){
console.log(this.name)
}
};
var person1 = new createobj();
person1.sayName();//seven
console.log(person1.constructor == createobj);//false
console.log(person1.constructor == createobj.prototype);//false
console.log(person1.constructor == Object);//true
console.log(person1.constructor == createobj.prototype.constructor);//true
console.log(person1.constructor);//function object(){}

console.log(person1 instanceof Object);//true
console.log(person1 instanceof createobj);//true

1、将挂在构造函数原型上的属性以一个对象的形式,一起赋给构造函数原型,即构造函数原型被赋值为一个对象
2、构造函数原型被Object创建,实例、构造函数的原型对象的构造函数为Object对象
3、若在定义原型对象时,指定原型对象的constructor,则对象实例的constructor也会跟着指到相应的值

1
2
3
4
5
6
7
8
9
10
11
12
13
14
15
16
17
18
function createobj(){}
createobj.prototype={
constructor:createobj, //明确指出,同时特性的枚举属性会被设置为true,默认为false
name:'seven',
sayName:function(){
console.log(this.name)
}
};
var person1 = new createobj();
person1.sayName();//seven
console.log(person1.constructor == createobj);//true
console.log(person1.constructor == createobj.prototype);//false
console.log(person1.constructor == Object);//false
console.log(person1.constructor == createobj.prototype.constructor);//true
console.log(person1.constructor);//function createobj(){}

console.log(person1 instanceof Object);//true
console.log(person1 instanceof createobj);//true

4、 实例中的指针指向原型,不指向构造函数

1
2
3
4
5
6
7
8
9
10
11
12
13
14
15
16
17
18
19
20
function createobj(){}

var person1 = new createobj();
console.log(person1 instanceof createobj);//true
createobj.prototype={
constructor:createobj,
name:'seven',
sayName:function(){
console.log(this.name)
}
};
//person1.sayName();//person1.sayName is not a function
console.log(person1.constructor == createobj);//true
console.log(person1.constructor == createobj.prototype);//false
console.log(person1.constructor == Object);//false
console.log(person1.constructor == createobj.prototype.constructor);//true
console.log(person1.constructor);//function createobj(){}

console.log(person1 instanceof Object);//true
console.log(person1 instanceof createobj);//false

obj2
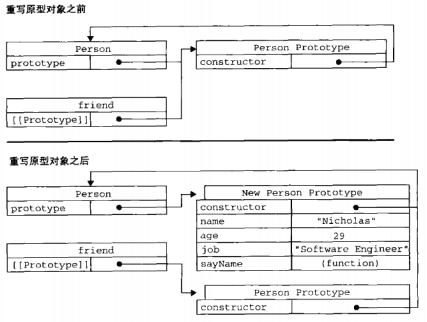
对象生成实例后,再去重写构造函数的原型对象,会将构造函数的原型对象指向后来被赋的对象,
切断与旧的原型对象之间的关系,新的原型对象与实例没有任何关系,实例仍引用旧的原型对象

原型方法可用于修改添加原生对象的属性方法
缺点:在原型对象prototype中的属性方法全都共享,当更改一个实例中的属性值时,其他实例一起变

1
2
3
4
5
6
7
8
9
10
11
12
13
14
15
16
17
18
19
20
21
22
23
24
25
26
27
28
29
//定义一
function createobj(name,age){}
createobj.prototype.name = [1,2];
createobj.prototype.sayName = function(){
console.log(this.name)
}
var person1 = new createobj();
var person2 = new createobj();
person1.sayName();//[1, 2]
person2.sayName();//[1, 2]
person1.name.push(3);
person1.sayName();//[1, 2, 3]
person2.sayName();//[1, 2, 3]
//定义二
function createobj(){}
createobj.prototype={
constructor:createobj,
name:[1,2],
sayName:function(){
console.log(this.name)
}
};
var person1 = new createobj();
var person2 = new createobj();
console.log(person1.name)//[1, 2]
console.log(person2.name)//[1, 2]
person1.name.push(3);
console.log(person1.name)//[1, 2, 3]
console.log(person2.name)//[1, 2, 3]

构造函数+原型模式

构造函数定义实例属性,
原型模式定义方法和共享属性

1
2
3
4
5
6
7
8
9
10
11
12
13
14
15
16
function createobj(name,age){
this.name = name;
this.age = age;
this.friends = [1,2];
}
createobj.prototype={
constructor:createobj,
sayName:function(){
console.log(this.name)
}
};
var person1 = new createobj('halo',24);
var person2 = new createobj('jack',25);
person1.friends.push(3);
console.log(person1.friends);//[1, 2, 3]
console.log(person2.friends);//[1, 2]

是用来定义引用类型的一种默认模式

动态原型模式

1
2
3
4
5
6
7
8
9
10
11
12
13
14
15
16
17
18
19
20
21
22
23
24
25
26
27
28
29
30
31
32
33
34
35
36
37
38
39
40
function createobj(name,age){
this.name = name;
this.age = age;
if(typeof this.sayName !='function'){
createobj.prototype.sayName = function(){
console.log(this.name)
}
}
}
var person1 = new createobj('halo',24);
var person2 = new createobj('jack',26);
person1.sayName();//halo
person2.sayName();//jack

//修改原型
createobj.prototype.sayName = function(){
console.log('111')
}
person1.sayName();//111
person2.sayName();//111

//使用字面方式重写
createobj.prototype={
constructor:createobj,
sayName:function(){
console.log(222)
}
};
var person3 = new createobj('kitty',24);
person1.sayName();//111
person2.sayName();//111
person3.sayName();//222
console.log(person1.prototype);//undefined

//重写一个原型方法
person1.sayName=function(){
console.log('333');
}
person1.sayName();//333
person2.sayName();//111

1、判断sayName函数是否存在的语句,只会在初次调用构造函数的时候运行,即第一次创建实例的时候运行,
运行过后,构造函数原型中就会存在sayName函数,即完成初始化,之后就不会在运行
2、对原型模式定义的方法属性能够在所有实例中立即得到放映
3、如果对构造函数原型使用字面方式重写,将切断已有实例与构造函数原型的联系,
已有实例会指向就原型对象,新建实例会指向新原型对象
4、在一个实例中重写一个原型方法,不会影响原型对象方法,其他实例和新建实例仍会调用原型对象方法

稳妥构造函数

创建对象的实例方法,不使用this
不使用new调用构造函数

1
2
3
4
5
6
7
8
9
10
11
12
13
14
function createobj(name,age){  //构造函数
var o=new Object();
o.name = name;
o.age = age;
o.sayName = function(){
console.log(this.name);
console.log(this == o)
};
return o;
}
var person1 = createobj('gray',25);
person1.sayName()//gray true

console.log(person1 instanceof createobj) //false

只用通过sayName函数访问传入到构造函数中的原始成员

继承

实例原型链模式

继承函数的原型被赋值为祖先函数的实例

1
2
3
4
5
6
7
8
9
10
11
12
13
14
15
16
17
18
19
20
21
22
23
24
25
26
27
28
29
30
31
32
33
34
35
36
37
38
//祖先函数
function Superfn(){
this.pro = true;
this.color = [1,2];
this.getsuper = function(){
console.log('aaa');
}
}
Superfn.prototype.getsuper=function(){
console.log('bbb');
}
//继承函数
function Subfn(){
this.subpro = false;
this.getsuper = function(){
console.log('000');
}
}
Subfn.prototype = new Superfn();
Subfn.prototype.getsuper = function(){
console.log('ccc')
}
var ins = new Subfn();
ins.getsuper();

console.log(ins instanceof Object); //true
console.log(ins instanceof Superfn); //true
console.log(ins instanceof Subfn); //true
console.log(Object.prototype.isPrototypeOf(ins)); //true
console.log(Superfn.prototype.isPrototypeOf(ins)); //true
console.log(Subfn.prototype.isPrototypeOf(ins)); //true

var ins1 = new Subfn();
console.log(ins.color)//[1,2]
console.log(ins1.color)//[1,2]
ins1.color.push(4);
console.log(ins.color)//[1,2,4]
console.log(ins1.color)//[1,2,4]

1.继承函数实例的属性/方法调用顺序:
自己定义的->继承函数实例->继承函数prototype->祖先函数实例属性->祖先函数prototype
2.因为所有引用类型默认继承object,所以调用toString等方法时,其实调用的的是object的prototype
3.重写原型中祖先函数的方法,一定要在继承函数原型被赋值祖先函数实例之后,相当于用实例方法覆盖原型方法
但注意不能用字面量方法重写继承函数原型,这样会导致继承函数原型重新指向新对象,切断与祖先函数联系
4.因为继承函数prototype指向祖先函数实例时,祖先函数所有属性相当于继承函数prototype属性,
构造函数原型的属性会被所有实例共享,所以创建继承函数实例时,
不能像祖先函数的构造函数中传递参数,因为会导致其他实例同时共享这些参数导致的后果

借用构造函数

使用apply()或者call()方法。在继承函数构造函数中调用祖先函数构造函数,这样,
在new 一个继承函数实例时,就会去执行祖先函数中所有对象初始化代码,每个实例都会具有自己的祖先函数属性的副本

1
2
3
4
5
6
7
8
9
10
11
12
13
14
15
16
17
18
19
20
21
22
23
24
25
26
function Superfn(time){
this.color = [1,2];
this.time = time;
}

Superfn.prototype.getsuper=function(){
console.log('bbb');
}

function Subfn(){
Superfn.call(this,'11:23:30');
this.age = 29;
}

var ins = new Subfn();
var ins1 = new Subfn();
console.log(ins.color) //[1, 2]
console.log(ins1.color)//[1, 2]
ins1.color.push(4);
console.log(ins.color)//[1, 2]
console.log(ins1.color)//[1, 2, 4]

console.log(ins.time);//"11:23:30"
console.log(ins.age);//29

ins.getsuper();//ins.getsuper is not a function

1、可以像祖先函数构造函数中传递参数;
2、定义继承函数自己的属性必须放在调用祖先函数之后,防止祖先函数重写继承函数属性
缺点: 所有的属性只能使用构造函数模式定义,而且,继承函数实例,不能调用祖先函数原型上的方法

组合继承

在继承函数构造函数中调用祖先函数,实现属性继承
将继承函数的原型赋值为祖先函数实例,实现方法复制

1
2
3
4
5
6
7
8
9
10
11
12
13
14
15
16
17
18
19
20
21
22
23
24
function Superfn(time){
this.color = [1,2];
this.time = time;
}
Superfn.prototype.getsuper=function(){
console.log('bbb');
}
function Subfn(){
Superfn.call(this,'11:23:30');
this.age = 29;
}
Subfn.prototype= new Superfn();
var ins = new Subfn();
var ins1 = new Subfn();
console.log(ins.color)
console.log(ins1.color)
ins1.color.push(4);
console.log(ins.color)
console.log(ins1.color)

console.log(ins.time);//"11:23:30"
console.log(ins.age);//29

ins.getsuper();//bbb

缺点:调用了两次Superfn(),初始化时,Subfn.prototype中的Superfn的实例属性会被构造函数中创建的Superfn的实例属性覆盖,
重复创建,没必要

原型式继承

Object.creat()方法原理像如下函数
function object(o){
function F(){
F.prototype = o;
}
return new F();
}
原型式继承 即使用Object.creat(祖先对象)定义实例,实例会共享祖先对象属性方法,通过添加第二个参数,覆盖祖先对象属性,或新增属性

1
2
3
4
5
6
7
8
9
10
11
12
13
14
Superfn={
color:['red','green'],
getsuper:function(){
console.log(222);
}
}

var test = Object.create(Superfn,{getsuper:{value:function(){console.log(111)}}});
var test1 = Object.create(Superfn,{color:{value:[1,2]},name:{value:'jack'}});
console.log(test.color);//['red','green']
console.log(test1.color,test1.name); //[1,2] jack
console.log(test.name);//undefined
test.getsuper(); //111
test1.getsuper();//222

寄生式继承

1
2
3
4
5
6
7
8
9
10
11
12
13
function createAnthoer(oriobj){
var clone = Object(oriobj);//创建oriobj对象副本
clone.sayHi=function(){//以某种方式增强这个对象,例如定义自己的方法
console.log('hi')
}
return clone;
}
var Superfn={
color:['red','green'],
}
var test = createAnthoer(Superfn);
test.sayHi()//hi
console.log(test.color);//["red", "green"]

最理想继承-寄生组合式继承

对比组合式继承
仅调用一次superfn函数,避免在Subfn.prototype中创建多余superfn实例属性

1
2
3
4
5
6
7
8
9
10
11
12
13
14
15
16
17
18
19
20
function inhertPrototype(subfn,superfn){
var prototype = Object(superfn.prototype);//创建对象 ,仅继承祖先函数原型
prototype.constructor = subfn;//增强对象
subfn.prototype = prototype;//指定对象
}
function Superfn(name){
this.color = [1,2];
this.name = name;
}
Superfn.prototype.getsuper=function(){
console.log('bbb');
}
function Subfn(name,age){
Superfn.call(this,name); //仅继承祖先函数实例属性,不会继承祖先函数原型
this.age = age;
}
Subfn.prototype.getsuper=function(){
console.log('ccc');
}
inhertPrototype(subfn,superfn);

类

类的定义相当于es5 对象构造函数的另一种写法,一种新语法
es5 的继承,实质是先创造子类的实例对象this,然后再将父类的方法添加到this上面
es6 类的继承,实质是先创造父类的实例对象this(必须先调用super方法),然后再用子类的构造函数修改this

类的定义

1
2
3
4
5
6
7
8
9
10
11
12
13
14
15
16
17
18
19
20
21
22
23
24
25
26
27
28
29
30
31
32
33
34
35
36
37
38
39
40
41
42
43
44
45
46
47
48
49
50
51
52
53
54
55
56
57
58
59
60
61
62
63
64
65
66
67
68
69
70
71
72
73
74
75
76
77
78
79
80
81
82
83
84
85
86
87
88
89
90
91
92
93
94
95
96
97
98
99
100
101
102
103
104
105
106
//es5
function Point(x, y) {
this.x = x;
this.y = y;
}

Point.prototype.toString = function () {
return '(' + this.x + ', ' + this.y + ')';
};

var p = new Point(1, 2);
//es6
let methodName = 'getArea';
class Point {
constructor(x, y) {
this.x = x;
this.y = y;
this.toString = function(){
console.log(111);
}
}

toString() {
return '(' + this.x + ', ' + this.y + ')';
}

[methodName]() {
console.log(666);
}
}

var temp = new Point('helo','world');
console.log(temp)// constructor定义的内容
console.log(temp.toString()) //先找实例属性,在去原型找属性

console.log(typeof Point) // "function"
console.log(Point === Point.prototype.constructor) // true

console.log(Object.keys(Point.prototype));//[]
console.log(Object.getOwnPropertyNames(Point.prototype));//["constructor", "toString"]
Object.assign(Point.prototype, {
toString222(){console.log(222);},
toValue(){console.log(333);}
});
temp.toString222()
console.log(Object.keys(Point.prototype));//["toString222", "toValue"]
console.log(Object.getOwnPropertyNames(Point.prototype));//["constructor", "toString", "toString222", "toValue"]


temp[methodName]() //666

class Foo {
constructor() {
return Object.create(null);
}
}
console.log(Foo.name)//Foo
console.log(new Foo() instanceof Foo)//false
var tt = new Foo();
console.log(tt.__proto__ == Point) //TRUE

var p1 = new Point(2,3);
var p2 = new Point(3,2);
console.log(p1.__proto__ === p2.__proto__)//true
p1.__proto__.printName = function () { console.log('Oops') };
p1.printName() // "Oops"
p2.printName() // "Oops"
var p3 = new Point(4,2);
p3.printName() // "Oops

//这个类的名字是MyClass而不是Me,Me只在 Class 的内部代码可用,指代当前类。
const MyClass = class Me {
getClassName() {
console.log(Me.name);
}
};
let inst = new MyClass();
inst.getClassName() // Me
console.log(MyClass.name)//me

//立即执行的 Class
let person = new class {
constructor(name) {
this.name = name;
}

sayName() {
console.log(this.name);
}
}('张三');

person.sayName(); // "张三"

class MyClass {
constructor() {
// ...
}
get prop() {
return 'getter';
}
set prop(value) {
console.log('setter: '+value);
s}
let inst = new MyClass();
inst.prop = 123;// setter: 123
console.log(inst.prop)// 'getter'

1.constructor函数定义实例属性,this代表实例对象,生成对象实例时,自动调用该方法,
默认返回实例对象this,也可以指定返回另外一个对象,则生成的实例将是另外这个对象的实例
如果没有显式定义,一个空的constructor方法会被默认添加。
其他在constructor函数之外定义的函数全都挂在类的prototype对象上(没有定义在this上的全都定义在class上)
其实constructor函数也挂在prototype对象上
2.定义原型方法时,不需要加上function这个关键字,方法之间不需要逗号分隔
3.类的数据类型就是函数,类本身就指向构造函数
4.使用Object.assign()新增原型方法,定义类时定义的原型方法是不可枚举的,但Object.assign()新增的可枚举
5.可以使用变量值做原型方法名
6.定义实例仍使用new关键字,且必须使用new定义,否则会报错
7.类的所有实例共享一个原型对象,使用实例的proto属性改写原型,会改变“类”的原始定义,影响到所有实例
8.类也可以使用表达式的形式定义,采用 Class 表达式,可以写出立即执行的 Class
9.类必须先定义再使用,无论是生成实例还是进行继承
10.类的name属性总是返回紧跟在class关键字后面的类名。
11.对某个属性设置对应的存值函数和取值函数,因此赋值和读取行为都被自定义了。存值函数和取值函数是设置在属性的 Descriptor 对象上的。
12.静态方法,该方法不会被实例继承,而是直接通过类来调用
如果静态方法包含this关键字,这个this指的是类,而不是实例
父类的静态方法,可以被子类继承。
静态方法也是可以从super对象上调用的
13.
ES6 为new命令引入了一个new.target属性,该属性一般用在构造函数之中,返回new命令作用于的那个构造函数。如果构造函数不是通过new命令调用的,new.target会返回undefined,因此这个属性可以用来确定构造函数是怎么调用的。

类的继承

定义

1
2
3
4
5
6
7
8
9
10
11
12
13
14
15
16
17
18
19
20
21
22
23
24
25
26
27
28
29
30
31
class Point {
constructor(x, y) {
this.x = x;
this.y = y;
console.log(new.target.name);
}
}

class ColorPoint extends Point {
constructor(x, y, color) {
super(x, y);
this.color = color;
}
}

let cp0 = new Point(25, 8);//"Point"
let cp = new ColorPoint(25, 8, 'green');//"ColorPoint" super()使用

console.log(cp instanceof ColorPoint)//true
console.log(cp instanceof Point)//true
console.log(Object.getPrototypeOf(ColorPoint) === Point)

console.log(ColorPoint.__proto__ === Point) // true
console.log(ColorPoint.prototype.__proto__ === Point.prototype) // true

console.log(cp.__proto__.__proto__ === cp0.__proto__ )// true
cp.__proto__.__proto__.printName = function () {
console.log('Ha');
};

cp0.printName() // "Ha"

1、使用extends关键字进行继承:class 子类名 extends 父类名{}
2、在子类构造函数constructor中使用super关键字继承父类this对象,必需在super语句之后使用this
3、Object.getPrototypeOf方法可以用来从子类上获取父类
4、子类的proto属性,表示构造函数的继承,总是指向父类。
子类prototype属性的proto属性,表示方法的继承,总是指向父类的prototype属性。
5、子类的原型的原型,是父类的原型,通过子类实例的proto.proto属性,可以修改父类实例的行为

关于super关键字

1、用作函数
作为函数时,super()只能用在子类的构造函数之中,用在其他地方就会报错,代表调用父类构造函数
super()在这里相当于parent.prototype.constructor.call(this),this指子类

2、用作对象

作为对象使用时,在普通方法中指向父类原型对象

1
2
3
4
5
6
7
8
9
10
11
12
13
14
15
16
17
18
19
20
21
22
23
24
25
26
27
28
class A {
constructor() {
this.p = 2;
}
q() {
console.log(this.p)
}
}

class B extends A {
constructor() {
super();
this.p =3
super.q();
super.p = 5;
console.log(super.p); // undefined
console.log(this.p); // 5
super.tt = 6;
console.log(this.tt); // 6
console.log(super.valueOf() instanceof B); // true
}
get m() {
return super.p;
}
}

let b = new B();//3
console.log(b.m) // undefined

在普通方法中指向父类原型对象,即使用super.xxxx(),相当于使用parent.prototype.xxxx(),
所以只能调用父类原型属性方法,不能使用实例属性方法

通过super调用父类的方法时,super会绑定子类的this,
即在子类使用super.xxxx()时,xxxx()里面的this指子类
通过super对某个属性赋值,赋值的属性会变成子类实例的属性

在静态方法中使用super将指向父类,而不是父类的原型对象。

1
2
3
4
5
6
7
8
9
10
11
12
13
14
15
16
17
18
19
20
21
22
23
24
class Parent {
static myMethod(msg) {
console.log('static', msg);
}

myMethod(msg) {
console.log('instance', msg);
}
}

class Child extends Parent {
static myMethod(msg) {
super.myMethod(msg);
}

myMethod(msg) {
super.myMethod(msg);
}
}

Child.myMethod(1); // static 1 super在静态方法之中指向父类

var child = new Child();
child.myMethod(2); // instance 2 在普通方法之中指向父类的原型对象。

extends特殊对象

第一种特殊情况,子类继承Object类。

1
2
3
4
5
class A extends Object {
}

A.__proto__ === Object // true
A.prototype.__proto__ === Object.prototype // true

这种情况下,A其实就是构造函数Object的复制,A的实例就是Object的实例。

第二种特殊情况,不存在任何继承。

1
2
3
4
5
class A {
}

A.__proto__ === Function.prototype // true
A.prototype.__proto__ === Object.prototype // true

这种情况下,A作为一个基类(即不存在任何继承),就是一个普通函数,所以直接继承Function.prototype。但是,A调用后返回一个空对象(即Object实例),所以A.prototype.proto指向构造函数(Object)的prototype属性。

第三种特殊情况,子类继承null。

1
2
3
4
5
class A extends null {
}

A.__proto__ === Function.prototype // true
A.prototype.__proto__ === undefined // true

这种情况与第二种情况非常像。A也是一个普通函数,所以直接继承Function.prototype。但是,A调用后返回的对象不继承任何方法,所以它的proto指向Function.prototype,即实质上执行了下面的代码。

1
2
3
class C extends null {
constructor() { return Object.create(null); }
}

第四种情况,允许继承原生构造函数定义子类,但无法通过super方法向父类Object传参

1
2
3
4
5
6
7
class NewObj extends Object{
constructor(){
super(...arguments);
}
}
var o = new NewObj({attr: true});
console.log(o.attr === true) // false

Mixin 模式

使用如下mix函数将多个对象合成为一个类

1
2
3
4
5
6
7
8
9
10
11
12
13
14
15
16
17
18
19
20
21
22
23
24
25
26
27
function mix(...mixins) {
class Mix {}

for (let mixin of mixins) {
copyProperties(Mix, mixin);
copyProperties(Mix.prototype, mixin.prototype);
}

return Mix;
}

function copyProperties(target, source) {
for (let key of Reflect.ownKeys(source)) {
if ( key !== "constructor"
&& key !== "prototype"
&& key !== "name"
) {
let desc = Object.getOwnPropertyDescriptor(source, key);
Object.defineProperty(target, key, desc);
}
}
}

//使用:继承返回的合成类
class DistributedEdit extends mix(Loggable, Serializable) {
// ...
}

几种创建方式对比

let a = null ===> null
let b = Object.create(null) ===> {} 但没有任何属性
let c = {} ===> {} proto指向Object
let d = new Object() ===> {} proto指向Object
let e = new Object(null) ===> {} proto指向Object
let f = Object.create(c) ===> {} proto指向c, proto.proto指向Object
!(obj4)[/image/ob4.png]
c instanceof Object , d instanceof Object ,e instanceof Object ===> true

let dd = {a:1}
let cc = new Object(dd)
let ee = Object.create(dd)
console.log(cc,ee)
!(obj3)[/image/ob3.png]
dd.isPrototypeOf(cc) ===>false
dd.isPrototypeOf(ee) ===>true

My Little World

Ajax和跨域

发表于 2017-08-19

ajax

ajax全称Asynchronous JavaScript and XML(异步的JavaScript与XML),是网页无需刷新页面、使用js与服务器进行交互的一种技术。

ajax的基本流程可以概括为:页面上js脚本实例化一个XMLHttpRequest对象,设置好服务器端的url、必要的查询参数、回调函数之后,向服务器发出请求,
服务器在处理请求之后将处理结果返回给页面,触发事先绑定的回调函数。
这样,页面脚本如果想要改变一个区域的内容,只需要通过ajax向服务器获取与该区域有关的少量数据,在回调函数中将该区域的内容替换掉即可,不需要刷新整个页面。

XMLHttpRequest在发送请求的时候,有两种方式:同步与异步。
同步方式是请求发出后,一直到收到服务器返回的数据为止,浏览器进程被阻塞,页面上什么事也做不了。
而异步方式则不会阻塞浏览器进程,在服务端返回数据并触发回调函数之前,用户依然可以在该页面上进行其他操作。
ajax的核心是异步方式,而同步方式只有在极其特殊的情况下才会被用到。

XMLHttpRequest 对象是一个接口,用于创建一个http请求对象实例,打开一个URL,然后发送这个请求,
当传输完毕后,结果的HTTP状态以及返回的响应内容也可以从请求对象中获取
五种状态
0:未打开
1:未发送
2:以获取响应头
3:正在下载响应体
4:请求完成
XMLHttpRequest API

1
2
3
4
5
6
7
8
9
10
11
12
13
14
15
16
17
18
19
20
21
22
23
24
25
26
27
28
29
30
31
32
33
const xhr = new XMLHttpRequest()

xhr.onreadystatechange = function () {
switch (xhr.readyState) {
case 0:
// UNSENT (未打开)
debugger
break
case 1:
// OPENED (未发送)
debugger
break
case 2:
// HEADERS_RECEIVED (已获取响应头)
debugger
break
case 3:
// LOADING (正在下载响应体)
debugger
break
case 4:
// DONE (请求完成)
if (xhr.status === 200) {
console.log(xhr.responseType)
console.log(xhr.responseText)
console.log(xhr.response)
}
break
}
}

xhr.open('GET', 'http://y.com:7001/json', true)
xhr.send(null)

使用ajax 封装POST,GET请求

1
2
3
4
5
6
7
8
9
10
11
12
13
14
15
16
17
18
19
20
21
22
23
24
25
26
27
28
29
30
31
32
33
function Ajax(method,url,callback,data,async){
method = method.toUpperCase()
async = async || true
let xmlHttp = null;
if (XMLHttpRequest) {
xmlHttp = new XMLHttpRequest();//服务器请求对象
}
else {
xmlHttp = new ActiveXObject('Microsoft.XMLHTTP');//兼容微软请求对象
}
let params = [];
for (var key in data){
params.push(key + '=' + opt.data[key]);
}
params = params.join('&');
if (method === 'POST') {//请求方法为POST,则执行如下操作
xmlHttp.open(method, url, async);
xmlHttp.setRequestHeader('Content-Type', 'application/x-www-form-urlencoded;charset=utf-8');
xmlHttp.send(params);
}
else if (method === 'GET') {//请求方法为GET,则执行如下操作
xmlHttp.open(opt.method, opt.url + '?' + params, async);
xmlHttp.send(null);
}
xmlHttp.onreadystatechange = function () {
if (xmlHttp.readyState == 4 && xmlHttp.status == 200) {//响应是否成功
var data = JSON.parse(xmlHttp.responseText);
callback(data);
}else{
throw xmlHttp.responseText
}
};
}

同源策略

为了保证用户信息的安全,防止恶意的网站窃取数据
解决办法:同源策略
同源策略是指三个相同:协议相同,域名相同,端口相同
以上三个不相同则是非同源,非同源之间相互访问即跨域访问

跨域和ip没有关系

跨域

浏览器在阻止跨域,阻止方式可能是在一开始就限制了发起跨站的请求,也可能是跨站请求可以正常发起,但返回结果被浏览器拦截了

为什么要防止跨域

跨域访问时会受到同源策略的三个限制
1、Cookie、LocalStorage 和 IndexDB 无法读取。
通过浏览器document.cookie我们可以获取用户登录态,如果cookie可以读取的话,
就会出现在A公司网站里可以去B公司网站获取登录信息的事情,这样就容易将用户信息泄露
2、DOM 无法获得
如果DOM可以获得,现在我是一个假网站,利用iframe套嵌一个目前线上运营的电商网站,那么
消费者在输入支付密码时,那我就可以获取input的值,从而获取用户支付密码
3、AJAX 请求不能发送
如果AJAx可以发送的话,那我们就能将内网东西下载下来发送到外网服务器,从而造成内网信息泄露

如何实现跨域

jsonp

原理是利用<script>标签可以在任何域下获取资源的原理,将要跨域获取的接口url放在<script>标签的src里面,
然后js将标签放到body里面,其中url包含一个callback参数,用于指向处理response的函数,这个函数我们挂载的window上,
即我们在js中定义的的函数

如果在浏览器直接访问接口’http://x.com:7001/json?callback=xxx'
页面会显示

1
/**/ typeof xxx === 'function' && xxx({"msg":"hello world"});

就是说,在请求这个接口时,会去window上找xxx这个对象,看它是不是函数,如果是函数,
就将接口定义的response({“msg”:”hello world”})作为参数传递给xxx函数,并执行xxx函数

现在在http://y.com/x.html页面中进行跨域

1
2
3
4
5
6
7
8
9
10
11
12
13
14
15
16
17
18
19
20
21
22
23
24
25
26
27
//json 接口  服务端

module.exports = app => {
class MsgController extends app.Controller {
* index(req) {
this.ctx.body = { msg: 'hello world' }
}
}
return MsgController
}

// js 客户端请求
//方法一:

//定义相应处理函数
window.xxx = function (value) {
console.log(value)
}
//添加script标签
var script = document.createElement('script')
script.src = 'http://x.com:7001/json?callback=xxx'
document.body.appendChild(script)

//方法二:
require(['http://x.com:7001/json?callback=define'], function (value) {
console.log(value)
})

现在访问http://y.com/x.html,在浏览器console就会打印{"msg":"hello world”}

CORS

XMLHttpRequest 2.0以后可以使用cors方法进行跨域
CORS需要浏览器和服务器同时支持
整个CORS通信过程,都是浏览器自动完成,不需要用户参与。
对于开发者来说,CORS通信与同源的AJAX通信没有差别,代码完全一样。
浏览器一旦发现AJAX请求跨源,就会自动添加一些附加的头信息,有时还会多出一次附加的请求,但用户不会有感觉。
实现CORS通信的关键是服务器。只要服务器实现了CORS接口,就可以跨源通信。

1
2
3
4
5
6
7
8
9
10
11
12
13
14
15
16
17
18
19
20
21
22
23
//cors接口 服务端
module.exports = app => {
class CrosController extends app.Controller {
* index(req) {
this.ctx.set('Access-Control-Allow-Origin', '*')//如果不添加则会禁止访问
// this.ctx.set('Access-Control-Allow-Origin', 'http://xx.com')
// 如果我们要 http://*.qq.com 都支持跨域怎么办?
this.ctx.body = { msg: 'hello world' }
}
}
return CrosController
}

//js应用 客户端
var xhr = new XMLHttpRequest()
xhr.onreadystatechange = function () {
if (xhr.readyState === 4 && xhr.status === 200) {
console.log(JSON.parse(xhr.responseText).msg)
}
}
xhr.withCredentials = true//在头部添加cookie带到y.stuq,如果不设置,则不带
xhr.open('GET', 'http://x.com:7001/cros')
xhr.send(null)

跨域资源共享 CORS 详解
HTTP访问控制(CORS)

Access-Control-Allow-Origin 的属性值只允许设置为单个确定域名字符串或者 (),设置的话,最不安全,允许所有域可以访问

在服务器端设置CORS跨域请求中的多域名白名单,可以实现Access-Control-Allow-Origin 允许对某一个或几个网站开放跨域请求权限

原理就是在服务器端判断请求的Header中Origin属性值(req.header.origin)是否在我们的域名白名单列表内。
如果在白名单列表内,那么我们就把 Access-Control-Allow-Origin 设置成当前的Origin值,这样就满足了Access-Control-Allow-Origin 的单一域名要求,也能确保当前请求通过访问;如果不在白名单列表内,则返回错误信息。

1
2
3
4
5
6
7
8
9
10
11
12
13
14
15
16
17
18
19
20
21
22
23
24
25
26
27
28
29
30
31
32
33
34
35
36
37
38
39
40
// 判断origin是否在域名白名单列表中
function isOriginAllowed(origin, allowedOrigin) {
if (_.isArray(allowedOrigin)) {
for(let i = 0; i < allowedOrigin.length; i++) {
if(isOriginAllowed(origin, allowedOrigin[i])) {
return true;
}
}
return false;
} else if (_.isString(allowedOrigin)) {
return origin === allowedOrigin;
} else if (allowedOrigin instanceof RegExp) {
return allowedOrigin.test(origin);
} else {
return !!allowedOrigin;
}
}


const ALLOW_ORIGIN = [ // 域名白名单
'*.233.666.com',
'hello.world.com',
'hello..*.com'
];

app.post('a/b', function (req, res, next) {
let reqOrigin = req.headers.origin; // request响应头的origin属性

// 判断请求是否在域名白名单内
if(isOriginAllowed(reqOrigin, ALLOW_ORIGIN)) {
// 设置CORS为请求的Origin值
res.header("Access-Control-Allow-Origin", reqOrigin);
res.header('Access-Control-Allow-Credentials', 'true');

// 业务代码逻辑代码 ...
// ...
} else {
res.send({ code: -2, msg: '非法请求' });
}
});

与JSONP的比较:
CORS与JSONP的使用目的相同,但是比JSONP更强大。
JSONP只支持GET请求,CORS支持所有类型的HTTP请求。JSONP的优势在于支持老式浏览器,以及可以向不支持CORS的网站请求数据。

iframe-Hash

Location 对象是 Window 对象的一个部分,可通过 window.location 属性来访问
hash是location对象的的一个属性,可以设置或返回从井号 (#) 开始的 URL(锚)

iframe是HTML标签,作用是文档中的文档,或者浮动的框架(FRAME)。iframe元素会创建包含另外一个文档的内联框架(即行内框架)。

原理是在原域页面包装 跨域src的iframe标签,在跨域src的文件里请求跨域的资源(此时二者同域),
跨域src文件是可以获取到iframe父类,即我们原域的window对象,
通过改变原域的hash值,引发原域onhashchange,从而将资源带回到原域

1
2
3
4
5
6
7
8
9
10
11
12
13
14
15
16
17
18
19
20
21
22
23
24
25
26
27
28
29
30
31
//原域js
//包装iframe
var iframe = document.createElement('iframe')
iframe.src = 'http://x.com:7001/public/hash.html'
document.body.appendChild(iframe)
//处理请求资源
window.onhashchange = function () {
// 小练习,做个工具方法,取出query的值
console.log(location.hash)
}

//跨域的hash.html文件

<!DOCTYPE html>
<html>
<head>
</head>
<body>
<script>
var xhr = new XMLHttpRequest()
xhr.onreadystatechange = function () {
if (xhr.readyState === 4 && xhr.status === 200) {
var res = JSON.parse(xhr.responseText)
parent.location.href = `http://y.stuq.com:7001/public/3.html#msg=${res.msg}` //引起原域onhashchange,同时将response带回
}
}
xhr.open('GET', 'http://x.com:7001/json', true) //请求同域资源
xhr.send(null)
</script>
</body>
</html>

iframe-window.name

原理是利用iframe的window.name,name 值在不同的页面(甚至不同域名)加载后依旧存在(如果没修改则值不会变化),并且可以支持非常长的 name 值(2MB)

1
2
3
4
5
6
7
8
9
10
11
12
13
14
15
16
17
18
19
20
21
22
23
24
25
26
27
28
29
30
31
32
//原域js
var iframe = document.createElement('iframe')
iframe.src = 'http://x.com:7001/public/name.html'
document.body.appendChild(iframe)

var times = 0
iframe.onload = function () {
if (++times === 2) {//第一次打开跨域页面name,第二次加载通知原域iframe改变值
console.log(JSON.parse(iframe.contentWindow.name))
}
}

//name.html
<!DOCTYPE html>
<html>
<head>
</head>
<body>
<script>
var xhr = new XMLHttpRequest()
xhr.onreadystatechange = function () {
if (xhr.readyState === 4 && xhr.status === 200) {
window.name = xhr.responseText //这里是原域iframe的window,iframe不能跨域读取对象,所以
location.href = 'http://y.com:7001/public/index.html' //再次加载iframe,通知原域parent,iframe的contentWindow.name需要做更改
//href的值,依然是跨域的也可以,这里是加载回原域的一个文件
}
}
xhr.open('GET', 'http://x.com:7001/json', true)
xhr.send(null)
</script>
</body>
</html>

iframe-postMessage

利用HTML5的postMessage方法

1
2
3
4
5
6
7
8
9
10
11
12
13
14
15
16
17
18
19
20
21
22
23
24
25
26
27
28
//原域js
var iframe = document.createElement('iframe')
iframe.src = 'http://x.stuq.com:7001/public/post.html'
document.body.appendChild(iframe)

window.addEventListener('message', function(e) {
console.log(JSON.parse(e.data))
}, false);

//post.html
<!DOCTYPE html>
<html>
<head>
</head>
<body>
<script>
var xhr = new XMLHttpRequest()
xhr.onreadystatechange = function () {
if (xhr.readyState === 4 && xhr.status === 200) {
parent.postMessage(xhr.responseText, '*') //拿到父级页面parent,执行postmessage的一个操作,从而引发父级页面的message事件
//*代表targetOrigin可以是任何域
}
}
xhr.open('GET', 'http://x.stuq.com:7001/json', true)
xhr.send(null)
</script>
</body>
</html>

Window.postMessage() API

小结

跨域方法很多
选择如何使用可以考虑以下几方面
1.场景,选择简单的
2.安全,解决问题是否足够安全
3.数据来源,如果跨域接口可以传资源给原域,则可以使用iframe代理
4.承接第三种情景,如果接口不允许传资源,则只能寄希望于后台,使用反向代理的方法获取

My Little World

Karma test

发表于 2017-08-12

Karma test

Karma是由Google团队开发的一套前端测试运行框架。它不同于测试框架(例如jasmine,mocha等),运行在这些测试框架之上。主要完成以下工作:
Karma启动一个web服务器,生成包含js源代码和js测试脚本的页面;
运行浏览器加载页面,并显示测试的结果;
如果开启检测,则当文件有修改时,执行继续执行以上过程。

搭建测试环境

npm install -g karma-cli //让全局都可以运行karma的命令行,命令行工具
npm i karma –save-dev //只在当前项目中使用karma
npm install //安装项目的依赖 package.json

1
2
3
4
5
6
7
"devDependencies": {
"karma": "^1.7.0",
"karma-chrome-launcher": "^2.2.0",
"karma-mocha": "^1.3.0",
"mocha": "^3.5.0",
"should": "^11.2.1"
}

karma init //在cmd中运行该命令,构建karma.conf.js文件,运行后会询问相关问题然后生成karma.conf.js文件

1
2
3
4
5
6
7
8
9
10
11
12
13
14
15
16
17
18
19
20
21
22
23
24
25
26
27
28
29
30
31
32
33
34
Which testing framework do you want to use ?
Press tab to list possible options. Enter to move to the next question.
> mocha //选择要使用的框架,不能直接输入,是选择题,点击键盘箭头可更改选项

Do you want to use Require.js ?
This will add Require.js plugin.
Press tab to list possible options. Enter to move to the next question.
> no //是否add Require.js plugin

Do you want to capture any browsers automatically ?
Press tab to list possible options. Enter empty string to move to the next quest
ion.
> Chrome //选择用哪个浏览器打开测试页,也是选择题,不能输入
>

What is the location of your source and test files ?
You can use glob patterns, eg. "js/*.js" or "test/**/*Spec.js".
Enter empty string to move to the next question.
> src/*.js //添加要测试的代码的路径,不是测试用例代码的路径,同时,代码中用到的其他文件也在这里同时添加,
11 08 2017 15:03:13.822:WARN [init]: There is no file matching this pattern.

> // 回车可以切换下一行继续添加,连续回车进入下一个问题

Should any of the files included by the previous patterns be excluded ?
You can use glob patterns, eg. "**/*.swp".
Enter empty string to move to the next question.
>

Do you want Karma to watch all the files and run the tests on change ?
Press tab to list possible options.
> yes //是否跟所有文件自动开启测试


Config file generated at "G:\css\homework1\karma.conf.js".

karma.conf.js文件

1
2
3
4
5
6
7
8
9
10
11
12
13
14
15
16
17
18
19
20
21
22
23
24
25
26
27
28
29
30
31
32
33
34
35
36
37
38
39
40
41
42
43
44
45
46
47
48
49
50
51
52
53
54
55
56
57
58
59
60
61
62
63
64
65
66
67
68
69
70
71
72
73
74
75
76
module.exports = function(config) {
config.set({

// base path that will be used to resolve all patterns (eg. files, exclude)
basePath: '',//根路径,后面配置的基本所有相对路径都会根据这个路径来构造。


// frameworks to use 使用到的框架
// available frameworks: https://npmjs.org/browse/keyword/karma-adapter
frameworks: ['mocha'],


// list of files / patterns to load in the browser 将会在浏览器里面执行的代码
files: [
'node_modules/should/should.js',
'js/*.js',
'quz/*.js',
'test/*.js'
],


// list of files to exclude 需要从 files 中排除掉的文件
exclude: [
],


// preprocess matching files before serving them to the browser需要做预处理的文件,以及这些文件对应的预处理器。
// available preprocessors: https://npmjs.org/browse/keyword/karma-preprocessor
preprocessors: {////此处就可以将 coffee 、 ES6 等代码转换一下。
'js/*.js': ['coverage'],//测试覆盖率
'quz/*.js': ['coverage']//测试覆盖率
},


// test results reporter to use 测试结果报告器
// possible values: 'dots', 'progress'
// available reporters: https://npmjs.org/browse/keyword/karma-reporter
reporters: ['progress', 'coverage'],

// 覆盖率报告器配置
coverageReporter: {
type : 'lcov', //html格式会生成html文件,lcov格式可以和coveralls结合生成coveralls徽章
dir : 'coverage/'
},

// web server port 服务器端口号
port: 9876,


// enable / disable colors in the output (reporters and logs)
colors: true,


// level of logging 日志级别
// possible values: config.LOG_DISABLE || config.LOG_ERROR || config.LOG_WARN || config.LOG_INFO || config.LOG_DEBUG
logLevel: config.LOG_INFO,


// enable / disable watching file and executing tests whenever any file changes 启用/禁用监视文件变化重新执行测试的功能
autoWatch: true,


// start these browsers 使用的浏览器
// available browser launchers: https://npmjs.org/browse/keyword/karma-launcher
browsers: ['Chrome'],


// Continuous Integration mode true测试一次就结束,false测试完一直处于测试状态
// if true, Karma captures browsers, runs the tests and exits
singleRun: true,

// Concurrency level
// how many browser should be started simultaneous
concurrency: Infinity
})
}

集成测试Travis CI

Travish CI使用
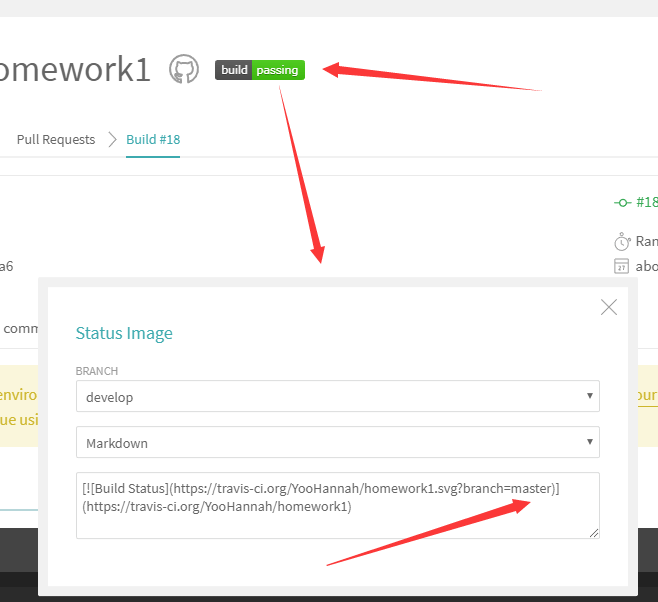
通过Travis CI测试我们可以获得一个测试通过的标志Build Status,可以将它放在github仓库readme.md文件里面
coverage1
更改链接中branch的值可以获得对应分支的测试结果

测试代码覆盖率 Coverage

衡量测试脚本的质量–代码覆盖率:测试中运行到的代码占所有代码的比率

安装测试覆盖率工具
npm i –save-dev karma-coverage

修改配置文件karma.conf.js

1
2
3
4
5
6
7
8
9
10
11
12
13
14
15
// modified
preprocessors: {
'src/**/*.js': ['coverage'], //要测试的功能代码路径:['coverage'] 多个文件夹就逗号隔开,按格式写下去
'js/*.js': ['coverage'],
'quz/*.js': ['coverage']
},

//modified
reporters: ['progress', 'coverage'],

// add
coverageReporter: {
type : 'html',
dir : 'coverage/'
},

运行karma start,会新增coverage文件夹,里面只有一个浏览器名的文件夹,里面是根据preprocessors添加的路径生成对应的文件夹和其他文件,
其他文件里面有index.html文件,是整个测试的测试报告,文件夹里是每个文件的覆盖测试结果和代码具体的覆盖情况

注意:如果不想将测试结果上传github,记得更改.gitignore文件,将coverage文件夹忽略掉

获取覆盖率标志

github 仓库经常会看到这个标志
coverage2
就是说项目的测试覆盖率是91%,要获取这个标志我们需要将测试覆盖率放到Coveralls上

安装 coveralls方便我们在Travis CI上测试完之后将结果上传
npm i coveralls –save-dev

更改karma.conf.js
coverageReporter: {
type : ‘lcov’, //将html改为lcov
dir : ‘coverage/‘
},
接下来操作步骤可以有两种
方法一:
仅更改 package.json文件,不保留测试命令karma start
更改package.json的scripts

1
2
3
"scripts": {
"test": "./node_modules/karma/bin/karma start --browsers Firefox --single-run && find coverage -name lcov.info -print0 | xargs -0 cat | ./node_modules/coveralls/bin/coveralls.js && rm -rf ./coverage"
}

方法二:
更改package.json文件,保留测试命令karma start

1
2
3
4
"scripts": {
"test": "karma start",
"report": "find coverage -name lcov.info -print0 | xargs -0 cat | ./node_modules/coveralls/bin/coveralls.js && rm -rf ./coverage"
}

也要更改.travis.yml文件,添加以下语句

1
2
after_success:
- "npm run report"

然后push代码,等Travi CI 完成测试后,我们可以在Coveralls上获取标志,
在总的测试结果那个页面不是具体某次提交的页面获取
coverage3
点击EMBED可以获取不同格式的标志代码,
复制粘贴MARKDOWN 格式可以放在readme.md文件中直接使用

相关链接:
使用 Karma 在真实浏览器上测试
前端单元测试之Karma环境搭建

My Little World

Karma test

发表于 2017-08-12

Karma test

Karma是由Google团队开发的一套前端测试运行框架。它不同于测试框架(例如jasmine,mocha等),运行在这些测试框架之上。主要完成以下工作:
Karma启动一个web服务器,生成包含js源代码和js测试脚本的页面;
运行浏览器加载页面,并显示测试的结果;
如果开启检测,则当文件有修改时,执行继续执行以上过程。

搭建测试环境

npm install -g karma-cli //让全局都可以运行karma的命令行,命令行工具
npm i karma –save-dev //只在当前项目中使用karma
npm install //安装项目的依赖 package.json

1
2
3
4
5
6
7
"devDependencies": {
"karma": "^1.7.0",
"karma-chrome-launcher": "^2.2.0",
"karma-mocha": "^1.3.0",
"mocha": "^3.5.0",
"should": "^11.2.1"
}

karma init //在cmd中运行该命令,构建karma.conf.js文件,运行后会询问相关问题然后生成karma.conf.js文件

1
2
3
4
5
6
7
8
9
10
11
12
13
14
15
16
17
18
19
20
21
22
23
24
25
26
27
28
29
30
31
32
33
34
Which testing framework do you want to use ?
Press tab to list possible options. Enter to move to the next question.
> mocha //选择要使用的框架,不能直接输入,是选择题,点击键盘箭头可更改选项

Do you want to use Require.js ?
This will add Require.js plugin.
Press tab to list possible options. Enter to move to the next question.
> no //是否add Require.js plugin

Do you want to capture any browsers automatically ?
Press tab to list possible options. Enter empty string to move to the next quest
ion.
> Chrome //选择用哪个浏览器打开测试页,也是选择题,不能输入
>

What is the location of your source and test files ?
You can use glob patterns, eg. "js/*.js" or "test/**/*Spec.js".
Enter empty string to move to the next question.
> src/*.js //添加要测试的代码的路径,不是测试用例代码的路径,同时,代码中用到的其他文件也在这里同时添加,
11 08 2017 15:03:13.822:WARN [init]: There is no file matching this pattern.

> // 回车可以切换下一行继续添加,连续回车进入下一个问题

Should any of the files included by the previous patterns be excluded ?
You can use glob patterns, eg. "**/*.swp".
Enter empty string to move to the next question.
>

Do you want Karma to watch all the files and run the tests on change ?
Press tab to list possible options.
> yes //是否跟所有文件自动开启测试


Config file generated at "G:\css\homework1\karma.conf.js".

karma.conf.js文件

1
2
3
4
5
6
7
8
9
10
11
12
13
14
15
16
17
18
19
20
21
22
23
24
25
26
27
28
29
30
31
32
33
34
35
36
37
38
39
40
41
42
43
44
45
46
47
48
49
50
51
52
53
54
55
56
57
58
59
60
61
62
63
64
65
66
67
68
69
70
71
72
73
74
75
76
module.exports = function(config) {
config.set({

// base path that will be used to resolve all patterns (eg. files, exclude)
basePath: '',//根路径,后面配置的基本所有相对路径都会根据这个路径来构造。


// frameworks to use 使用到的框架
// available frameworks: https://npmjs.org/browse/keyword/karma-adapter
frameworks: ['mocha'],


// list of files / patterns to load in the browser 将会在浏览器里面执行的代码
files: [
'node_modules/should/should.js',
'js/*.js',
'quz/*.js',
'test/*.js'
],


// list of files to exclude 需要从 files 中排除掉的文件
exclude: [
],


// preprocess matching files before serving them to the browser需要做预处理的文件,以及这些文件对应的预处理器。
// available preprocessors: https://npmjs.org/browse/keyword/karma-preprocessor
preprocessors: {////此处就可以将 coffee 、 ES6 等代码转换一下。
'js/*.js': ['coverage'],//测试覆盖率
'quz/*.js': ['coverage']//测试覆盖率
},


// test results reporter to use 测试结果报告器
// possible values: 'dots', 'progress'
// available reporters: https://npmjs.org/browse/keyword/karma-reporter
reporters: ['progress', 'coverage'],

// 覆盖率报告器配置
coverageReporter: {
type : 'lcov', //html格式会生成html文件,lcov格式可以和coveralls结合生成coveralls徽章
dir : 'coverage/'
},

// web server port 服务器端口号
port: 9876,


// enable / disable colors in the output (reporters and logs)
colors: true,


// level of logging 日志级别
// possible values: config.LOG_DISABLE || config.LOG_ERROR || config.LOG_WARN || config.LOG_INFO || config.LOG_DEBUG
logLevel: config.LOG_INFO,


// enable / disable watching file and executing tests whenever any file changes 启用/禁用监视文件变化重新执行测试的功能
autoWatch: true,


// start these browsers 使用的浏览器
// available browser launchers: https://npmjs.org/browse/keyword/karma-launcher
browsers: ['Chrome'],


// Continuous Integration mode true测试一次就结束,false测试完一直处于测试状态
// if true, Karma captures browsers, runs the tests and exits
singleRun: true,

// Concurrency level
// how many browser should be started simultaneous
concurrency: Infinity
})
}

集成测试Travis CI

Travish CI使用
通过Travis CI测试我们可以获得一个测试通过的标志Build Status,可以将它放在github仓库readme.md文件里面
coverage1
更改链接中branch的值可以获得对应分支的测试结果

测试代码覆盖率 Coverage

衡量测试脚本的质量–代码覆盖率:测试中运行到的代码占所有代码的比率

安装测试覆盖率工具
npm i –save-dev karma-coverage

修改配置文件karma.conf.js

1
2
3
4
5
6
7
8
9
10
11
12
13
14
15
// modified
preprocessors: {
'src/**/*.js': ['coverage'], //要测试的功能代码路径:['coverage'] 多个文件夹就逗号隔开,按格式写下去
'js/*.js': ['coverage'],
'quz/*.js': ['coverage']
},

//modified
reporters: ['progress', 'coverage'],

// add
coverageReporter: {
type : 'html',
dir : 'coverage/'
},

运行karma start,会新增coverage文件夹,里面只有一个浏览器名的文件夹,里面是根据preprocessors添加的路径生成对应的文件夹和其他文件,
其他文件里面有index.html文件,是整个测试的测试报告,文件夹里是每个文件的覆盖测试结果和代码具体的覆盖情况

注意:如果不想将测试结果上传github,记得更改.gitignore文件,将coverage文件夹忽略掉

获取覆盖率标志

github 仓库经常会看到这个标志
coverage2
就是说项目的测试覆盖率是91%,要获取这个标志我们需要将测试覆盖率放到Coveralls上

安装 coveralls方便我们在Travis CI上测试完之后将结果上传
npm i coveralls –save-dev

更改karma.conf.js
coverageReporter: {
type : ‘lcov’, //将html改为lcov
dir : ‘coverage/‘
},
接下来操作步骤可以有两种
方法一:
仅更改 package.json文件,不保留测试命令karma start
更改package.json的scripts

1
2
3
"scripts": {
"test": "./node_modules/karma/bin/karma start --browsers Firefox --single-run && find coverage -name lcov.info -print0 | xargs -0 cat | ./node_modules/coveralls/bin/coveralls.js && rm -rf ./coverage"
}

方法二:
更改package.json文件,保留测试命令karma start

1
2
3
4
"scripts": {
"test": "karma start",
"report": "find coverage -name lcov.info -print0 | xargs -0 cat | ./node_modules/coveralls/bin/coveralls.js && rm -rf ./coverage"
}

也要更改.travis.yml文件,添加以下语句

1
2
after_success:
- "npm run report"

然后push代码,等Travi CI 完成测试后,我们可以在Coveralls上获取标志,
在总的测试结果那个页面不是具体某次提交的页面获取
coverage3
点击EMBED可以获取不同格式的标志代码,
复制粘贴MARKDOWN 格式可以放在readme.md文件中直接使用

相关链接:
使用 Karma 在真实浏览器上测试
前端单元测试之Karma环境搭建
前端自动化测试解决方案探析

My Little World

断言语句assert

发表于 2017-08-12

测试用例里面的一种判断语句

在mocha中需要require
var assert = require(‘assert’)

参数一般有三个
value 待判断的值
expected 要和value进行比较的值,看二者是否相等或者不相等,如果没有expected,则是在判断value的值是否为真
message 判断结果为错误时,抛出来的错误提醒语句,如果 message 参数为 undefined,则赋予默认的错误信息。

assert(value[, message]) 同assert.ok()
assert.ok(value[, message]) value如果不为真值,抛出一个带有 message 属性的 AssertionError

assert.fail(message) 抛出错误信息message

assert.fail(actual, expected, message, operator) 根据参数抛出相应错误信息
如果 message 不存在,则错误信息会被设为 actual 的值加分隔符 operator 再加 expected 的值。 否则,错误信息为 message 的值,operator没有的话,默认为!=

assert.ifError(value) 如果 value 为真,则抛出 value,如果为假,则测试通过

assert.equal(actual, expected[, message]) 使用相等运算符(==)测试 actual 参数与 expected 参数是否相等。
assert.deepEqual(actual, expected[, message]) 测试 actual 参数与 expected 参数是否深度相等。 原始值使用 相等运算符(==)比较,只比较可枚举的自身属性。
深度相等意味着子对象的可枚举的自身属性也会被比较

1
2
3
4
5
6
7
8
9
10
11
12
13
14
15
16
const obj1 = {
a: {
b: 1
}
};
const obj3 = {
a: {
b: 1
}
};
const obj4 = Object.create(obj1);
assert.deepEqual(obj1, obj4);
// 抛出 AssertionError: { a: { b: 1 } } deepEqual {}
// 原型会被忽略
assert.deepEqual(obj1, obj3);
// 通过,两个对象相等

assert.deepStrictEqual(actual, expected[, message])
大多数情况下与 assert.deepEqual() 一样,但有三个例外:

原始值使用 全等运算符(===)比较。使用SameValueZero比较法来比较设置的值及映射的键(也就意味不用考虑caveats)。
对象的 原型 也使用 全等运算符 比较。
对象的类型标签应该相同。

assert.notEqual(actual, expected[, message]) 使用 不等运算符(!=)测试是否不相等。
assert.notDeepEqual(actual, expected[, message]) 测试是否不深度相等。 与 assert.deepEqual() 相反。
assert.notStrictEqual(actual, expected[, message]) 使用 不全等运算符(!==)测试是否不全等。
assert.notDeepStrictEqual(actual, expected[, message]) 测试是否不深度全等。 与 assert.deepStrictEqual() 相反。

assert.throws(block[, error][, message]) 期望 block 函数抛出错误error,如果block(function)抛出error的错误,则测试通过
error 可以是构造函数、正则表达式、或自定义的验证函数。

assert.doesNotThrow(block[, error][, message]) 断言 block 函数不会抛出错误
当 assert.doesNotThrow() 被调用时,它会立即调用 block 函数。
如果抛出错误且错误类型与 error 参数指定的相同,则抛出 AssertionError。 如果错误类型不相同,或 error 参数是 undefined,则错误会被抛回给调用者。
如果block不抛出错误,则测试通过

My Little World

变量提升

发表于 2017-08-09

一个变量的生成需要经历 创建、初始化、赋值三个阶段
let 的「创建」过程被提升了,但是初始化没有提升。
var 的「创建」和「初始化」都被提升了。
function 的「创建」「初始化」和「赋值」都被提升了。
const,其实 const 和 let 只有一个区别,那就是 const 只有「创建」和「初始化」,没有「赋值」过程。
let
1、
假设有如下代码:

function fn(){
var x = 1
var y = 2
}
fn()

在执行 fn 时,会有以下过程(不完全):

进入 fn,为 fn 创建一个环境。
找到 fn 中所有用 var 声明的变量,在这个环境中「创建」这些变量(即 x 和 y)。
将这些变量「初始化」为 undefined。
开始执行代码
x = 1 将 x 变量「赋值」为 1
y = 2 将 y 变量「赋值」为 2
也就是说 var 声明会在代码执行之前就将「创建变量,并将其初始化为 undefined」。

这就解释了为什么在 var x = 1 之前 console.log(x) 会得到 undefined。

2、
fn2()

function fn2(){
console.log(2)
}
JS 引擎会有一下过程:

找到所有用 function 声明的变量,在环境中「创建」这些变量。
将这些变量「初始化」并「赋值」为 function(){ console.log(2) }。
开始执行代码 fn2()
也就是说 function 声明会在代码执行之前就「创建、初始化并赋值」
3、
{
let x = 1
x = 2
}
只看 {} 里面的过程:

找到所有用 let 声明的变量,在环境中「创建」这些变量
开始执行代码(注意现在还没有初始化)
执行 x = 1,将 x 「初始化」为 1(这并不是一次赋值,如果代码是 let x,就将 x 初始化为 undefined)
执行 x = 2,对 x 进行「赋值」
这就解释了为什么在 let x 之前使用 x 会报错:

let x = ‘global’
{
console.log(x) // Uncaught ReferenceError: x is not defined
let x = 1
}
原因有两个

console.log(x) 中的 x 指的是下面的 x,而不是全局的 x
执行 log 时 x 还没「初始化」,所以不能使用(也就是所谓的暂时死区)

补充
1.
在进入一个执行环境后,先把 var 和 function 声明的变量前置, 再去顺序执行代码
是 var 声明在前还是 function 声明的在前?按先来后到,同名覆盖。当然如果一个变量已经有值,再 var 是无效的

1
2
3
4
5
6
7
8
9
10

var fn
function fn(){}

console.log(fn) //function

function fn(){}
var fn //已经声明过 fn, 再 var 无效,并不会重置为 undefined

console.log(fn) //function

2.
函数在执行的过程中,先从自己内部找变量
如果找不到,再从创建当前函数所在的作用域去找, 以此往上

1
2
3
4
5
6
7
8
9
10
11
12
13
14
15
16
17
18
19
20
21
var a = 1
function fn1(){
function fn2(){
console.log(a)
}
var a = 2
return fn2
}
var fn = fn1()
fn() //输出多少 2
////////////////////////////////
var a = 1
function fn1(){
var a = 2
return fn2
}
function fn2(){
console.log(a)
}
var fn = fn1()
fn() //输出多少 1

相关

1
2
3
4
5
var a = {n:1};
var b = a;
a.x = a = {n:2};
console.log(a)//{n:2}
console.log(b)//{n:1,x:{n:2}}

a.x = a = {n:2};执行顺序

  1. a.x,这时a,b指向{n:1},增加x,属性,但值为undefined,即这时a,b为{n:1,x:undefined}

2.a={n:2},a这时指向{n:2},b依然为{n:1,x:undefined}

3.a.x = a;这时的x是{n:1,x:undefined}中的x,指向a,此时a指向{n:2}

1
a==1 && a==2 && a==3

可能为true
关键在于==在比较两端之前会调用对象的valueof,toString等方法,只要a对象中的toString方法有递增值返回就可以实现

1
2
3
4
5
6
const a = {
i: 1,
toString: function () {
return a.i++;
}
}

立即执行函数的目的
造出一个函数作用域,防止污染全局变量
ES 6 新语法

1
2
3
{
let name
}

My Little World

关于this

发表于 2017-08-09

普通函数中的this

  1. this总是代表它的直接调用者, 例如 obj.func ,那么func中的this就是obj
    2.在默认情况(非严格模式下,未使用 ‘use strict’),没找到直接调用者,则this指的是 window
    3.在严格模式下,没有直接调用者的函数中的this是 undefined
    4.使用call,apply,bind绑定的,this指的是 绑定的对象,
    bind绑定一次后不会改变,且bind 的执行的结果返回的是绑定了一个对象的新函数
    1
    2
    3
    4
    5
    6
    7
    8
    9
    10
    11
    12
    13
    14
    15
    16
    17
    18
    19
    20
    21
    22
    23
    24
    25
    26
    27
    28
    29
    30
    31
    32
    33
    34
    35
    36
    37
    38
    39
    40
    41
    42
    43
    44
    45
    46
    47
    48
    49
    50
    51
    52
    53
    54
    55
    56
    57
    58
    59
    60
    61
    62
    63
    64
    65
    66
    67
    68
    69
    70
    71
    72
    73
    74
    75
    76
    77
    78
    79
    80
    81
    82
    83
    84
    85
    86
    87
    88
    89
    90
    91
    1、
    function test() {
    console.log(this);//window
    }
    test();

    2、
    function test() {
    'use strict';
    console.log(this);//undefined
    }
    test();

    3、
    window.val = 1;
    var obj = {
    val: 2,
    fn: function () {
    this.val *= 2; //普通函数,this指向调用者
    val *= 2;
    console.log(this.val);
    console.log(val);
    }
    };
    obj.fn();// 4 2
    var func = obj.fn;
    func(); //8 8
    //obj.fn()执行时,val 没有在fn的作用域里面定义,则去obj.fn()的作用域里面找,obj.fn()位于window,window.val是1;this指向obj,this.val是2
    //func()执行时,window.val由于执行obj.fn(),现在是2;func()在window作用域下执行,this就是window,所以this.val和val都是window.val

    4、
    function f() {
    var test = 'in the f!';
    setTimeout(function(){ //是函数就会建立作用域
    console('inner '+ test) // inner in the f!
    }, 0);
    }
    //以上代码等于
    function f() {
    var test = 'in the f!';

    function ff() {
    alert('inner ' + test) //test在ff里面没定义,但在f里面进行了定义
    } // 能访问到f中的test局部变量

    setTimeout(ff, 0); // inner in the f!
    }

    f();
    5、
    var lzh = {
    name: 'lzh',
    say: function(something){
    alert(something + this.name);
    }
    }

    var iny = {
    name: 'iny'
    }

    lzh.say.apply(iny, ['hi, I am ']); // 输出 hi I am iny
    6、
    var arr = []
    for(var i=0; i<3; i++){
    arr[i] = function(){ console.log(this) }
    }
    var fn = arr[0]

    arr[0]
    /*
    解析: 因为函数是个特殊的对象,所以 arr 相当于 { '0': function(){}, '1': function(){}, '2': function(){}, length:3}
    arr[0]相当于 `arr['0']` 相当于 `arr.0` (当然这种写法不符合规范),所以 arr[0]等价于 arr.0.call(arr), this就是 arr
    */

    fn()
    /*
    解析: 相当于 `fn.call(undefined)`, 所以 fn 里面的 this 是 Window
    */
    7、
    var app = {
    container: document.querySelector('body'),
    bind: function(){
    this.container.addEventListener('click', this.sayHello) //点击的时候会执行 sayHello,sayHello 里面的 this 代表 body 对象
    this.container.addEventListener('click', this.sayHello.bind(this)) //点击的时候会执行 sayHello,sayHello 里面的 this 代表 app 对象
    },
    sayHello: function(){
    console.log(this)
    }
    }
    app.bind()

箭头函数中的this

默认指向在定义它时,它所绑定的对象的上一级,而不是执行时的对象, 定义它的时候,可能环境是window

1
2
3
4
5
6
7
8
9
10
11
12
13
14
15
function foo() {
return () => {
return () => {
return () => {
console.log(this);
};
};
};
}
foo()()()() //window
var f = foo.call({id: 1});
f()()() //{id:1}
var t1 = f.call({id: 2})()();//{id:1}
var t2 = f().call({id: 3})();//{id:1}
var t3 = f()().call({id: 4});//{id:1}

setTimeout中的this

普通函数指向window
箭头函数指向定义的对象
引用函数,指向调用对象

1
2
3
4
5
6
7
8
9
10
11
12
13
14
15
16
17
18
19
20
21
22
23
24
25
26
27
28
29
30
31
32
33
34
35
36
37
38
39
40
41
42
43
44
45
46
47
48
49
50
51
52
53
54
55
56
57
58
59
60
61
62
63
64
65
66
67
68
69
70
71
72
73
74
75
76
77
78
79
80
81
82
83
 0、
var obj = {
fn1 : function () {
console.log(this); //obj
},
fn2 : function () {
setTimeout(function () {
console.log(this); //window 匿名函数执行在window环境,找不到宿主对象,所以指向window
},0);
},
fn3: function () {
setTimeout(() => {
console.log(this); //obj 箭头函数创建在obj上
},100);
}
fn4: function () {
var that = this;
setTimeout(function () {
console.log(that) //obj 在setTimeout里面引用obj
console.log(this) //window
});
}
fn5: function () {
var f1 = () => {
console.log(this); // obj f1定义处在obj里面
setTimeout(() => {
console.log(this); // obj 箭头函数定义处在obj里面
})
}
f1();
}
fn6: function () {
var f2 = function () {
console.log(this); // window, f2调用时,没有宿主对象,默认是window
setTimeout(() => {
console.log(this); // window 箭头函数定义在f2确定的window里面
})
};
f2();
}
fn7: function () {
'use strict';
var f3 = function () {
console.log(this); // undefined
setTimeout(() => {
console.log(this); // undefined
})
};
f3();
}
};
obj.fn1();
obj.fn2();
obj.fn3();
obj.fn4();
···

1、
function foo(){
setTimeout(function(){
console.log(this) //window 匿名函数,找不到宿主对象
}, 100);
setTimeout(() => {
console.log(this) //window foo挂载在window对象上
}, 100);
}
foo();
foo.call({id:42}); //window {id:42} foo运行时所在的对象,恰好是箭头函数定义时所在的对象
//call([thisObj[,arg1[, arg2,....]) 方法可将一个函数的对象上下文从初始的上下文改变为由 thisObj 指定的新对象。

2、
function method() {
alert(this.value); // 输出 42 第二个this
}

function Foo() {
this.value = 42;
setTimeout(this.method, 500); // 这里this指向window 第一个this
}

Foo();
//Foo挂载在window上,当执行Foo时,this指向window,Foo里面的value被挂到window,method本来就挂在window上,所以执行this.method就是调用window.method
//method执行,它的this指向window,这时window已经挂上value值42
1
2
3
4
5
6
7
8
9
10
11
12
13
14
15
16
17
18
19
20
21
22
23
24
25
26
27
28
29
30
31
32
33
34
35
36
37
38
39
40
41
42
43
44
45
46
47
48
49
50
51
52
53
54
55
56
57
58
59
60
61
62
63
64
65
66
67
68
69
70
71
72
73
74
75
76
77
78
79
80
81
82
83
84
85
86
87
 //其他理解
let app = {
fn1: function(a){
console.log(this) //app
}
fn2(a) {
consoel.log(this) //app
},
fn3: (a)=>{
console.log(this) //window
}
}

app.fn2.call(app)
app.fn3.call( 它的上一级的 this )
1.
var app = {
init() {
var menu = {
init: ()=>{
console.log(this)
},
bind() {
console.log(this)
}
}
menu.init()
/*相当于 menu.init.call(menu 所在的环境下的 this) , 所以 init 里面的 this 也就是 app。
(假设 app.init 也是箭头函数,想想 menu.init 里面的 this 是什么?)
*/
menu.bind()
/*相当于 menu.bind.call(menu),也就是 menu,所以 bind 里面的 this 就是 menu
*/
}
}
app.init()


2.
var app = {
fn1() {
setTimeout(function(){
console.log(this)
}, 10)
},
fn2() {
setTimeout(()=>{
console.log(this)
},20)
},
fn3() {
setTimeout((function(){
console.log(this)
}).bind(this), 30)
},
fn4: ()=> {
setTimeout(()=>{
console.log(this)
},40)
}
}
app.fn1()
app.fn2()
app.fn3()
app.fn4()

var app = {
fn1() {
function fn(){
console.log(this)
}
//过10ms 后执行
//fn.call(undefined) ,所以输出 Window
},
fn2() {
//过20ms 执行箭头函数
//箭头函数里面没资格有 自己的 this,借用 setTimeout 外面的 this,也就是 app
},
fn3() {
// 创建了一个新函数,这个新函数里面绑定了 外面的this,也就是 app
// 20 ms 后执行新函数,输出 this,也就是刚刚绑定的 app
}
fn4: ()=> {
//过40ms 执行箭头函数
//箭头函数里面没资格有 this,用 setTimeout 外面的 this
//setTimeout 所在的 fn4也是箭头函数,没资格拥有自己的 this,借用外面的 this ,也就是 Window
}

应用

My Little World

Travish CI使用

发表于 2017-08-08

Travish CI使用

1、使用github 账号登陆https://www.travis-ci.org/
2、点击右上角自己的账户名,选择accounts,弹出在github上所有的仓库
ci1.png
点击这个按钮重新从github上获取所有仓库
ci2.png
3、点击对应仓库按钮,变为对勾,则开启对应仓库的集成化测试,每次提交代码到远程仓库都进行一次测试
4、点击仓库名,可进入到测试界面,
ci3.png
5、为项目添加.travis.yml文件
.travis.yml 文件编写的相关语法可参考https://docs.travis-ci.com/user/languages/javascript-with-nodejs/

.travis.yml 文件可以在https://lint.travis-ci.org/页面进行检查,是否编写正确

6、push代码,在Travish CI等待测试结果
页面图标因为有缓存所以可能出现不能及时更换状态的情况,这个注意看结果就好

My Little World

fork仓库

发表于 2017-08-08

fork

在页面点击Fork,将被人的仓库复制到自己的远程仓库
使用git clone 将远程仓库克隆到本地
切换分支到develop git checkout -b develop
修改完代码后
git add . && git commit -m ‘test new pull request’
git push origin develop
然后在github页面找到刚刚fork的仓库,切换branch到develop,
点击New pull request进行merge

保持与原仓库同步

git remote -v
查看当前的远程仓库地址,输出如下:

origin https://github.com/YooHannah/homework2.git (fetch)
origin https://github.com/YooHannah/homework2.git (push)
可以看到从自己帐号 clone 下来的仓库,远程仓库地址是与自己的远程仓库绑定的(这不是废话吗)

接下来运行

git remote add upstream https://github.com/FE-star/homework2.git
这条命令就算添加一个别名为 upstream(上游)的地址,指向之前 fork 的原仓库地址。git remote -v 输出如下:

origin https://github.com/YooHannah/homework2.git (fetch)
origin https://github.com/YooHannah/homework2.git (push)
upstream https://github.com/FE-star/homework2.git (fetch)
upstream https://github.com/FE-star/homework2.git (push)
之后运行下面几条命令,就可以保持本地仓库和上游仓库同步了

git fetch upstream
git checkout master 如果本来就在master上就不用切换
git merge upstream/master
接着就是熟悉的推送本地仓库到远程仓库

git push origin master

Git 合并两个不同的仓库

My Little World

事件冒泡和事件捕获

发表于 2017-08-06

addEventListener/attachEvent/element.onclick

辨别区分addEventListener、attachEvent和element.onclick

attachEvent事件

attachEvent是ie添加事件处理程序,接收两个参数,其中事件类型名称要加”on”,
可以添加多个事件处理程序,按照添加顺序相反的顺序触发

addEventListener事件

addEventListener是给非ie添加事件处理程序,接收三个参数,第一个是事件名,不需要加“on”,
第二个是绑定的函数,第三个参数是一个布尔值,如果是false,就使用传统的冒泡方式,
如果为true,就在捕获阶段调用事件处理程序
可以添加多个事件处理程序,按照添加顺序触发

onclick

el.onclick相当于在标签上写onclick

区别

1.上下文
attachEvent会在全局作用域中运行,this等于window对象
addEventLinstener在其依附的元素的作用域中运行,this等于绑定元素对象
使this关键字都指向元素处理方法

1
2
3
4
5
6
function bind(el, fn, type){
var _fn = function(){
fn.apply(el, arguments);
};
window.addEventListener ? el.addEventListener(type, _fn, false) : el.attachEvent("on" + type, _fn);
}

2.绑定
el.onclick通过标签的onclick属性输入到文档,然后由文档解析成事件
attachEvent和addEventLinstener要在文档解析完成以后,通过文档的dom接口去绑定的事件
资源加载和页面事件

3.取消绑定
el.onclick:el.onclick=null;
addEventListener:removeEventListener();
attachEvent():detachEvent()

4.获取event事件
非IE:

1
2
3
4
5
6
el.onclick=function(event){
  alert(event.type); //"click"
};
el.addEventListener("click",function(event){
  alert(event.type); //"click"
},false);

IE:
通过el.onclick绑定的事件处理程序中,event对象作为window对象的一个属性存在。
el.onclick=function(){
  var event=window.event;
  alert(event.type); //“click”
}
如果通过attachEvent()添加事件处理程序时,event对象作为参数被传入事件处理程序,
el.attachEvent(“onclick”,function(event){
  alert(event.type); //“click”
});

标签时一样

1
<input type="button" value="Click me" onclick="alert(event.type)"/>   //"click"

事件捕获、事件冒泡

二者是指当事件在某一DOM元素被触发时,该DOM元素的父级元素也绑定了触发事件,则触发事件的执行顺序

事件冒泡

事件自下而上依次执行,先执行子元素触发事件,再执行父元素触发事件,
addEventListener第三个参数设置为false,参数不设置默认是冒泡执行

1
2
3
4
5
6
7
8
9
10
11
12
13
14
15
16
17
18
19
20
21
22
23
24
25
26
27
28
29
30
<body>
<div id="parent">
  <div id="child" class="child">您好</div>
</div>
</body>

<script type="text/javascript">
document.getElementById("parent").addEventListener("click",function(e){
alert("parent事件被触发,"+this.id);
})
document.getElementById("child").addEventListener("click",function(e){
alert("child事件被触发,"+this.id)
})
document.getElementById("parent").onclick=function(e){
alert("parentonclik事件被触发,"+this.id);
}
document.getElementById("child").onclick=function(e){
alert("childonclik事件被触发,"+this.id);
}
</script>
//点击'您好',弹出顺序:child事件被触发->childonclik事件被触发->parent事件被触发->parentonclik事件被触发
<script type="text/javascript">
document.getElementById("parent").addEventListener("click",function(e){
alert("parent事件被触发,"+this.id);
},false)
document.getElementById("child").addEventListener("click",function(e){
alert("child事件被触发,"+this.id)
},true)
</script>
//点击'您好',先弹出child事件被触发,再弹出parent事件被触发

事件捕获

事件从上到下一次执行,先执行父元素触发事件,再执行子元素触发事件,
addEventListener第三个参数设置为true

1
2
3
4
5
6
7
8
9
10
11
12
13
14
15
16
17
18
19
20
21
22
23
24
25
26
27
28
29
30
31
<body>
<div id="parent">
  <div id="child" class="child">您好</div>
</div>
</body>

<script type="text/javascript">
document.getElementById("parent").addEventListener("click",function(e){
alert("parent事件被触发,"+this.id);
},true)
document.getElementById("child").addEventListener("click",function(e){
alert("child事件被触发,"+this.id)
},true)
document.getElementById("parent").onclick=function(e){
alert("parentonclik事件被触发,"+this.id);
}
document.getElementById("child").onclick=function(e){
alert("childonclik事件被触发,"+this.id);
}
</script>
//点击'您好',弹出顺序:parent事件被触发->child事件被触发->childonclik事件被触发->parentonclik事件被触发
<script type="text/javascript">
document.getElementById("parent").addEventListener("click",function(e){
alert("parent事件被触发,"+this.id);
},true)
document.getElementById("child").addEventListener("click",function(e){
alert("child事件被触发,"+this.id)
},false)
</script>

//点击'您好',先弹出parent事件被触发,再弹出child事件被触发

应用

1
2
3
4
5
6
7
8
9
10
11
12
13
14
15
16
17
//要求:鼠标放到li上对应的li背景变灰
<ul>
<li>item1</li>
<li>item2</li>
<li>item3</li>
<li>item4</li>
<li>item5</li>
<li>item6</li>
</ul>
//实现一:利用事件冒泡实现,不用遍历所有li节点
$("ul").on("mouseover",function(e){
$(e.target).css("background-color","#ddd").siblings().css("background-color","white");
})
//实现二:给每个li绑定事件,缺点,动态的加载了一些元素,新增li后,还要再绑定一次事件
$("li").on("mouseover",function(){
$(this).css("background-color","#ddd").siblings().css("background-color","white");
})

禁止冒泡

1
2
3
4
5
6
7
8
9
function doSomething(e) {
if (!e) {//微软模型
var e = window.event;
e.cancelBubble = true;
}
if (e.stopPropagation) {//w3c事件模型
e.stopPropagation();
}
}

补充

事件委托是什么?有什么好处?

假设父元素有4个儿子,我不监听4个儿子,而是监听父元素,看触发事件的元素是哪个儿子,这就是事件委托。
可以监听还没有出生的儿子(动态生成的元素)。省监听器。

1…192021…29
YooHannah

YooHannah

287 日志
1 分类
25 标签
RSS
© 2026 YooHannah
由 Hexo 强力驱动
主题 - NexT.Pisces